


Table of Contents
itertools.count() -- 生成一个 无限大的数据流
itertools.cycle() -- 生成一个 无限大的数据流,数据来源为参数中的可迭代元素
itertools.repeat() -- 生成一个 有限的数据流,参数指定循环内容以及次数
itertools.takewhile() -- 截取一个Iterator对象中的一部分数据
itertools.takewhile() -- 拼接多个可迭代对象
groupby() -- 把迭代器中相邻的重复元素挑出来放在一起
itertools
通过itertools可以给我们创建出一个Iterator对象,Iterator对象是每次调用其next函数才会在内存中生成数据,因为其往往是一个无限大的数据流,一次在内存中生成也无法实现。
itertools.count() -- 生成一个 无限大的数据流
>>> import itertools
>>> from collections import Iterator
>>> from collections import Iterable
>>> natuals = itertools.count(1)  # 参数1 则代表生成的数据从 1开始
>>> isinstance(natuals,Iterator)
True
>>> isinstance(natuals,Iterable)
True
>>> next(natuals)
1
>>> next(natuals)
2
>>> next(natuals)
3
>>> next(natuals)
4
>>> for n in natuals:
	print(n)


5
6
7
....
# 上面会一直循环下去,按Ctrl+c 手动结束
Traceback (most recent call last):
  File "<pyshell#14>", line 2, in <module>
    print(n)
KeyboardInterrupt
>>>
itertools.cycle() -- 生成一个 无限大的数据流,数据来源为参数中的可迭代元素
>>> import itertools
>>> cs = itertools.cycle('ABC')
>>> isinstance(cs,Iterator)
True
>>> isinstance(cs,Iterable)
True
>>> next(cs)
'A'
>>> next(cs)
'B'
>>> next(cs)
'C'
>>> next(cs)
'A'
>>> next(cs)
'B'
>>> next(cs)
'C'
>>> for n in cs:
	print(n)


A
B
C
A
B
C
A
B
CTraceback (most recent call last):
  File "<pyshell#29>", line 2, in <module>
    print(n)
KeyboardInterrupt
>>>
itertools.repeat() -- 生成一个 有限的数据流,参数指定循环内容以及次数
>>> ns = itertools.repeat('A',3)
>>> isinstance(ns,Iterator)
True
>>> isinstance(ns,Iterable)
True
>>> next(ns)
'A'
>>> next(ns)
'A'
>>> next(ns)
'A'
>>> next(ns)
Traceback (most recent call last):
  File "<pyshell#36>", line 1, in <module>
    next(ns)
StopIteration
>>> ns = itertools.repeat('A',3)
>>> for n in ns:
	print(n)


A
A
A
>>> for n in ns:
	print(n)


ABC
ABC
ABC
itertools.takewhile() -- 截取一个Iterator对象中的一部分数据
例一:
>>> li = [x for x in range(1,100)]  # 创建一个列表
>>> li
[1, 2, 3, 4, 5, 6, 7, 8, 9, 10, 11, 12, 13, 14, 15, 16, 17, 18, 19, 20, 21, 22, 23, 24, 25, 26, 27, 28, 29, 30, 31, 32, 33, 34, 35, 36, 37, 38, 39, 40, 41, 42, 43, 44, 45, 46, 47, 48, 49, 50, 51, 52, 53, 54, 55, 56, 57, 58, 59, 60, 61, 62, 63, 64, 65, 66, 67, 68, 69, 70, 71, 72, 73, 74, 75, 76, 77, 78, 79, 80, 81, 82, 83, 84, 85, 86, 87, 88, 89, 90, 91, 92, 93, 94, 95, 96, 97, 98, 99]
>>> itli = iter(li) # 将列表转换为 iterator对象
>>> it = itertools.takewhile(lambda x: x<=10,itli)  # 取出前10个元素
>>> for n in it:
	print(n)


1
2
3
4
5
6
7
8
9
10
>>> next(itli)   # 被截取的iterator已被迭代,注意结果为12,因为调用next()返回11的之后暂停了,但11已经生成出来了
12
例二:
>>> co = itertools.count(1)
>>> ns = itertools.takewhile(lambda x: 10<=x<=20,co) # 注意不能对前面的部分做限制 如 10<=x
>>> list(ns)   # 会导致第一次迭代返回1 就不满足条件从而推出迭代
[]
>>> co = itertools.count(1)
>>> ns = itertools.takewhile(lambda x: x<=20,co)
>>> list(ns)
[1, 2, 3, 4, 5, 6, 7, 8, 9, 10, 11, 12, 13, 14, 15, 16, 17, 18, 19, 20]
>>>
itertools.takewhile() -- 拼接多个可迭代对象
>>> a = [1,2,3,4,5]
>>> b = {'a':1,'b':2,'c':3}
>>> co = itertools.count(1)
>>> ns = itertools.takewhile(lambda x: x<=20,co)
>>> ch = itertools.chain(a,b,'xyz',ns)  # dict迭代的是key
>>> for n in ch:
	print(n)


1
2
3
4
5
a
b
c
x
y
z
1
2
3
4
5
6
7
8
9
10
11
12
13
14
15
16
17
18
19
20
>>> a = [1,2,3,4,5]
>>> b = {'a':1,'b':2,'c':3}
>>> co = itertools.count(1)
>>> ns = itertools.takewhile(lambda x: x<=20,co)
>>> ch = itertools.chain(a,b.items(),'xyz',ns) # 让dict迭代 key-value
>>> for n in ch:
print(n)
1
2
3
4
5
('a', 1)
('b', 2)
('c', 3)
x
y
z
1
2
3
4
5
6
7
8
9
10
11
12
13
14
15
16
17
18
19
20groupby() -- 把迭代器中相邻的重复元素挑出来放在一起
>>> for key,group in itertools.groupby('AACEEESAA'):
	print(key,list(group))


A ['A', 'A']
C ['C']
E ['E', 'E', 'E']
S ['S']
A ['A', 'A']
contextlib
@contextmanager
之前我们说过 with...as 可以代替 try ..catch..finally,我们需要在类中定义 __enter__和__exit__两个函数比较麻烦,contextlib中有一个contextmanager进一步对with...as 进行了优化,使其可以省略 __enter__和__exit__两个函数。
下面是使用 with代码块
>>> class Query(object):
	def __init__(self, name):
		self.name = name
	def __enter__(self):
		return self
	def __exit__(self,exc_type,exc_value,traceback):
		print('in exit function')
		print('type',exc_type)
		print('value',exc_value)
		print('traceback',traceback)
	def test(self):
		print('my name is %s' % self.name)


>>> with Query('zzh') as q:
	q.test()


my name is zzh
in exit function
type None
value None
traceback None
>>>
使用 @ contextmanager
>>> class Query(object):
	def __init__(self, name):
		self.name = name
	def test(self):
		print('my name is %s' % self.name)


>>> @contextmanager
def extract_func(name):  # 将以前的__enter__和__exit__函数中的内容放到了这里
	print('Begin')
	q = Query(name)
	yield q       # 这行与这行之前的内容是__enter__中的,yield q相当于之前的return q返回实例
	print('End') # yield 后面的内容相当于 之前__exit__函数中的内容


>>> with extract_func('zzh') as q:
	q.test()


Begin
my name is zzh
End
>>>
extract_func实际上是一个generator,但是它不能通过next进行迭代。
@contextmanager 对函数进行拦截,分别在前后做一些事,如下
>>> @contextmanager
def tag(name):
	print("<%s>" % name)
	yield   # yield 没有会返回值
	print("<%s>" % name)


>>> with tag("h1"):   # as 之后代表 __enter__或yield的返回值 ,如没有可以省略不写
	print("hello")
	print("world")


<h1>
hello
world
<h1>
>>>
# 代码执行顺序:
1、创建对象并执行到yield语句,或__enter__中的内容
2、将yield的返回值 或 __enter__的返回值赋值给 as 后面的变量(如果有)
3、执行with代码块中的内容
4、执行yield后面的代码
@closing
看源码来理解
class closing(AbstractContextManager):

    def __init__(self, thing):
        self.thing = thing
    def __enter__(self):   # 实现了上下文,__enter__用来返回closing参数中的对象
        return self.thing
    def __exit__(self, *exc_info): # closing参数中的对象 执行完毕后 自动关闭
        self.thing.close()
可以发现closing可以使一个对象实现上下文从而能够使用with代码块,并且提供执行完毕自动关闭的功能。
用法:
>>> from contextlib import closing
>>> class close_clz():
	def close(self):
		print('closing')


>>> def colse_method():
	print('closing的参数')
	return close_clz()

>>> with closing(colse_method()) as c:
	print('with代码块')


closing的参数
with代码块
closing
>>> with colse_method() as c:   # 如果没用closing,close_clz又没有实现上下文,所以会报错
	print('with代码块')


closing的参数
Traceback (most recent call last):
  File "<pyshell#13>", line 1, in <module>
    with colse_method() as c:
AttributeError: __enter__
>>>
urllib
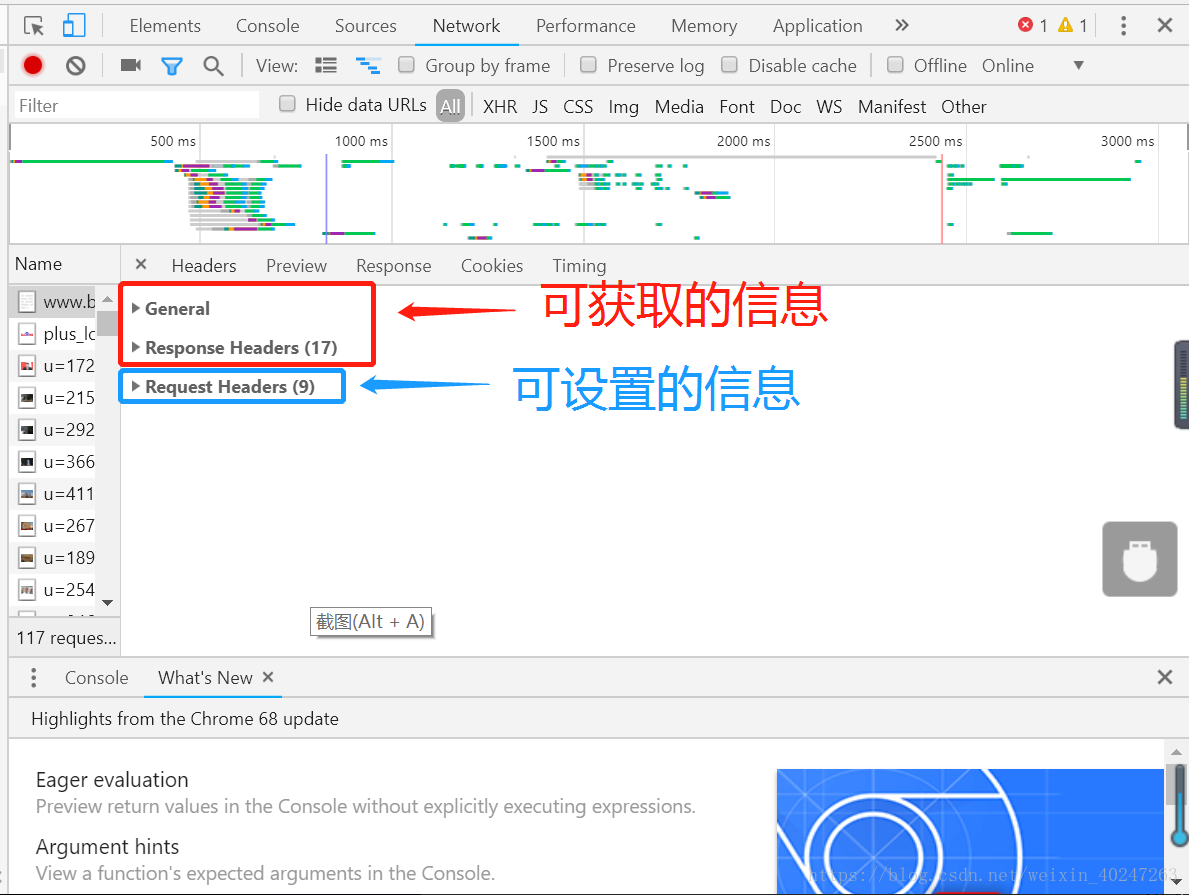
向服务器发送请求,可以设置一些请求信息,如浏览器的版本,可以通过这个来模拟浏览器访问。然后通过返回的数据可以获取访问的状态、Rsponse Headers中的信息、以及页面的代码
Get请求
from urllib import request

with request.urlopen('https://www.baidu.com') as f: # 通过urlopen函数向服务器发送请求
    data = f.read() # 读取返回来的数据
    print('Status:', f.status, f.reason)   # 获取状态值 和 状态
    for k, v in f.getheaders():  # 获取Response Headers信息
        print('%s: %s' % (k, v))
    print('Data:', data.decode('utf-8')) # 获取源码,这里用utf-8是因为百度首页是utf8编码的
模拟IOS9系统使用Safari浏览器访问网站
from urllib import request

# 创建Request对象,同时传入要扒取数据的网址
req = request.Request('http://www.baidu.com/')
# 设置请求头的User-Agent,模拟iPhone
req.add_header('User-Agent', 'Mozilla/5.0 (iPhone; CPU iPhone OS 9_1 like Mac OS X) AppleWebKit/601.1.46 (KHTML, like Gecko) Version/9.0 Mobile/13B137 Safari/601.1')
with request.urlopen(req) as f:
    print('Status:', f.status, f.reason)  # 查看状态值 和 状态
    for k, v in f.getheaders():  # 获取 Response Headers 信息
        print('%s: %s' % (k, v))
    print('Data:', f.read().decode('utf-8'))  # 获取页面代码
Post请求
如果要以POST发送一个请求,只需要把参数data以bytes形式传入。
我们模拟一个微博登录,先读取登录的邮箱和口令,然后按照weibo.cn的登录页的格式以username=xxx&password=xxx的编码传入:
from urllib import request, parse

print('Login to weibo.cn...')
email = input('Email: ')
passwd = input('Password: ')
login_data = parse.urlencode([  # 通过抓包获取登录需要传递的参数
    ('username', email),
    ('password', passwd),
    ('entry', 'mweibo'),
    ('client_id', ''),
    ('savestate', '1'),
    ('ec', ''),
    ('pagerefer', 'https://passport.weibo.cn/signin/welcome?entry=mweibo&r=http%3A%2F%2Fm.weibo.cn%2F')
])

req = request.Request('https://passport.weibo.cn/sso/login') # 登录提交的请求地址
req.add_header('Origin', 'https://passport.weibo.cn')
req.add_header('User-Agent', 'Mozilla/6.0 (iPhone; CPU iPhone OS 8_0 like Mac OS X) AppleWebKit/536.26 (KHTML, like Gecko) Version/8.0 Mobile/10A5376e Safari/8536.25')
req.add_header('Referer', 'https://passport.weibo.cn/signin/login?entry=mweibo&res=wel&wm=3349&r=http%3A%2F%2Fm.weibo.cn%2F')

with request.urlopen(req, data=login_data.encode('utf-8')) as f: # 这里要将请求数据转换为byte
    print('Status:', f.status, f.reason)
    for k, v in f.getheaders():
        print('%s: %s' % (k, v))
    print('Data:', f.read().decode('utf-8'))
关于 Origin 和 Referer不明白的看这里
如果登录成功,我们获得的响应如下:
Status: 200 OK
Server: nginx/1.2.0
...
Set-Cookie: SSOLoginState=1432620126; path=/; domain=weibo.cn
...
Data: {"retcode":20000000,"msg":"","data":{...,"uid":"1658384301"}}
如果登录失败,我们获得的响应如下:
...
Data: {"retcode":50011015,"msg":"\u7528\u6237\u540d\u6216\u5bc6\u7801\u9519\u8bef","data":{"username":"example@python.org","errline":536}}
Handler
如果还需要更复杂的控制,比如通过一个Proxy去访问网站,我们需要利用ProxyHandler来处理,示例代码如下:
proxy_handler = urllib.request.ProxyHandler({'http': 'http://www.example.com:3128/'})
proxy_auth_handler = urllib.request.ProxyBasicAuthHandler()
proxy_auth_handler.add_password('realm', 'host', 'username', 'password')
opener = urllib.request.build_opener(proxy_handler, proxy_auth_handler)
with opener.open('http://www.example.com/login.html') as f:
    pass


 363
363


 被折叠的 条评论
为什么被折叠?
被折叠的 条评论
为什么被折叠?
 到【灌水乐园】发言


