


从Vue2转换到Vue3
这个方便的Vue2到Vue3的生命周期映射直接来自于Vue3 Composition API 文档,我认为这是一种最有用的方式来查看事情将如何变化,以及我们如何使用它们。
beforeCreate -> use setup()
created -> use setup()
beforeMount -> onBeforeMount
mounted -> onMounted
beforeUpdate -> onBeforeUpdate
updated -> onUpdated
beforeDestroy -> onBeforeUnmount
destroyed -> onUnmounted
errorCaptured -> onErrorCaptured
什么是Composition API
如果你还不知道,Vue3 Composition API 附带了一个 setup() 方法。此方法封装了我们的大多数组件代码,并处理了响应式,生命周期钩子函数等。
简而言之,Composition API使我们能够更好地将代码组织为更多的模块化功能,而不是根据属性的类型(方法,计算的数据)进行分离。
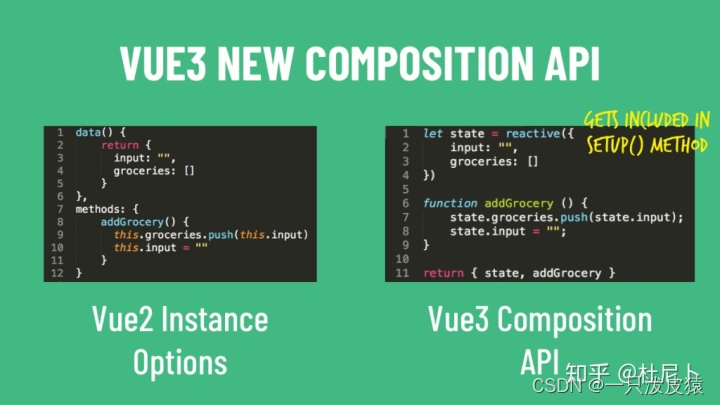
在旧的 beforeCreate 钩子函数之后和 created 的钩子函数之前立即调用 setup 方法。因此,我们不再需要这两个钩子,我们可以简单地将本应有的代码放在 setup() 方法中。
生命周期钩子的使用
与Vue3中的大多数功能一样,生命周期钩子是我们必须导入到项目中的东西,这是为了帮助使项目尽可能轻巧。
我们导入生命周期钩子的方式是这样的。
import { onMounted, onUpdated, onUnmounted } from 'vue'
<script lang="ts">
import { computed, ref, onBeforeMount, onMounted, onBeforeUpdate, onUpdated, onBeforeUnmount, onUnmounted, onActivated, onDeactivated, onErrorCaptured,} from "vue";

export default {
  setup() {
    onBeforeMount(() => {
      // ...
    });
    onMounted(() => {
      // ...
    });
    onBeforeUpdate(() => {
      // ...
    });
    onUpdated(() => {
      // ...
    });
    onBeforeUnmount(() => {
      // ...
    });
    onUnmounted(() => {
      // ...
    });
    onActivated(() => {
      // ...
    });
    onDeactivated(() => {
      // ...
    });
    onErrorCaptured(() => {
      // ...
    });
  },
  functionName() {
    const count = ref(0);
    const double = computed(() => {
      return count.value * 2;
    });
  },
};
</script>
新的调试钩子函数
onRenderTracked : 状态跟踪
onRenderTracked 直译过来就是状态跟踪,他会跟踪页面上所有的方法跟变量,也就是我们return返回的属性与方法,它都会进行跟踪。当页面有update时,会生成一个event对象。我们可以通过这个event对象查看程序的问题所在。
onRenderTriggered : 状态触发
onRenderTriggered直译过来是状态触发,它不会跟踪每一个值,而是给你变化值的信息,并且新值和旧值都会给你明确的展示出来。
这两个事件都带有一个DebuggerEvent,它使我们能够知道是什么导致了Vue实例中的重新渲染。
export default {
 onRenderTriggered(e) {
    debugger
    // 检查哪个依赖项导致组件重新呈现
  }
}


 398
398


 被折叠的 条评论
为什么被折叠?
被折叠的 条评论
为什么被折叠?
 到【灌水乐园】发言


