


一、安装Scrapy
运行命令:
pip install scrapy安装失败遇到如下图

需要解决的应该是

到这里下载 twisted 64位 的版本后运行pip install [对应的twisted离线whl路径]安装,又出现
Twisted-18.7.0-cp27-cp27m-win_amd64.whl is not a supported wheel on this platform.原因是这个版本的twisted不被当前的Python所支持,度娘一番后,在这位博主的文章中找到历史版本
再次运行 pip install 成功安装
C:\Users\Administrator\Downloads>pip install Twisted-17.5.0-cp36-cp36m-win_amd64.whl
Processing c:\users\administrator\downloads\twisted-17.5.0-cp36-cp36m-win_amd64.whl
Requirement already satisfied: constantly>=15.1 in e:\python36\lib\site-packages (from Twisted==17.5.0) (15.1.0)
Requirement already satisfied: incremental>=16.10.1 in e:\python36\lib\site-packages (from Twisted==17.5.0) (17.5.0)
Requirement already satisfied: zope.interface>=4.0.2 in e:\python36\lib\site-packages (from Twisted==17.5.0) (4.5.0)
Requirement already satisfied: Automat>=0.3.0 in e:\python36\lib\site-packages (from Twisted==17.5.0) (0.7.0)
Requirement already satisfied: hyperlink>=17.1.1 in e:\python36\lib\site-packages (from Twisted==17.5.0) (18.0.0)
Requirement already satisfied: setuptools in e:\python36\lib\site-packages (from zope.interface>=4.0.2->Twisted==17.5.0) (28.8.0)
Requirement already satisfied: six in e:\python36\lib\site-packages (from Automat>=0.3.0->Twisted==17.5.0) (1.11.0)
Requirement already satisfied: attrs>=16.1.0 in e:\python36\lib\site-packages (from Automat>=0.3.0->Twisted==17.5.0) (18.2.0)
Requirement already satisfied: idna>=2.5 in e:\python36\lib\site-packages (from hyperlink>=17.1.1->Twisted==17.5.0) (2.7)
Installing collected packages: Twisted
Successfully installed Twisted-17.5.0
然后运行 pip install scrapy 安装成功
C:\Users\Administrator\Downloads>pip install scrapy
Collecting scrapy
  Using cached https://files.pythonhosted.org/packages/5d/12/a6197eaf97385e96fd8ec56627749a6229a9b3178ad73866a0b1fb377379/Scrapy-1.5.1-py2.py3-none-any.whl
Requirement already satisfied: cssselect>=0.9 in e:\python36\lib\site-packages (from scrapy) (1.0.3)
Requirement already satisfied: lxml in e:\python36\lib\site-packages (from scrapy) (4.2.4)
...
...
...
Installing collected packages: scrapy
Successfully installed scrapy-1.5.1
查看是否安装成功 scrapy

二、scrapy 初接触
1.创建scrapy项目
scrapy startproject mySpider2.项目结构理解
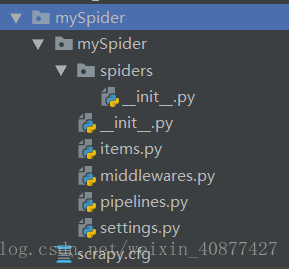
scrapy.cfg :项目的配置文件
mySpider/ :项目的Python模块,将会从这里引用代码
mySpider/items.py :项目的目标文件
mySpider/pipelines.py :项目的管道文件
mySpider/settings.py :项目的设置文件
mySpider/spiders/ :存储爬虫代码目录
3.第一个demo
step1:目标:抓取:http://www.itcast.cn/channel/teacher.shtml 网站里的所有讲师的姓名、职称和个人信息。
-
打开mySpider目录下的items.py
-
Item 定义结构化数据字段,用来保存爬取到的数据,有点像Python中的dict,但是提供了一些额外的保护减少错误。
-
可以通过创建一个 scrapy.Item 类, 并且定义类型为 scrapy.Field的类属性来定义一个Item(可以理解成类似于ORM的映射关系)。
-
接下来,创建一个ItcastItem 类,和构建item模型(model)。
import scrapy

class ItcastItem(scrapy.Item):
    name = scrapy.Field()
    level = scrapy.Field()
    info = scrapy.Field()
step2: 制作爬虫:分两步
第一步:爬数据
1.在当前目录(mySpider/)下输入命令,将在mySpider/spider目录下创建一个名为itcast的爬虫,并指定爬取域的范围:

其中,"itcast.cn"为要爬取的指定域范围;
2.打开 mySpider/spider目录里的 itcast.py,默认增加了下列代码:
import scrapy

class ItcastSpider(scrapy.Spider):
    name = "itcast"
    allowed_domains = ["itcast.cn"]
    start_urls = (
        'http://www.itcast.cn/',
    )

    def parse(self, response):
        pass
其实也可以由我们自行创建itcast.py并编写上面的代码,只不过使用命令可以免去编写固定代码的麻烦
自己建立Spider时,必须用scrapy.Spider类创建一个子类,并确定了三个强制的属性 和 一个方法。
-
name = "":这个爬虫的识别名称,必须是唯一的,在不同的爬虫必须定义不同的名字。 -
allow_domains = []是搜索的域名范围,也就是爬虫的约束区域,规定爬虫只爬取这个域名下的网页,不存在的URL会被忽略。 -
start_urls = ():爬取的URL元祖/列表。爬虫从这里开始抓取数据,所以,第一次下载的数据将会从这些urls开始。其他子URL将会从这些起始URL中继承性生成。 -
parse(self, response):解析的方法,每个初始URL完成下载后将被调用,调用的时候传入从每一个URL传回的Response对象来作为唯一参数,主要作用如下:- 负责解析返回的网页数据(response.body),提取结构化数据(生成item)
- 生成需要下一页的URL请求。
将start_urls的值修改为需要爬取的第一个url
start_urls = ("http://www.itcast.cn/channel/teacher.shtml",)
修改parse()方法
def parse(self, response):
    filename = "teacher.html"
    open(filename, 'wb+').write(response.body)
然后运行一下看看,在mySpider目录下执行:
scrapy crawl itcast 命令scrapy crawl itcast中的itcast是ItcastSpider 类的 name 属性,也就是使用 scrapy genspider命令的唯一爬虫名
出现

说明爬虫运行完成,当前文件夹中多出一个teacher.html 文件,里面就是我们刚刚要爬取的网页的全部源代码信息

第二步:取数据
爬完网页,接下来就是从中取数据的过程了;
观察页面源码:

可以看出需要取的数据是这种的
<div class="li_txt">
    <h3>  xxx  </h3>
    <h4> xxxxx </h4>
    <p> xxxxxxxx </p>
一目了然,使用Xpath提取数据;
- 之前在mySpider/items.py 里定义了一个ItcastItem类。 这里引入进来
from mySpider.items import ItcastItem - 然后将我们得到的数据封装到一个
ItcastItem对象中,可以保存每个老师的属性:
from mySpider.items import ItcastItem

def parse(self, response):
    #open("teacher.html","wb").write(response.body).close()

    # 存放老师信息的集合
    items = []

    for each in response.xpath("//div[@class='li_txt']"):
        # 将我们得到的数据封装到一个 `ItcastItem` 对象
        item = ItcastItem()
        #extract()方法返回的都是unicode字符串
        name = each.xpath("h3/text()").extract()
        title = each.xpath("h4/text()").extract()
        info = each.xpath("p/text()").extract()

        #xpath返回的是包含一个元素的列表
        item['name'] = name[0]
        item['level'] = level[0]
        item['info'] = info[0]

        items.append(item)

    # 直接返回最后数据
    return items
取到数据,保存;
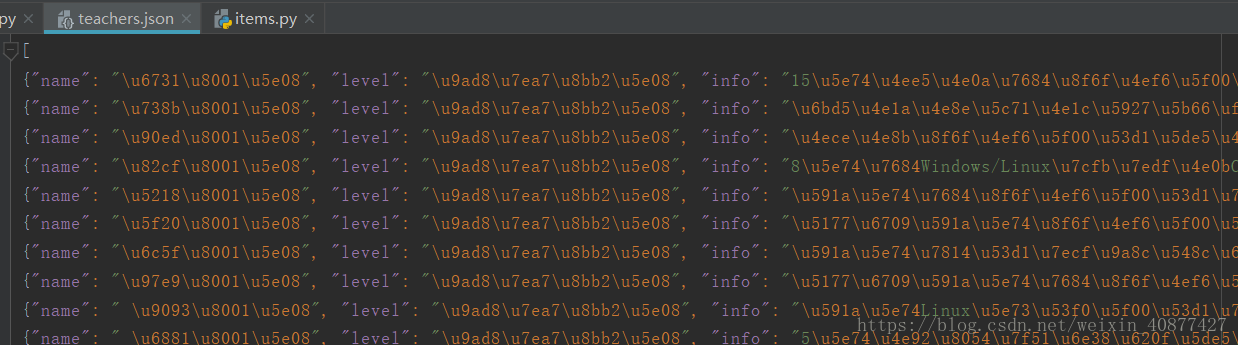
# json格式,默认为Unicode编码
scrapy crawl itcast -o teachers.json

# json lines格式,默认为Unicode编码
scrapy crawl itcast -o teachers.jsonl

# csv 逗号表达式,可用Excel打开
scrapy crawl itcast -o teachers.csv

# xml格式
scrapy crawl itcast -o teachers.xml
scrapy保存信息的最简单的方法主要有四种,-o 输出指定格式的文件,命令如上:
保存为json后结果如下:
PS:下面这种代码形式,结果完全一样,但需要在piplines里处理yield出来的数据:
from mySpider.items import ItcastItem

def parse(self, response):
    #open("teacher.html","wb").write(response.body).close()

    # 存放老师信息的集合
    #items = []

    for each in response.xpath("//div[@class='li_txt']"):
        # 将我们得到的数据封装到一个 `ItcastItem` 对象
        item = ItcastItem()
        #extract()方法返回的都是unicode字符串
        name = each.xpath("h3/text()").extract()
        title = each.xpath("h4/text()").extract()
        info = each.xpath("p/text()").extract()

        #xpath返回的是包含一个元素的列表
        item['name'] = name[0]
        item['level'] = title[0]
        item['info'] = info[0]

        #items.append(item)

        #将获取的数据交给pipelines
        yield item

    # 返回数据,不经过pipeline
    #return items
学过python核心编程的应该知道,带有yield的函数,一般称为生成器;关于生成器,这里给个链接,文章很好,深入浅出,但需要注意python版本的差异,这是12年的文章了;


 816
816


 被折叠的 条评论
为什么被折叠?
被折叠的 条评论
为什么被折叠?
 到【灌水乐园】发言


