


掘金(字节跳动)MD编辑器源码解析
写在开头
今天在朋友圈发现,掘金运营发布了新的掘金编辑器,作为一位曾经的富文本编辑器开发者,我当然充满了好奇,于是就有了这篇文章

首先找到
github源码,https://github.com/bytedance/bytemd,然后克隆下来,就开始了
最近我写了一个前端学架构100集,会慢慢更新,请大家别着急,目前在反复修改推敲内容
正式开始
我本人电脑环境
Arm架构Mac,M1芯片那款环境,
nvm控制多个node.js版本,电脑需要全局安装pnpm,用于依赖管理(这里字节跳动是使用的pnpm管理依赖)
如果你比较菜,不懂
pnpm,没事,我有文章:https://juejin.cn/post/6932046455733485575

安装项目依赖(这个项目是用的
lerna管理依赖):
nvm install 12.17
npm i pnpm -g
pnpm i
在项目本地调试编辑器源码:
npm link或者yalc
如果你比较菜,不会这两种方式,没事,我也有文章:
https://mp.weixin.qq.com/s/t6u6snq_S3R0X7b1MbvDVA,总之不会的来公众号翻翻,都有。我的前端学架构100集里面也会都有
React版本的源码解析
先看看在React里面怎么使用的
先引入样式:
import 'bytemd/dist/index.min.css';
再引入组件:
import { Editor, Viewer } from '@bytemd/react';
import gfm from '@bytemd/plugin-gfm';

const plugins = [
  gfm(),
  // Add more plugins here
];

const App = () => {
  const [value, setValue] = useState('');

  return (
    <Editor
      value={value}
      plugins={plugins}
      onChange={(v) => {
        setValue(v);
      }}
    />
  );
};
从
Editor组件入手
import React, { useEffect, useRef } from 'react';
import * as bytemd from 'bytemd';

export interface EditorProps extends bytemd.EditorProps {
  onChange?(value: string): void;
}

export const Editor: React.FC<EditorProps> = ({
  children,
  onChange,
  ...props
}) => {
  const ed = useRef<bytemd.Editor>();
  const el = useRef<HTMLDivElement>(null);

  useEffect(() => {
    if (!el.current) return;

    const editor = new bytemd.Editor({
      target: el.current,
      props,
    });
    editor.$on('change', (e: CustomEvent<{ value: string }>) => {
      onChange?.(e.detail.value);
    });
    ed.current = editor;

    return () => {
      editor.$destroy();
    };
  }, []);

  useEffect(() => {
    // TODO: performance
    ed.current?.$set(props);
  }, [props]);

  return <div ref={el}></div>;
};
发现一切都是来源于:
bytemd这个库,于是我们去找到它的源码~
bytemd的源码入口文件
/// <reference types="svelte" />
import Editor from './editor.svelte';
import Viewer from './viewer.svelte';

export { Editor, Viewer };
export * from './utils';
export * from './types';
好家伙,这个
Editor是用sveltejs写的,地址是:https://www.sveltejs.cn/
React和Vue都是基于runtime的框架。所谓基于runtime的框架就是框架本身的代码也会被打包到最终的bundle.js并被发送到用户浏览器。
当用户在你的页面进行各种操作改变组件的状态时,框架的runtime会根据新的组件状态(state)计算(diff)出哪些DOM节点需要被更新,从而更新视图
最小的Vue都有58k,React更有97.5k。换句话说如果你使用了React作为开发的框架,即使你的业务代码很简单,你的首屏bundle size都要100k起步。当然100k不算很大,可是事物都是相对的,相对于大型的管理系统来说100k肯定不算什么,可是对于那些首屏加载时间敏感的应用(例如淘宝,京东主页),100k的bundle size在一些网络环境不好的情况或者手机端真的会影响用户体验。那么如何减少框架的runtime代码大小呢?要想减少runtime代码的最有效的方法就是压根不用runtime
所以这里可以看出来,掘金(字节跳动)非常看重性能
什么是Svelte?
Svelte是由RollupJs的作者Rich Harris编写的编译型框架,没了解过RollupJs的同学可以去它官网了解一下,它其实是一个类似于Webpack的打包工具。Svelte这个框架具有以下特点:和React,Vue等现代Web框架的用法很相似,它可以允许开发者快速开发出具有流畅用户体验的Web应用。不使用Virtual DOM,也不是一个runtime的库。基于Compiler as framework的理念,会在编译的时候将你的应用转换为原生的DOM操作
这篇文章写得很全面,关于
Svelte,https://zhuanlan.zhihu.com/p/97825481,由于本文重点是源码,不是环境,不是框架底层介绍,点到为止,有兴趣的去看文章~
编辑器划分为几个区域

首先是标题区域,输入框,没什么好说的
接下来,应该都是向编辑器插入内容的操作(重点)
右边的改变一些样式和布局的,可以忽略不计
左侧内容区域为编辑区域(重点)
右侧为内容预览区域(重点)
先来一波性能测试

这里我疯狂复制内容,一直粘贴,这里会有一个防抖的优化,应该是达到一定频次,就会等放开粘贴后再渲染内容。(参考了
React的Fiber思想)在编辑器源码中发现了
codemirror这个库,好吧。源码来自这个编辑器,我们还是去找这个编辑器源码吧。于是来到github,克隆源码:https://github.com/codemirror/CodeMirror
编辑器这玩意,能找到合适开源的二次封装,就是好事,我刚工作那会为了写一个微信这种桌面端编辑器(又是跨平台的,Electron),那两个月差点去世了,重构了N次,换了N次方案,顺便把React源码都学了一遍,最后用原生手写实现了
找到CodeMirror入口文件
import { CodeMirror } from "./edit/main.js"

export default CodeMirror
CodeMirror怎么用的
   var editor = CodeMirror.fromTextArea(document.getElementById("editorArea"), {
                lineNumbers: true,        //是否在编辑器左侧显示行号
                matchBrackets: true,      // 括号匹配
                mode: "text/x-c++src",    //C++
                indentUnit:4,             // 缩进单位为4
                indentWithTabs: true,     //
                smartIndent: true,        //自动缩进,设置是否根据上下文自动缩进(和上一行相同的缩进量)。默认为true。
                styleActiveLine: true,       // 当前行背景高亮
                theme: 'midnight',         // 编辑器主题

            });

            editor.setSize('600px','400px'); //设置代码框大小
先找到这个方法
fromTextArea方法,它是整个源码的入口
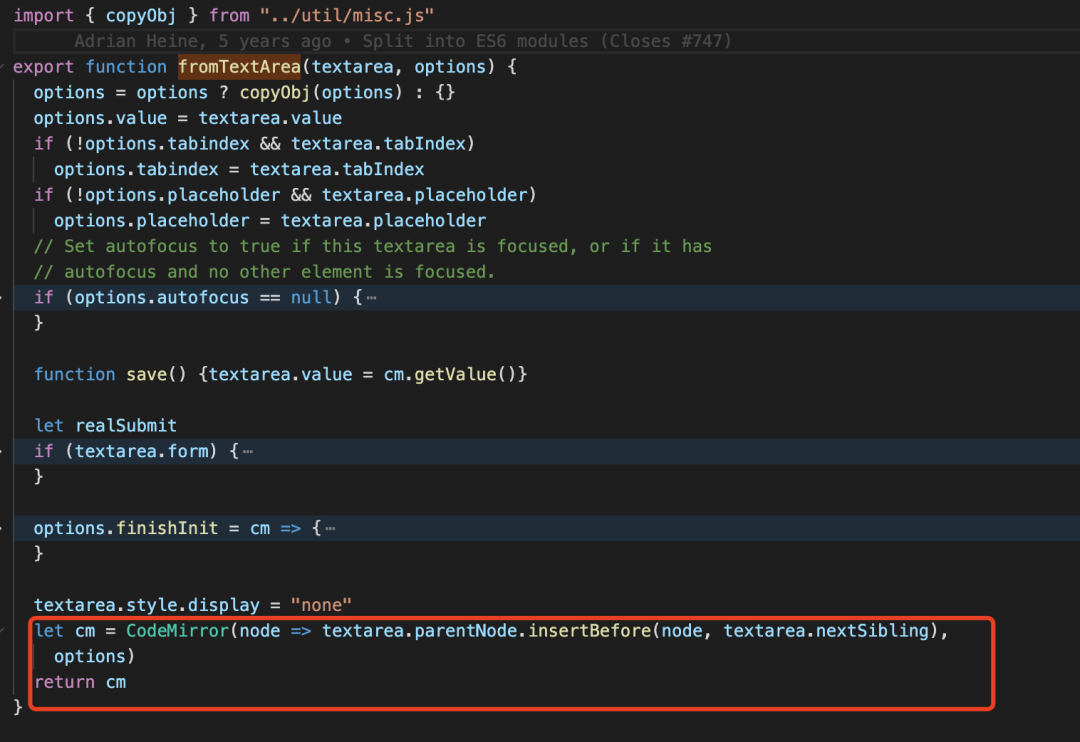
向编辑器的父节点之前插入一个节点,然后传入
CodeMirror函数
再找到
CodeMirror的真正源码,发现是一个函数
这个函数是精髓,源码跟
node.js源码有点像,原型链相关的用得比较多
CodeMirror函数
if (!(this instanceof CodeMirror))
{return new CodeMirror(place, options)
}
确保被构造调用,this指向
接着确保
options会是一个对象
this.options = options = options ? copyObj(options) : {}
(
copyObj是一个浅克隆+合并两个对象的方法)
export function copyObj(obj, target, overwrite) {
 if (!target) target = {}
 for (let prop in obj)
   if (obj.hasOwnProperty(prop) && (overwrite !== false || !target.hasOwnProperty(prop)))
     target[prop] = obj[prop]
 return target
}
接着函数内部把传入的参数和默认的配置项合并
copyObj(defaults, options, false)
这样传入的
options就有了默认配置的选项~
接着获取
value,编辑器一般是双向数据绑定~(即暴露onchange方法,使用组件者在外部维护value,通过onchange回调的参数修改value)
  let doc = options.value
  if (typeof doc == "string") doc = new Doc(doc, options.mode, null, options.lineSeparator, options.direction)
  else if (options.mode) doc.modeOption = options.mode
  this.doc = doc
上面的意思,是把传入的value去做一个格式化,这是我的想法,我们去看看
Doc源码
let Doc = function(text, mode, firstLine, lineSep, direction) {
  if (!(this instanceof Doc)) return new Doc(text, mode, firstLine, lineSep, direction)
  if (firstLine == null) firstLine = 0

  BranchChunk.call(this, [new LeafChunk([new Line("", null)])])
  this.first = firstLine
  this.scrollTop = this.scrollLeft = 0
  this.cantEdit = false
  this.cleanGeneration = 1
  this.modeFrontier = this.highlightFrontier = firstLine
  let start = Pos(firstLine, 0)
  this.sel = simpleSelection(start)
  this.history = new History(null)
  this.id = ++nextDocId
  this.modeOption = mode
  this.lineSep = lineSep
  this.direction = (direction == "rtl") ? "rtl" : "ltr"
  this.extend = false

  if (typeof text == "string") text = this.splitLines(text)
  updateDoc(this, {from: start, to: start, text: text})
  setSelection(this, simpleSelection(start), sel_dontScroll)
}
好了,我们已经开始接近了编辑器的实现原理,为了减低复杂度,我们只看关键几个点的源码
编辑器使用了一个
firstLine记录第一行开始的位置,默认是0,其他都是一些默认值。从POS开始,这个比较重要了。
let start = Pos(firstLine, 0)

POS方法:

// A Pos instance represents a position within the text.
export function Pos(line, ch, sticky = null) {
  if (!(this instanceof Pos)) return new Pos(line, ch, sticky)
  this.line = line
  this.ch = ch
  this.sticky = sticky
}
这个函数,我大概知道是什么意思,但是看到这里,我还不能很好的解答。于是我们这个地方先留着,知道它是记录位置的(但是不知道记录什么位置)
接下来是
this.sel = simpleSelection(start)

//simpleSelection方法
export function simpleSelection(anchor, head) {
  return new Selection([new Range(anchor, head || anchor)], 0)
}
simpleSelection方法是通过新建一个Range光标对象,然后返回一个Selection对象,这也就是近十年,大部分前端编辑器的原理
这里先科普下
Range和Select对象
一个 Selection 对象表示用户选择的 Range 的集合。通常,它只包含一个区域,访问方式如下:
window.getSelection();
下方蓝色选中部分就是这个方法返回值

Range 接口表示一个包含节点与文本节点的一部分的文档片段。
可以用 Document 对象的 Document.createRange 方法创建 Range,也可以用 Selection 对象的 getRangeAt 方法获取 Range。另外,还可以通过 Document 对象的构造函数 Range() 来得到 Range。
创建好了
Select对象后,我们接下来要判断,如果传入的value是一个string,那么就要去做一次处理
if (typeof text == "string") text =
this.splitLines(text)

//splitLines方法
 splitLines: function(str) {
    if (this.lineSep) return str.split(this.lineSep)
    return splitLinesAuto(str)
  },
split()方法使用指定的分隔符字符串将一个String对象分割成子字符串数组,以一个指定的分割字串来决定每个拆分的位置。
这里意思是,如果是要按照指定位置拆分,就要按照制定位置拆分这个value,否则就走定义的方法
splitLinesAuto处理(此处是为了兼容IE里面的"".split~)
export let splitLinesAuto = "\n\nb".split(/\n/).length != 3 ? string => {
  let pos = 0, result = [], l = string.length
  while (pos <= l) {
    let nl = string.indexOf("\n", pos)
    if (nl == -1) nl = string.length
    let line = string.slice(pos, string.charAt(nl - 1) == "\r" ? nl - 1 : nl)
    let rt = line.indexOf("\r")
    if (rt != -1) {
      result.push(line.slice(0, rt))
      pos += rt + 1
    } else {
      result.push(line)
      pos = nl + 1
    }
  }
  return result
} : string => string.split(/\r\n?|\n/)
在数据数据完毕后,需要更新编辑器内容
 updateDoc(this, {from: start, to:
 start, text: text})
写到这里,我有点怀疑人生了,我本想着clone源码下来,半个小时搞定的。(因为我写过编辑器),结果这个代码特别难阅读,跟node.js源码一样,方法和属性大都是挂载在原型上的,特别链路这么长,所以大家现在理解写一篇好的文章多难了吧。说多了都是泪,还好我币圈昨天梭哈抄底,今天大涨。我今晚就是再怎么样也要写完
接着看
updateDoc这个方法,可以看到,传入了实例对象和起点,终点,和文本进去。(这个方法真的好难看)
首先定义了几个函数,先不看
// Perform a change on the document data structure.
export function updateDoc(doc, change, markedSpans, estimateHeight) {
  function spansFor(n) {return markedSpans ? markedSpans[n] : null}
  function update(line, text, spans) {
    updateLine(line, text, spans, estimateHeight)
    signalLater(line, "change", line, change)
  }
  function linesFor(start, end) {
    let result = []
    for (let i = start; i < end; ++i)
      result.push(new Line(text[i], spansFor(i), estimateHeight))
    return result
  }
  ...
接着获取了外部传入的数据,例如from,to,text,第一行,最后的内容等
  let from = change.from, to = change.to, text = change.text
  let firstLine = getLine(doc, from.line), lastLine = getLine(doc, to.line)
  let lastText = lst(text), lastSpans = spansFor(text.length - 1), nlines = to.line - from.line
接下来,就是真正的处理编辑器内容变化的处理逻辑了,认真看,直接先把代码搞出来吧
 // Adjust the line structure
  if (change.full) {
    doc.insert(0, linesFor(0, text.length))
    doc.remove(text.length, doc.size - text.length)
  } else if (isWholeLineUpdate(doc, change)) {
    // This is a whole-line replace. Treated specially to make
    // sure line objects move the way they are supposed to.
    let added = linesFor(0, text.length - 1)
    update(lastLine, lastLine.text, lastSpans)
    if (nlines) doc.remove(from.line, nlines)
    if (added.length) doc.insert(from.line, added)
  } else if (firstLine == lastLine) {
    if (text.length == 1) {
      update(firstLine, firstLine.text.slice(0, from.ch) + lastText + firstLine.text.slice(to.ch), lastSpans)
    } else {
      let added = linesFor(1, text.length - 1)
      added.push(new Line(lastText + firstLine.text.slice(to.ch), lastSpans, estimateHeight))
      update(firstLine, firstLine.text.slice(0, from.ch) + text[0], spansFor(0))
      doc.insert(from.line + 1, added)
    }
  } else if (text.length == 1) {
    update(firstLine, firstLine.text.slice(0, from.ch) + text[0] + lastLine.text.slice(to.ch), spansFor(0))
    doc.remove(from.line + 1, nlines)
  } else {
    update(firstLine, firstLine.text.slice(0, from.ch) + text[0], spansFor(0))
    update(lastLine, lastText + lastLine.text.slice(to.ch), lastSpans)
    let added = linesFor(1, text.length - 1)
    if (nlines > 1) doc.remove(from.line + 1, nlines - 1)
    doc.insert(from.line + 1, added)
  }

  signalLater(doc, "change", doc, change)
上面代码的意思:
如果是行结构调整,那么就执行
 doc.insert(0, linesFor(0, text.length))
 doc.remove(text.length, doc.size - text.length)
如果是整个行更新,那么就
 else if (isWholeLineUpdate(doc, change)) {
    // This is a whole-line replace. Treated specially to make
    // sure line objects move the way they are supposed to.
    let added = linesFor(0, text.length - 1)
    update(lastLine, lastLine.text, lastSpans)
    if (nlines) doc.remove(from.line, nlines)
    if (added.length) doc.insert(from.line, added)
  }
如果第一行等于最后一行
else if (firstLine == lastLine) {
    if (text.length == 1) {
      update(firstLine, firstLine.text.slice(0, from.ch) + lastText + firstLine.text.slice(to.ch), lastSpans)
    } else {
      let added = linesFor(1, text.length - 1)
      added.push(new Line(lastText + firstLine.text.slice(to.ch), lastSpans, estimateHeight))
      update(firstLine, firstLine.text.slice(0, from.ch) + text[0], spansFor(0))
      doc.insert(from.line + 1, added)
    }
  }
如果只有一行
 else if (text.length == 1) {
    update(firstLine, firstLine.text.slice(0, from.ch) + text[0] + lastLine.text.slice(to.ch), spansFor(0))
    doc.remove(from.line + 1, nlines)
  }
否则就执行默认逻辑
 else {
    update(firstLine, firstLine.text.slice(0, from.ch) + text[0], spansFor(0))
    update(lastLine, lastText + lastLine.text.slice(to.ch), lastSpans)
    let added = linesFor(1, text.length - 1)
    if (nlines > 1) doc.remove(from.line + 1, nlines - 1)
    doc.insert(from.line + 1, added)
  }
这里具体的逻辑大都是数据处理,根据不同条件来进行什么样的数据处理。主要给大家梳理下这些调用逻辑
我之前说过,它跟node.js源码很像,都是把方法和属性挂载在原型链上的方便调用取值,在Doc上也是

Doc的原型上挂载的方法有四百多行代码,我选择几个有代表意义的讲解下:
//插入
insert: function(at, lines) {
    let height = 0
    for (let i = 0; i < lines.length; ++i) height += lines[i].height
    this.insertInner(at - this.first, lines, height)
  },

//移除
remove: function(at, n) { this.removeInner(at - this.first, n) },

//替换光标对象
replaceRange: function(code, from, to, origin) {
    from = clipPos(this, from)
    to = to ? clipPos(this, to) : from
    replaceRange(this, code, from, to, origin)
},

//获取光标对象
getRange: function(from, to, lineSep) {
    let lines = getBetween(this, clipPos(this, from), clipPos(this, to))
    if (lineSep === false) return lines
    if (lineSep === '') return lines.join('')
    return lines.join(lineSep || this.lineSeparator())
  },

//获取行
getLine: function(line) {let l = this.getLineHandle(line); return l && l.text},

//获取第一行
firstLine: function() {return this.first},

//获取最后一行
lastLine: function() {return this.first + this.size - 1},
编辑器的大题逻辑快要清晰了,在
Doc上挂载了很多方法,先把传入的value通过Doc格式化,然后把input样式初始化,接着把编辑器的输入节点和格式化后的doc一起传入Display方法
input样式初始化
let input = new CodeMirror.inputStyles[options.inputStyle](this)
把编辑器的输入节点和格式化后的doc一起传入
Display方法
 if (typeof doc == "string") doc = new Doc(doc, options.mode, null, options.lineSeparator, options.direction)
  else if (options.mode) doc.modeOption = options.mode
  this.doc = doc

  let input = new CodeMirror.inputStyles[options.inputStyle](this)
  let display = this.display = new Display(place, doc, input, options)

这个display的方法,我认为大部分都是样式处理,这里不展开讲了。回到整个文章和源码的精髓
回到Doc
整个源码最难的点就是
Doc这里,它是通过外界传入的value,以及挂载在Doc原型链上的方法,对传入的数据进行格式化,有人肯定会问,这TM怎么导致编辑器重新渲染的呢?
当然是更改
Selection对象
刚才有写到,在
Doc上,挂载了很多的方法,其中有一个setValue方法
setValue: docMethodOp(function(code) {
    let top = Pos(this.first, 0), last = this.first + this.size - 1
    makeChange(this, {from: top, to: Pos(last, getLine(this, last).text.length),
                      text: this.splitLines(code), origin: "setValue", full: true}, true)
    if (this.cm) scrollToCoords(this.cm, 0, 0)
    //更新编辑器重点
    setSelection(this, simpleSelection(top), sel_dontScroll)
  }),
重点 - 设置新的
selection:
// Set a new selection.
export function setSelection(doc, sel, options) {
  setSelectionNoUndo(doc, sel, options)
  addSelectionToHistory(doc, doc.sel, doc.cm ? doc.cm.curOp.id : NaN, options)
}
这里可以看到,因为编辑器可以支持回退,于是每次更新编辑器内容时候,要添加一个历史。还好,我们应该没看错源码方向
export function setSelectionNoUndo(doc, sel, options) {
  if (hasHandler(doc, "beforeSelectionChange") || doc.cm && hasHandler(doc.cm, "beforeSelectionChange"))
    sel = filterSelectionChange(doc, sel, options)

  let bias = options && options.bias ||
    (cmp(sel.primary().head, doc.sel.primary().head) < 0 ? -1 : 1)
  setSelectionInner(doc, skipAtomicInSelection(doc, sel, bias, true))

  if (!(options && options.scroll === false) && doc.cm && doc.cm.getOption("readOnly") != "nocursor")
    ensureCursorVisible(doc.cm)
}
没有发现阻断的
return代码,应该种带你观察setSelectionInner这个方法
function setSelectionInner(doc, sel) {
  if (sel.equals(doc.sel)) return

  doc.sel = sel

  if (doc.cm) {
    doc.cm.curOp.updateInput = 1
    doc.cm.curOp.selectionChanged = true
    signalCursorActivity(doc.cm)
  }
  signalLater(doc, "cursorActivity", doc)
}
这个
setSelectionInner会做判断,如果两者的新的sel对象和旧的对比是一致的就结束函数调用,否则就更新赋值。
如果此刻存在编辑器实例,那么就去更新它上面的一些属性,例如
selectionChanged,它应该是一把类似锁的标识,告诉其他调用它的地方,Selection对象改变了,最后调用signalLater对象的方法
最后的代码需要回到使用来讲解
我们看字节跳动的编辑器是怎么调用它的
import React, { useEffect, useRef } from 'react';
import * as bytemd from 'bytemd';

export interface EditorProps extends bytemd.EditorProps {
  onChange?(value: string): void;
}

export const Editor: React.FC<EditorProps> = ({
  children,
  onChange,
  ...props
}) => {
  const ed = useRef<bytemd.Editor>();
  const el = useRef<HTMLDivElement>(null);

  useEffect(() => {
    if (!el.current) return;

    const editor = new bytemd.Editor({
      target: el.current,
      props,
    });
    editor.$on('change', (e: CustomEvent<{ value: string }>) => {
      onChange?.(e.detail.value);
    });
    ed.current = editor;

    return () => {
      editor.$destroy();
    };
  }, []);

  useEffect(() => {
    // TODO: performance
    ed.current?.$set(props);
  }, [props]);

  return <div ref={el}></div>;
};
看重点:
 editor.$on('change', (e: CustomEvent<{ value: string }>) => {
      onChange?.(e.detail.value);
    });
监听了
change事件,恰好我们上面最后一段源码是这样的:
  signalLater(doc, "cursorActivity", doc)

//signalLater方法
export function signalLater(emitter, type /*, values...*/) {
  let arr = getHandlers(emitter, type)
  if (!arr.length) return
  let args = Array.prototype.slice.call(arguments, 2), list
  if (operationGroup) {
    list = operationGroup.delayedCallbacks
  } else if (orphanDelayedCallbacks) {
    list = orphanDelayedCallbacks
  } else {
    list = orphanDelayedCallbacks = []
    setTimeout(fireOrphanDelayed, 0)
  }
  for (let i = 0; i < arr.length; ++i)
    list.push(() => arr[i].apply(null, args))
}
会将所有的监听事件触发一次,这样例如:我每次设置一个新的
Selection,就会触发外部的change事件。
list.push(() => arr[i].apply(null, args))
每次触发回调函数后将参数传递出去,就会像上面的
change方法一样,拿到dom节点
   editor.$on('change', (e: CustomEvent<{ value: string }>) => {
      onChange?.(e.detail.value);
    });
梳理本次看源码的流程
clone字节跳动的编辑器源码发现是
pnpm + lerna模式,使用nvm切换nodejs版本,安装依赖发现字节跳动使用的是
Svelte框架,对接的CodeMirror本地 link 或者yalc调试源码发现编辑器底层依赖的是CodeMirror找到
CodeMirror源码CodeMirror源码跟nodejs设计很像,5年前写的,我看大多数是发现
CodeMirror是通过fromTextArea方法返回实例,开始使用的重点解析了
Doc方法,将传入的value进行初始化,展示在编辑器中(通过设置Selection对象的方式),并且在doc实例上挂载了很多方法暴露给外面组件调用(重点)简要解析了
Display方法,为了样式和一些节点的处理(非重点)
写在最后
原以为,一个文章只要一个小时写完,没想到遇到的技术栈还挺杂,幸好我看过
nodejs一些核心模块源码,不然我是写不下去了字节跳动的技术是牛逼的,掘金这次改版编辑器好用了很多,点个赞
往期推荐


最后
如果你觉得这篇内容对你挺有启发,我想邀请你帮我三个小忙:
点个「在看」,让更多的人也能看到这篇内容(喜欢不点在看,都是耍流氓 -_-)
欢迎加我微信「huab119」拉你进技术群,长期交流学习...
关注公众号「前端劝退师」,持续为你推送精选好文,也可以加我为好友,随时聊骚。

点个在看支持我吧,转发就更好了


 5131
5131


 被折叠的 条评论
为什么被折叠?
被折叠的 条评论
为什么被折叠?
 到【灌水乐园】发言


