


目录
Maven相关的概念
Maven介绍
什么是Maven
Maven
是项⽬进⾏模型抽象,充分运⽤⾯向对象的思想,
Maven可以通过⼀⼩段描述信息来管理项⽬的构建,报告和⽂档的软件项⽬管理⼯具。
Maven 除了以程序构建能⼒为特⾊之外,还提供⾼级项⽬管理⼯具。由于
Maven
的缺省构建规则有较⾼的可重⽤性,所以常常⽤两三⾏
Maven 构建脚本就可以构建简单的项⽬。
说⽩了
:
Maven
是由
Apache
开发的⼀个⼯具。
⽤来管理
java
项⽬
,
依赖管理
(jar
包的管理
)
,项⽬构建
.
Maven的作用
- 依赖管理: maven对项⽬的第三⽅构件(jar包)进⾏统⼀管理。向⼯程中加⼊jar包不要⼿⼯从其它地⽅拷⻉,通过maven定义jar包的坐标,⾃动从maven仓库中去下载到⼯程中。
- 项⽬构建: maven提供⼀套对项⽬⽣命周期管理的标准,开发⼈员、和测试⼈员统⼀使⽤maven进⾏项⽬构建。项⽬⽣命周期管理:编译、测试、打包、部署、运⾏。
- maven对⼯程分模块构建,提⾼开发效率。 (后⾯Maven⾼级会涉及)
Maven的好处
- 使⽤普通⽅式构建项⽬大小50M
- 使⽤Maven构建项⽬大小2M
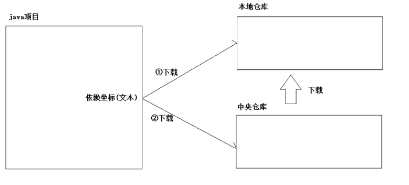
Maven仓库和坐标
Maven的仓库
maven仓库: 指的是jar包所在位置
|
仓库
名称
|
作⽤
|
|
本地
仓库
|
相当于缓存,⼯程第⼀次会从远程仓库(互联⽹)去下载
jar
包,将jar包存在本地仓库(在程序员的电脑上)。第⼆次不需要从远程仓库去下载。先从本地仓库找,如果找不到才会 去远程仓库找。
|
|
中央
仓库
|
就是远程仓库,仓库中
jar
由专业团队(
maven
团队)统⼀维护。中央仓库的地址:
http://repo1.maven.org/maven2/
|
|
远程
仓库
(私服
)
|
私服是⼀种特殊的远程仓库,它是架设在局域⽹内的仓库服务,私服代理⼴域⽹上的远程仓库,供局域⽹内的
Maven
⽤户使⽤。当
Maven须要下载构件的时候。它从私服请求,假设私服上不存在该构件,则从外部的远程仓库下载,缓存在私服上之后,再为
Maven的下载请求提供服务。
|
Maven的坐标
Maven
的⼀个核⼼的作⽤就是管理项⽬的依赖,引⼊我们所需的各种
jar
包等。在
Maven中,不论什么⼀个依赖、插件或者项⽬构建的输出
,
都能够称之为
构件
。
为了能⾃动化的解析任何⼀个
Java
构件
. Maven
必须将这些
Jar包或者其他资源进⾏唯⼀标识,这是管理项⽬的依赖的基础,也就是我们要说的
坐标
。
包括我们⾃⼰开发的项⽬,也是要通过坐标进⾏唯⼀标识的,这样才能才其它项⽬中进⾏依赖引⽤。
坐标的定义元素如下:
- groupId:项⽬组织唯⼀的标识符,实际对应JAVA的包的结构
- (⼀般写公司的组织名称 例如:com.baidu, com.alibaba)
- artifactId: 项⽬的名称
- version:定义项⽬的当前版本
例如:要引⼊
druid
的
jar
包,只需要在
pom.xml
配置⽂件中配置引⼊
druid
的坐标即可:
<!--druid连接池-->
<dependency>
 <groupId>com.alibaba</groupId>
 <artifactId>druid</artifactId>
 <version>1.1.10</version>
</dependency>
小结
- Maven是apache开发⼯具, 对项⽬进⾏管理
- Maven的作⽤:
- 依赖管理(jar)
- 项⽬构建(编译, 测试, 打包...)
- maven对⼯程分模块构建
- 我们如果要使⽤jar, 只需要在项⽬⾥⾯添加对应的坐标
- 先从本地仓库找
- 有, 就直接依赖使⽤
- 没有, 从中央仓库找, 提示会下载到本地仓库, 下次⽤的时候就直接从本地依赖使⽤了
Maven的安装
Maven的安装
下载Maven
官网:http://maven.apache.org/
安装Maven
将Maven压缩包解压,即安装完毕
Maven目录介绍

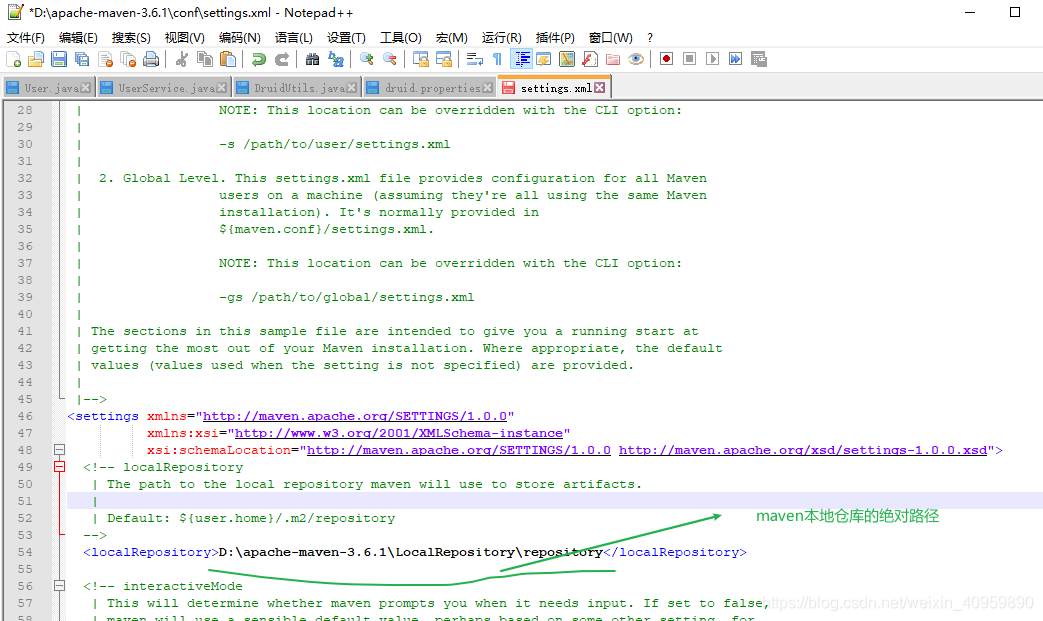
配置本地仓库
本地库:链接:https://pan.baidu.com/s/1AmAm94_1VQjNUJOWSeCGwg 提取码:4sco
1. 将软件⽂件夹中的Repository解压
2
配置本地仓库
在
maven
的安装⽬录中
conf/ settings.xml
⽂件,在这⾥配置本地仓库
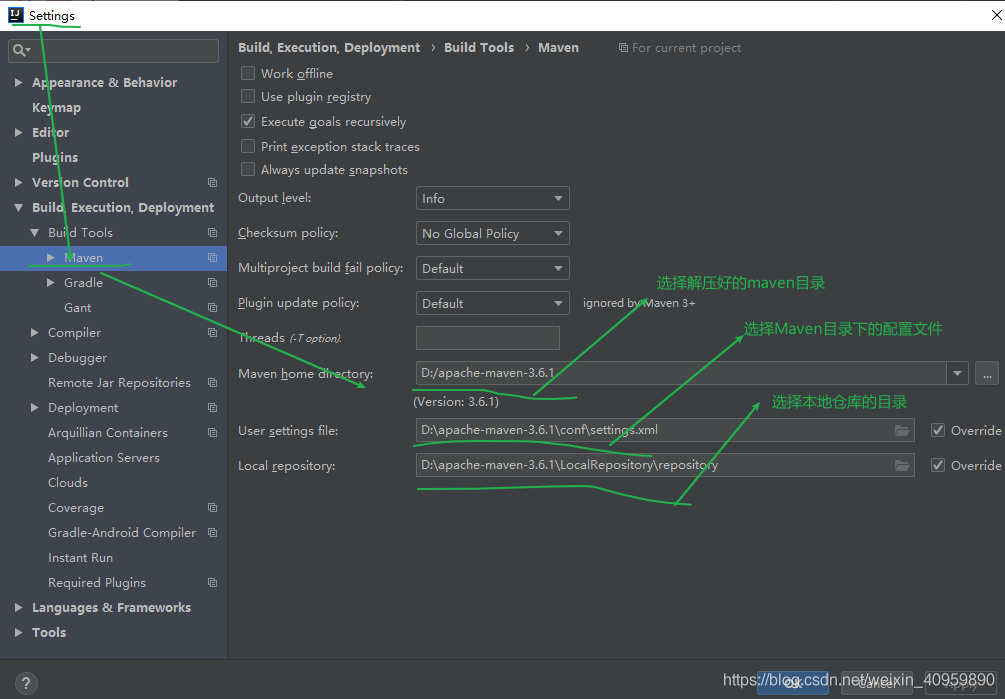
IDEA集成Maven
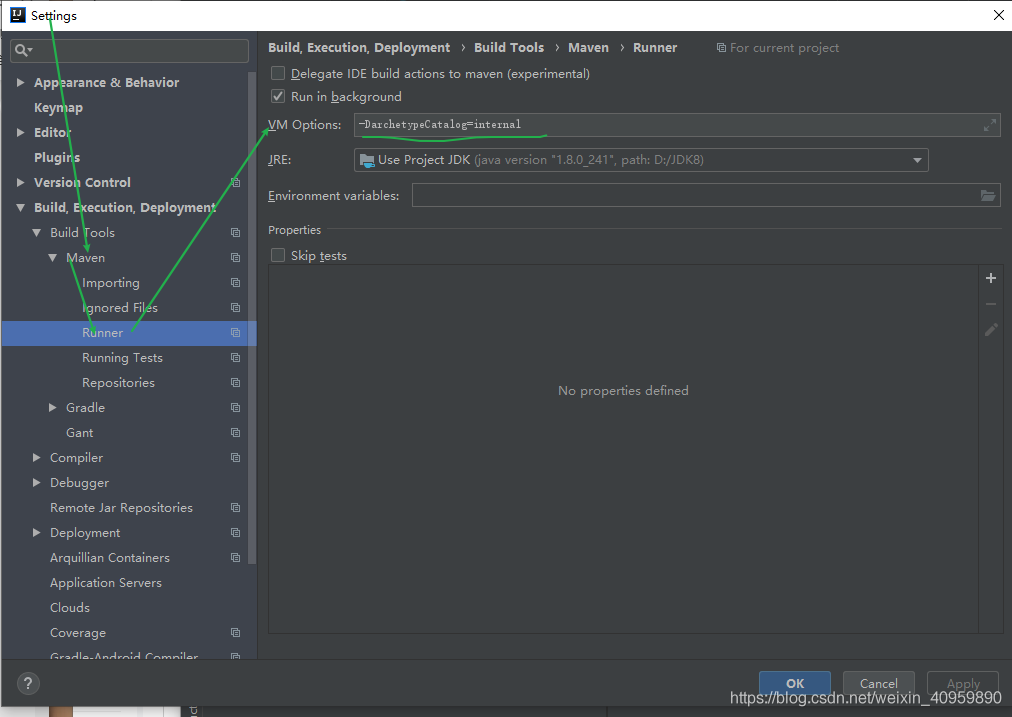
配置Maven
配置参数
(
创建⼯程不需要联⽹
,
解决创建慢的问题
) -DarchetypeCatalog=internal
使用IDEA创建Maven⼯程
创建javase⼯程
- 第一步

- 第二步

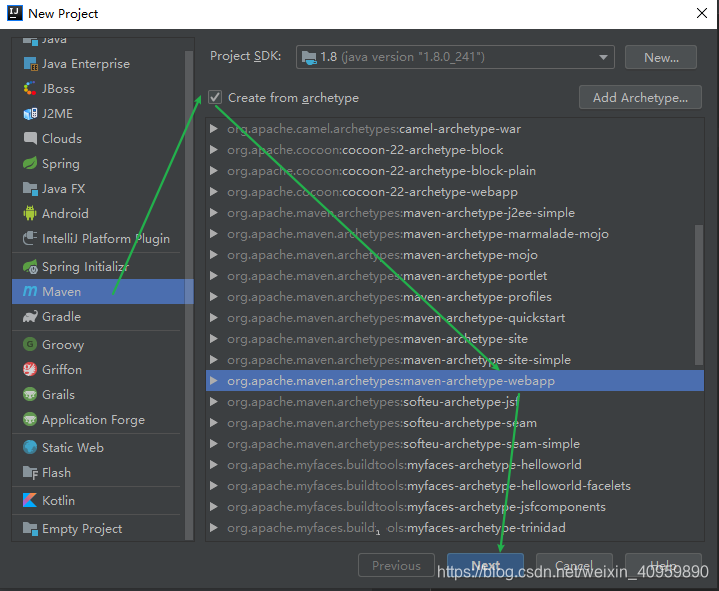
创建javaweb⼯程
- 创建javaweb⼯程与创建javase⼯程类似,但在选择Maven⻣架时,选择maven-archetype-webapp即可:
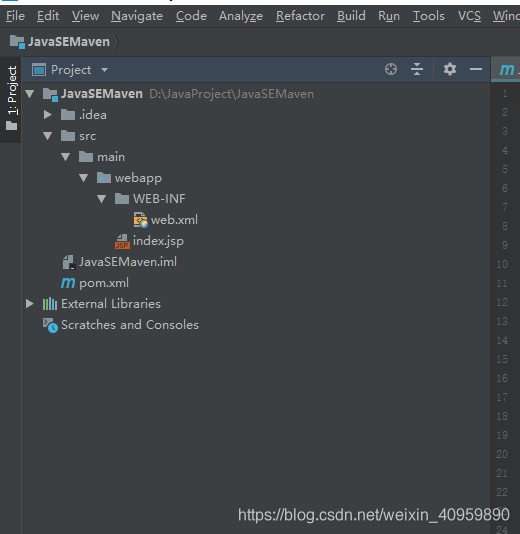
- 创建好的javaweb⼯程后,需要做后续操作:
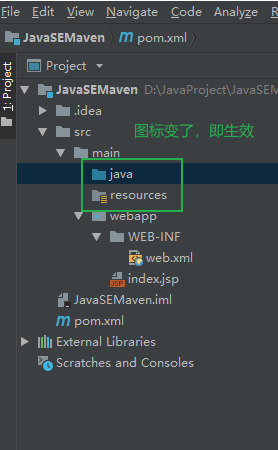
- 1.要⼿动创建⼀个java⽬录⽤于编写java代码
- 2.还要将java⽬录设置为Source Root


Maven的常用命令
clean命令
清除编译产⽣的target⽂件夹内容
compile命令
该命令可以对src/main/java⽬录的下的代码进⾏编译
test命令
测试命令
,
或执⾏
src/test/java/
下所有
junit
的测试⽤例
- 在src/test/java下创建测试类DemoTest
- 执⾏test命令测试, 控制台显示测试结果
package命令
打包项⽬
- 如果是JavaSe的项⽬,打包成jar包
- 如果是JavaWeb的项⽬,打包成war包
打包后的项⽬会在
target
⽬录下找到
小结
1.命令作⽤
- clean 清除编译内容
- compile 编译
- test 执⾏单元测试
- package 打包(java⼯程打成jar, javaweb⼯程打war)
- install 把打的包安装到本地仓库
2.
⽣命周期
- 执⾏后⾯的命令, 会先执⾏前⾯的命令. 例如: install 先执⾏ clean ,compile ,test, package
- 执⾏顺序: clean --> compile --> test --> package --> install
依赖管理和插件
依赖管理
导⼊依赖
导⼊依赖坐标,⽆需⼿动导⼊
jar
包就可以引⼊
jar
。在
pom.xml中使⽤标签引⼊依赖。 去
Maven
官⽹找
,
赋值
,
粘贴
.
http://mvnrepository.com/
导⼊junit的依赖
- 导⼊junit坐标依赖
<!-- https://mvnrepository.com/artifact/junit/junit -->
<dependency>
 <groupId>junit</groupId>
 <artifactId>junit</artifactId>
 <version>4.12</version>
 <scope>test</scope>
</dependency>- 进⾏单元测试
import org.junit.Test;
public class DemoTest {
     @Test
     public void test1(){
         System.out.println("测试junit");
     }
}
导⼊
servlet
的依赖
- 创建Servlet,但是发现报错,原因是没有导⼊Servlet的坐标依赖
- 导⼊Servlet的坐标依赖
<!-- https://mvnrepository.com/artifact/javax.servlet/javax.servlet-api -->
<dependency>
 <groupId>javax.servlet</groupId>
 <artifactId>javax.servlet-api</artifactId>
 <version>3.1.0</version>
 <scope>provided</scope>
</dependency>- 原有报错的Servlet恢复正常
依赖范围
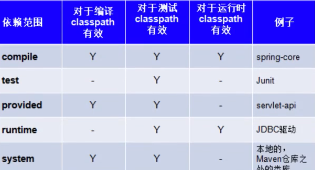
- 按照依赖强度,由强到弱来排序:(理解) compile> provided> runtime> test
小结
1.
坐标不需要背
,
做项⽬时候
/
⼯作开发都有整套的坐标
.
如果是导⼊⼀些特定
,
可以查阅⽹站
,直接拷⻉
2.
作⽤范围
- compile 编译, 测试 打包部署有效
- provided 编译, 测试 有效, 不会打包进去的
- test 测试有效
- runtime 编译⽆效, 测试 打包部署有效
3.
servlet, jsp
坐标
,
⼀定要加上
provided
这个范围
,
因为
tomcat
⾥⾯有这些
jar, 如果没有加上 provided
这个范围会能导致
jar
冲突
,
单元测试的建议加上
test
这个范围
,
其它不加
Maven插件
Maven是⼀个核⼼引擎,提供了基本的项⽬处理能⼒和建设过程的管理,以及⼀系列的插件是⽤来执⾏实际建设任务。
maven
插件可以完成⼀些特定的功能。例如,集成
jdk插件可以⽅便的修改项⽬的编译环境;集成
tomcat
插件后,⽆需安装
tomcat
服务器就可以运⾏
tomcat进⾏项⽬的发布与测试。在pom.xml
中通过
plugin
标签引⼊
maven
的功能插件。
JDK编译版本的插件【了解】
<!--jdk编译插件-->
<plugin>
 <groupId>org.apache.maven.plugins</groupId>
 <artifactId>maven-compiler-plugin</artifactId>
 <version>3.2</version>
 <configuration>
 <source>1.8</source>
 <target>1.8</target>
 <encoding>utf-8</encoding>
 </configuration>
</plugin>Tomcat7服务端的插件
- 添加tomcat7插件
<plugins>
 <plugin>
 <groupId>org.apache.tomcat.maven</groupId>
 <artifactId>tomcat7-maven-plugin</artifactId>
 <configuration>
 <!-- 指定端⼝ -->
 <port>8080</port>
 <!-- 请求路径 -->
 <path>/</path>
 </configuration>
 </plugin>
</plugins>
注意
: Maven
的中央仓库中只有
Tomcat7.X
版本的插件,⽽之前我们使⽤的是
8.X的版本,如果想使
Tomcat8.X
的插件可以去其他第三⽅仓库进⾏寻找,或者使⽤
IDEA
集成外部
Tomcat8极其以上版本,进⾏项⽬的发布。
小结
掌握在哪⾥添加
(
位置
)
<build>
<!--添加插件-->
<plugins>
<plugin>
</plugin>
<plugin>
</plugin>
</plugins>
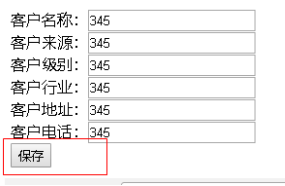
</build>案例 - 使用Maven搭建WEB项目
需求:完成添加客户信息的操作
思路分析
1.
在⻚⾯点击保存
,
数据提交到服务器
2.
创建
CustomerServlet,
在
CustomerServlet
的
doPost()
⽅法⾥⾯
//1.
获得请求参数
(
封装成⼀个对象
)
//2.
调⽤业务 进⾏保存
//3.
响应
3.
创建
CustomerService,
创建⼀个⽅法
4.
创建
CustomerDao,
使⽤
DBUtils
操作数据库
(
保存
)
代码实现
- 创建数据库
CREATE TABLE `cst_customer` (
 `cust_id` bigint(32) NOT NULL AUTO_INCREMENT COMMENT '客户编号(主键)',
 `cust_name` varchar(32) NOT NULL COMMENT '客户名称(公司名称)',
 `cust_source` varchar(32) DEFAULT NULL COMMENT '客户信息来源',
 `cust_industry` varchar(32) DEFAULT NULL COMMENT '客户所属⾏业',
 `cust_level` varchar(32) DEFAULT NULL COMMENT '客户级别',
 `cust_phone` varchar(64) DEFAULT NULL COMMENT '固定电话',
 `cust_mobile` varchar(16) DEFAULT NULL COMMENT '移动电话',
 PRIMARY KEY (`cust_id`)
)- 创建JavaBean
public class Customer implements Serializable {
     private Long cust_id;
     private String cust_name;
     private String cust_source;
     private String cust_industry;
     private String cust_level;
     private String cust_phone;
     private String cust_mobile;
}- 使⽤ Maven项⽬ "javaweb_demo", ⽬录结构

- 导⼊坐标
<?xml version="1.0" encoding="UTF-8"?>

<project xmlns="http://maven.apache.org/POM/4.0.0" xmlns:xsi="http://www.w3.org/2001/XMLSchema-instance"
  xsi:schemaLocation="http://maven.apache.org/POM/4.0.0 http://maven.apache.org/xsd/maven-4.0.0.xsd">
  <modelVersion>4.0.0</modelVersion>

  <groupId>com.wensong</groupId>
  <artifactId>JavaWebDemo</artifactId>
  <version>1.0-SNAPSHOT</version>
  <packaging>war</packaging>

  <properties>
    <project.build.sourceEncoding>UTF-8</project.build.sourceEncoding>
    <maven.compiler.source>1.8</maven.compiler.source>
    <maven.compiler.target>1.8</maven.compiler.target>
  </properties>

  <dependencies>
    <!-- https://mvnrepository.com/artifact/junit/junit -->
    <dependency>
      <groupId>junit</groupId>
      <artifactId>junit</artifactId>
      <version>4.12</version>
      <scope>test</scope>
    </dependency>
    <!-- https://mvnrepository.com/artifact/javax.servlet/javax.servlet-api -->
    <dependency>
      <groupId>javax.servlet</groupId>
      <artifactId>javax.servlet-api</artifactId>
      <version>3.1.0</version>
      <scope>provided</scope>
    </dependency>
    <!-- https://mvnrepository.com/artifact/mysql/mysql-connector-java -->
    <dependency>
      <groupId>mysql</groupId>
      <artifactId>mysql-connector-java</artifactId>
      <version>8.0.16</version>
    </dependency>
    <!-- https://mvnrepository.com/artifact/com.alibaba/druid -->
    <dependency>
      <groupId>com.alibaba</groupId>
      <artifactId>druid</artifactId>
      <version>1.1.10</version>
    </dependency>
    <!-- https://mvnrepository.com/artifact/commons-dbutils/commons-dbutils -->
    <dependency>
      <groupId>commons-dbutils</groupId>
      <artifactId>commons-dbutils</artifactId>
      <version>1.6</version>
    </dependency>
    <!-- https://mvnrepository.com/artifact/commons-beanutils/commons-beanutils -->
    <dependency>
      <groupId>commons-beanutils</groupId>
      <artifactId>commons-beanutils</artifactId>
      <version>1.9.3</version>
    </dependency>
    <!-- https://mvnrepository.com/artifact/javax.servlet.jsp/jsp-api -->
    <dependency>
      <groupId>javax.servlet.jsp</groupId>
      <artifactId>jsp-api</artifactId>
      <version>2.1</version>
      <scope>provided</scope>
    </dependency>
    <!-- https://mvnrepository.com/artifact/javax.servlet/jstl -->
    <dependency>
      <groupId>javax.servlet</groupId>
      <artifactId>jstl</artifactId>
      <version>1.2</version>
    </dependency>
  </dependencies>

  <build>
    <plugins>
      <plugin>
        <groupId>org.apache.tomcat.maven</groupId>
        <artifactId>tomcat7-maven-plugin</artifactId>
        <configuration>
          <!-- 指定端口 -->
          <port>8000</port>
          <!-- 请求路径 -->
          <path>/</path>
        </configuration>
      </plugin>
    </plugins>
  </build>

</project>
- 导⼊配置⽂件, ⼯具类
代码 druid.properties
driverClassName=com.mysql.cj.jdbc.Driver
url=jdbc:mysql://localhost:3306/test_wensong?useUnicode=true&characterEncoding=UTF-8&useSSL=false&use&serverTimezone=Asia/Shanghai
username=root
password=root- 代码 DruidUtils.java
package utils;

import com.alibaba.druid.pool.DruidDataSourceFactory;

import javax.sql.DataSource;
import java.io.InputStream;
import java.sql.Connection;
import java.sql.SQLException;
import java.util.Properties;

/**
 * 阿里巴巴的连接池 Druid 工具类
 */
public class DruidUtils {
    /*
    1. 加载 druid.properties 配置文件
    2. 创建 Druid 连接池对象
    3. 提供 获得 连接池对象的方法
    4. 提供 从连接池中 获取连接对象Connection的 方法
    */

    public static DataSource ds = null;

    static {
        try {
            //1. 加载 druid.properties 配置文件
            InputStream is = DruidUtils.class.getClassLoader().getResourceAsStream("druid.properties");
            Properties prop = new Properties();
            prop.load(is);
            //2. 创建 Druid 连接池对象
            ds = DruidDataSourceFactory.createDataSource(prop);
        } catch (Exception e) {
            e.printStackTrace();
        }
    }

    /*
    3. 提供 获得 连接池对象的方法
     */
    public static DataSource getDataSource(){
        return ds;
    }

    /*
    4. 提供 从连接池中 获取连接对象Connection的 方法
     */
    public static Connection getConnetion() throws SQLException {
        Connection conn = ds.getConnection();
        return  conn;
    }
}
- 导⼊⻚⾯ register.jsp
<%--
  Created by IntelliJ IDEA.
  User: wensong
  Date: 2020/8/26
  Time: 10:32 PM
  To change this template use File | Settings | File Templates.
--%>
<%@ page contentType="text/html;charset=UTF-8" language="java" %>
<html>
<head>
    <title>注册页面</title>
</head>
<body>
<form action="/register" method="post">
    客户名称:<input type="text" name="cust_name"/><br/>
    客户来源:<input type="text" name="cust_source"/><br/>
    客户级别:<input type="text" name="cust_industry"/><br/>
    客户行业:<input type="text" name="cust_level"/><br/>
    客户手机:<input type="text" name="cust_phone"/><br/>
    客户电话:<input type="text" name="cust_mobile"/><br/>
    <input type="submit" value="保存"/><br/>
</form>
</body>
</html>
- servlet代码
package web;

import org.apache.commons.beanutils.BeanUtils;
import org.junit.Test;
import pojo.Customer;
import service.CustomerService;

import javax.servlet.ServletException;
import javax.servlet.annotation.WebServlet;
import javax.servlet.http.HttpServlet;
import javax.servlet.http.HttpServletRequest;
import javax.servlet.http.HttpServletResponse;
import java.io.IOException;
import java.util.Map;

@WebServlet(urlPatterns = "/register")
public class MyServlet extends HttpServlet {
    public void doPost(HttpServletRequest request, HttpServletResponse
            response) throws ServletException, IOException {
        doGet(request, response);
    }
    @Test
    public void doGet(HttpServletRequest request, HttpServletResponse
            response) throws ServletException, IOException {
        request.setCharacterEncoding("utf-8");
        response.setContentType("text/html;charset=utf-8");
        //1. 获取参数
        Map<String, String[]> map = request.getParameterMap();
        //2. 封装数据到 Customer对象
        Customer customer = new Customer();
        try {
            BeanUtils.populate(customer, map);
        } catch (Exception e) {
            e.printStackTrace();
        }
        //3. 调⽤业务层⽅法, 传递customer对象, 完成添加操作
        CustomerService customerService = new CustomerService();
        customerService.register(customer);
        //4. 重定向到⾸⻚
        response.sendRedirect( request.getContextPath());
    }
}
- service代码
package service;

import dao.CustomerDao;
import pojo.Customer;

import java.sql.SQLException;

public class CustomerService {
    public void register(Customer customer) {
        //调⽤dao层⽅法
        CustomerDao customerDao = new CustomerDao();
        try {
            customerDao.register(customer);
        } catch (SQLException e) {
            e.printStackTrace();
        }
    }
}
- dao代码
package dao;

import org.apache.commons.dbutils.QueryRunner;

import pojo.Customer;
import utils.DruidUtils;
import java.sql.SQLException;

public class CustomerDao {
    public void register(Customer c) throws SQLException {

        QueryRunner queryRunner = new
                QueryRunner(DruidUtils.getDataSource());
        String sql = "insert into cst_customer values(?,?,?,?,?,?,?)";
        Object[] params = {c.getCust_id(),
                c.getCust_name(),c.getCust_source(),c.getCust_level(),
                c.getCust_industry(),c.getCust_mobile(),c.getCust_phone()};
        queryRunner.update(sql, params);
    }
}


 2510
2510


 被折叠的 条评论
为什么被折叠?
被折叠的 条评论
为什么被折叠?
 到【灌水乐园】发言


