


SNMP AGNET 学习资料
SNMP AGNET 学习资料(传载)
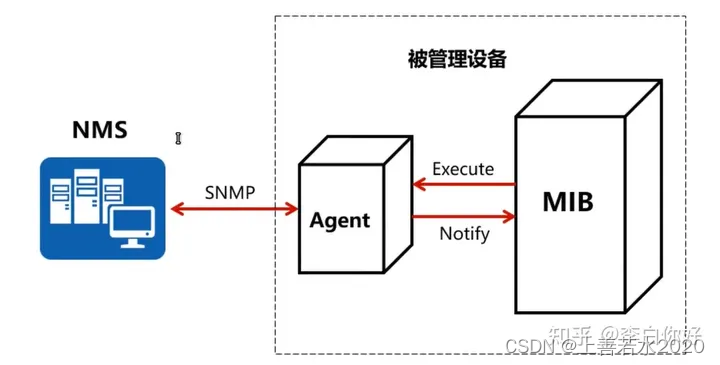
模型:

版本

SNMP数据包
MIB
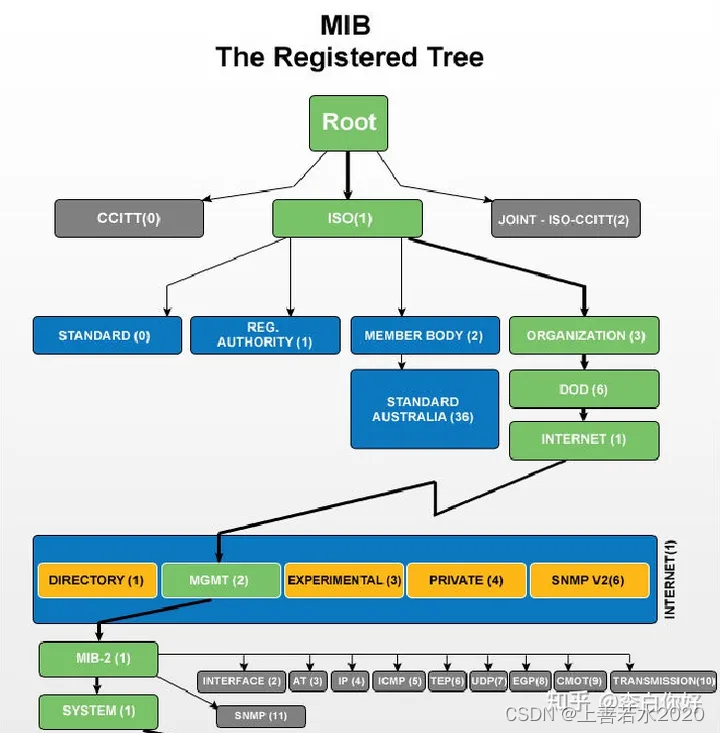
MIB:Management Information Base,管理信息库
是一个被管理对象的集合,是NMS同Agent进行沟通的桥梁。
使网管软件和设备进行标准对接。
每一个Agent都维护一个MIB库,NMS可以对MIB库中对象的值进行读取或设置。
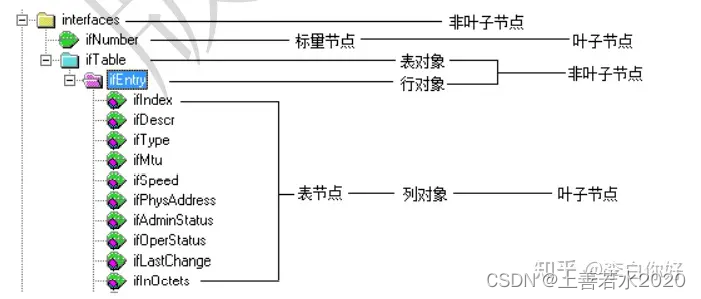
MIB以树状结构进行存储,树的叶子节点表示管理对象,它可以通过从根节点开始的一条惟一路径来识别,这也就是OID(Object Identifier)。
MIB对象及节点
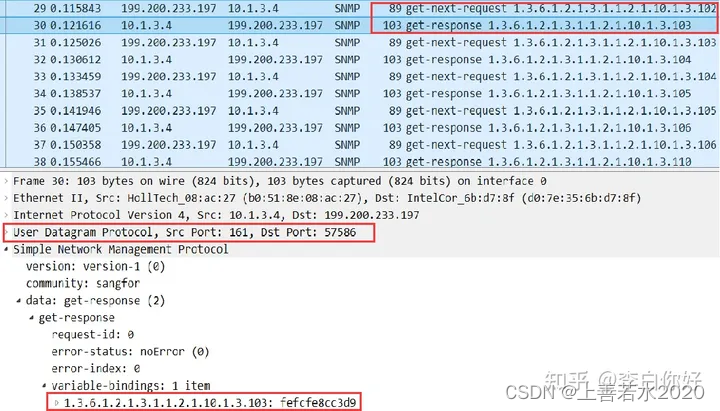
OID值

SNMP配置
snmp-agent #开启SNMP Agent
snmp-agent sys-info version v2c #配置SNMP版本
snmp-agent sys-info contact libai QQ:724284659 #配置管理员联系方式
snmp-agent sys-info location QHNU #配置管理员位置
snmp-agent community read libai #配置读团体名
snmp-agent community write huawei #配置写团体名
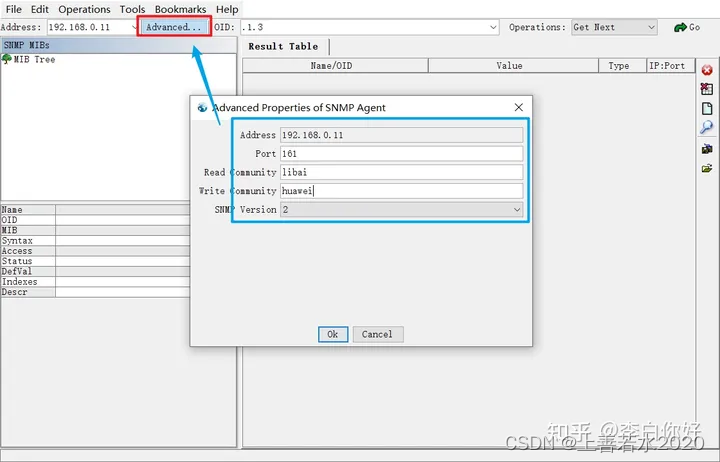
MIB Broeser

MIB Browser是来自ManageEngine的一款免费的MIB浏览器工具,用于监控采用SNMP协议的网络设备和服务器。利用MIB浏览器可以加载查看设备的MIB,执行GET、GETNEXT和SET SNMP操作。
1、执行工具
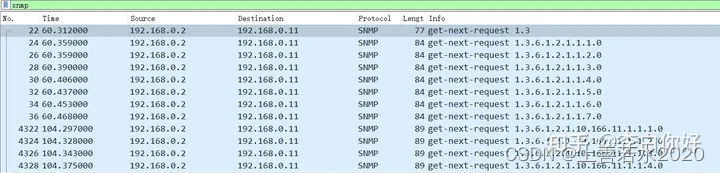
2、wireshark抓包

SNMP AGENT在SNMP框架中的位置
1.1 SNMP是被广泛接受并投入使用的工业标准,它采用轮询机制,便于网络管 理员检索任何节点的信息,进行修改,寻找故障;完成故障诊断,容量规划和报告生成。
SNMP的结构分为NMS和AGENT两部分(如图1.1.1),NMS(Network Management Station,目前常用的网管平台有SunNetManager和IBM NetView)向Agent发请求,Agent是驻留在被管设备上的一个进程或任务,接受到NMS的请求报文后,进行解码,分析,然后从相关模块中得到管理变量的值,生成Response报文,编码返送回NMS。SNMP就是用来规定NMS和Agent之间是如何传递管理信息的应用层协议。
1.2 SNMP协议现在有3个版本。
SNMPv1有5个基本原语
l get-request
l set-request
l get-next-request
l get-reponse
l trap
SNMPv2增加了两个原语
l get-bulk- request
l inform-request
SNMPv3主要是在安全上进行了加强。
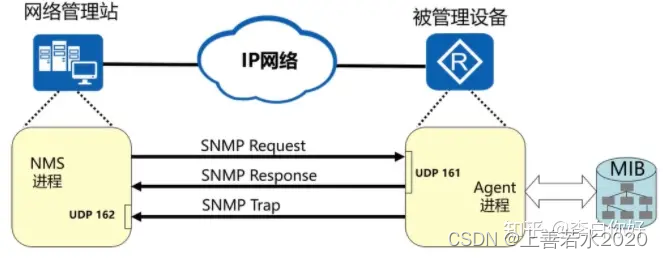
1.3 为了简化Agent(网管代理一般分为两个功能模块和一个公用模块MIB库)一侧的开发,SNMP规定只有两种操作Get, Set,前者用于从 被管设备获取管理信息。后者通过设置变量值来起到配置被管设备的作用。开放端口 UDP Port162 UDP Port161 AGENT Response Trap
NMS和Agent之间通过发送报文来传递管理信息,SNMPv1规定只有五种报 文: Get Request报文:用于获取指定管理变量的值。
GetNext Request报文:用于连续获取一组管理变量的值。
GetResponse报文:用于响应请求,返回请求值或错误类型等。
Set Request报文:用于设置指定的管理变量。
Trap报文:用于在紧急情况下由被管设备向NMS主动发信息
GetResponse报文:用于响应请求,返回请求值或错误类型等。
Set Request报文:用于设置指定的管理变量。
Trap报文:用于在紧急情况下由被管设备向NMS主动发信息
SNMP AGENT的作用和流程
SNMP AGENT在网管站和设备上相关应用模块之间起到了一个翻译传递的作用。具体说包含两个部分:一是接收来自网管站的请求,对报文进行解码,验证团体名合法后,搜索MIB树并调用相应访问函数通知相关模块进行相应操作,并根据相关模块发回的操作结果构造响应报文,编码并发回网管站。二是提供向网管站主动报警的功能,由相关模块发起,在AGENT构造TRAP报文,并编码发送。
SNMP AGENT流程如下(以基于PSOS SNMP协议栈的AGENT为例进行介绍):
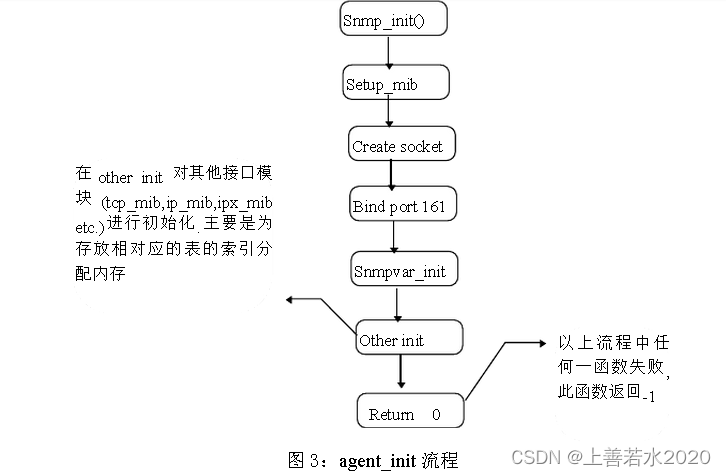
Return 0 Other init Snmpvar_init Bind port 161 Create socket Setup_mib Snmp_init() 在other init 对其他接口模块(tcp_mib,ip_mib,ipx_mibetc.)进行初始化.主要是为存放相对应的表的索引分配内存 以上流程中任何一函数失败,此函数返回-1
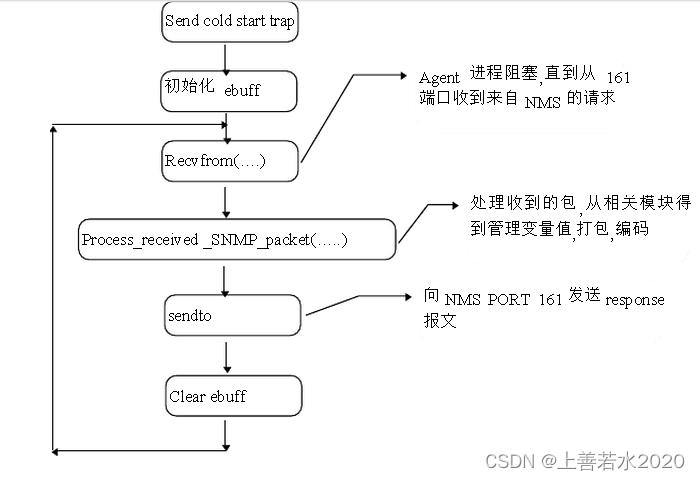
图4:agent_body流程
在agent_body流程中,函数Process_received_SNMP_packet()是核心。该函数由PSOS协议栈提供。首先对报文进行解码,解码成功后将进行团体名验证。验证通过后,搜索MIB树(MIB树生成方法不再介绍)查找对应的访问函数进行调用,在访问函数中将通知相应模块进行处理。根据返回结果,Process_received_SNMP_packet()将构造报文并进行编码。访问函数包括四种:test(), get(), next(), set(),由开发者自己编写,其实SNMP AGENT开发的很大一块工作就是编写这些访问函数。test()的作用是检查将要GET或SET的对象实例是否存在。如果test()检查失败,将直接构造响应报文指明错误类型和位置并编码。否则将调用get()或set()。 next()的作用是检查将要GETNEXT的对象实例的下一实例是否存在,如果next()检查失败,将直接构造响应报文指明错误类型和位置并编码。否则将调用get()或set()。 get()的作用是获取指定对象实例的值。 set()的作用是设置指定对象实例的值。
开始 解码 成功 团体名验证 N Y 成功 N Y 分析包中内容,在MIB树中 搜索 到变量名对应的节点 Switch PDU类型 不作进一步处理 返回等待下一个请求报文 不作进一步处理 返回等待下一个请求报文 case Gettest_proc成功Y N Get_proc 填入error index errorstatus caseGetNext Next_proc 成功Y N Get_proc 填入error index errorstatus case set test_proc 成功Y N Set_proc填入error index errorstatus 将得到的值填入Vorr Bind 生成Response PDU 编码 返回
图5 Process_received_SNMP_packet()流程
SNMP AGENT与相关应用模块的接口。
网管管理设备的各个模块,实际数据都存储在相关的应用模块中。因此访问函数需要与其他模块接口,通知其他模块进行相应操作,并能得到操作的结果。AGENT与其他应用模块的接口可以有多种方式。以下是我们通常采用的一种方式: XXXX_ioctl( int cmd, char* arg ) ,其中cmd是命令字,表明了操作的类型是GET还是SET,对表对象它还表明了是表的哪一列。 arg是一个指向结构的指针。该结构分为两部分,第一部分是由表中的若干列所组成的索引,可以唯一确定操作表的哪一行。第二部分是一个C语言的联合体(union),用于存放待设定或取回的值。
实践出真知
看了若干遍snmp相关资料,还是没有见到最终的效果,下定决心实现自己的agent,下面为调试的过程。
从网上下载 net-snmp-5.0.6.src.rpm;
按装源码: rpm –i snmp-5.0.6.src.rpm(虚拟机的linux采用redhat7.3,没有开启默认的snmpd服务哦):cd
/usr/src/redhat/SPECS, rpmbuild –bp net-snmp.spec;cd /usr/src/redhat/BUILD 目录,按照<<USING NET-SNMP UNDER LINUX AND
μCLINUX INTRODUCTION TO NETWORK MANAGEMENT>>文档进行编译和安装;
./configure ;make;make install;
cp EXAMPLE.conf 到/usr/local/share/snmp/snmpd.conf
修改默认的配置,比如NETWORK COMMUNITY等;
为了验证snmpd.conf,启动snmpd时添加 –d –L 参数,这样会报告启动信息,具体看snmpd –help;
为了保证测试,请输出 MIBS变量: export MIBS=ALL;
测试snmpd ,snmpwalk –c public –v 1 localhost system(注意system的识别就是从MIBS变量中读)
ok,下面编写自己的agent吧,直接参考文档,编写ENSEIRB-MIB.txt,然后copy 的到/usr/local/share/snmp/mibs/
编译# cd ~/net-snmp,# cd agent/mibgroup,
#mib2c -c …/…/local/mib2c.scalar.conf enseirb
好像编译老是出错,从网上看了一下,发现些个脚本就可以解决
#!/usr/bin/perl
$ | = 1;
use SNMP;
$ENV{‘MIBS’} = ‘ALL’;
&SNMP::initMib();
$SNMP::best_guess = 2;
$include_module = 1;
print “\n”;
mib2c -c mib2c.scalar.conf enseirb`;
参考http://uuu.enseirb.fr/~kadionik/embedded/snmp/src/net-snmpv5.x.x/enseirb.c
修改一下文件;重新编译
#./configure --with-mib-modules=enseirb
#make
#make install
启动snmpd -L –Denseirb
snmpwalk -c tst -v 1 localhost enseirb
snmptranslate -Tp -IR enseirb
ok? MIBS 变量一定要输出哦,否则根据name查不到,只能用Oid查询。
另:如何移植到ppc上,网上有很多资料 README.txt INSTALL.txt FAQ.txt ./configure --help
AGENT.txt module API 描述 man 手册 man snmpd.conf man snmp.conf man
snmp_conf man read_config(5)
http://www.net-snmp.org/wiki/index.php/Tutorials WiKi Tutorials
Agent扩展http://www.net-snmp.org/wiki/index.php/TUT:Writing_a_MIB_Module
Agent扩展例程: 源码树中/agent/example/ (这三个程序都在Tutorials上面进行了说明)
agent/examples/scalar_int.c agent/examples/data_set.c
agent/examples/delayed_instance.c
一、编译
CC=mipsel-linux-gcc 确定交叉编译工具
–prefix=/nfsroot/cq8401/bin/net-snmp 指定安装路径
–with-perl-modules 指定编译Perl模块
–build=BUILD 指定在BUILD进行编译
–host=mips-linux 指定编译好的程序在什么类型机器上运行
–target=mips-linux configure for building compilers for TARGET
–with-endianness=little 指定目标机的大小端
–with-cc=mipsel-linux-gcc 确定交叉编译工具
–with-ar=mipsel-linux-ar 确定编译库的工具
LD=mipsel-linux-ld 确定交叉链接工具
–with-mibdirs=
–with-mibdirs=
–with-mibfiles
–enable-debugging 打开调试信息
–disable-applications 指定不编译SNMP的应用(即SNMP协议的管理程序snmpget、snmpgetnext等)
–disable-manuals 指定不编译manual手册
–disable-debugging 指定不编译debug信息
–disable-scripts 指定不安装Perl脚本
--disable-snmptrapd-subagent
LD=mipsel-linux-ld
./configure --with-cc=mipsel-linux-gcc --with-ar=mipsel-linux-ar
–prefix=/nfsroot/cq8401/bin/net-snmp --host=mips-linux
–build=i386-linux --with-endianness=little --disable-applications
–disable-manuals --disable-debugging --disable-snmptrapd-subagent
LD=mipsel-linux-ld
./configure --with-cc=mipsel-linux-gcc --with-ar=mipsel-linux-ar
–prefix=/nfsroot/cq8401 --host=mips-linux --build=i386-linux
–with-endianness=little --disable-applications --disable-manuals
–disable-debugging --disable-snmptrapd-subagent --disable-scripts
LD=mipsel-linux-ld
./configure --with-cc=mipsel-linux-gcc --with-ar=mipsel-linux-ar
–prefix=/nfsroot/cq8401 --host=mips-linux --build=i386-linux
–with-endianness=little --disable-manuals
–disable-snmptrapd-subagent --disable-scripts --enable-debugging
–with-mib-modules=loogson 打开调试信息的
二、配置
1、基本配置
其实配制一个snmpd.conf文件不算太难,
(1)首选是定义一个共同体名(community),这里是public,及可以访问这个public的用户名(sec name),这里是notConfigUser。Public相当于用户notConfigUser的密码:)
#sec.name source community
com2sec notConfigUser default public
(2)定义一个组名(groupName)这里是notConfigGroup,及组的安全级别,把notConfigGroup这个用户加到这个组中。
groupName securityModel securityName
group notConfigGroup v1 notConfigUser
group notConfigGroup v2c notConfigUser
(3)定义一个可操作的范围(view)名, 这里是all,范围是 .1
#name incl/excl subtree mask(optional)
view all included .1
(4)定义notConfigUser这个组在all这个view范围内可做的操作,这时定义了notConfigUser组的成员可对.1这个范围做只读操作。
#group context sec.model sec.level prefix read write notif
access notConfigGroup “” any noauth exact all none none
2、高级配置
3、问题
错误1:
gw firewall # snmpwalk -v 1 -c public localhost system Cannot
find module (IP-MIB): At line 0 in (none) Cannot find module (IF-MIB):
At line 0 in (none) Cannot find module (TCP-MIB): At line 0 in (none)
Cannot find module (UDP-MIB): At line 0 in (none) Cannot find module
(HOST-RESOURCES-MIB): At line 0 in (none) Cannot find module
(SNMPv2-MIB): At line 0 in (none) Cannot find module (SNMPv2-SMI): At
line 0 in (none) Cannot find module (NOTIFICATION-LOG-MIB): At line 0
in (none) Cannot find module (UCD-SNMP-MIB): At line 0 in (none)
Cannot find module (UCD-DEMO-MIB): At line 0 in (none) Cannot find
module (SNMP-TARGET-MIB): At line 0 in (none) Cannot find module
(NET-SNMP-AGENT-MIB): At line 0 in (none) Cannot find module
(SNMP-VIEW-BASED-ACM-MIB): At line 0 in (none) Cannot find module
(SNMP-COMMUNITY-MIB): At line 0 in (none) Cannot find module
(NET-SNMP-EXTEND-MIB): At line 0 in (none) Cannot find module
(UCD-DLMOD-MIB): At line 0 in (none) Cannot find module
(SNMP-FRAMEWORK-MIB): At line 0 in (none) Cannot find module
(SNMP-MPD-MIB): At line 0 in (none) Cannot find module
(SNMP-USER-BASED-SM-MIB): At line 0 in (none) Cannot find module
(SNMP-NOTIFICATION-MIB): At line 0 in (none) Cannot find module
(SNMPv2-TM): At line 0 in (none) system: Unknown Object Identifier
(Sub-id not found: (top) -> system)
gw firewall #
参考资料:可以参考FAQ文档
设置MIBDIRS环境变量 == MIBS库的路径
错误2:
qu@ubuntu:~$ snmpwalk -v 2c -c public 192.168.4.12
Timeout: No Response from 192.168.4.12
dunkel :
The original problem was:
"However if I run “snmpwalk -v 1 -c public 192.168.1.36 system” on the
stable box, with 192.168.1.36 the IP address of the testing box, i get:
Timeout: No Response from 192.168.1.36snmpd is up and running, I can ping both ways, there are no firewalls
in place. What could be wrong?"The solution is:
open snmpd.conf with your favourite editor and
add these 2 lines:
interface eth0
agentaddress [ip address of your host]:[listening port - 161 is the default]
错误3:
sarge:/# snmpwalk -v 2c -c public localhost
Timeout: No Response from localhost
错误排除:
步骤1:
#snmpd -f -Le
屏幕显示(net-snmpd的log文件中是同样内容)
Warning: no access control information configured. It’s unlikely this
agent can serve any useful purpose in this state. Run “snmpconf -g
basic_setup” to help you configure the snmpd.conf file for this agent.
Error opening specified endpoint “udp:161” Server Exiting with code 1
步骤2:
#snmpd -f -Le -Dread_config
读配置文件,开头显示了默认的配置文件的路径。
sarge:/# snmpd -f -Le -Dread_config read_config: reading premib
configuration tokens read_config: config path used:
/nfsroot/cq8401/bin/net-snmp/etc/snmp:/nfsroot/cq8401/bin/net-snmp/sh
are/snmp:/nfsroot/cq8401/bin/net-snmp/lib/snmp:/root/.snmp:/var/net-snmp
中间显示了配置文件的内容。
首先查看在默认配置文件的路径中是否有你的配置文件。
如果有,再在配置文件中配置权限。
小技巧:可以使用snmpd -f -Le -Dread_config 命令来查看日志文件信息,排错。
snmpd命令的有用选项:
-c FILE 指定文件为配置文件
-C 不读取默认的配置文件
-d dump接收和发送SNMP数据包
-D TOKEN 对于给定的TOKEN(标志)打开调试信息 ( -Dmib_init)
-I [-]INITLIST 对于要初始化的MIB列表显示
-M DIRLIST 指定MIB库的路径
-V 显示详细信息
-Le 把错误信息输出到日志中
-Lf FILE 把错误信息输出到指定文件中
-m MIBLIST use MIBLIST instead of the default MIB list
错误4:
为什么添加代码后,也不能够访问这个变量?
排错步骤:
(1)看这个新模块是否编译进去了?
把.o目标文件删除,重新编译,看是否重新产生.o目标文件?
可以看/agent/mibgroup/mib_module_includes.h
/agent/mibgroup/mib_module_inits.h
(2)看这个新模块是否被包含近Agent library?
运行nm libnetsnmpmibs.so.8命令查找initialisation routine and variable handlers的名称。
(3)initialisation routine(初始化例程)是否运行?
(4)这个新模块是否注册进Agent?
(Try walking the NET-SNMP-MIB::nsModuleTable)
This will also check whether the agent accepts
requests for enterprise-specific OIDs.
(5)这个新模块处理程序是否真正的执行了?
如果上面都正确,可能是配置文件错误,没有权限进行访问,需要修改配置文件。
例如需要把 view system included .iso.org.dod.internet.mgnt.mib.system 修改为
view system included .iso.org.dod.internet
(6)这个新模块处理程是否返回了错误?
添加之后,如果出现这个错误,
qu@ubuntu:~/Desktop$ snmpget -v 2c -c public 192.168.4.12
.1.3.6.1.4.1.29881.3.1.1.0 SNMPv2-SMI::enterprises.29881.3.1.1.0 = No
Such Object available on this agent at this OID
在配置文件中添加下面的配置
view all included .1 80 view system included .iso.org.dod.internet
错误5:
我把自己的MIB文件写好了,也把它拷贝到MIBS库的目录下了。
并且把环境变量
export MIBS=+MY-MIB
这么设置了。
在MIB Browser中,怎么看不到这个节点呀?
答:
资料:http://www.net-snmp.org/wiki/index.php/TUT:Using_and_loading_MIBS(TUT:Using and loading MIBS)
使用snmptranslate命令来测试MY-MIB文件中一个节点名,是否能够识别。
snmptranslate -IR -On MachType(MY-MIB中的一个节点)
qu@ubuntu:~/Desktop$ snmptranslate -IR -On MachType
.1.3.6.1.4.1.29881.3.1.1
% snmptranslate -IR -On ciscoLS1010ChassisFanLed
Unknown object identifier: ciscoLS1010ChassisFanLed
不能够识别。
三、自定义MIB
1、简单变量
(1)mib2c配置文件的确定(参考FAQ.txt)If the MIB contains scalar objects, then use the config file’mib2c.scalar.conf’. This will generate template handlers forthese scalar objects (ignoring internal structural definitions,table objects and notifications).
(2)如何处理由mib2c产生的文件如果你使用源码树来编译新的MIB 模块,把mib2c产生的两个文件(mymib.c和mymib.h)放在agent/mibgroup目录下。再重新配置并编译Agent程序,使用这个参数( --with-mib-modules=mymib)。如果你由一系列的MIB模块要添加,把所有的文件放入agent/mibgroup目录下一个单独的目录mymib下,再创建一个头文件,列表单个的MIB模块,如下所示:
config_require(mymib/myObjects)config_require(mymib/myTable)
config_require(mymib/myOtherTablLD=mipsel-linux-ld ./configure
–with-cc=mipsel-linux-gcc --with-ar=mipsel-linux-ar
–prefix=/nfsroot/cq8401 --host=mips-linux --build=i386-linux
–with-endianness=little --disable-applications --disable-manuals
–disable-debugging --disable-snmptrapd-subagent
–disable-scripts --with-mib-modules=loogsone)
把它保存成mymib.h文件,放在agent/mibgroup目录下。
参考agent/mibgroup下的例子。
What is the name of the code file?
That’s what --with-mib-module is wanting, not the name of the MIB.
If your code is in the file ‘drs.c’, then the configure command
should be
./configure --with-mib-modules=drs .
…
and it will invoke the routine ‘init_drs’
If your init routine is called ‘init_drsProductName’, then the file
must be called ‘drsProductName.c’, and you invoke configure
as
./configure --with-mib-modules=drsProductName … These three values
must match.
2、table变量
(1)mib2c配置文件的确定(参考FAQ.txt)
当是table变量时,至少于四种config文件。
mib2c.create-dataset.conf mib2c.iterate.conf mib2c.iterate_access.conf
mib2c.array-user.conf
四、Agent增加一个功能有四种方法
(1)net-snmp已经开发了这个功能,需要在编译配置时把这个功能配置上。
–with-mib-modules=“list”
(2)这个Agent运行一个命令或者脚本来应答SNMP的访问。通过这样来获取和报告所需要的信息,或者来执行所需要的操作。细节信息看snmp(8)或者snmpd.conf(5)manual pages。
(3)连接到另一个SubAgent(子Agent)程序,这个Agent程序有所需要的功能。
(4)最后,可以通过用C语言编程扩展Agent的方式,来支持新添加的MIB Group。可以把C语言编程静态编译进Agent主程序,或者通过动态加载的方式。(用net-snmp扩展代理,实现方式可归结为两种:一是静态库方式,通过修改配置头文件,在相应地方包含新引入的mib模块的.c和.h文件,然后重新编译库文件和代理程序;二是编译动态共享库,只需把新引入的mib模块的.c和.h文件编译成动态库,通过设置能够让代理程序载入。对于第二种方式,一需要编译成.so动态共享库,二需要原代理程序是否包含dlmod或load命令,三还要看系统是否支持。一般情况下仅支持Unix平台。我
们在CygWin下试验过Unix平台编译。在VC下的编译环境,基本上都是参考其makefile,configure等文件。)
五、C语言与Agent的综合
有三种方法可以使C语言和Agent结合起来。
(1)静态编译进Agent主程序
(2)当Agent运行时,动态加载MIB库(必须大于4.2版本)
(3)通过SubAgent来实现。
六、如何使Agent产生一个trap?
资料:snmp_trap_api(3) manual page。
要产生一个trap信息,还是很简单的,直接调用系统调用send_easy_trap()或者send_v2trap()就行。
在使用mib2c时使用mib2c.notify.conf配置文件就能够构建一个产生trap的合适的模板。
产生trap有两种情况,一种是Agent的Action进行报告,一种是对某种状态的改变进行trap。
七、使用shell命令来扩展Agent
(1)
(2)pass MIBOID EXEC
使用EXEC(三种方式)
命令格式: EXEC [选项] MIBOID 命令 命令参数
EXEC -g MIBOID
EXEC -n MIBOID
这种方式用来匹配SNMP的get和getnext命令。
把命令参数传递给命令,并通过命令的标准输出来输出的内容来响应请求。
标注输出中的内容应该为:
第一行:请求的MIBOID
第二行:返回值的类型 (string, integer, unsigned, objectid, timeticks, ipaddress, counter, or gauge.)
第三行:Value
EXEC -s MIBOID TYPE VALUE
这种方式用来匹配SNMP的set命令。
TYPE是要设置的类型(string, integer, unsigned, objectid, timeticks, ipaddress, counter, or gauge.)
如果stdout没有返回内容, Agent程序假设操作正确。
否则Agent程序将报错,not-writable或者wrong-type。


 1万+
1万+


 被折叠的 条评论
为什么被折叠?
被折叠的 条评论
为什么被折叠?
 到【灌水乐园】发言


