vuepress是尤大大4月12日发布的一个全新的基于vue的静态网站生成器,实际上就是一个vue的spa应用,内置webpack,可以用来写文档。这篇文章给大家介绍了VuePress搭建个人博客的过程,感兴趣的朋友一起看看吧。
VuePress
vuepress是尤大大4月12日发布的一个全新的基于vue的静态网站生成器,实际上就是一个vue的spa应用,内置webpack,可以用来写文档。

一个基于 Vue SSR 的静态站生成器,本来的目的是爽爽的写文档,但是我发现用来撸一个人博客也非常不错。
这是VuePress的官方文档
上手搭建
你可以跟着文档上的例子自己玩一玩,不过由于VuePress的文档也是用VuePress来实现的,所以我取巧直接拿VuePress仓库中的docs目录拿来玩耍。
1.首先安装VuePress到全局
npm install -g vuepress
2.然后把VuePress仓库克隆到你的电脑
git clone git@github.com:docschina/vuepress.git
在docs文件中执行(请确保你的 Node.js 版本 >= 8)
?
| 1 2 3 | cd vuepress
cd docs
vuepress dev
|
当你看到这一行就说明已经成功了:
?
| 1 | VuePress dev server listening at http://localhost:8080/
|
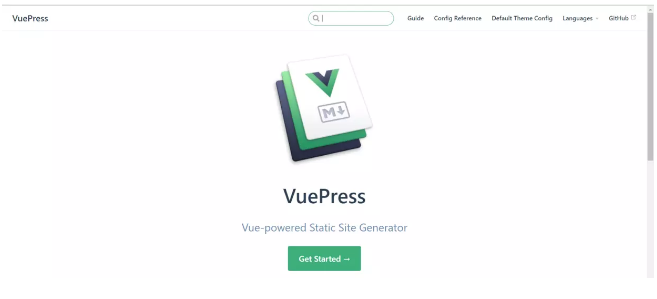
下面我们打开http://localhost:8080/
发现真的打开了vuepress文档:
下面的工作就是数据的替换了,但我们应该先看一下docs的目录结构:
?
| 1 2 3 4 5 6 7 8 9 10 11 12 13 | ├─.vuepress
│ ├─components
│ └─public
│ └─icons
│ └─config.js // 配置文件
├─config // Vuepress文档的配置参考内容
├─default-theme-config // Vuepress文档的默认主题配置内容
├─guide // Vuepress文档的指南内容
└─zh // 中文文档目录
├─config
├─default-theme-config
└─guide
└─README.md // 首页配置文件
|
文档分成了两部分,中文文档在/zh/目录下,英文文档在根目录下。
其实目录里面的东西都挺好看懂的,首先guide 、default-theme-config、config 这三个目录中的都是Vuepress文档的主要内容,从中文文档里也可以看到只有这三个目录被替换了。
首页配置
默认主题提供了一个主页布局,要使用它,需要在你的根目录 README.md 的 YAML front matter 中指定 home:true,并加上一些其他的元数据。
我们先看看根目录下的README,md:
?
| 1 2 3 4 5 6 7 8 9 10 11 12 | home: true // 是否使用Vuepress默认主题
heroImage: /hero.png // 首页的图片
actionText: Get Started → // 按钮的文字
actionLink: /guide/ // 按钮跳转的目录
features: // 首页三个特性
- title: Simplicity First
details: Minimal setup with markdown-centered project structure helps you focus on writing.
- title: Vue-Powered
details: Enjoy the dev experience of Vue + webpack, use Vue components in markdown, and develop custom themes with Vue.
- title: Performant
details: VuePress generates pre-rendered static HTML for each page, and runs as an SPA once a page is loaded.
footer: MIT Licensed | Copyright © 2018-present Evan You // 页尾
|
实在看不懂,官网有比我更详细的配置说明。
导航配置
导航配置文件在.vuepress/config.js中
在导航配置文件中nav是控制导航栏链接的,你可以把它改成自己的博客目录。
?
| 1 2 3 4 5 6 7 8 9 10 11 12 13 14 | nav: [
{
text: 'Guide',
link: '/guide/',
},
{
text: 'Config Reference',
link: '/config/'
},
{
text: 'Default Theme Config',
link: '/default-theme-config/'
}
]
|
剩下的默认主题配置官方文档都有很详细的文档说明这里就不在啰嗦了。
更改默认主题色
你可以在.vuepress/目录下创建一个override.styl文件。
vuepress提供四个可更改的颜色:
| 1 2 3 4 | $accentColor = #3eaf7c // 主题色
$textColor = #2c3e50 // 文字颜色
$borderColor = #eaecef // 边框颜色
$codeBgColor = #282c34 // 代码背景颜色
|
我把它改成了这样:
侧边栏的实现
由于评论区里问的人较多,所以在这里更新一下,其实我就算在这里写的再详细也不如大家去看官方文档。
侧边栏的配置也在.vuepress/config.js中:
| 1 2 3 4 5 6 7 8 9 10 11 12 13 14 15 16 17 18 19 20 21 22 23 | sidebar: [
{
title: 'JavaScript', // 侧边栏名称
collapsable: true, // 可折叠
children: [
'/blog/JavaScript/学会了ES6,就不会写出那样的代码', // 你的md文件地址
]
},
{
title: 'CSS',
collapsable: true,
children: [
'/blog/CSS/搞懂Z-index的所有细节',
]
},
{
title: 'HTTP',
collapsable: true,
children: [
'/blog/HTTP/认识HTTP-Cookie和Session篇',
]
},
]
|
对应的文档结构:
| 1 2 3 4 | ├─blog // docs目录下新建一个博客目录
│ ├─CSS
│ ├─HTTP
│ └─JavaScript
|
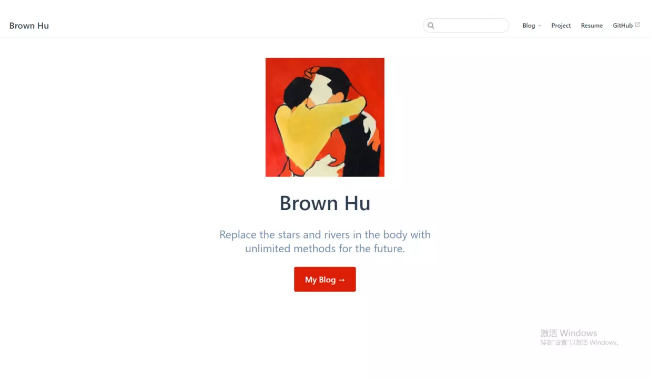
我的博客:brownhu
部署
在配置好你博客之后,命令行执行:
Vuepress build
当你看到这一行就说明成功了:
Success! Generated static files in vuepress.
将打包好的vuepress目录上传到你的github仓库,和github page配合,就可以配置好你的博客网站了。
原文链接:https://juejin.im/post/5addb90af265da0b7f442935


 695
695


 被折叠的 条评论
为什么被折叠?
被折叠的 条评论
为什么被折叠?
 到【灌水乐园】发言


