


1、cookie和session
- cookie:在网站中,http请求是无状态的。也就是说即使第一次和服务器连接后并且登录成功后,第二次请求服务器依然不能知道当前请求是哪个用户。cookie的出现就是为了解决这个问题,第一次登录后服务器返回一些数据(cookie)给浏览器,然后浏览器保存在本地,当该用户发送第二次请求的时候,就会自动的把上次请求存储的cookie数据自动的携带给服务器,服务器通过浏览器携带的数据就能判断当前用户是哪个了。cookie存储的数据量有限,不同的浏览器有不同的存储大小,但一般不超过4KB。因此使用cookie只能存储一些小量的数据。
@app.route('/')
def index():
# return '123'
res = Response("首页")
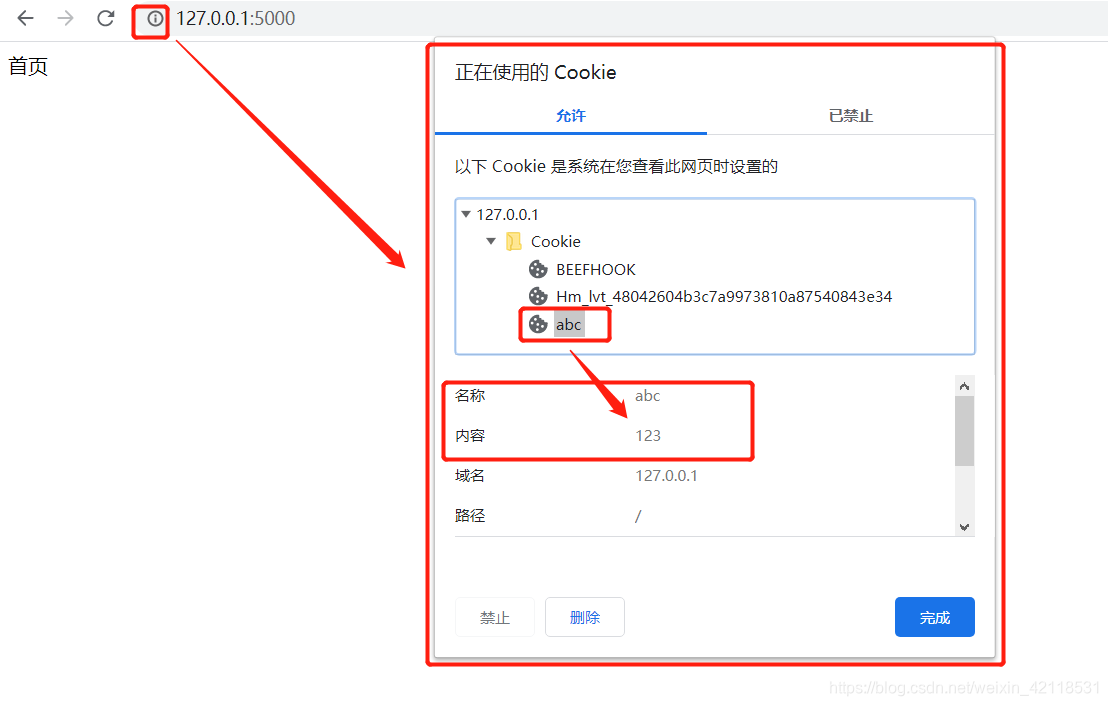
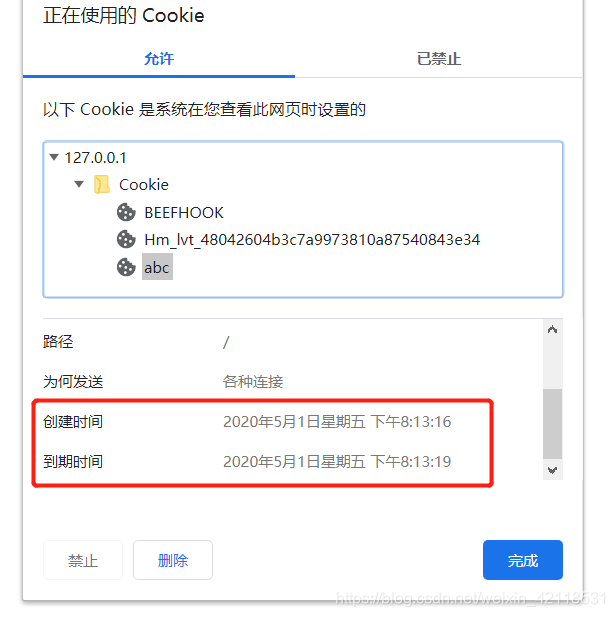
res.set_cookie('abc', '123', max_age=3) # key=abc, value=123, 3s后过期
''' set_cookie()源码
def set_cookie(
self,
key,
value="",
max_age=None, # 失效时间
expires=None, # datetime形式的失效时间
path="/", # 在该路径下才能设置cookie
domain=None, # 域名限制
secure=False, # 仅可通过HTTPS使用
httponly=False,
samesite=None,
):
:param key: the key (name) of the cookie to be set.
:param value: the value of the cookie.
:param max_age: should be a number of seconds, or `None` (default) if
the cookie should last only as long as the client's
browser session.
:param expires: should be a `datetime` object or UNIX timestamp.
:param path: limits the cookie to a given path, per default it will
span the whole domain.
:param domain: if you want to set a cross-domain cookie. For example,
``domain=".example.com"`` will set a cookie that is
readable by the domain ``www.example.com``,
``foo.example.com`` etc. Otherwise, a cookie will only
be readable by the domain that set it.
:param secure: If `True`, the cookie will only be available via HTTPS
'''
return res
-
session: session和cookie的作用有点类似,都是为了存储用户相关的信息。不同的是,cookie是存储在本地浏览器,session是一个思路、一个概念、一个服务器存储授权信息的解决方案,不同的服务器,不同的框架,不同的语言有不同的实现。虽然实现不一样,但是他们的目的都是服务器为了方便存储数据的。session的出现,是为了解决cookie存储数据不安全的问题的。
-
cookie和session结合使用:web开发发展至今,cookie和session的使用已经出现了一些非常成熟的方案。在如今的市场或者企业里,一般有两种存储方式:
• 存储在服务端:通过cookie存储一个session_id,然后具体的数据则是保存在session中。如果用户已经登录,则服务器会在cookie中保存一个session_id,下次再次请求的时候,会把该session_id携带上来,服务器根据session_id在session库中获取用户的session数据。就能知道该用户到底是谁,以及之前保存的一些状态信息。这种专业术语叫做server side session。存储在服务器的数据会更加的安全,不容易被窃取。但存储在服务器也有一定的弊端,就是会占用服务器的资源,但现在服务器已经发展至今,一些session信息还是绰绰有余的。(Django框架采用这种模式)。
• 将session数据加密,然后存储在cookie中:这种专业术语叫做client side session。flask采用的就是这种方式,但是也可以替换成其他形式。
from flask import Flask, session
import os

print(os.urandom(24))    # 输出的是24位随机的字符串  当做secret_key使用

app = Flask(__name__)
# 加密session中的 secret_key
app.config['SECRET_KEY'] = os.urandom(24)


@app.route("/")
def index():
    # session  字典类型
    session['username'] = 'xxx'
    session['user_id'] = 123
    return "1231231"


if __name__ == '__main__':
    app.run(debug=True)

flask中使用cookie和session
- cookies:在Flask中操作cookie,是通过response对象来操作,可以在response返回之前,通过response.set_cookie来设置,这个方法有以下几个参数需要注意:
- key:设置的cookie的key。
- value:key对应的value。
- max_age:改cookie的过期时间,如果不设置,则浏览器关闭后就会自动过期。
- expires:过期时间,应该是一个datetime类型。
- domain:该cookie在哪个域名中有效。一般设置子域名,比如cms.example.com。
- path:该cookie在哪个路径下有效。
- session:Flask中的session是通过from flask import session。然后添加值key和value进去即可。并且,Flask中的session机制是将session信息加密,然后存储在cookie中。专业术语叫做client side session。
from flask import Flask, session
import os
from datetime import timedelta    # 导入时间

# print(os.urandom(24))    # 输出的是24位随机的字符串  当做secret_key使用

app = Flask(__name__)
# 加密session中的 secret_key
app.config['SECRET_KEY'] = os.urandom(24)
# 持久化时间设置
app.config['PERMANENT_SESSION_LIFETIME'] = timedelta(hours=2)            # 2小时session过期


@app.route("/login/")
def login():
    # session  字典类型     登录操作,记录信息传输到数据库
    session['username'] = 'xxxxxx'
    session['user_id'] = 123

    # 持久化  有效期
    session.permanent = True

    return "登录界面"


@app.route("/")
def index():
    username = session.get('username')
    print(username)
    return "首页界面"


@app.route("/logout/")
def logout():
    # 删除session中的username
    session.pop('username')

    # 清空session中的所有数据
    session.clear()

    return "退出登录"


if __name__ == '__main__':
    app.run(debug=True)
2、Flask上下文
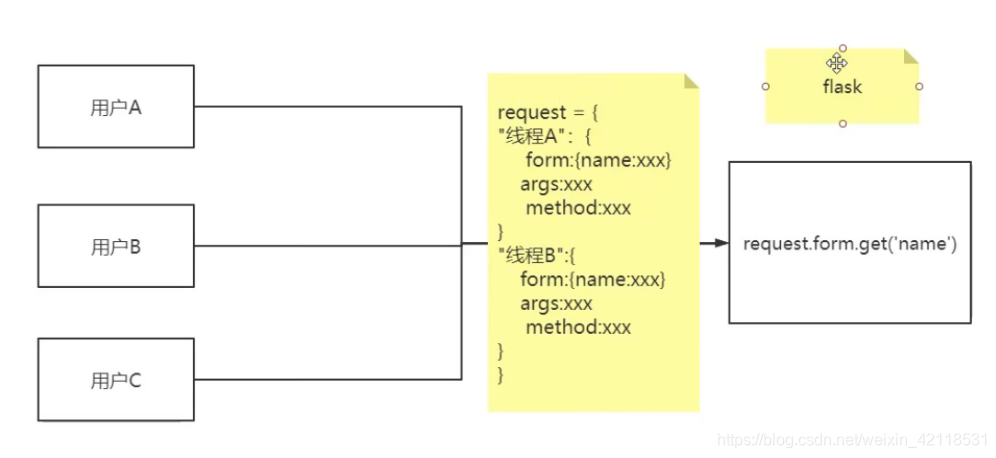
Flask项目中有两个上下文,一个是应用上下文(app),另外一个是请求上下文(request)。请求上下文request和应用上下文current_app都是一个全局变量。所有请求都共享的。Flask有特殊的机制可以保证每次请求的数据都是隔离的,即A请求所产生的数据不会影响到B请求。所以可以直接导入request对象,也不会被一些脏数据影响了,并且不需要在每个函数中使用request的时候传入request对象。这两个上下文具体的实现方式和原理可以没必要详细了解。
请求上下文
- request:请求上下文上的对象。这个对象一般用来保存一些请求的变量。比如method、args、form等。
- session:请求上下文上的对象。这个对象一般用来保存一些会话信息。
应用上下文
- current_app:返回当前的app。
- g:应用上下文上的对象。处理请求时用作临时存储的对象。
# -*- encoding: utf-8 -*-
"""
@File    : session_demo.py
@Time    : 2020/5/8 9:57
@Author  : chen

"""
from flask import Flask, session, request, current_app
import os
from datetime import timedelta    # 导入时间
from utils import log_a, log_b       # 导入记录模块

import config


# print(os.urandom(24))    # 输出的是24位随机的字符串  当做secret_key使用

app = Flask(__name__)             # current_app代表app
# 加密session中的 secret_key
app.config['SECRET_KEY'] = os.urandom(24)
# 持久化时间设置
app.config['PERMANENT_SESSION_LIFETIME'] = timedelta(hours=2)            # 2小时session过期


@app.route("/login/")
def login():
    # session  字典类型     登录操作,记录信息传输到数据库
    session['username'] = 'xxxxxx'
    session['user_id'] = 123

    # 持久化  有效期
    session.permanent = True

    return "登录界面"

# 需要在视图函数中调用   不能在视图函数外使用
# print(current_app.name)


@app.route("/")
def index():
    username = session.get('username')
    # 采用g对象,每次刷新页面,会被清空,临时对象
    g.username = username
    log_a()         # 这里可以不用传参   g对象是全局
    log_b()

    # print(username)
    print(current_app.name)           # 输出当前app的名字   需要在视图函数中调用

    # 不是读取config.py中的数据,查看的是app绑定的配置
    # print(current_app.config['HOST'])
    print(current_app.config['SECRET_KEY'])    # 输出配置中的数据

    return "首页界面"


@app.route("/logout/")
def logout():
    # 删除session中的username
    session.pop('username')

    # 清空session中的所有数据
    session.clear()

    return "退出登录"


if __name__ == '__main__':
    app.run(debug=True)
# -*- encoding: utf-8 -*-
"""
@File    : utils.py
@Time    : 2020/5/9 17:18
@Author  : chen

"""
# utils.py 工具文件   发送验证码等,随机生成字符串等

# 记录登录的信息
def log_a(username):
    print("log a %s"% username)


def log_b(username):
    print("log b %s" % username)
g对象的传参
# -*- encoding: utf-8 -*-
"""
@File    : utils.py
@Time    : 2020/5/9 17:18
@Author  : chen

"""
# utils.py 工具文件   发送验证码等,随机生成字符串等

from flask import g           # 导入g对象


# 记录登录的信息
def log_a():
    print("log a %s"% g.username)


def log_b():
    print("log b %s" % g.username)
常用的钩子函数
- before_first_request:处理第一次请求之前执行。
@app.before_first_request
  def first_request():
      print 'first time request'
- before_request:在每次请求之前执行。通常可以用这个装饰器来给视图函数增加一些变量。
@app.before_request
  def before_request():
      if not hasattr(g,'user'):
          setattr(g,'user','xxxx')
- teardown_appcontext:不管是否有异常,注册的函数都会在每次请求之后执行。
@app.teardown_appcontext
def teardown(response):
    print("teardown 被执行")
    return respons
- context_processor:上下文处理器。返回的字典中的键可以在模板上下文中使用。
@app.context_processor
def context_processor():
    return {'current_user':'xxx'}
- errorhandler:errorhandler接收状态码,可以自定义返回这种状态码的响应的处理方法。
@app.errorhandler(404)
  def page_not_found(error):
      return 'This page does not exist',404
钩子函数整体代码文件hook_demo.py
# -*- encoding: utf-8 -*-
"""
@File    : hook_demo.py
@Time    : 2020/5/9 20:27
@Author  : chen

"""
from flask import Flask, render_template, abort

app = Flask(__name__)


@app.route("/")
def index():
    # 主动抛出异常的同时需要errorhandler模块捕获到这个异常
    abort(404)          # 此时访问首页的状态码就是404了,直接运行errorhandler(404)中的方法

    # 这种主动抛出异常方式无法被捕获到
    # raise IndexError(" index error!")

    print("这是首页")
    # return "这是首页"
    return render_template("index.html")


# 处理第一次请求之前执行。
@app.before_first_request
def handel_first_request():                  # 只执行一次,刷新后不会再执行
    print("1  这是第一次请求之前执行的")


# before_request:在每次请求之前执行。通常可以用这个装饰器来给视图函数增加一些变量。
@app.before_request
def handel_before_request():
    print("2  每次请求之前执行")


# after_request: 在每次请求之后执行
@app.after_request
def handel_after_request(response):
    print("3  每次请求之后执行的")
    return response


#  teardown_appcontext:不管是否有异常,注册的函数都会在每次请求之后执行。
@app.teardown_appcontext
def handel_teardown_appcontext(response):
    print("4  注册的函数都会在每次请求之后执行")
    return response


#  context_processor:上下文处理器。返回的字典中的键可以在模板上下文中使用。
@app.context_processor
def handel_context_processor():
    print("5 上下文处理器。返回的字典中的键可以在模板上下文中使用。")
    return {"username": "abcd"}              # 将这个参数变量映射到模板html文件中,


# 错误异常的捕获
#  errorhandler:errorhandler接收状态码,可以自定义返回这种状态码的响应的处理方法。
@app.errorhandler(404)
def handel_errorhandler(error):           # error必须传递
    print("6 errorhandler接收状态码,可以自定义返回这种状态码的响应的处理方法。")
    # return "页面不存在", 404                    # 404网页访问状态码
    return render_template("404.html"), 404      # 404网页访问状态码


@app.errorhandler(500)
def server_error(error):           # error必须传递
    return "服务器错误!", 500      # 500 网页响应状态码


if __name__ == '__main__':
    # 项目上线之后 部署到服务器,debug模式需要关闭,因为报错信息不能给客户看
    app.run(debug=True, port=9999)
404.html
<!DOCTYPE html>
<html lang="en">
<head>
    <meta charset="UTF-8">
    <title>Title</title>
</head>
<body>
    <p>页面不见了!!!!</p>
</body>
</html>
index.html
<!DOCTYPE html>
<html lang="en">
<head>
    <meta charset="UTF-8">
    <title>Title</title>
</head>
<body>
<!--   使用context_processor:上下文处理器进行参数传递 -->
    {{  username }}

</body>
</html>
3、Restful API规范
restful api是用于在前端与后台进行通信的一套规范。使用这个规范可以让前后端开发变得更加轻松。以下将讨论这套规范的一些设计细节。
协议
采用http或者https协议。
数据传输格式
数据之间传输的格式应该都使用json,而不使用xml。
url链接
url链接中,不能有动词,只能有名词。并且对于一些名词,如果出现复数,那么应该在后面加s。
HTTP请求的方法
- GET:从服务器上获取资源。
- POST:在服务器上新创建一个资源。
- PUT:在服务器上更新资源。(客户端提供所有改变后的数据)
- PATCH:在服务器上更新资源。(客户端只提供需要改变的属性)
- DELETE:从服务器上删除资源。
示例:
- GET /users/:获取所有用户。
- POST /user/:新建一个用户。
- GET /user/id/:根据id获取一个用户。
- PUT /user/id/:更新某个id的用户的信息(需要提供用户的所有信息)。
- PATCH /user/id/:更新某个id的用户信息(只需要提供需要改变的信息)。
- DELETE /user/id/:删除一个用户。
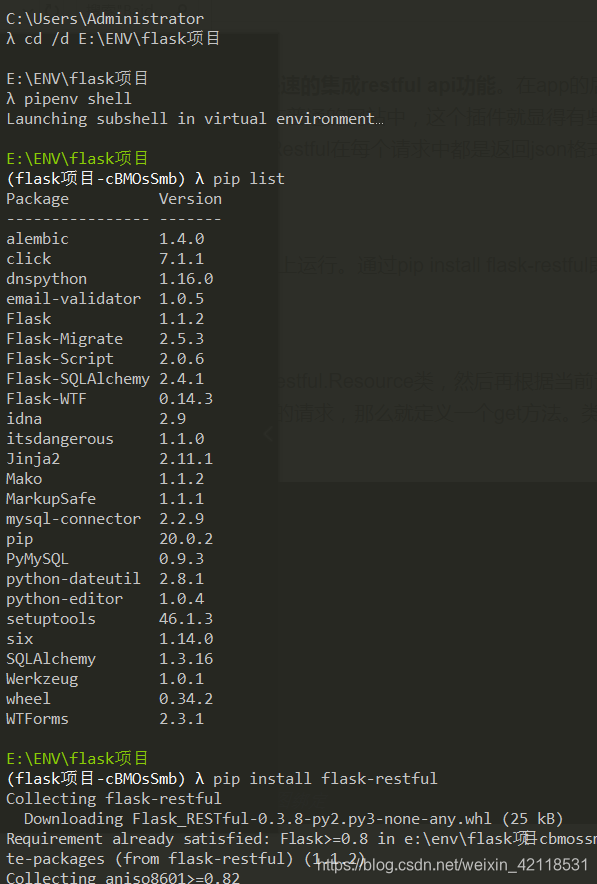
4、Flask-Restful插件
Flask-Restful是一个专门用来写restful api的一个插件。使用他可以快速的集成restful api功能。在app的后台以及纯api的后台中,这个插件可以帮助我们节省很多时间。当然,如果在普通的网站中,这个插件就显得有些鸡肋了,因为在普通的网页开发中,是需要去渲染HTML代码的,而Flask-Restful在每个请求中都是返回json格式的数据。
安装
Flask-Restful需要在Flask 0.8以上的版本,在Python2.6或者Python3.3上运行。通过pip install flask-restful即可安装。
定义Restful的视图
如果使用Flask-Restful,那么定义视图函数的时候,就要继承自flask_restful.Resource类,然后再根据当前请求的method来定义相应的方法。比如期望客户端是使用get方法发送过来的请求,那么就定义一个get方法。类似于MethodView。
from flask import Flask,render_template,url_for
from flask_restful import Api, Resource
app = Flask(__name__)
# 用Api来绑定app
api = Api(app)
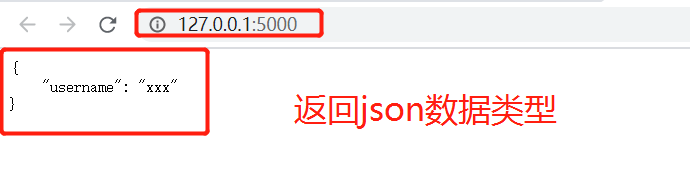
class IndexView(Resource): # 类视图不同于之前继承View
def get(self):
return {"username":"xxx"} # 返回数据
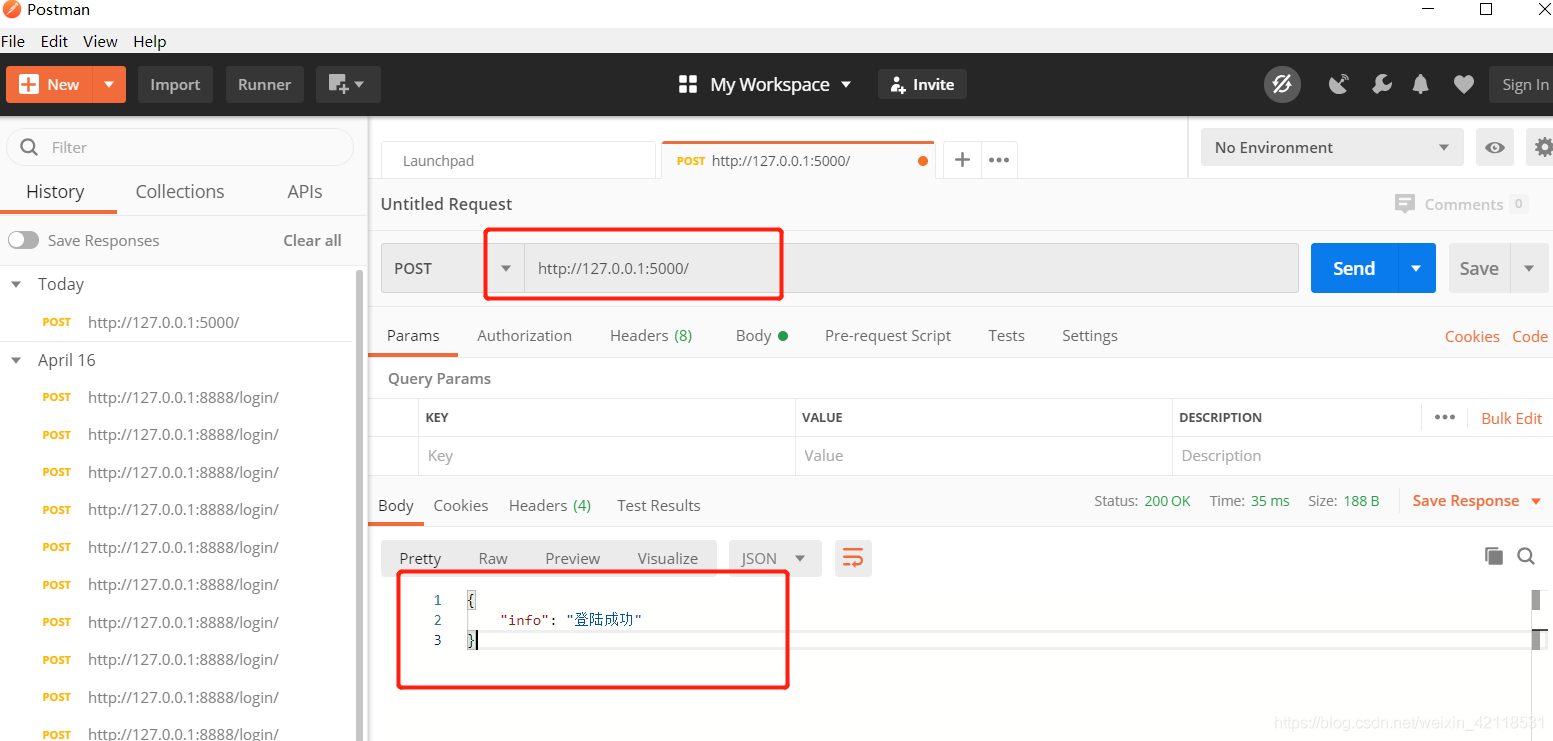
def post(self):
return {"info": "登陆成功"}
api.add_resource(IndexView, '/', endpoint='index') # 类视图绑定
if __name__ == '__main__':
app.run(debug=True)
注意事项
- endpoint是用来给url_for反转url的时候指定的。如果不写endpoint,那么将会使用视图的名字的小写来作为endpoint。
- add_resource的第二个参数是访问这个视图函数的url,这个url可以跟之前的route一样,可以传递参数。并且还有一点不同的是,这个方法可以传递多个url来指定这个视图函数。
Postman软件测试post方法传递参数是否连接成功
5、 参数解析
Flask-Restful插件提供了类似WTForms来验证提交的数据是否合法的包,叫做reqparse。
add_argument可以指定这个字段的名字,这个字段的数据类型等。
- default:默认值,如果这个参数没有值,那么将使用这个参数指定的值。
- required:是否必须。默认为False,如果设置为True,那么这个参数就必须提交上来。
- type:这个参数的数据类型,如果指定,那么将使用指定的数据类型来强制转换提交上来的值。
- choices:选项。提交上来的值只有满足这个选项中的值才符合验证通过,否则验证不通过。
- help:错误信息。如果验证失败后,将会使用这个参数指定的值作为错误信息。
- trim:是否要去掉前后的空格。
from flask import Flask, render_template, url_for
from flask_restful import Api, Resource, reqparse, inputs # reqparse 类似WTForms来验证提交的数据是否合法 ,inputs验证email,url等数据
app = Flask(__name__)
# 用Api来绑定app
api = Api(app)
class IndexView(Resource): # 类视图不同于之前继承View
def get(self):
return {"username": "xxx"} # 返回数据
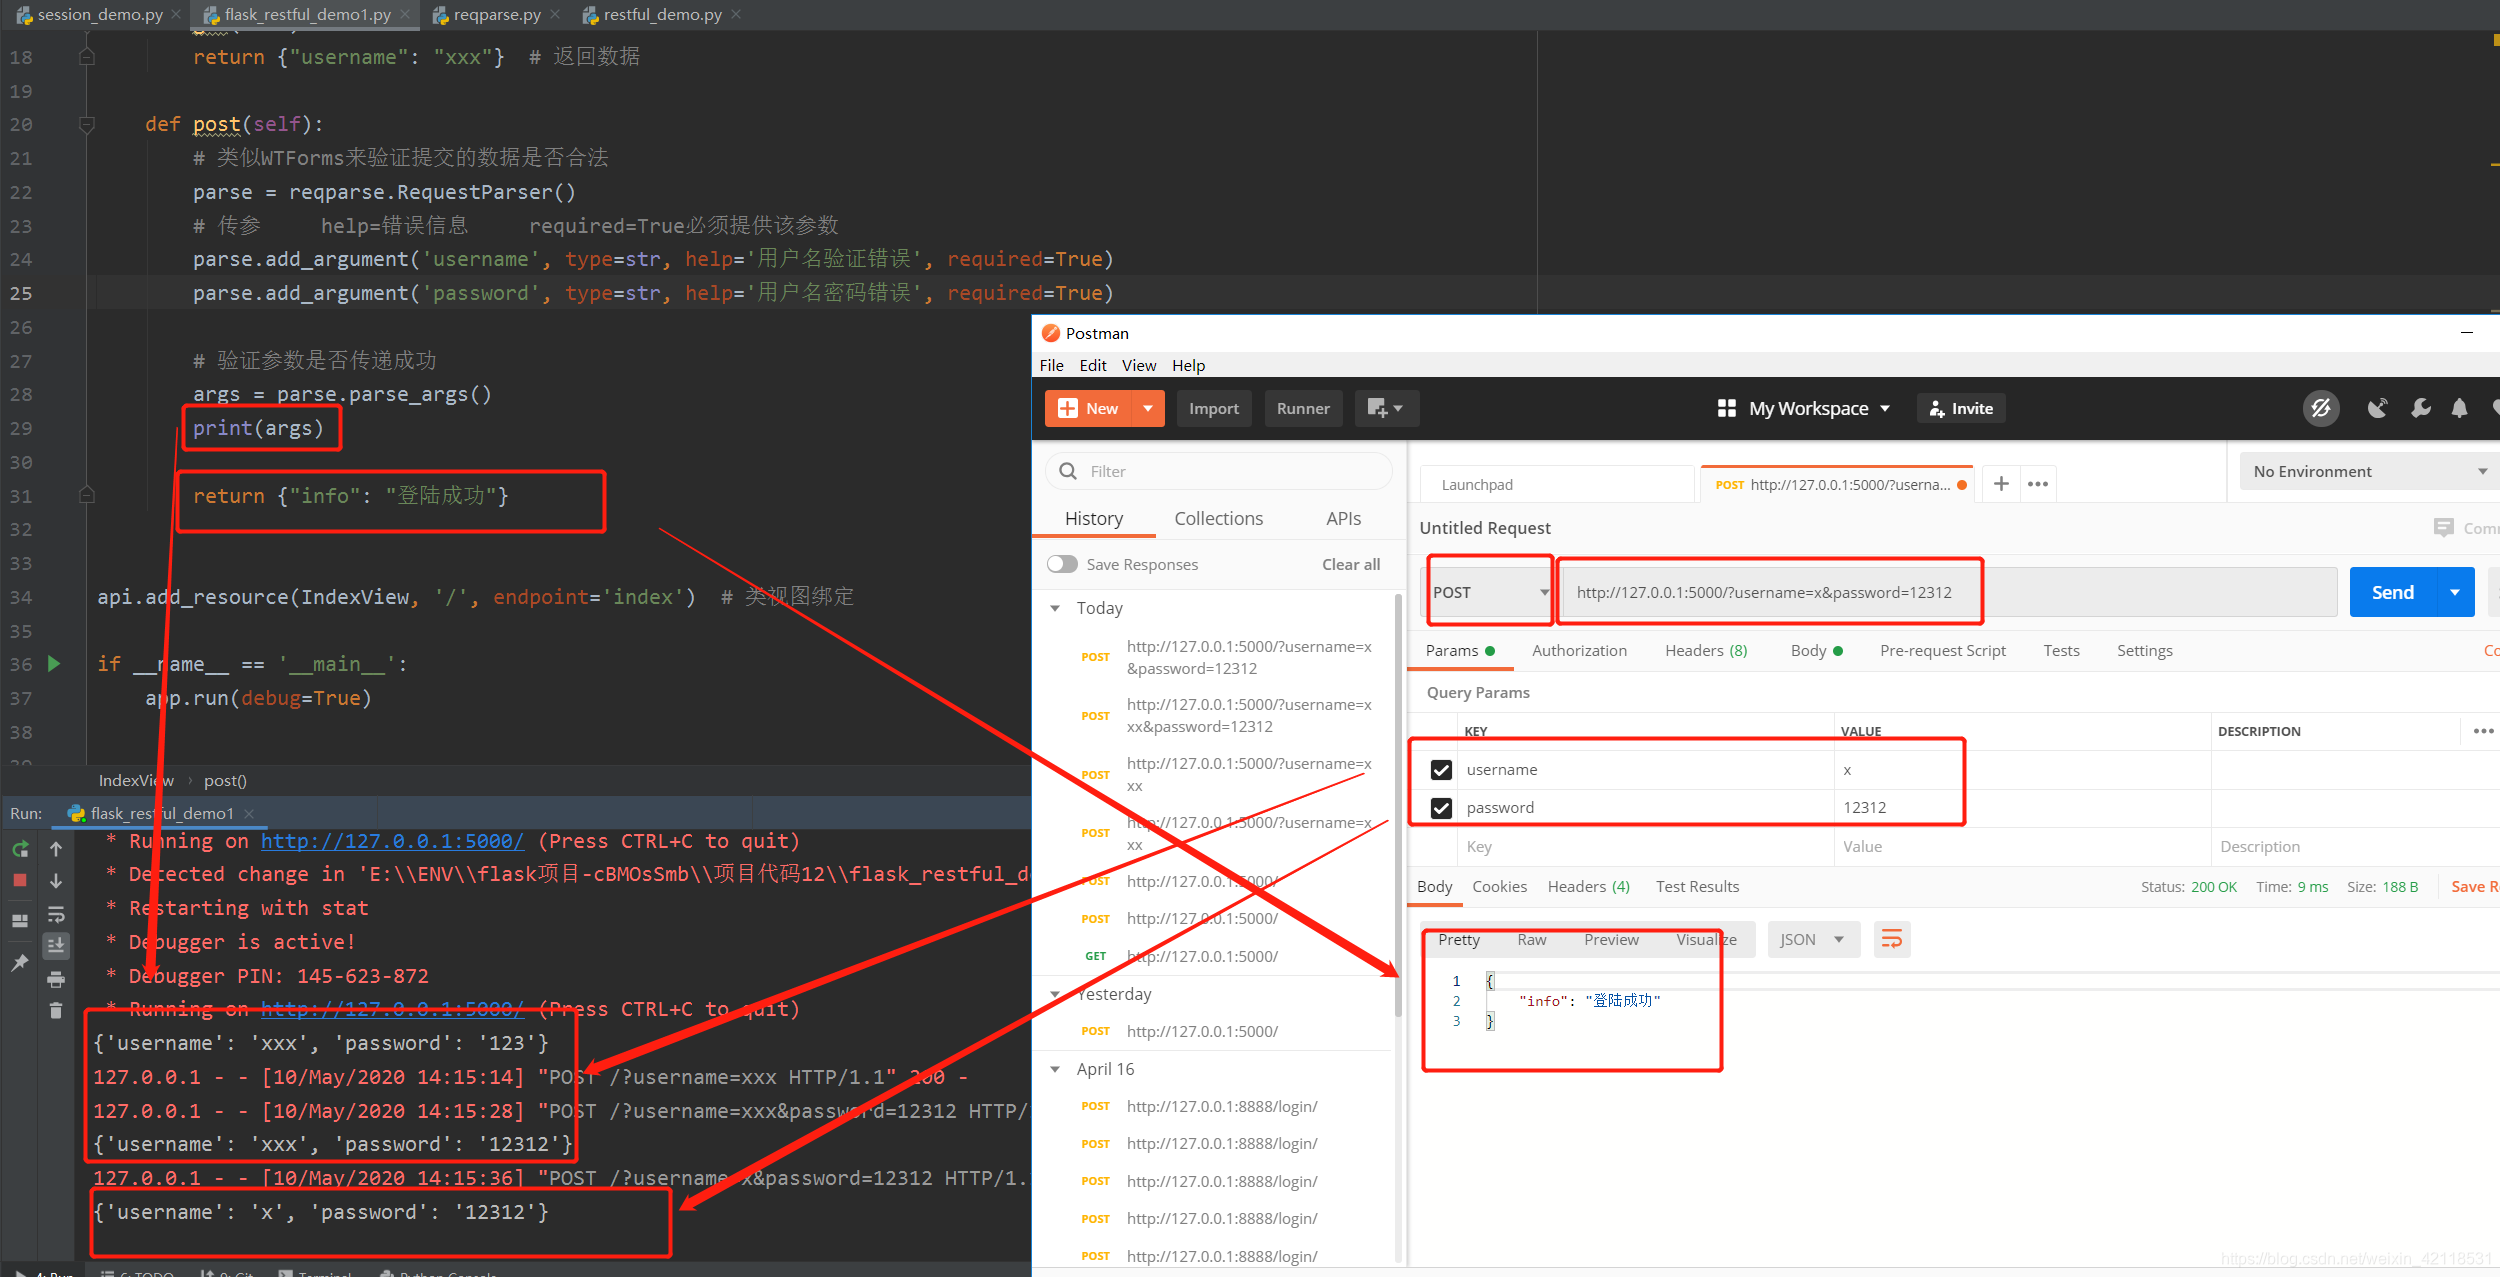
def post(self):
# 类似WTForms来验证提交的数据是否合法
parse = reqparse.RequestParser()
# 传参 help=错误信息 required=True必须提供该参数
parse.add_argument('username', type=str, help='用户名验证错误', required=True)
parse.add_argument('password', type=str, help='用户名密码错误', required=True)
parse.add_argument('age', type=int, help='用户年龄错误')
parse.add_argument('gender', type=str, help='用户性别错误', choices=['male', 'female'])
# url验证\邮箱验证
parse.add_argument('homepage', type=inputs.url, help='网页链接错误', required=True)
# regex 正则表达式 手机号码验证
parse.add_argument('phone', type=inputs.regex(r'1[3456]\d{9}'), help='手机号码错误', required=True)
# 验证参数是否传递成功
args = parse.parse_args()
print(args)
return {"info": "登陆成功"}
api.add_resource(IndexView, '/', endpoint='index') # 类视图绑定
if __name__ == '__main__':
app.run(debug=True)
6、 输出字段
对于一个视图函数,你可以指定好一些字段用于返回。以后可以使用ORM模型或者自定义的模型的时候,他会自动的获取模型中的相应的字段,生成json数据,然后再返回给客户端。这其中需要导入flask_restful.marshal_with装饰器。并且需要写一个字典,来指示需要返回的字段,以及该字段的数据类型。
from flask import Flask, render_template, url_for
from flask_restful import Api, Resource, reqparse, inputs # reqparse 类似WTForms来验证提交的数据是否合法 ,inputs验证email,url等数据
from flask_restful import fields, marshal_with # fields用于输出字段 marshal_with装饰器关联返回字段信息
app = Flask(__name__)
# 用Api来绑定app
api = Api(app)
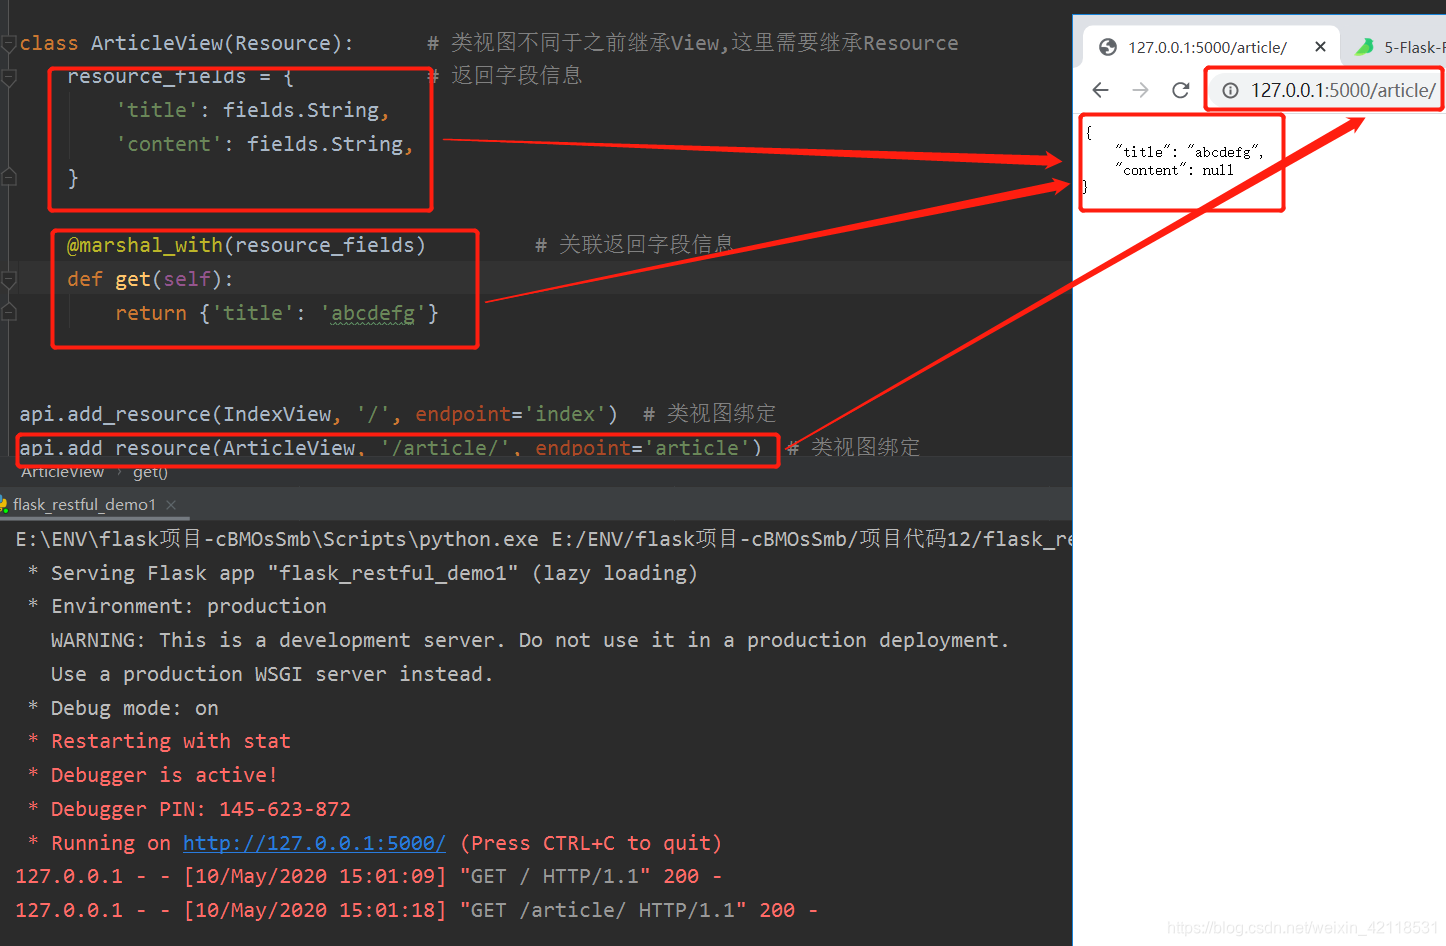
class ArticleView(Resource): # 类视图不同于之前继承View,这里需要继承Resource
resource_fields = { # 返回字段信息
'title': fields.String,
'content': fields.String,
}
@marshal_with(resource_fields) # 关联返回字段信息
def get(self):
return {'title': 'abcdefg'}
api.add_resource(ArticleView, '/article/', endpoint='article') # 类视图绑定
if __name__ == '__main__':
app.run(debug=True)
重命名属性
很多时候你面向公众的字段名称是不同于内部的属性名。使用 attribute可以配置这种映射。比如现在想要返回user.school中的值,但是在返回给外面的时候,想以education返回回去,那么可以这样写
resource_fields = {
    'education': fields.String(attribute='school')
}
默认值
在返回一些字段的时候,有时候可能没有值,那么这时候可以在指定fields的时候给定一个默认值
resource_fields = {
    'age': fields.Integer(default=18)
}
复杂结构
有时候想要在返回的数据格式中,形成比较复杂的结构。那么可以使用一些特殊的字段来实现。比如要在一个字段中放置一个列表,那么可以使用fields.List,比如在一个字段下面又是一个字典,那么可以使用fields.Nested。
class ProfileView(Resource):
    resource_fields = {
        'username': fields.String,
        'age': fields.Integer,
        'school': fields.String,
        'tags': fields.List(fields.String),
        'more': fields.Nested({
            'signature': fields.String
        })
    }
实例代码如下
主体代码文件: flask_restful_demo1.py
from flask import Flask, render_template, url_for
from flask_restful import Api, Resource, reqparse, inputs  # reqparse 类似WTForms来验证提交的数据是否合法 ,inputs验证email,url等数据
from flask_restful import fields, marshal_with  # fields用于输出字段   marshal_with装饰器关联返回字段信息

import config    # 导入配置文件
from exts import db      # 第三方文件防止互相引用

from model import Article    # 导入模型

app = Flask(__name__)

# 加载配置
app.config.from_object(config)
db.init_app(app)                      # 绑定app

# 用Api来绑定app
api = Api(app)


class ArticleView(Resource):  # 类视图不同于之前继承View,这里需要继承Resource
    resource_fields = {  # 返回字段信息
        # 'title': fields.String,
        # 修改给前端返回的字段信息   原本的模型中的属性或者叫字段为title,现在返回给前端的是article_title
        'article_title': fields.String(attribute='title'),

        'content': fields.String,
        # 'author': fields.String,
        'author': fields.Nested({               # 一对多关系
            "username": fields.String,
            "email": fields.String,
        }),

        # 'tag': fields.String,
        'tag': fields.List(fields.Nested({      # 多对多关系
            "id": fields.Integer,
            "name": fields.String,
        })),

        # 模型中没有的字段名和设置默认值
        'read_count': fields.Integer(default=0)
    }

    @marshal_with(resource_fields)  # 关联返回字段信息
    def get(self, article_id):       # 传参
        article = Article.query.get(article_id)
        return article                  # 返回模型,返回的数据中包含模型中的所有字段
        # return {'title': 'abcdefg'}


api.add_resource(IndexView, '/', endpoint='index')  # 类视图绑定
# api.add_resource(ArticleView, '/article/', endpoint='article')  # 类视图绑定
api.add_resource(ArticleView, '/article/<article_id>', endpoint='article')  # 传参的时候路由也一起改变


if __name__ == '__main__':
    app.run(debug=True)
模型文件model.py
# -*- encoding: utf-8 -*-
"""
@File    : model.py
@Time    : 2020/5/10 17:09
@Author  : chen

"""
from exts import db

# 用户
# 文章         用户与文章是一对多关系
# 标签         文章与标签是多对多关系     此时需要建立中间表
class User(db.Model):
    __tablename__ = 'user'

    id = db.Column(db.Integer, primary_key=True)
    username = db.Column(db.String(50))
    email = db.Column(db.String(50))


# 中间表的创建   创建article和tag的中间表
article_tag_table = db.Table(
    'article_tag',
    db.Column('article_id', db.Integer, db.ForeignKey('article.id')),
    db.Column('tag_id', db.Integer, db.ForeignKey('tag.id')),
)


class Article(db.Model):
    __tablename__ = 'article'

    id = db.Column(db.Integer, primary_key=True)
    title = db.Column(db.String(50))
    context = db.Column(db.String(50))

    # 外键
    author_id = db.Column(db.Integer, db.ForeignKey('user.id'))
    # 反向引用
    author = db.relationship('User', backref='articles')

    # 中间表建立连接关系
    tags = db.relationship('Tag', secondary=article_tag_table, backref='tags')


class Tag(db.Model):
    __tablename__ = 'tag'

    id = db.Column(db.Integer, primary_key=True)
    name = db.Column(db.String(50))
配置文件config.py
# -*- encoding: utf-8 -*-
"""
@File    : config.py
@Time    : 2020/5/10 17:08
@Author  : chen

"""
HOSTNAME = '127.0.0.1'
DATABASE = 'demo0510'
PORT = 3306
USERNAME = 'root'
PASSWORD = 'root'

DB_URL = 'mysql+mysqlconnector://{}:{}@{}/{}?charset=utf8'.format(USERNAME, PASSWORD, HOSTNAME, PORT, DATABASE)

# engine = create_engine(DB_URL)
SQLALCHEMY_DATABASE_URI = DB_URL
SQLALCHEMY_TRACK_MODIFICATIONS = False
第三方引用文件exts.py :防止互相引用报错
from flask_sqlalchemy import SQLAlchemy
db = SQLAlchemy()
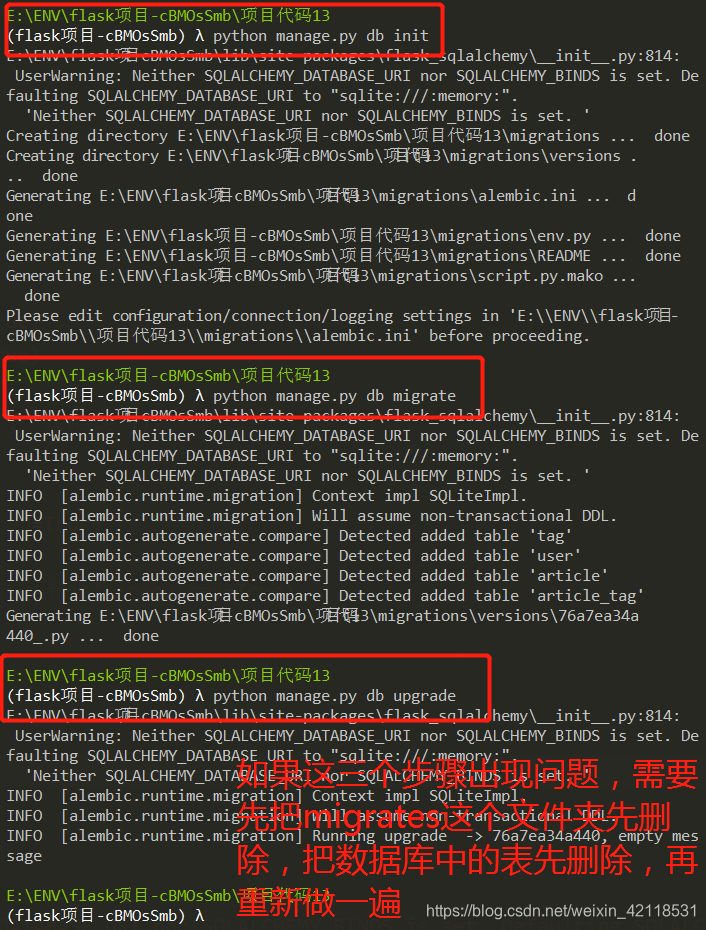
映射到数据库文件manage.py
# -*- encoding: utf-8 -*-
"""
@File    : manage.py
@Time    : 2020/5/10 17:36
@Author  : chen

"""
from flask_script import Manager
from flask_restful_demo import app     # 需要将当前文件夹设置为当前根目录,才不会报错
from flask_migrate import Migrate, MigrateCommand
from exts import db

# 导入模型 才能映射到数据库
import model

manage = Manager(app)

Migrate(app, db)
manage.add_command('db', MigrateCommand)

if __name__ == '__main__':
    manage.run()


 461
461


 被折叠的 条评论
为什么被折叠?
被折叠的 条评论
为什么被折叠?
 到【灌水乐园】发言


