


您现在访问的是微软AZURE全球版技术文档网站,若需要访问由世纪互联运营的MICROSOFT AZURE中国区技术文档网站,请访问 https://docs.azure.cn.
教程:在 Azure 应用服务中生成 ASP.NET Core 和 Azure SQL 数据库应用Tutorial: Build an ASP.NET Core and Azure SQL Database app in Azure App Service
06/20/2020
本文内容
Azure 应用服务在 Azure 中提供高度可缩放、自修补的 Web 托管服务。Azure App Service provides a highly scalable, self-patching web hosting service in Azure. 本教程演示如何创建 .NET Core 应用,并将其连接至 SQL 数据库。This tutorial shows how to create a .NET Core app and connect it to SQL Database. 完成操作后,将拥有一个在 Windows 应用服务中运行的 .NET Core MVC 应用。When you're done, you'll have a .NET Core MVC app running in App Service on Windows.
Azure 应用服务使用 Linux 操作系统,提供高度可缩放的自修补 Web 托管服务。Azure App Service provides a highly scalable, self-patching web hosting service using the Linux operating system. 本教程演示如何创建 .NET Core 应用,并将其连接至 SQL 数据库。This tutorial shows how to create a .NET Core app and connect it to a SQL Database. 完成操作后,将拥有一个在 Linux 应用服务中运行的 .NET Core MVC 应用。When you're done, you'll have a .NET Core MVC app running in App Service on Linux.
本教程介绍如何执行下列操作:In this tutorial, you learn how to:
在 Azure 中创建 SQL 数据库。Create a SQL Database in Azure
将 .NET Core 应用连接到 SQL 数据库Connect a .NET Core app to SQL Database
将应用部署到 AzureDeploy the app to Azure
更新数据模型并重新部署应用Update the data model and redeploy the app
从 Azure 流式传输诊断日志Stream diagnostic logs from Azure
在 Azure 门户中管理应用Manage the app in the Azure portal
如果还没有 Azure 订阅,可以在开始前创建一个免费帐户。If you don't have an Azure subscription, create a free account before you begin.
先决条件Prerequisites
完成本教程:To complete this tutorial:
Use the Bash environment in Azure Cloud Shell.

如果需要,请安装 Azure CLI 来运行 CLI 参考命令。If you prefer, install the Azure CLI to run CLI reference commands.
如果使用的是本地安装,请使用 az login 命令登录到 Azure CLI。If you're using a local installation, sign in to the Azure CLI by using the az login command. 若要完成身份验证过程,请遵循终端中显示的步骤。To finish the authentication process, follow the steps displayed in your terminal. 有关其他登录选项,请参阅登录 Azure CLI。For additional sign-in options, see Sign in with the Azure CLI.
出现提示时,请在首次使用时安装 Azure CLI 扩展。When you're prompted, install Azure CLI extensions on first use. For more information about extensions, see Use extensions with the Azure CLI.
运行 az version 以查找安装的版本和依赖库。Run az version to find the version and dependent libraries that are installed. 若要升级到最新版本,请运行 az upgrade。To upgrade to the latest version, run az upgrade.
创建本地 .NET Core 应用Create local .NET Core app
在此步骤中,你将设置本地 .NET Core 项目。In this step, you set up the local .NET Core project.
克隆示例应用程序Clone the sample application
在终端窗口中,通过 cd 转到工作目录。In the terminal window, cd to a working directory.
运行以下命令来克隆示例存储库,并转到其根目录。Run the following commands to clone the sample repository and change to its root.
git clone https://github.com/azure-samples/dotnetcore-sqldb-tutorial
cd dotnetcore-sqldb-tutorial
此示例项目包含使用 Entity Framework Core 的基本 CRUD(创建-读取-更新-删除)应用。The sample project contains a basic CRUD (create-read-update-delete) app using Entity Framework Core.
运行应用程序Run the application
运行以下命令,安装所需的包,运行数据库迁移并启动应用程序。Run the following commands to install the required packages, run database migrations, and start the application.
dotnet tool install -g dotnet-ef
dotnet ef database update
dotnet run
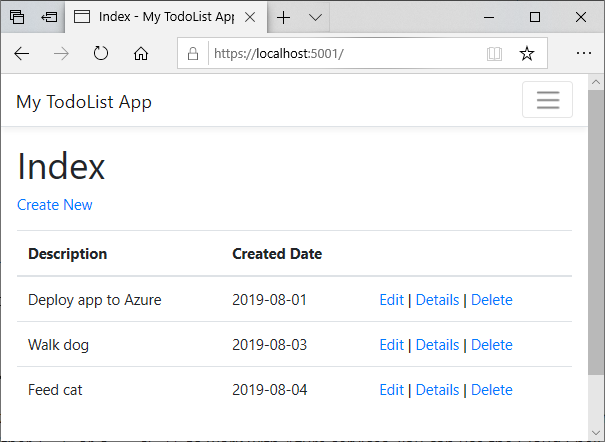
在浏览器中导航到 http://localhost:5000。Navigate to http://localhost:5000 in a browser. 选择“新建”链接,创建多个待办事项。Select the Create New link and create a couple to-do items.
在终端按 Ctrl+C,随时停止 .NET Core。To stop .NET Core at any time, press Ctrl+C in the terminal.
创建生产环境 SQL 数据库Create production SQL Database
此步骤在 Azure 中创建一个 SQL 数据库。In this step, you create a SQL Database in Azure. 应用部署到 Azure 后,它将使用该云数据库。When your app is deployed to Azure, it uses this cloud database.
对于 SQL 数据库,本教程使用 Azure SQL 数据库。For SQL Database, this tutorial uses Azure SQL Database.
创建资源组Create a resource group
资源组是在其中部署和管理 Azure 资源(例如 Web 应用、数据库和存储帐户)的逻辑容器。A resource group is a logical container into which Azure resources, such as web apps, databases, and storage accounts, are deployed and managed. 例如,可以选择在使用完之后通过一个简单的步骤删除整个资源组。For example, you can choose to delete the entire resource group in one simple step later.
在 Cloud Shell 中,使用 az group create 命令创建资源组。In the Cloud Shell, create a resource group with the az group create command. 以下示例在“西欧”位置创建名为“myResourceGroup”的资源组。The following example creates a resource group named myResourceGroup in the West Europe location. To see all supported locations for App Service in Free tier, run the az appservice list-locations --sku FREE command.
az group create --name myResourceGroup --location "West Europe"
通常在附近的区域中创建资源组和资源。You generally create your resource group and the resources in a region near you.
此命令完成后,JSON 输出会显示资源组属性。When the command finishes, a JSON output shows you the resource group properties.
创建 SQL 数据库逻辑服务器Create a SQL Database logical server
在 Cloud Shell 中,使用 az sql server create 命令创建 SQL 数据库逻辑服务器。In the Cloud Shell, create a SQL Database logical server with the az sql server create command.
将 占位符替换为唯一的 SQL 数据库名称 。Replace the placeholder with a unique SQL Database name. 此名称将用作全局唯一的 SQL 数据库终结点 (.database.windows.net) 的一部分。This name is used as the part of the globally unique SQL Database endpoint, .database.windows.net. 有效字符为 a-z、0-9 和 -。Valid characters are a-z, 0-9, -. 此外,将 和 替换为所选的用户名和密码 。Also, replace and with a username and password of your choice.
az sql server create --name --resource-group myResourceGroup --location "West Europe" --admin-user --admin-password
创建 SQL 数据库逻辑服务器后,Azure CLI 会显示类似于以下示例的信息:When the SQL Database logical server is created, the Azure CLI shows information similar to the following example:
{
"administratorLogin": "",
"administratorLoginPassword": null,
"fullyQualifiedDomainName": ".database.windows.net",
"id": "/subscriptions/00000000-0000-0000-0000-000000000000/resourceGroups/myResourceGroup/providers/Microsoft.Sql/servers/",
"identity": null,
"kind": "v12.0",
"location": "westeurope",
"name": "",
"resourceGroup": "myResourceGroup",
"state": "Ready",
"tags": null,
"type": "Microsoft.Sql/servers",
"version": "12.0"
}
配置服务器防火墙规则Configure a server firewall rule
若同时将起始 IP 和结束 IP 设置为 0.0.0.0,防火墙将仅对其他 Azure 资源开启。When both starting IP and end IP are set to 0.0.0.0, the firewall is only opened for other Azure resources.
az sql server firewall-rule create --resource-group myResourceGroup --server --name AllowAzureIps --start-ip-address 0.0.0.0 --end-ip-address 0.0.0.0
提示
你甚至可以让防火墙规则更严格,即只使用应用所使用的出站 IP 地址。You can be even more restrictive in your firewall rule by using only the outbound IP addresses your app uses.
在 Cloud Shell 中再次运行该命令(将 替换为本地 IPv4 IP 地址),以便从本地计算机进行访问。In the Cloud Shell, run the command again to allow access from your local computer by replacing with your local IPv4 IP address.
az sql server firewall-rule create --name AllowLocalClient --server --resource-group myResourceGroup --start-ip-address= --end-ip-address=
创建数据库Create a database
Create a database with an S0 performance level in the server using the az sql db create command.
az sql db create --resource-group myResourceGroup --server --name coreDB --service-objective S0
创建连接字符串Create connection string
az sql db show-connection-string --client ado.net --server --name coreDB
在命令输出中,将 和 替换为你先前使用的数据库管理员凭据 。In the command output, replace , and with the database administrator credentials you used earlier.
这是 .NET Core 应用的连接字符串。This is the connection string for your .NET Core app. 将其进行复制,留待稍后使用。Copy it for use later.
配置应用以连接到生产数据库Configure app to connect to production database
在本地存储库中,打开 Startup.cs 并查找下列代码:In your local repository, open Startup.cs and find the following code:
services.AddDbContext(options =>
options.UseSqlite("Data Source=localdatabase.db"));
将其替换为以下代码。Replace it with the following code.
services.AddDbContext(options =>
options.UseSqlServer(Configuration.GetConnectionString("MyDbConnection")));
重要
对于需要横向扩展的生产应用,请遵循在生产中应用迁移中的最佳做法。For production apps that need to scale out, follow the best practices in Applying migrations in production.
运行到生产数据库的数据库迁移Run database migrations to the production database
应用当前连接到本地 Sqlite 数据库。Your app currently connects to a local Sqlite database. 配置 Azure SQL 数据库后,请重新创建以其为目标的初始迁移。Now that you configured an Azure SQL Database, recreate the initial migration to target it.
在存储库根目录中运行以下命令。From the repository root, run the following commands. 将 替换为之前创建的连接字符串。Replace with the connection string you created earlier.
# Delete old migrations
rm -r Migrations
# Recreate migrations
dotnet ef migrations add InitialCreate
# Set connection string to production database
# PowerShell
$env:ConnectionStrings:MyDbConnection=""
# CMD (no quotes)
set ConnectionStrings:MyDbConnection=
# Bash (no quotes)
export ConnectionStrings__MyDbConnection=
# Run migrations
dotnet ef database update
使用新配置运行应用Run app with new configuration
现在,数据库迁移将在生产数据库中运行,请通过运行以下命令来测试应用:Now that database migrations is run on the production database, test your app by running:
dotnet run
在浏览器中导航到 http://localhost:5000。Navigate to http://localhost:5000 in a browser. 选择“新建”链接,创建多个待办事项。Select the Create New link and create a couple to-do items. 应用现在正在读取数据并将数据写入生产数据库。Your app is now reading and writing data to the production database.
提交本地更改,然后将其提交到 Git 存储库。Commit your local changes, then commit it into your Git repository.
git add .
git commit -m "connect to SQLDB in Azure"
现在已准备好部署代码。You're now ready to deploy your code.
将应用部署到 AzureDeploy app to Azure
在此步骤中,将已连接 SQL 数据库的 .NET Core 应用程序部署到应用服务。In this step, you deploy your SQL Database-connected .NET Core application to App Service.
配置本地 Git 部署Configure local git deployment
可以使用“deployment user”将 FTP 和本地 Git 部署到 Azure Web 应用。FTP and local Git can deploy to an Azure web app by using a deployment user. 配置部署用户之后,可对所有 Azure 部署使用此用户。Once you configure your deployment user, you can use it for all your Azure deployments. 帐户级部署用户名和密码不同于 Azure 订阅凭据。Your account-level deployment username and password are different from your Azure subscription credentials.
若要配置部署用户,请在 Azure Cloud Shell 中运行 az webapp deployment user set 命令。To configure the deployment user, run the az webapp deployment user set command in Azure Cloud Shell. 将 和 替换为部署用户的用户名和密码。Replace and with a deployment user username and password.
用户名在 Azure 中必须唯一,并且对于本地 Git 推送,不能包含“@”符号。The username must be unique within Azure, and for local Git pushes, must not contain the ‘@’ symbol.
密码必须至少为 8 个字符,且具有字母、数字和符号这三种元素中的两种。The password must be at least eight characters long, with two of the following three elements: letters, numbers, and symbols.
az webapp deployment user set --user-name --password
JSON 输出会将该密码显示为 null。The JSON output shows the password as null. 如果收到 'Conflict'. Details: 409 错误,请更改用户名。If you get a 'Conflict'. Details: 409 error, change the username. 如果收到 'Bad Request'. Details: 400 错误,请使用更强的密码。If you get a 'Bad Request'. Details: 400 error, use a stronger password.
请记录你要用于部署 Web 应用的用户名和密码。Record your username and password to use to deploy your web apps.
创建应用服务计划Create an App Service plan
在 Cloud Shell 中,使用 az appservice plan create 命令创建一个应用服务计划。In the Cloud Shell, create an App Service plan with the az appservice plan create command.
以下示例在免费定价层中创建名为 myAppServicePlan 的应用服务计划:The following example creates an App Service plan named myAppServicePlan in the Free pricing tier:
az appservice plan create --name myAppServicePlan --resource-group myResourceGroup --sku FREE
创建应用服务计划后,Azure CLI 会显示类似于以下示例的信息:When the App Service plan has been created, the Azure CLI shows information similar to the following example:
{
"adminSiteName": null,
"appServicePlanName": "myAppServicePlan",
"geoRegion": "West Europe",
"hostingEnvironmentProfile": null,
"id": "/subscriptions/0000-0000/resourceGroups/myResourceGroup/providers/Microsoft.Web/serverfarms/myAppServicePlan",
"kind": "app",
"location": "West Europe",
"maximumNumberOfWorkers": 1,
"name": "myAppServicePlan",
< JSON data removed for brevity. >
"targetWorkerSizeId": 0,
"type": "Microsoft.Web/serverfarms",
"workerTierName": null
}
创建 Web 应用Create a web app
在 myAppServicePlan 应用服务计划中创建一个 Web 应用。Create a web app in the myAppServicePlan App Service plan.
在 Cloud Shell 中可以使用 az webapp create 命令。In the Cloud Shell, you can use the az webapp create command. 在以下示例中,将 替换为全局唯一的应用名称(有效字符是 a-z、0-9 和 -)。In the following example, replace with a globally unique app name (valid characters are a-z, 0-9, and -).
az webapp create --resource-group myResourceGroup --plan myAppServicePlan --name --deployment-local-git
创建 Web 应用后,Azure CLI 会显示类似于以下示例的输出:When the web app has been created, the Azure CLI shows output similar to the following example:
Local git is configured with url of 'https://@.scm.azurewebsites.net/.git'
{
"availabilityState": "Normal",
"clientAffinityEnabled": true,
"clientCertEnabled": false,
"clientCertExclusionPaths": null,
"cloningInfo": null,
"containerSize": 0,
"dailyMemoryTimeQuota": 0,
"defaultHostName": ".azurewebsites.net",
"deploymentLocalGitUrl": "https://@.scm.azurewebsites.net/.git",
"enabled": true,
< JSON data removed for brevity. >
}
备注
Git 远程的 URL 将显示在 deploymentLocalGitUrl 属性中,其格式为 https://@.scm.azurewebsites.net/.git。The URL of the Git remote is shown in the deploymentLocalGitUrl property, with the format https://@.scm.azurewebsites.net/.git. 保存此 URL,后续将会用到。Save this URL as you need it later.
在 myAppServicePlan 应用服务计划中创建一个 Web 应用。Create a web app in the myAppServicePlan App Service plan.
在 Cloud Shell 中可以使用 az webapp create 命令。In the Cloud Shell, you can use the az webapp create command. 在以下示例中,将 替换为全局唯一的应用名称(有效字符是 a-z、0-9 和 -)。In the following example, replace with a globally unique app name (valid characters are a-z, 0-9, and -). 运行时设置为 DOTNETCORE|3.1。The runtime is set to DOTNETCORE|3.1. To see all supported runtimes, run az webapp list-runtimes --linux.
# Bash
az webapp create --resource-group myResourceGroup --plan myAppServicePlan --name --runtime "DOTNETCORE|3.1" --deployment-local-git
# PowerShell
az --% webapp create --resource-group myResourceGroup --plan myAppServicePlan --name --runtime "DOTNETCORE|3.1" --deployment-local-git
创建 Web 应用后,Azure CLI 会显示类似于以下示例的输出:When the web app has been created, the Azure CLI shows output similar to the following example:
Local git is configured with url of 'https://
已在 Linux 容器中创建了一个空的 Web 应用并启用了 Git 部署。You’ve created an empty web app in a Linux container, with git deployment enabled.
备注
Git 远程的 URL 将显示在 deploymentLocalGitUrl 属性中,其格式为 https://@.scm.azurewebsites.net/.git。The URL of the Git remote is shown in the deploymentLocalGitUrl property, with the format https://@.scm.azurewebsites.net/.git. 保存此 URL,后续将会用到。Save this URL as you need it later.
配置连接字符串Configure connection string
若要为 Azure 应用设置连接字符串,请使用 Cloud Shell 中的 az webapp config appsettings set 命令。To set connection strings for your Azure app, use the az webapp config appsettings set command in the Cloud Shell. 在下列命令中,将 和 参数替换为先前创建的连接字符串 。In the following command, replace , as well as the parameter with the connection string you created earlier.
az webapp config connection-string set --resource-group myResourceGroup --name --settings MyDbConnection="" --connection-string-type SQLAzure
在 ASP.NET Core 中,可以通过标准模式使用此命名连接字符串 (MyDbConnection),就像在 appsettings.json 中指定的任何连接字符串一样。In ASP.NET Core, you can use this named connection string (MyDbConnection) using the standard pattern, like any connection string specified in appsettings.json. 在本例中,MyDbConnection 也在 appsettings.json 中定义。In this case, MyDbConnection is also defined in your appsettings.json. 在应用服务中运行时,应用服务中定义的连接字符串优先于 appsettings.json 中定义的连接字符串。When running in App Service, the connection string defined in App Service takes precedence over the connection string defined in your appsettings.json. 此代码在本地开发过程中使用 appsettings.json 值,相同的代码在部署时使用应用服务值。The code uses the appsettings.json value during local development, and the same code uses the App Service value when deployed.
若要了解如何在代码中引用连接字符串,请参阅配置应用以连接到生产数据库。To see how the connection string is referenced in your code, see Configure app to connect to production database.
从 Git 推送到 AzurePush to Azure from Git
回到本地终端窗口,将 Azure 远程功能添加到本地 Git 存储库。Back in the local terminal window, add an Azure remote to your local Git repository. 将 替换为在创建 Web 应用中保存的 Git 远程 URL。Replace with the URL of the Git remote that you saved from Create a web app.
git remote add azure
使用以下命令推送到 Azure 远程库以部署应用。Push to the Azure remote to deploy your app with the following command. 当 Git 凭据管理器提示输入凭据时,请确保输入在 配置部署用户 中创建的凭据,而不是用于登录到 Azure 门户的凭据。When Git Credential Manager prompts you for credentials, make sure you enter the credentials you created in Configure a deployment user, not the credentials you use to sign in to the Azure portal.
git push azure master
此命令可能需要花费几分钟时间运行。This command may take a few minutes to run. 运行时,该命令会显示类似于以下示例的信息:While running, it displays information similar to the following example:
Enumerating objects: 268, done.
Counting objects: 100% (268/268), done.
Compressing objects: 100% (171/171), done.
Writing objects: 100% (268/268), 1.18 MiB | 1.55 MiB/s, done.
Total 268 (delta 95), reused 251 (delta 87), pack-reused 0
remote: Resolving deltas: 100% (95/95), done.
remote: Updating branch 'main'.
remote: Updating submodules.
remote: Preparing deployment for commit id '64821c3558'.
remote: Generating deployment script.
remote: Project file path: .\DotNetCoreSqlDb.csproj
remote: Generating deployment script for ASP.NET MSBuild16 App
remote: Generated deployment script files
remote: Running deployment command...
remote: Handling ASP.NET Core Web Application deployment with MSBuild16.
remote: .
remote: .
remote: .
remote: Finished successfully.
remote: Running post deployment command(s)...
remote: Triggering recycle (preview mode disabled).
remote: App container will begin restart within 10 seconds.
To https://.scm.azurewebsites.net/.git
* [new branch] main -> main
回到本地终端窗口,将 Azure 远程功能添加到本地 Git 存储库。Back in the local terminal window, add an Azure remote to your local Git repository. 将 替换为在创建 Web 应用中保存的 Git 远程 URL。Replace with the URL of the Git remote that you saved from Create a web app.
git remote add azure
使用以下命令推送到 Azure 远程库以部署应用。Push to the Azure remote to deploy your app with the following command. 当 Git 凭据管理器提示输入凭据时,请确保输入在 配置部署用户 中创建的凭据,而不是用于登录到 Azure 门户的凭据。When Git Credential Manager prompts you for credentials, make sure you enter the credentials you created in Configure a deployment user, not the credentials you use to sign in to the Azure portal.
git push azure master
此命令可能需要花费几分钟时间运行。This command may take a few minutes to run. 运行时,该命令会显示类似于以下示例的信息:While running, it displays information similar to the following example:
Enumerating objects: 273, done.
Counting objects: 100% (273/273), done.
Delta compression using up to 4 threads
Compressing objects: 100% (175/175), done.
Writing objects: 100% (273/273), 1.19 MiB | 1.85 MiB/s, done.
Total 273 (delta 96), reused 259 (delta 88)
remote: Resolving deltas: 100% (96/96), done.
remote: Deploy Async
remote: Updating branch 'main'.
remote: Updating submodules.
remote: Preparing deployment for commit id 'cccecf86c5'.
remote: Repository path is /home/site/repository
remote: Running oryx build...
remote: Build orchestrated by Microsoft Oryx, https://github.com/Microsoft/Oryx
remote: You can report issues at https://github.com/Microsoft/Oryx/issues
remote: .
remote: .
remote: .
remote: Done.
remote: Running post deployment command(s)...
remote: Triggering recycle (preview mode disabled).
remote: Deployment successful.
remote: Deployment Logs : 'https://.scm.azurewebsites.net/newui/jsonviewer?view_url=/api/deployments/cccecf86c56493ffa594e76ea1deb3abb3702d89/log'
To https://.scm.azurewebsites.net/.git
* [new branch] main -> main
转到 Azure 应用Browse to the Azure app
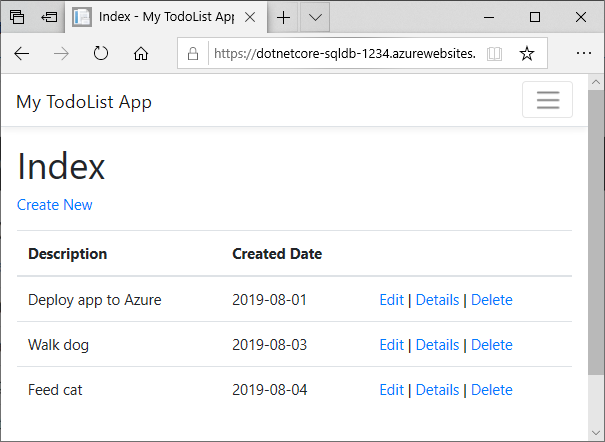
使用 Web 浏览器转到已部署的应用。Browse to the deployed app using your web browser.
http://.azurewebsites.net
添加多个待办事项。Add a few to-do items.
祝贺你!Congratulations! 数据驱动的 .NET Core 应用已经在你的应用服务中运行了。You're running a data-driven .NET Core app in App Service.
在本地更新并重新部署Update locally and redeploy
在此步骤中,将对数据库架构做出更改,并将其发布至 Azure。In this step, you make a change to your database schema and publish it to Azure.
更新数据模型Update your data model
在代码编辑器中打开 Models/Todo.cs。Open Models/Todo.cs in the code editor. 将以下属性添加到 ToDo 类:Add the following property to the ToDo class:
public bool Done { get; set; }
重新运行数据库迁移Rerun database migrations
运行几个命令以更新生产数据库。Run a few commands to make updates to the production database.
dotnet ef migrations add AddProperty
dotnet ef database update
备注
如果打开新的终端窗口,则需要像在运行到生产数据库的数据库迁移中一样,在终端中将连接字符串设置为生产数据库。If you open a new terminal window, you need to set the connection string to the production database in the terminal, like you did in Run database migrations to the production database.
使用新属性Use the new property
为了使用 Done 属性,请对代码做一些更改。Make some changes in your code to use the Done property. 简单起见,本教程中将仅更改 Index 和 Create 视图,以便在操作过程中查看属性。For simplicity in this tutorial, you're only going to change the Index and Create views to see the property in action.
打开 Controllers/TodosController.cs。Open Controllers/TodosController.cs.
找到 Create([Bind("ID,Description,CreatedDate")] Todo todo) 方法,并将 Done 添加到 Bind 属性中的属性列表。Find the Create([Bind("ID,Description,CreatedDate")] Todo todo) method and add Done to the list of properties in the Bind attribute. 完成后,Create() 方法签名应如下面的代码所示:When you're done, your Create() method signature looks like the following code:
public async Task Create([Bind("ID,Description,CreatedDate,Done")] Todo todo)
打开 Views/Todos/Create.cshtml。Open Views/Todos/Create.cshtml.
在 Razor 代码中,应能看到用于 Description 的
打开 Views/Todos/Index.cshtml。Open Views/Todos/Index.cshtml.
搜索空的
元素。Search for the empty element. 在此元素的正上方,添加下列 Razor 代码:Just above this element, add the following Razor code:@Html.DisplayNameFor(model => model.Done)
查找包含 asp-action 标记帮助程序的
元素。Find the element that contains the asp-action tag helpers. 在此元素的正上方,添加下列 Razor 代码:Just above this element, add the following Razor code:@Html.DisplayFor(modelItem => item.Done)
这就是要在 Index 和 Create 视图中查看更改所需的全部操作。That's all you need to see the changes in the Index and Create views.
在本地测试更改Test your changes locally
在本地运行应用。Run the app locally.
dotnet run
备注
如果打开新的终端窗口,则需要像在运行到生产数据库的数据库迁移中一样,在终端中将连接字符串设置为生产数据库。If you open a new terminal window, you need to set the connection string to the production database in the terminal, like you did in Run database migrations to the production database.
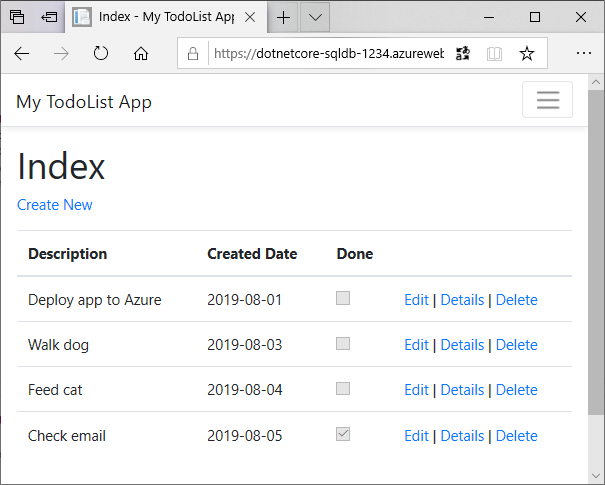
在浏览器中,导航到 http://localhost:5000/。In your browser, navigate to http://localhost:5000/. 你现在可以添加一个待办事项,并检查''Done''。You can now add a to-do item and check Done. 然后,它应作为已完成项在主页中显示。Then it should show up in your homepage as a completed item. 请记住,Edit视图不显示Done字段,因为没有更改Edit视图。Remember that the Edit view doesn't show the Done field, because you didn't change the Edit view.
发布对 Azure 所做的更改Publish changes to Azure
git add .
git commit -m "added done field"
git push azure main
git push 完成后,请导航至应用服务应用,尝试添加一个待办事项并选中“Done”。Once the git push is complete, navigate to your App Service app and try adding a to-do item and check Done.
所有现有待办事项仍将显示。All your existing to-do items are still displayed. 重新发布 ASP.NET Core 应用时,SQL 数据库中的现有数据不会丢失。When you republish your ASP.NET Core app, existing data in your SQL Database isn't lost. 此外,实体框架核心迁移仅更改数据架构,而使现有数据保持不变。Also, Entity Framework Core Migrations only changes the data schema and leaves your existing data intact.
流式传输诊断日志Stream diagnostic logs
当 ASP.NET Core 应用在 Azure 应用服务中运行时,可以将控制台日志传输到 Cloud Shell。While the ASP.NET Core app runs in Azure App Service, you can get the console logs piped to the Cloud Shell. 如此,可以获得相同的诊断消息,以便调试应用程序错误。That way, you can get the same diagnostic messages to help you debug application errors.
The sample project already follows the guidance at ASP.NET Core Logging in Azure with two configuration changes:
在 DotNetCoreSqlDb.csproj 中包含了对 Microsoft.Extensions.Logging.AzureAppServices 的引用。Includes a reference to Microsoft.Extensions.Logging.AzureAppServices in DotNetCoreSqlDb.csproj.
在 Program.cs 中调用 loggerFactory.AddAzureWebAppDiagnostics()。Calls loggerFactory.AddAzureWebAppDiagnostics() in Program.cs.
若要将应用服务中的 ASP.NET Core 日志级别从默认级别 Error 设置为 Information,请在 Cloud Shell 中使用 az webapp log config 命令。To set the ASP.NET Core log level in App Service to Information from the default level Error, use the az webapp log config command in the Cloud Shell.
az webapp log config --name --resource-group myResourceGroup --application-logging filesystem --level information
备注
项目的日志级别在 appsettings.json 中已设置为 Information。The project's log level is already set to Information in appsettings.json.
若要启动日志流式处理,请在 Cloud Shell 中使用 az webapp log tail 命令。To start log streaming, use the az webapp log tail command in the Cloud Shell.
az webapp log tail --name --resource-group myResourceGroup
启动日志流式处理后,请在浏览器中刷新 Azure 应用,以获取一些 Web 流量。Once log streaming has started, refresh the Azure app in the browser to get some web traffic. 现在可以看到通过管道传送到终端的控制台日志。You can now see console logs piped to the terminal. 如果没有立即看到控制台日志,请在 30 秒后重新查看。If you don't see console logs immediately, check again in 30 seconds.
若要随时停止日志流式处理,请键入 Ctrl+C。To stop log streaming at any time, type Ctrl+C.
有关自定义 ASP.NET Core 日志的详细信息,请参阅 ASP.NET Core 中的日志记录。For more information on customizing the ASP.NET Core logs, see Logging in ASP.NET Core.
管理 Azure 应用Manage your Azure app
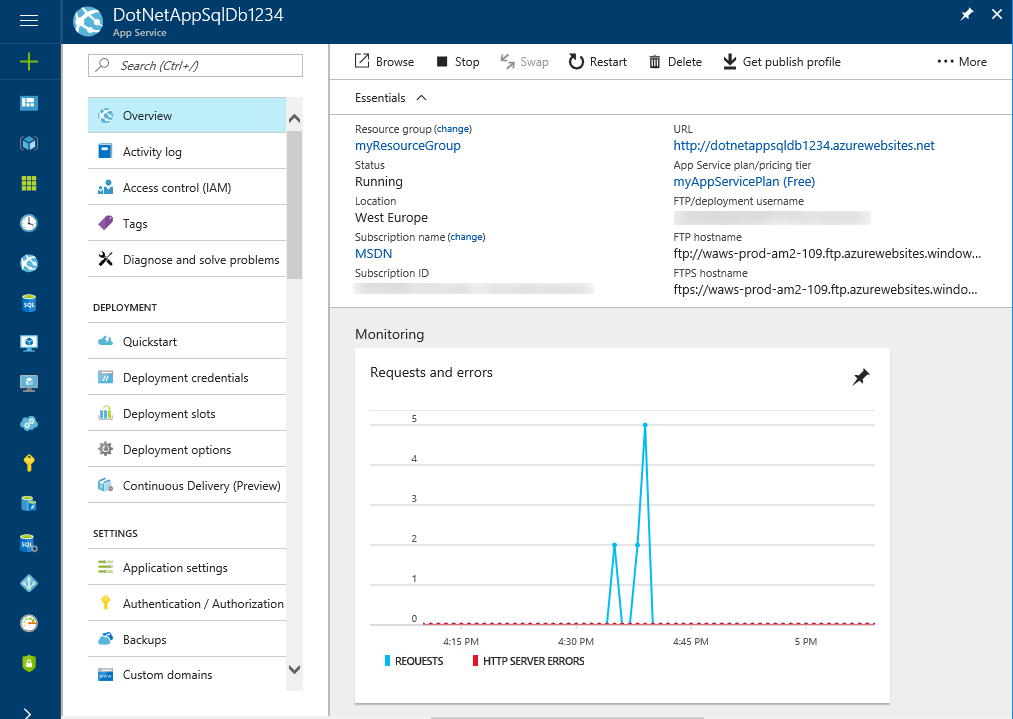
若要查看所创建的应用,请在 Azure 门户中,搜索并选择“应用服务”"。To see the app you created, in the Azure portal, search for and select App Services.

在“应用服务”页上,选择 Azure 应用的名称。On the App Services page, select the name of your Azure app.
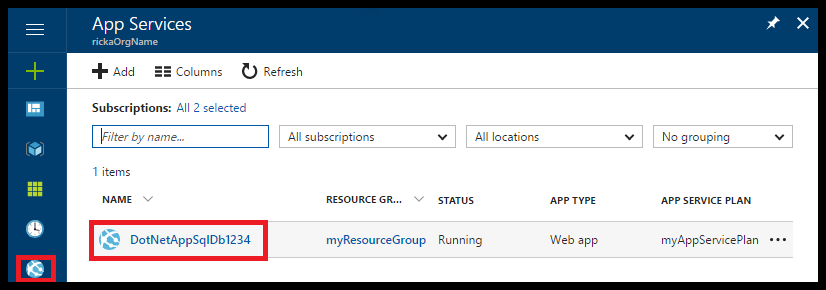
默认情况下,门户将显示应用的“概述”页。By default, the portal shows your app's Overview page. 在此页中可以查看应用的运行状况。This page gives you a view of how your app is doing. 在此处还可以执行基本的管理任务,例如浏览、停止、启动、重新启动和删除。Here, you can also perform basic management tasks like browse, stop, start, restart, and delete. 该页左侧的选项卡显示可以打开的不同配置页。The tabs on the left side of the page show the different configuration pages you can open.
清理资源Clean up resources
在前面的步骤中,你在资源组中创建了 Azure 资源。In the preceding steps, you created Azure resources in a resource group. 如果认为将来不需要这些资源,请在 Cloud Shell 中运行以下命令删除资源组:If you don't expect to need these resources in the future, delete the resource group by running the following command in the Cloud Shell:
az group delete --name myResourceGroup
此命令可能需要花费一点时间运行。This command may take a minute to run.
后续步骤Next steps
你已了解:What you learned:
在 Azure 中创建 SQL 数据库。Create a SQL Database in Azure
将 .NET Core 应用连接到 SQL 数据库Connect a .NET Core app to SQL Database
将应用部署到 AzureDeploy the app to Azure
更新数据模型并重新部署应用Update the data model and redeploy the app
将日志从 Azure 流式传输到终端Stream logs from Azure to your terminal
在 Azure 门户中管理应用Manage the app in the Azure portal
继续学习下一篇教程,了解如何将自定义 DNS 名称映射到应用。Advance to the next tutorial to learn how to map a custom DNS name to your app.
或者,查看其他资源:Or, check out other resources:


 被折叠的 条评论
为什么被折叠?
被折叠的 条评论
为什么被折叠?
 到【灌水乐园】发言


