


CentOs7.3 搭建 Redis-4.0.1 Cluster 集群服务
原文 https://segmentfault.com/a/1190000010682551
环境
-
三台虚拟机(IP):192.168.217.130,192.168.217.131,192.168.217.132
-
VMware版本号:12.0.0
-
CentOS版本:CentOS 7.3.1611
-
CentosOs 7.X安装教程 https://blog.csdn.net/babyxue/article/details/80970526
注意事项
安裝 GCC 编译工具 不然会有编译不过的问题
$ yum install -y gcc g++ gcc-c++ make
升级所有的包,防止出现版本过久不兼容问题
$ yum -y update
修改主机名
$ hostnamectl set-hostname redis-cluster1
#查看主机名
$ hostname
关闭防火墙 节点之前需要开放指定端口,为了方便,生产不要禁用
centos 6.x
service iptables stop # 关闭命令:
centos 7.x
systemctl stop firewalld.service # 停止firewall
集群搭建
下载,解压,编译安装
cd /opt
$ wget http://download.redis.io/releases/redis-4.0.1.tar.gz
$ tar xzf redis-4.0.1.tar.gz
$ cd redis-4.0.1
$ make
创建节点
1.首先在 redis-cluster1 机器上 /opt/redis-4.0.1目录下创建 redis-cluster 目录
$ mkdir /opt/redis-4.0.1/redis-cluster
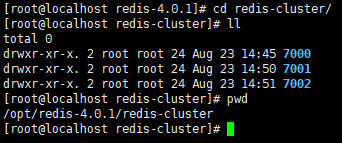
2.在 redis-cluster目录下,创建名为7000、7001、7002的目录
$ cd /opt/redis-4.0.1/redis-cluster
$ mkdir 7000 7001 7002
3.分别修改这三个配置文件,把如下redis.conf配置内容粘贴进去
$ vi 7000/redis.conf
$ vi 7001/redis.conf
$ vi 7002/redis.conf
如图:
redis.conf 配置
port 7000
bind 192.168.252.101
daemonize yes
pidfile /var/run/redis_7000.pid
cluster-enabled yes
cluster-config-file nodes_7000.conf
cluster-node-timeout 10100
appendonly yes
redis.conf 配置说明
#端口7000,7001,7002
port 7000

#默认ip为127.0.0.1,需要改为其他节点机器可访问的ip,否则创建集群时无法访问对应的端口,无法创建集群
bind 192.168.252.101

#redis后台运行
daemonize yes

#pidfile文件对应7000,7001,7002
pidfile /var/run/redis_7000.pid

#开启集群,把注释#去掉
cluster-enabled yes

#集群的配置,配置文件首次启动自动生成 7000,7001,7002
cluster-config-file nodes_7000.conf

#请求超时,默认15秒,可自行设置
cluster-node-timeout 10100

#aof日志开启,有需要就开启,它会每次写操作都记录一条日志
appendonly yes
- 接着在另外两台机器上(
192.168.217.131,192.168.217.132)重复以上三步,只是把目录改为7003、7004、7005、7006、7007、7008对应的配置文件也按照这个规则修改即可
启动集群
#第一台机器上执行 3个节点
$ for((i=0;i<=2;i++)); do /opt/redis-4.0.1/src/redis-server /opt/redis-4.0.1/redis-cluster/700$i/redis.conf; done

#第二台机器上执行 3个节点
$ for((i=3;i<=5;i++)); do /opt/redis-4.0.1/src/redis-server /opt/redis-4.0.1/redis-cluster/700$i/redis.conf; done

#第三台机器上执行 3个节点
$ for((i=6;i<=8;i++)); do /opt/redis-4.0.1/src/redis-server /opt/redis-4.0.1/redis-cluster/700$i/redis.conf; done
检查服务
- 检查各 Redis 各个节点启动情况
 $ ps -ef | grep redis           //redis是否启动成功
 $ netstat -tnlp | grep redis    //监听redis端口
安装 Ruby
$ yum -y install ruby ruby-devel rubygems rpm-build
$ gem install redis
如果报错:

    是因为 ruby 版本过低
    [1].安装RVM:
    curl -L get.rvm.io | bash -s stable
    [2]执行命令
    source /usr/local/rvm/scripts/rvm
    [3]这个比较久 要下载东西 15分钟左右
    rvm install 2.3.3
    [4].使用一个ruby版本
    rvm use 2.3.3
    [5]。设置默认版本
    rvm use 2.3.3 --default
    [6]。卸载一个已知版本
    rvm remove 2.0.0
    [7]。查看版本
    ruby -v
创建集群
-
注意:在任意一台上运行 不要在每台机器上都运行,一台就够了 -
Redis 官方提供了 redis-trib.rb 这个工具,就在解压目录的 src 目录中
$ /opt/redis-4.0.1/src/redis-trib.rb create --replicas 1 192.168.217.130:7000 192.168.217.130:7001 192.168.217.130:7002 192.168.217.131:7003 192.168.217.131:7004 192.168.217.131:7005 192.168.217.132:7006 192.168.217.132:7007 192.168.217.132:7008
出现以下内容
[root@localhost redis-4.0.1]# /opt/redis-4.0.1/src/redis-trib.rb create --replicas 1 192.168.217.130:7000 192.168.217.130:7001 192.168.217.130:7002 192.168.217.131:7003 192.168.217.131:7004 192.168.217.131:7005 192.168.217.132:7006 192.168.217.132:7007 192.168.217.132:7008
>>> Creating cluster
>>> Performing hash slots allocation on 9 nodes...
Using 4 masters:
192.168.217.130:7000
192.168.217.131:7003
192.168.217.132:7006
192.168.217.130:7001
Adding replica 192.168.217.131:7004 to 192.168.217.130:7000
Adding replica 192.168.217.132:7007 to 192.168.217.131:7003
Adding replica 192.168.217.130:7002 to 192.168.217.132:7006
Adding replica 192.168.217.131:7005 to 192.168.217.130:7001
Adding replica 192.168.217.132:7008 to 192.168.217.130:7000
M: a31f582e944c69648c3cf6f083d85e7e25cd1e6f 192.168.217.130:7000
   slots:0-4095 (4096 slots) master
M: e04e4b3cb22682aed43943621d51393e95e57b10 192.168.217.130:7001
   slots:12288-16383 (4096 slots) master
S: 03fb068b801a0227750e06d77113478b592df892 192.168.217.130:7002
   replicates 0130acc05c54de4a1564e04dff0186c50aff1e33
M: 42b05a2729a8117eb020243b70c12c474cc55378 192.168.217.131:7003
   slots:4096-8191 (4096 slots) master
S: 79bf01822861b31f5b60f17e36b54253c274d70f 192.168.217.131:7004
   replicates a31f582e944c69648c3cf6f083d85e7e25cd1e6f
S: ff7b14c009f5191509106aed83838badf59a536e 192.168.217.131:7005
   replicates e04e4b3cb22682aed43943621d51393e95e57b10
M: 0130acc05c54de4a1564e04dff0186c50aff1e33 192.168.217.132:7006
   slots:8192-12287 (4096 slots) master
S: 0c67bf556f82b6bd213f3ed64966e5bbba3305ca 192.168.217.132:7007
   replicates 42b05a2729a8117eb020243b70c12c474cc55378
S: 0ca323ced2a0eff487227f1dce61c700a0711be7 192.168.217.132:7008
   replicates a31f582e944c69648c3cf6f083d85e7e25cd1e6f
Can I set the above configuration? (type 'yes' to accept): yes
输入 yes
>>> Nodes configuration updated
>>> Assign a different config epoch to each node
>>> Sending CLUSTER MEET messages to join the cluster
Waiting for the cluster to join.....
>>> Performing Cluster Check (using node 192.168.217.130:7000)
M: a31f582e944c69648c3cf6f083d85e7e25cd1e6f 192.168.217.130:7000
   slots:0-4095 (4096 slots) master
   2 additional replica(s)
S: ff7b14c009f5191509106aed83838badf59a536e 192.168.217.131:7005
   slots: (0 slots) slave
   replicates e04e4b3cb22682aed43943621d51393e95e57b10
S: 0ca323ced2a0eff487227f1dce61c700a0711be7 192.168.217.132:7008
   slots: (0 slots) slave
   replicates a31f582e944c69648c3cf6f083d85e7e25cd1e6f
S: 0c67bf556f82b6bd213f3ed64966e5bbba3305ca 192.168.217.132:7007
   slots: (0 slots) slave
   replicates 42b05a2729a8117eb020243b70c12c474cc55378
S: 79bf01822861b31f5b60f17e36b54253c274d70f 192.168.217.131:7004
   slots: (0 slots) slave
   replicates a31f582e944c69648c3cf6f083d85e7e25cd1e6f
M: 42b05a2729a8117eb020243b70c12c474cc55378 192.168.217.131:7003
   slots:4096-8191 (4096 slots) master
   1 additional replica(s)
S: 03fb068b801a0227750e06d77113478b592df892 192.168.217.130:7002
   slots: (0 slots) slave
   replicates 0130acc05c54de4a1564e04dff0186c50aff1e33
M: 0130acc05c54de4a1564e04dff0186c50aff1e33 192.168.217.132:7006
   slots:8192-12287 (4096 slots) master
   1 additional replica(s)
M: e04e4b3cb22682aed43943621d51393e95e57b10 192.168.217.130:7001
   slots:12288-16383 (4096 slots) master
   1 additional replica(s)
[OK] All nodes agree about slots configuration.
>>> Check for open slots...
>>> Check slots coverage...
[OK] All 16384 slots covered.
[root@localhost redis-4.0.1]# ps aux|grep java
关闭集群(这只是方法,这一步请勿操作)
#关闭所有
$ pkill redis


# 或者 循环节点逐个关闭
$ for((i=0;i<=2;i++)); do /opt/redis-4.0.1/src/redis-cli -c -h 192.168.252.101 -p 700$i shutdown; done

$ for((i=3;i<=5;i++)); do /opt/redis-4.0.1/src/redis-cli -c -h 192.168.252.102 -p 700$i shutdown; done

$ for((i=6;i<=8;i++)); do /opt/redis-4.0.1/src/redis-cli -c -h 192.168.252.103 -p 700$i shutdown; done
集群验证
参数 -C 可连接到集群,因为 redis.conf 将 bind 改为了ip地址,所以 -h 参数不可以省略,-p 参数为端口号
- 我们在192.168.217.130机器redis 7000 的节点set 一个key
[root@localhost redis-4.0.1]# /opt/redis-4.0.1/src/redis-cli -h 192.168.217.130 -c -p 7000
192.168.217.130:7000> set name zhaojie
-> Redirected to slot [5798] located at 192.168.217.131:7003
OK
- 我们在192.168.217.132机器redis 7008 的节点get一个key
[root@redis-cluste3 redis-4.0.1]# /opt/redis-4.0.1/src/redis-cli -h 192.168.217.132 -c -p 7008
192.168.217.132:7008> get name
-> Redirected to slot [5798] located at 192.168.217.131:7003
"zhaojie"
如果您看到这样的现象,说明集群已经是可用的了
检查集群状态
./redis-trib.rb check 192.168.217.130:7000
[root@localhost src]# ./redis-trib.rb check 192.168.217.130:7000
>>> Performing Cluster Check (using node 192.168.217.130:7000)
M: 369f5ecb5e97a68c80022068ba59b9709bb60a6a 192.168.217.130:7000
   slots:0-4095 (4096 slots) master
   2 additional replica(s)
M: a46e18b53e81a40838aa1a56cb2bc40c7756531c 192.168.217.132:7006
   slots:8192-12287 (4096 slots) master
   1 additional replica(s)
M: 67ecc8df9f62a76601cde52074a7ff2f9753cb89 192.168.217.131:7003
   slots:4096-8191 (4096 slots) master
   1 additional replica(s)
S: f0c081c4c38abb0b65d7a75e76546e8e21f87d63 192.168.217.131:7004
   slots: (0 slots) slave
   replicates 369f5ecb5e97a68c80022068ba59b9709bb60a6a
S: 096cbc31677458388d6f9bead0b192f4125adb4c 192.168.217.131:7005
   slots: (0 slots) slave
   replicates ed37b7ab202728a3075361fdd9042123a626d208
M: ed37b7ab202728a3075361fdd9042123a626d208 192.168.217.130:7001
   slots:12288-16383 (4096 slots) master
   1 additional replica(s)
S: 8a233387fcfe6cab920ab2dac545dd8ff5bd8b9e 192.168.217.132:7007
   slots: (0 slots) slave
   replicates 67ecc8df9f62a76601cde52074a7ff2f9753cb89
S: 3337efec5dc66f853b5969ebd7ffbaeb6569d29c 192.168.217.132:7008
   slots: (0 slots) slave
   replicates 369f5ecb5e97a68c80022068ba59b9709bb60a6a
S: 5f854408fb693a9410134caf2326afdb7dae98eb 192.168.217.130:7002
   slots: (0 slots) slave
   replicates a46e18b53e81a40838aa1a56cb2bc40c7756531c
[OK] All nodes agree about slots configuration.
>>> Check for open slots...
>>> Check slots coverage...
[OK] All 16384 slots covered.
列出集群节点
192.168.217.130:7000> cluster nodes
打印集群信息
192.168.217.130:7000> cluster info
如果出现
Node 192.168.217.130:7000 is not empty. Either the node already knows other nodes (check with CLUSTER NODES) or contains some key in database 0.

集群挂了
- 解决办法:
1)将每个节点下aof、rdb、nodes.conf本地备份文件删除;
重新执行
$ /opt/redis-4.0.1/src/redis-trib.rb create --replicas 1 192.168.217.130:7000 192.168.217.130:7001 192.168.217.130:7002 192.168.217.131:7003 192.168.217.131:7004 192.168.217.131:7005 192.168.217.132:7006 192.168.217.132:7007 192.168.217.132:7008


 1068
1068


 被折叠的 条评论
为什么被折叠?
被折叠的 条评论
为什么被折叠?
 到【灌水乐园】发言


