


一、准备相关环境
1、如果环境没有网络,我们准备可以拿光盘做yum源来安装相应的软件[root@centso-test ~]# mkdir /media/cdrom # 创建挂载点
[root@centso-test ~]# mount -r -t iso9660 /dev/dvd /media/cdrom/
[root@centso-test ~]# mount # 查看是否挂载成功
.......以上省略.....
/dev/sr0 on /media/cdrom type iso9660 (ro) # 显示挂载成功。
新建光盘YUM源
在/etc/yum.repos.d/目录下新建以 .repo结尾的文件,文件内容如下[cdrom_yum]
name=cdrom_yum
baseurl=file///media/cdrom
enabled=1
gpgcheck=0
如果想开机自动挂载,要不然每次关机后,都需要重新挂载光盘才能使用光盘YUM源
修改配置文件/etc/fstab
增加一行/dev/dvd /media/cdrom iso9660 defaults 0 0
挂载设备 挂载目录 文件类型 挂载选项 0表示从不备份 0表示从不自检
2、需要安装软件 DHCP tftp http
配置TFTP[root@centso-test ~]# yum -y install xinetd tftp-server tftp # 安装所需软件
[root@centso-test ~]# chkconfig --list # 查看以xinetd管理的服务
。。。。以上部份省略。。。。。
udev-post 0:off 1:on 2:on 3:on 4:on 5:on 6:off
xinetd 0:off 1:off 2:off 3:on 4:on 5:on 6:off
xinetd based services:
chargen-dgram: off
chargen-stream: off
daytime-dgram: off
daytime-stream: off
discard-dgram: off
discard-stream: off
echo-dgram: off
echo-stream: off
tcpmux-server: off
tftp: off # 发现tftp是关闭的,我们启用之
time-dgram: off
time-stream: off
[root@centso-test ~]# chkconfig xinetd on # 设为开机启动
[root@centso-test ~]# chkconfig tftp on # 设为开机启动
[root@centso-test ~]# service xinetd start # 由于我们的tfpt是由xinetd管理的所以这里我们启动xinetd
[root@centso-test ~]# ss -unl | grep 69 # 查看是否启动成功。tftp默认使用69端口
UNCONN 0 0 *:69 *:* #存在,己经启动成功
设置共享目录:# vim /etc/xinetd.d/tftp # 把这项server_args = -s /var/lib/tftpboot
准备ftpboot下的文件
[root@desktop ~]# yum -y install syslinux
[root@desktop ~]# cp /usr/share/syslinux/pxelinux.0 /var/lib/tftpboot/[root@desktop ~]# cp /media/cdrom/p_w_picpaths/pxeboot/{vmlinuz,initrd.img} /var/lib/tftpboot/
[root@desktop ~]# cp /media/cdrom/isolinux/{boot.msg,vesamenu.c32,splash.jpg} /var/lib/tftpboot/[root@desktop ~]# mkdir /var/lib/tftpboot/pxelinux.cfg
[root@desktop ~]# cp /media/cdrom/isolinux/isolinux.cfg /var/lib/tftpboot/pxelinux.cfg/default[root@desktop ~]# chmod u+w /var/lib/tftpboot/pxelinux.cfg/default
[root@desktop ~]# vim /var/lib/tftpboot/pxelinux.cfg/default
把第一行改成default linux
配置dhcp服务器[root@desktop ~]# yum -y install dhcp[root@desktop ~]# vim /etc/dhcp/dhcpd.conf # 修改配置文件内容如下
#
# DHCP Server Configuration file.
# see /usr/share/doc/dhcp*/dhcpd.conf.sample
# see 'man 5 dhcpd.conf'
#
subnet 172.16.0.0 netmask 255.255.0.0{
reage 172.16.0.1 172.16.0.100
next-server 172.16.0.1
filename "pxelinux.0"
}[root@desktop ~]# vim /etc/sysconfig/network-scripts/ifcfg-eth0
BOOTPROTO=none
IPADDR=172.16.0.1
NETMASK=255.255.0.0
GETEWAY=172.16.0.1
DNS1=172.16.0.1
关闭防火墙和selinux ,要不然dhcpd服务无法启动。[root@desktop Desktop]# chkconfig dhcpd on
[root@desktop Desktop]# service dhcpd start
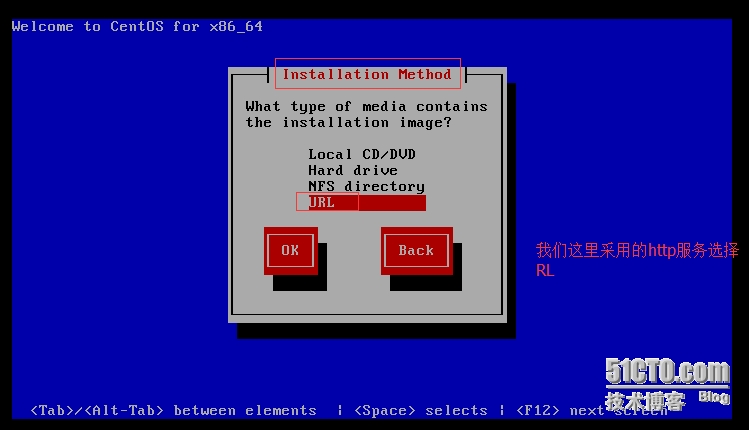
配置安装树,HTTP[root@desktop Desktop]# yum -y install http
[root@desktop Desktop]# mkdir /var/www/html/centos6
[root@desktop Desktop]# mount --bind /media/cdrom/ /var/www/html/centos6/
or cp -r /media/cdrom/* /var/www/html/centos6/ 我使用此方法,因为后面我还要复制annakanda.ks.conf文件到这目录下完成自动化安装
[root@desktop Desktop]# chkconfig httpd on
[root@desktop Desktop]# service httpd start
Starting httpd: httpd: apr_sockaddr_info_get() failed for desktop
httpd: Could not reliably determine the server's fully qualified domain name, using 127.0.0.1 for ServerName
[ OK ]
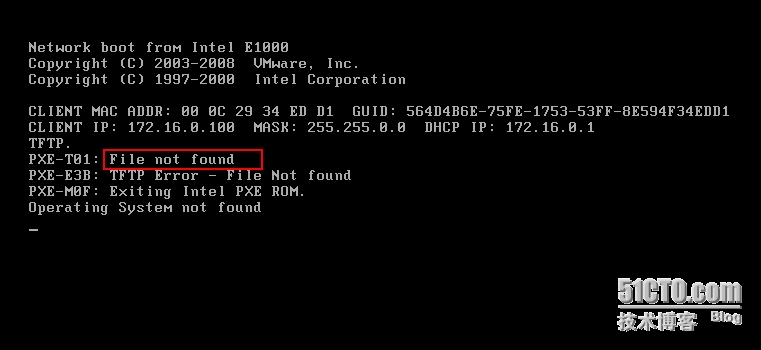
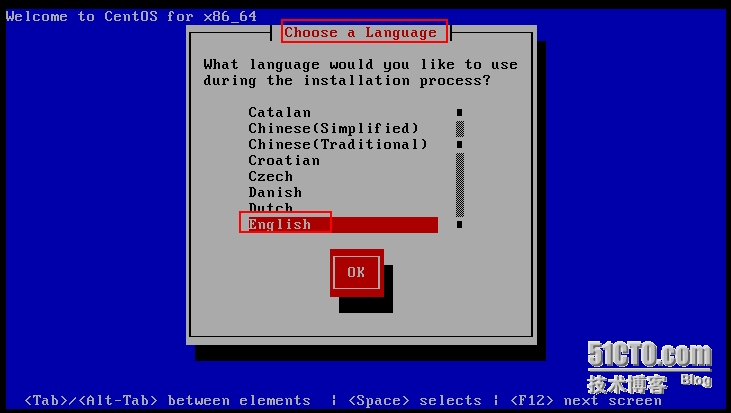
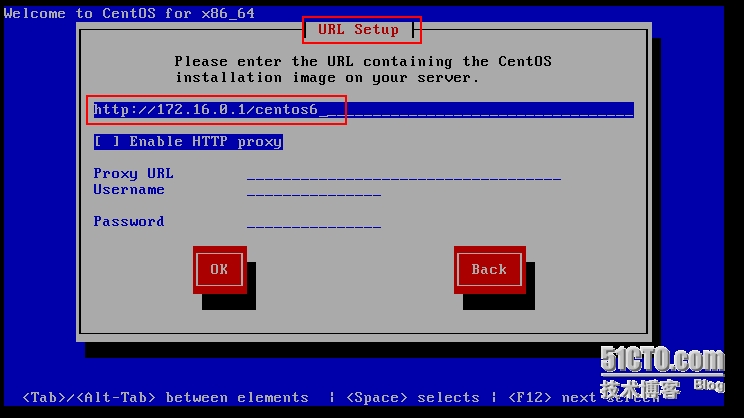
-----------------------通过PXE启动测试手动安装是否有问题 -------------------
启动客户端,设置从网卡启动,
出现如下原因:检查1、vim /etc/dhcp/dhcpd.conf 中的filename "pxlinux.0"记录是否存在,与/var/lib/tftpboot下对应
2、/var/lib/tftpboot/pxlinux.0 文件是否有读权限
3、如修改了/etc/dhcp/dhcpd.conf 文件后需重启dhcpd服务才可以


至此手动安装没有问题 ------------------------
准备annakanda.ks.cfg文件实现自动安装---
我们可以使用系统中存在的anakanda.ks.cfg文件做模板来设置# cd ~ # 切换到家目录
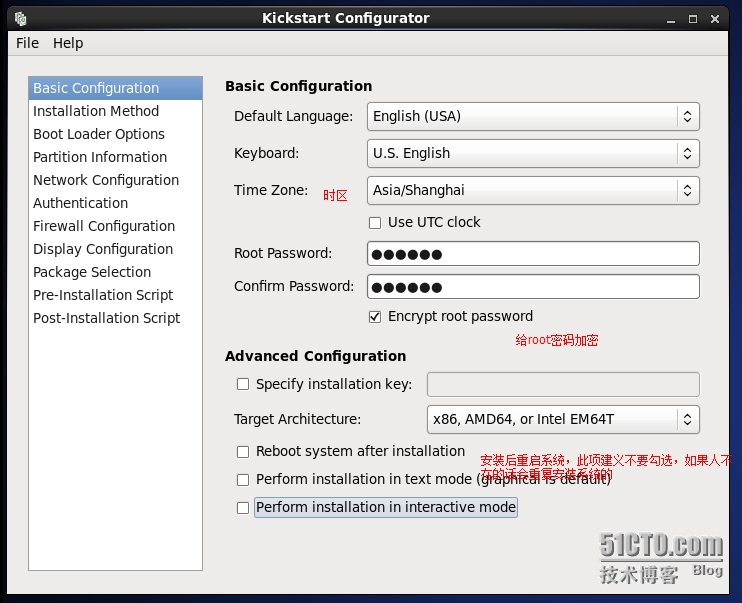
# cp anakanda.ks.cfg /tmp/ks.cfg# system-config-kickstart # 此命令默认没有安装,需要在桌面环境下使用,不然会提示x server没有运行
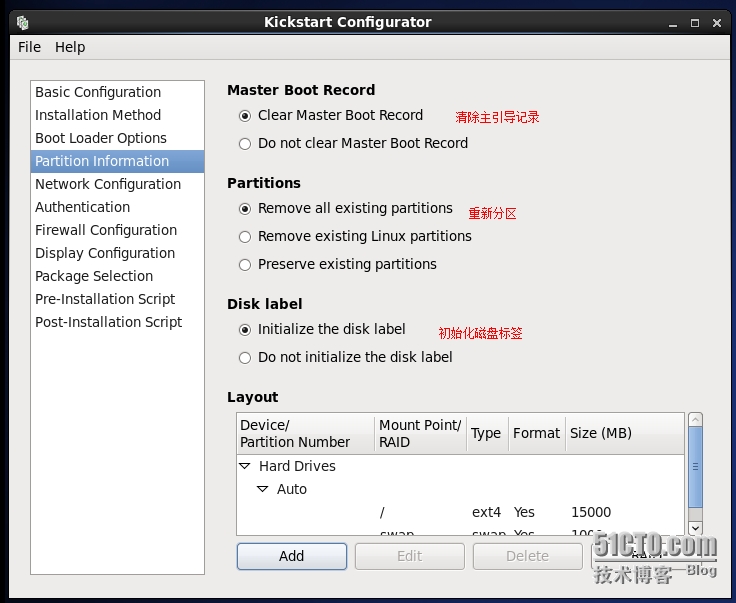
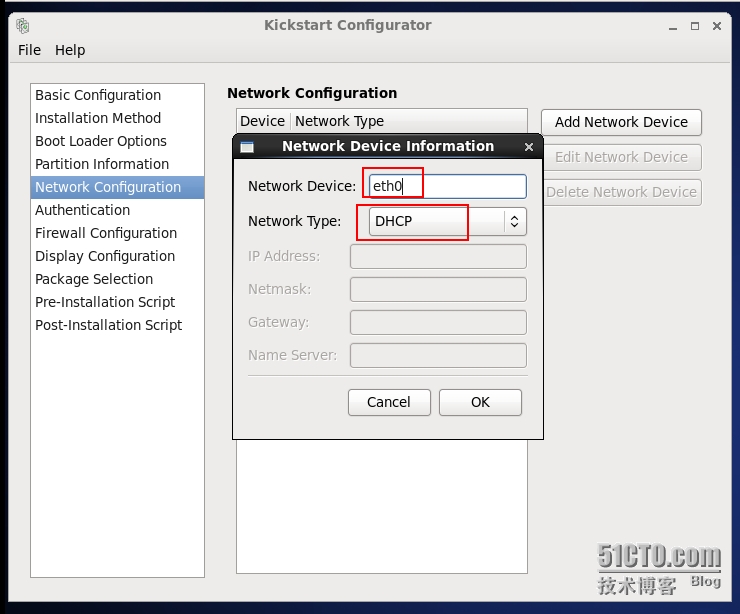
使用kickstart部骤如下
如果使用模板的话启动kickstart后,点file--->open file,载入后再进行配置
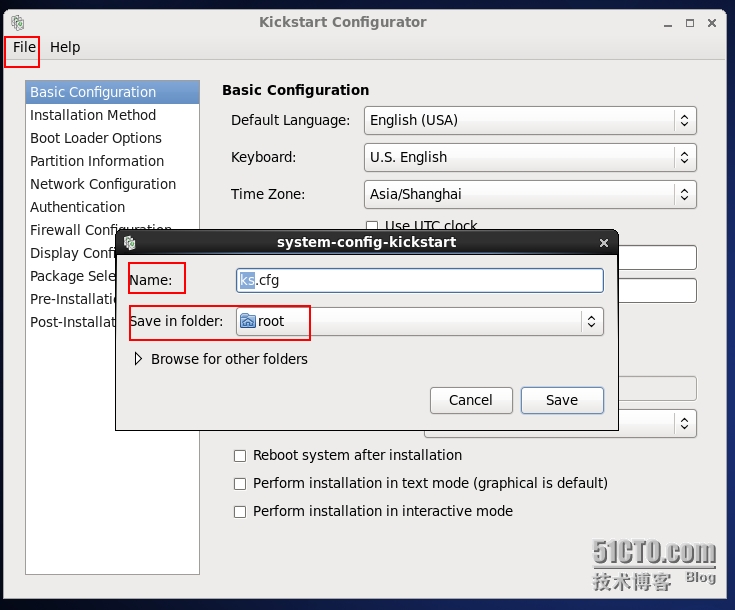
安装前准备完成。下面准备yum源和指定需要安装的包# cp ~root/ks.cfg /var/
[root@desktop ~]# vim /var/www/html/centos6/ks.cfg#platform=x86, AMD64, or Intel EM64T
#version=DEVEL
# Firewall configuration
firewall --disabled
# Install OS instead of upgrade
install
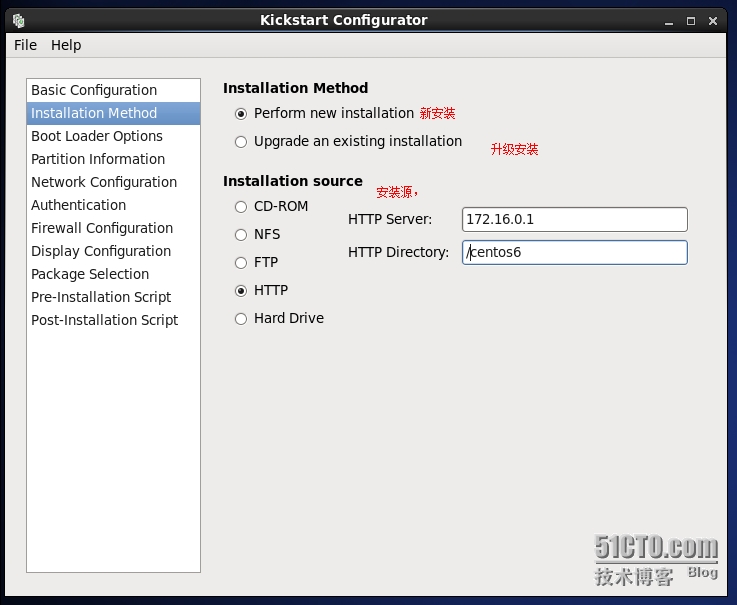
# Use network installation
url --url="http://172.16.0.1/centos6"
# Root password
rootpw --iscrypted $1$qsPEkP0S$OCIXeAxJxeg522h4KlBYt/
# System authorization information
auth --useshadow --passalgo=sha512
# Use graphical install
graphical
firstboot --disable
# System keyboard
keyboard us
# System language
lang en_US
# SELinux configuration
selinux --disabled
# Installation logging level
logging --level=info
# System timezone
timezone Asia/Shanghai
# Network information
network --bootproto=dhcp --device=eth0 --onboot=on
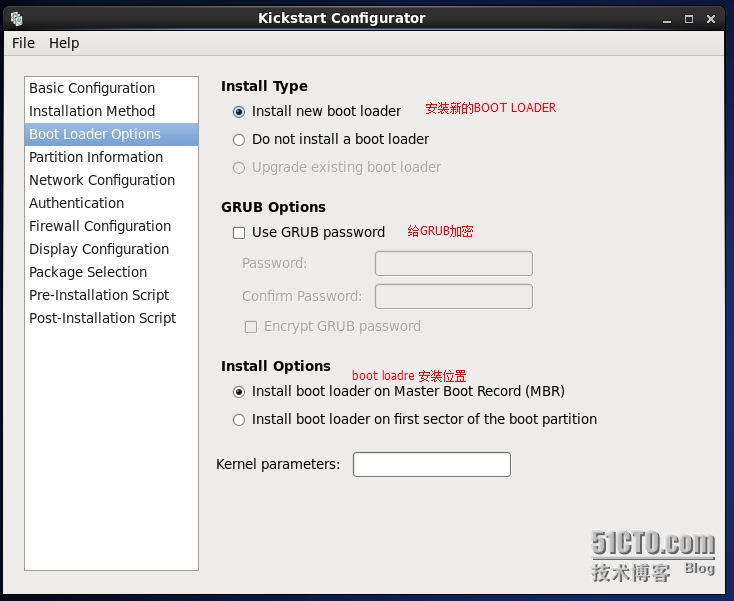
# System bootloader configuration
bootloader --location=mbr
# Clear the Master Boot Record
zerombr
# Partition clearing information
clearpart --all --initlabel
# Disk partitioning information
part / --fstype="ext4" --size=15000
part swap --fstype="swap" --size=1000
repo --name="CentOS" --baseurl=http://172.16.0.1/centos6 --cost=100
%packages
@base
@core
@debugging
@basic-desktop
@desktop-debugging
@desktop-platform
@directory-client
@fonts
@general-desktop
@graphical-admin-tools
@input-methods
@internet-applications
@internet-browser
@java-platform
@legacy-x
@network-file-system-client
@office-suite
@print-client
@remote-desktop-clients
@server-platform
@server-policy
@workstation-policy
@x11
mtools
pax
oddjob
wodim
sgpio
genisop_w_picpath
device-mapper-persistent-data
abrt-gui
samba-winbind
certmonger
pam_krb5
krb5-workstation
libXmu
%end
kickstart文件的组成部份:分为三段,命令段、软件包段、脚本段
命令段:用于配置系统
install
firwall
part
lv
软件包:指定要安装的程序组及程序包(@组包)及程序包(程序包名)每行一个
%packages包组
@Base #使用@表示组
lftp # 表示单个包
%end 表示软件包安装结束
注意:在程序包名称之前附加“-”号,表示不希望安装。
脚本段: (不是必须的)
%pre:安装过程开始之前执行的安装预备脚本 %表示段
所能执行的操作较小,它是一个受限的环境 ,因为其仅有
配置引导程能自动加载此kickstart文件[root@desktop ~]# cd /var/lib/tftpboot/pxelinux.cfg/
[root@desktop pxelinux.cfg]# vim default
在label为linux项的append一行后附加:
ks=http://HTTP_SERVER_IP/ks.cfg在文件append initrd=initrd.img 后增加ks.cfg文件路径 ks=http://172.16.0.1/centos6/ks.cfgdefault linux
#prompt 1
timeout 600
display boot.msg
menu background splash.jpg
menu title Welcome to CentOS 6.5!
menu color border 0 #ffffffff #00000000
menu color sel 7 #ffffffff #ff000000
menu color title 0 #ffffffff #00000000
menu color tabmsg 0 #ffffffff #00000000
menu color unsel 0 #ffffffff #00000000
menu color hotsel 0 #ff000000 #ffffffff
menu color hotkey 7 #ffffffff #ff000000
menu color scrollbar 0 #ffffffff #00000000
label linux
menu label ^Install or upgrade an existing system
menu default
kernel vmlinuz
append initrd=initrd.img ks=http://172.16.0.1/centos6/ks.cfg
label vesa
menu label Install system with ^basic video driver
kernel vmlinuz
append initrd=initrd.img xdriver=vesa nomodeset
label rescue
menu label ^Rescue installed system
kernel vmlinuz
append initrd=initrd.img rescue


 7419
7419


 被折叠的 条评论
为什么被折叠?
被折叠的 条评论
为什么被折叠?
 到【灌水乐园】发言


