


LeanCloud在android studio的SDK安装和连接
之前看官方文档看到头晕,网上我看都是有jar包的,我就有点迷终于摸索出来了一点方法在Android studio中去安装SDK,连接leancloud
官网下载好SDK
可以根据需要下载,可用Git,SDK下载网址:
点击链接下载: SDK下载.
复制相应包
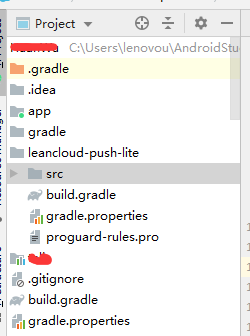
看产品文档需要哪个包,就下载哪个。在这里我需要存取数据,所以用了leancloud-push-lite,把这一整个文件夹放到项目的目录下


放置目录如图:
修改整个项目的gradle文件(可适当参照对比)
buildscript {
repositories {
google()
jcenter()
maven {
url "https://oss.sonatype.org/content/groups/public/"//仓库地址
}
}
dependencies {
classpath 'com.android.tools.build:gradle:3.6.1'
// NOTE: Do not place your application dependencies here; they belong
// in the individual module build.gradle files
}
}
allprojects {
repositories {
google()
jcenter()
maven {
url "https://oss.sonatype.org/content/groups/public/"//仓库地址
}
}
}
task clean(type: Delete) {
delete rootProject.buildDir
}
在app的build.gradle依赖加上
implementation 'cn.leancloud:storage-android:6.5.6'
implementation 'io.reactivex.rxjava2:rxandroid:2.1.1'
把
implementation fileTree(dir: 'libs', include: ['*.jar'])
再修改为
// implementation fileTree(dir: 'libs', include: ['*.jar'])
implementation ('cn.leancloud:realtime-android:6.5.3') {
exclude group: 'cn.leancloud', module: 'realtime-core'}
加上
packagingOptions {
exclude 'META-INF/LICENSE.txt'
exclude 'META-INF/NOTICE.txt'
}
lintOptions {
abortOnError false
}
所有修改之后如下,可对比参照:
apply plugin: 'com.android.application'
android {
compileSdkVersion 29
buildToolsVersion "29.0.2"
defaultConfig {
applicationId "com.example.huanwu"
minSdkVersion 16
targetSdkVersion 29
versionCode 1
versionName "1.0"
testInstrumentationRunner "androidx.test.runner.AndroidJUnitRunner"
}
compileOptions {
sourceCompatibility JavaVersion.VERSION_1_8
targetCompatibility JavaVersion.VERSION_1_8
}
buildTypes {
release {
minifyEnabled false
proguardFiles getDefaultProguardFile('proguard-android-optimize.txt'), 'proguard-rules.pro'
}
}
packagingOptions {
exclude 'META-INF/LICENSE.txt'
exclude 'META-INF/NOTICE.txt'
}
lintOptions {
abortOnError false
}
}
dependencies {
// implementation fileTree(dir: 'libs', include: ['*.jar'])
implementation ('cn.leancloud:realtime-android:6.5.3') {
exclude group: 'cn.leancloud', module: 'realtime-core'
}
implementation 'androidx.appcompat:appcompat:1.1.0'
implementation 'androidx.constraintlayout:constraintlayout:1.1.3'
testImplementation 'junit:junit:4.12'
androidTestImplementation 'androidx.test.ext:junit:1.1.1'
androidTestImplementation 'androidx.test.espresso:espresso-core:3.2.0'
implementation 'androidx.recyclerview:recyclerview:1.2.0-alpha03'
implementation 'cn.leancloud:storage-android:6.5.6'
implementation 'io.reactivex.rxjava2:rxandroid:2.1.1'
}
在app的AndroidManifest.xml文件上
加上
android:name=".MainActivity"
修改之后的文件参考如下
package="com.example.test">
android:allowBackup="true"
android:icon="@mipmap/ic_launcher"
android:label="@string/app_name"
android:roundIcon="@mipmap/ic_launcher_round"
android:supportsRtl="true"
android:theme="@style/AppTheme"
android:name=".MainActivity">
>
测试自己的活动
package com.example.test;
import androidx.appcompat.app.AppCompatActivity;
import android.app.Application;
import android.os.Bundle;
import cn.leancloud.AVOSCloud;
import cn.leancloud.AVObject;
public class MainActivity extends Application {
@Override
public void onCreate() {
super.onCreate();
// 提供 this、App ID、App Key、Server Host 作为参数
// 注意这里千万不要调用 cn.leancloud.core.AVOSCloud 的 initialize 方法,否则会出现 NetworkOnMainThread 等错误。
AVOSCloud.initialize(this, "XC2Rr7WVhYA68PaFTu2voQQf-gzGzoHsz", "UF3Ivhw9uLXPDUDJ4m2MBTQh", "https://please-replace-with-your-customized.domain.com");//放自己的域名
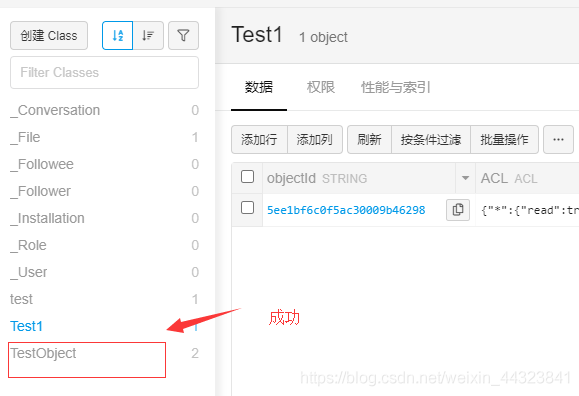
AVObject testObject = new AVObject("TestObject");
testObject.put("words", "Hello world!");
testObject.saveInBackground().blockingSubscribe();
}
}
如果编译有问题,可以尝试在app的build.gradle加上
compileOptions {
sourceCompatibility JavaVersion.VERSION_1_8
targetCompatibility JavaVersion.VERSION_1_8
}
加上之后参考如下
apply plugin: 'com.android.application'
android {
compileSdkVersion 29
buildToolsVersion "29.0.2"
defaultConfig {
applicationId "com.example.huanwu"
minSdkVersion 16
targetSdkVersion 29
versionCode 1
versionName "1.0"
testInstrumentationRunner "androidx.test.runner.AndroidJUnitRunner"
}
compileOptions {
sourceCompatibility JavaVersion.VERSION_1_8
targetCompatibility JavaVersion.VERSION_1_8
}
buildTypes {
release {
minifyEnabled false
proguardFiles getDefaultProguardFile('proguard-android-optimize.txt'), 'proguard-rules.pro'
}
}
packagingOptions {
exclude 'META-INF/LICENSE.txt'
exclude 'META-INF/NOTICE.txt'
}
lintOptions {
abortOnError false
}
}
测试成功
来源:oschina
链接:https://my.oschina.net/u/4274967/blog/4311247


 2094
2094


 被折叠的 条评论
为什么被折叠?
被折叠的 条评论
为什么被折叠?
 到【灌水乐园】发言


