


根据这段时间的博客访问量来看,我判断出写一些小玩意非常受欢迎,那也就是说,有很多人喜欢这些东西,写这个东西能帮助到一部分人,无论他们是拿来学习也好,做一个送人也好,都是有意义的。由此推出,我并不是为了那些可有可无的访问量来的。

刚好你喜欢,刚好我会做,所以很希望能够一如既往的帮到那些可爱的同志们。
还是老规矩,先来效果:

上代码:

html部分:
<body>
	<div class="box">
		<div class="wheel">
			<ul>
				<li></li>
				<li></li>
				<li></li>
				<li></li>
				<li></li>
				<li></li>
				<li></li>
				<li></li>
			</ul>
		</div>

		<div class="bracket"></div>
		<div class="bracketsmall"></div>
		<div class="bigtitle"></div>
		<div class="title"></div>
		<div class="arrow"></div>
	</div>
</body>
css部分:
<style>
*{
	margin:0px;
	padding: 0px;
}
body{
	background: url("images/2.jpg");
	background-size: cover;
	background-position: center center;
}
.box{
	/*border:solid 1px red;*/
	width: 1000px;
	height: 1000px;
	margin:0px auto;
	position: relative;
}
.wheel{
	background: url("images/fsw.png");
	height:768px;
	width: 768px;
	margin: 0px auto;
	-webkit-animation:wheelrotation 10s linear infinite;
	position: relative;
}
.wheel li{
	border-radius: 20px;
}
.bracket{
	width: 358px;
	height: 529px;
	background: url("images/bracket.png") no-repeat;
	position: absolute;
	left:318px;
	top:375px;
}
.bracketsmall{
	width: 247px;
	height: 505px;
	background: url("images/bracketsmall.png") no-repeat;
	position: absolute;
	left:375px;
	top:382px;
	z-index:-2;
}
.bigtitle{
	width: 577px;
	height: 257px;
	position: absolute;
	left: 212px;
	top: 269px;
	background-image: url("images/big-title.png");
}
.arrow{
	width: 48px;
	height: 64px;
	position: absolute;
	left: 482px;
	top: 550px;
	background: url("images/arrow.png") no-repeat;
}
ul{
	list-style: none;
}
li{
	height:170px;
	width: 130px;
	position: absolute;
	-webkit-animation:childrotation 10s linear infinite;
	-webkit-transform-origin:50% 0;
}
li:nth-child(1){
	background: url("images/1.jpg");
	left: 330px;
	top:0px;
}
li:nth-child(2){
	background: url("images/3.jpg");
	left: 594px;
	top:125px;
}
li:nth-child(3){
	background: url("images/4.jpg");
	left: 694px;
	top:370px;
}
li:nth-child(4){
	background: url("images/5.jpg");
	left: 594px;
	top:650px;
}
li:nth-child(5){
	background: url("images/6.jpg");
	left: 330px;
	top:740px;
}
li:nth-child(6){
	background: url("images/7.jpg");
	left: 94px;
	top:640px;
}
li:nth-child(7){
	background: url("images/8.jpg");
	left: -6px;
	top:370px;
}
li:nth-child(8){
	background: url("images/9.jpg");
	left: 94px;
	top:125px;
}
@-webkit-keyframes wheelrotation{
	0%{
		-webkit-transform:rotate(0deg);
	}
	100%{
		-webkit-transform:rotate(360deg);
	}
}
@-webkit-keyframes childrotation{
	0%{
		-webkit-transform:rotate(0deg);
	}
	100%{
		-webkit-transform:rotate(-360deg);
	}
}
</style>
需要用到的图片素材,已上传到此链接(贴心吧,哈哈):素材所在链接 提取码:72tn
注意:图中悬挂图片是130像素x170像素的,如果想要把自己的图片替换掉上面的图片,用PS调整一下你的图片大小即可。
【附】PS调整图片大小方法:
- 打开PS
- 把图片拖进来
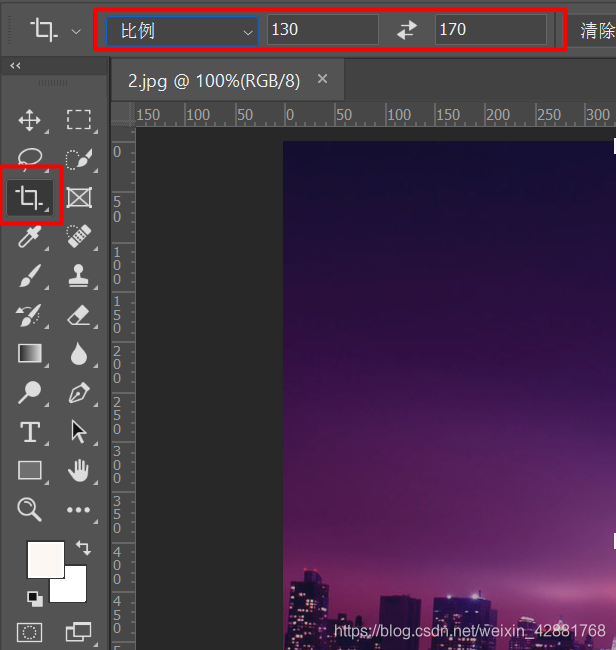
- 点击“裁剪”,然后选择“比例”为130:170,然后
按两次回车键,此时裁剪完成
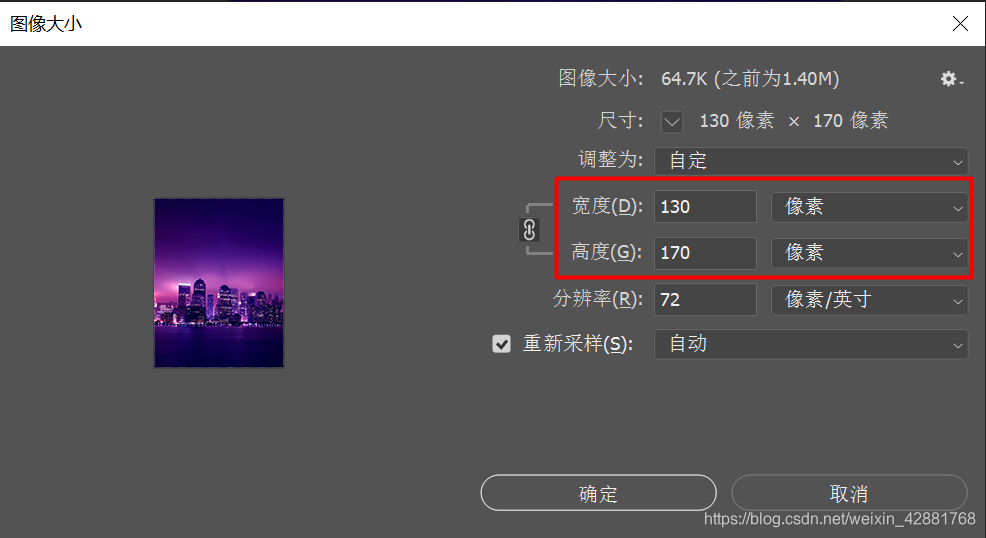
- 在上方菜单栏选择“图像”,“图像大小”,弹出以下界面。或在键盘上按下快捷键Ctrl+Alt+i,设置为像素格式,宽度130,高度170,点击确定
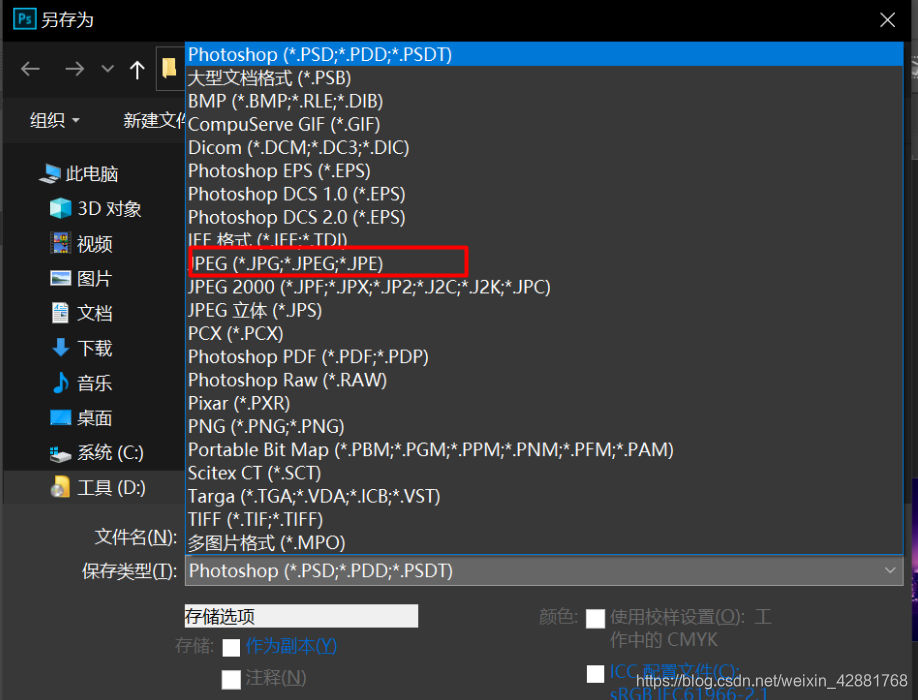
- 此时,点击上方菜单栏的“文件”,“存储为…”弹出以下界面进行保存,或按Ctrl+S
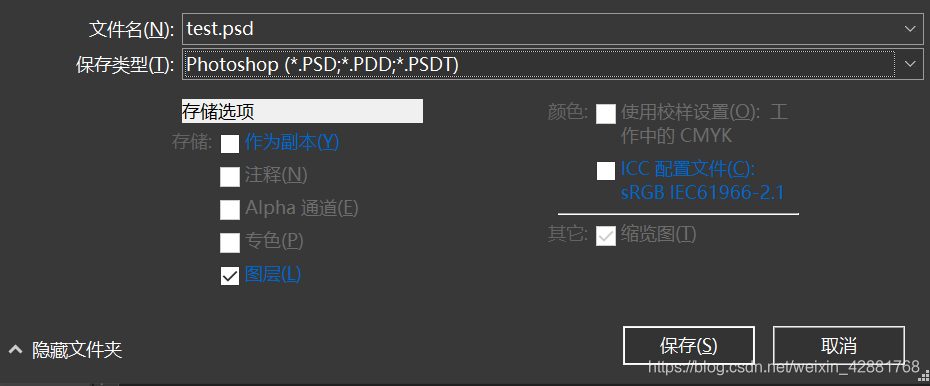
- 图片名对应百度网盘里面素材对应的名字,然后在“保存类型”里面选择JPG格式进行保存,保存到HTML文件能够找到的images文件夹里面
- 完成
帮人帮到底,运行不出来或者有问题的小伙伴,欢迎随时打扰哦~


 338
338


 被折叠的 条评论
为什么被折叠?
被折叠的 条评论
为什么被折叠?
 到【灌水乐园】发言


