


Introduction
What is Logging?
Logging is the act of keeping a log. The log file is a file where all events or error of application is written.
Reference: - https://en.wikipedia.org/wiki/Log_file
Logging is an important part of application; how much we try to build application error free but some errors are there which occurs conditionally to log this kind of error we need use some logging libraries, for example, some errors may occur due some database server is down or some application functionally is not working properly how we are going to know if we don’t have proper logging setup we would not able to know what functionally is not working at client end. There is a well-known phrase from developers “it works on my machine”. To know what is going wrong in your application logging is important.

Icons made by Freepik from www.flaticon.com is licensed by CC 3.0 BY
4 Logging libraries
We have 4 logging libraries which we are going see in details how to implement them with ASP.NET MVC application.
1. Log4net (Logging in text file + logging in SQL database)
2. Nlog (Logging in text file + logging in SQL database)
3. SerialLog (Logging in text file + logging in SQL database)
4. Elmah (logging in SQL database)
Source Code is available on Github link are provided at end of the Article.
Creating ASP.NET Application
Let’s start with creating a simple ASP.NET Web application using 4.5 ASP.NET Template with Name “WebErrorLogging”.

After creating the application first library which we are going to see how to implement is Log4net.
Log4net
What is Apache log4net?
The Apache log4net library is a tool to help the programmer output log statements to a variety of output targets.
Reference of definition: - https://logging.apache.org/log4net/
Adding Reference to project from NuGet
We are going to install log4net from NuGet package.

After adding reference of log4net next we are going configure it for logging errors.
We are going to see 2 ways of logging in Log4net
- In Text file
- In Database
Log4net Logging in Text File
Let’s begin with logging in a text file. For doing this in Log4net we need to add configuration in web.config file. for logging messages in the text file, we are going to use “RollingLogFileAppender” Class.
RollingLogFileAppender that rolls log files based on size or date or both.
The RollingFileAppender builds on the FileAppender and has the same options as that appender.
Adding this configuration in web.config file will start writing logging messages to file.
Hide Copy Code
<configSections>
    <section name="log4net" type="log4net.Config.Log4NetConfigurationSectionHandler,log4net" />
 </configSections>

<log4net>
    <root>
      <level value="ALL"></level>
      <appender-ref ref="RollingLogFileAppender"></appender-ref>
    </root>
    <appender name="RollingLogFileAppender" type="log4net.Appender.RollingFileAppender">
      <file value="E:\DemoProject\WebErrorLogging\WebErrorLogging\ErrorLog\logfile.txt" />
      <appendToFile value="true" />
      <rollingStyle value="Date" />
      <datePattern value="yyyyMMdd" />
      <maxSizeRollBackups value="10" />
      <maximumFileSize value="1MB" />
      <layout type="log4net.Layout.PatternLayout">
        <conversionPattern

        value="%date [%thread] %-5level %logger [%property{NDC}] - %message%newline" />
      </layout>
    </appender>
</log4net>
As you can see in above configuration settings which must be added in your “<configuration>” tag of the web.config file.
Then inside log4net element we can see root element inside that tag we have 2 more child element one is level and another is appender-ref.
appender-ref: - Zero or more elements allowed. Allows the logger to reference appenders by name.
level: - Optional element, maximum of one allowed. Defines the logging level for this logger. This logger will only accept an event that is at this level or above.
Different Logging Levels
- ALL
- DEBUG
- INFO
- WARN
- ERROR
- FATAL
- OFF
RollingLogFileAppender
If you can see main element appender which has the name “RollingLogFileAppender” inside that there is a child element file where we can configure path where to log a file.
Example: -
Hide Copy Code
<file value="ErrorLog/log.txt" />
Note: - I have given path as “ErrorLog/log.txt” because I have created an ErrorLog folder inside this application.

Next element is appendToFile.
appendToFile
If the value is set to false then the file will be overwritten, if it is set to true then the file will be appended to.
RollingStyle
| Name | Description |
| Once | Roll files once per program execution |
| Size | Roll files based only on the size of the file |
| Date | Roll files based only on the date |
| Composite | Roll files based on both the size and date of the file |
Reference from: - https://logging.apache.org/
maxSizeRollBackups
if we set the maximum file size to 1MB and maxSizeRollBackups to 10 MB it will keep only the last 10 files of MB based on date or file size.
Snapshot of the web.config file
I have given snapshot below for reference were to add elements properly in the web.config file.

After add configuration in web.config file Next, we are going to initialize Log4net.
Initialize Log4net
We need to call configure method of XmlConfigurator class to initialize Log4net.
Hide Copy Code
log4net.Config.XmlConfigurator.Configure();

After initializing the XmlConfigurator method in global.asax. Now for the demo, I have added a Controller with name DefaultController with index action method in this to show how we can log error, debug information using it.
Code Snippet
Hide Shrink  Copy Code
using System;
using System.Collections.Generic;
using System.Linq;
using System.Web;
using System.Web.Mvc;
using log4net;

namespace WebErrorLogging.Controllers
{
    public class DefaultController : Controller
    {
        private static readonly ILog Log = LogManager.GetLogger(typeof(DefaultController));

        // GET: Default

        public ActionResult Index()
        {
            try
            {
                Log.Debug("Hi I am log4net Debug Level");
                Log.Info("Hi I am log4net Info Level");
                Log.Warn("Hi I am log4net Warn Level");
                throw new NullReferenceException();
                return View();
            }
            catch (Exception ex)
            {
                Log.Error("Hi I am log4net Error Level", ex);
                Log.Fatal("Hi I am log4net Fatal Level", ex);
                throw;
            }
        }
    }
}
After adding a controller and getting an instance of LogManager class we have logged message on various levels.
Now let’s test it by running application.
Error Logged file
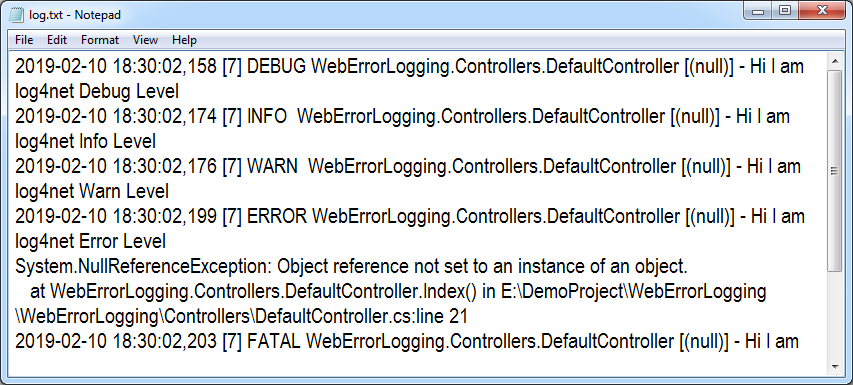
Now we have completed with logging application into text file next we are going to log the exception into the database.
Log4net Logging in Database
For logging in the database, we need to first create a table in the database.

The script for creating table
Hide Copy Code
CREATE TABLE [dbo].[Log](
       [Id] [int] IDENTITY(1,1) NOT NULL,
       [Date] [datetime] NOT NULL,
       [Thread] [varchar](255) NOT NULL,
       [Level] [varchar](50) NOT NULL,
       [Logger] [varchar](255) NOT NULL,
       [Message] [varchar](4000) NOT NULL,
       [Exception] [varchar](2000) NULL
) ON [PRIMARY]
After creating the Log table in database next we are going to add New type of appender which is “log4net.Appender.AdoNetAppender”
Adding this configuration in web.config file will start writing logging messages to the Database table.
For doing that we need connection string of database where we are going to log error, if you see below configuration you will see connectionStrings element where I have added database connection settings which we are going to assign connectionStrings inside “AdoNetAppender”.
If you see commandText element inside “AdoNetAppender” you will see the script of insert statement in it.
The Main thing we need to set is “appender-ref” here we are going to log message into a database for doing that we are going to set reference (ref) as “AdoNetAppender”.
Hide Copy Code
<appender-ref ref="AdoNetAppender"></appender-ref>
Configuration Setting
Hide Shrink Copy Code
<configuration>
  <configSections>
    <section name="log4net" type="log4net.Config.Log4NetConfigurationSectionHandler,log4net" />
  </configSections>
  <connectionStrings>
    <add name="ConnectionStringLogging"

    connectionString="data source=SAI-PC\SQLEXPRESS;
    initial catalog=LoggingDatabase;
    integrated security=false;persist security info=True;User ID=sa;Password=Pass$123"

    providerName="System.Data.SqlClient" />
  </connectionStrings>
  <log4net>
    <root>
      <level value="ALL"></level>
      <appender-ref ref="AdoNetAppender"></appender-ref>
    </root>
    <appender name="AdoNetAppender" type="log4net.Appender.AdoNetAppender">
      <bufferSize value="1" />
      <connectionType

      value="System.Data.SqlClient.SqlConnection,System.Data,
      Version=1.0.3300.0, Culture=neutral, PublicKeyToken=b77a5c561934e089" />
      <connectionStringName value="ConnectionStringLogging" />
      <commandText value="INSERT INTO Log ([Date],[Thread],[Level],[Logger],[Message],[Exception])
      VALUES (@log_date, @thread, @log_level, @logger, @message, @exception)" />
      <parameter>
        <parameterName value="@log_date" />
        <dbType value="DateTime" />
        <layout type="log4net.Layout.RawTimeStampLayout" />
      </parameter>
      <parameter>
        <parameterName value="@thread" />
        <dbType value="String" />
        <size value="255" />
        <layout type="log4net.Layout.PatternLayout">
          <conversionPattern value="%thread" />
        </layout>
      </parameter>
      <parameter>
        <parameterName value="@log_level" />
        <dbType value="String" />
        <size value="50" />
        <layout type="log4net.Layout.PatternLayout">
          <conversionPattern value="%level" />
        </layout>
      </parameter>
      <parameter>
        <parameterName value="@logger" />
        <dbType value="String" />
        <size value="255" />
        <layout type="log4net.Layout.PatternLayout">
          <conversionPattern value="%logger" />
        </layout>
      </parameter>
      <parameter>
        <parameterName value="@message" />
        <dbType value="String" />
        <size value="4000" />
        <layout type="log4net.Layout.PatternLayout">
          <conversionPattern value="%message" />
        </layout>
      </parameter>
      <parameter>
        <parameterName value="@exception" />
        <dbType value="String" />
        <size value="2000" />
        <layout type="log4net.Layout.ExceptionLayout" />
      </parameter>
    </appender>
  </log4net>
</configuration>
Snapshot of the web.config file
I have given snapshot below for reference were to add elements properly in the web.config file.

Now we are going to run the same application which we have used for logging message in the text file but this time we are going to log message into the database.
Now let’s test it by running application.
Error Logged into the database
After running application and accessing Default Controller messages are logged in the database as shown below.

After completing with understand Log4net next we are going to move forward and see how to use Nlog for logging messages.
Nlog
What is Nlog?
NLog is a flexible and free logging platform for various .NET platforms, including .NET standard. NLog makes it easy to write to several targets. (database, file, console) and change the logging configuration on-the-fly.
Reference from: - https://nlog-project.org/
Adding Reference to project from NuGet
We are going to install 2 packages NLog and NLog.Config from NuGet package.

After adding reference of NLog next we are going configure it for logging errors.
We are going to see 2 ways of logging in NLog
- In Text file
- In Database
Nlog Logging in Text File
| Level | Typical Use |
|---|---|
| Fatal | Something bad happened; an application is going down |
| Error | Something failed; an application may or may not continue |
| Warn | Something unexpected; the application will continue |
| Info | Normal behaviour like mail sent user updated profile etc. |
| Debug | For debugging; executed query, user authenticated, session expired |
| Trace | For trace debugging; begin method X, end method X |
Referenced from: https://github.com/NLog/NLog/wiki/Configuration-file#log-levels
Let’s begin with logging in a text file. For doing this in NLog we need to add configuration in web.config file for writing in a text file.
Code Snippet
Hide Copy Code
<configSections>
    <section name="nlog" type="NLog.Config.ConfigSectionHandler, NLog" />
  </configSections>

  <nlog xmlns:xsi="http://www.w3.org/2001/XMLSchema-instance">
    <targets>
      <target name="logfile" xsi:type="File"

              maxArchiveFiles="10"

              archiveAboveSize="5242880"

              archiveEvery="Minute"

              archiveNumbering="Sequence"

              fileName="${basedir}/ErrorLog/logfile.txt"

              layout="------${level}(${longdate})${machinename}------${newline}
                      Exception Type:${exception:format=Type} |
                      Exception Message:${exception:format=Message} |
                      Stack Trace:${exception:format=Stack Trace} |
                      Additional Info:${message}${newline}" />
    </targets>
    <rules>
      <logger name="*" minlevel="Trace" writeTo="logfile" />
    </rules>
  </nlog>
There are lots of options you can set according to your need you can archive logs based on time size of the file. For this example, I have done on bases of time and size for the time I have passed archiveEvery="Minute" and for size, I have provided archiveAboveSize="5242880" the size is in bytes 5MB =” 5,242,880” bytes.
Link: - https://github.com/nlog/NLog/wiki/File-target
Snapshot of the web.config file
I have given snapshot below for reference were to add elements properly in the web.config file.

After configuring NLog next we are going to add DefaultController with index action method in it for logging Next, we are going to use LogManager class to create Logger instance.
Code Snippet
Hide Copy Code
public class DefaultController : Controller
    {
        public readonly Logger Logger = NLog.LogManager.GetCurrentClassLogger();
        // GET: Default
        public ActionResult Index()
        {
            try
            {
                Logger.Debug("Hi I am NLog Debug Level");
                Logger.Info("Hi I am NLog Info Level");
                Logger.Warn("Hi I am NLog Warn Level");
                throw new NullReferenceException();
                return View();
            }
            catch (Exception ex)
            {
                Logger.Error(ex, "Hi I am NLog Error Level");
                Logger.Fatal(ex, "Hi I am NLog Fatal Level");
                throw;
            }
        }
    }
After creating an instance of Logger, we are going to call various logger levels methods to log messages.
Now let’s test it by running application.
Error Logged file
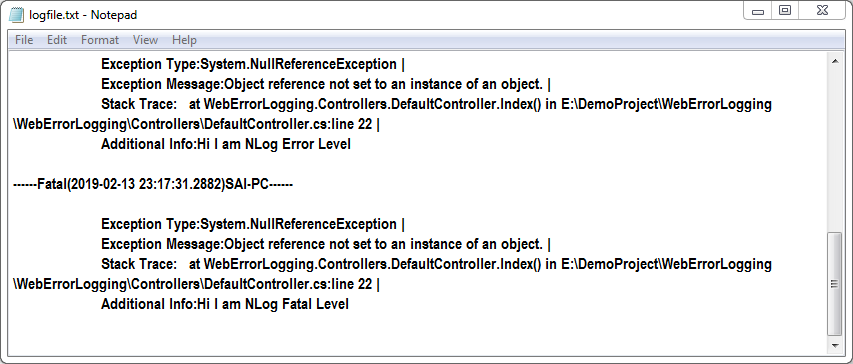
Now we have completed with logging messages in text files next with few changes in config file we are going log messages into the database in simple steps.
NLog Logging in Database
For logging in the database, we need to first create a table in the database.

The script for creating table
Hide Copy Code
CREATE TABLE [dbo].[NLog](
    [id] [int] IDENTITY(1,1) NOT NULL Primary key,
    [timestamp] [datetime] NOT NULL,
    [level] [varchar](100) NOT NULL,
    [logger] [varchar](1000) NOT NULL,
    [message] [varchar](3600) NOT NULL,
    [Callsite] [varchar](3600) NULL,
    [exception] [varchar](3600) NULL
)
After completing with creating NLog table next we are going to add configuration settings to an existing web.config file for logging in the database.
We just need to add a new target with a new name in existing NLog configuration. This target contains connection string of database along with SQL insert query to insert log in to the database, next step we need to pass parameters which will contain data to log along with it we need to register target (“database”) inside rules element with Log Levels (“Trace”).
Config setting for logging into the database
Hide Copy Code
<target name="database" type="Database"

connectionString="data source=SAI-PC\SQLEXPRESS;
initial catalog=LoggingDatabase;
integrated security=false;
persist security info=True;
User ID=sa;Password=Pass$123">
        <commandText> insert into NLog ([TimeStamp],[Level],Logger, [Message], Callsite, Exception)
        values (@TimeStamp, @Level, @Logger, @Message, @Callsite, @Exception); </commandText>
        <parameter name="@TimeStamp" layout="${date}" />
        <parameter name="@Level" layout="${level}" />
        <parameter name="@Logger" layout="${logger}" />
        <parameter name="@Message" layout="${message}" />
        <parameter name="@Callsite" layout="${callsite}" />
        <parameter name="@Exception" layout="${exception:tostring}" />
        <dbProvider>System.Data.SqlClient</dbProvider>
      </target>
    <rules>
      <logger name="*" minlevel="Trace" writeTo="database" />
    </rules>
Note: - * - matches 0 or more characters.
Snapshot of the web.config file after adding New Target for logging messages in the database

Now let’s test it by running application.
Error Logged into the database
After running application and accessing Default Controller messages are logged in the database as shown below.

After completing with understanding Nlog next we are going to move forward and see how to use Serial Log for logging messages.
SerialLog
What is Serilog?
Serilog is a diagnostic logging library for .NET applications. It is easy to set up, has a clean API, and runs on all recent .NET platforms. While it's useful even in the simplest applications, Serilog's support for structured logging shines when instrumenting complex, distributed, and asynchronous applications and systems.
We are going to see 2 ways of logging in Serilog
- In Text file
- In Database
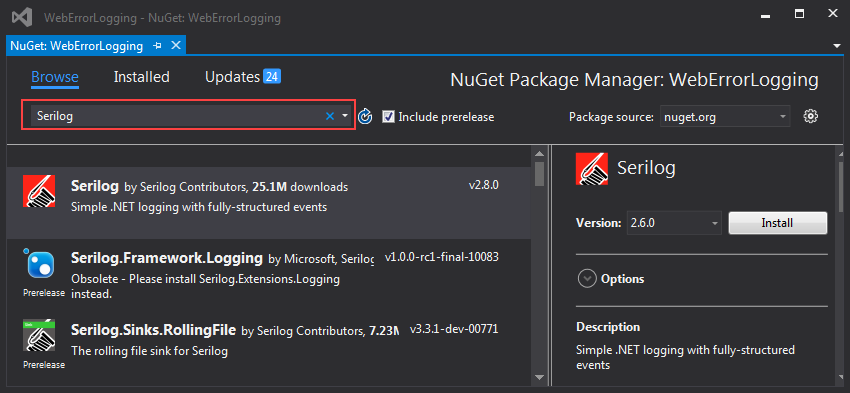
Adding Reference to project from NuGet
We are going to install 2 packages “Serilog” and “Serilog.Sinks.File” from NuGet package.
Serilog: - Serilog is a logging library for .NET applications.
Serilog.Sinks.File: - this package is used for writing a log message to text files.

After adding both packages next, we are going look at Log Event Levels.
Log Event Levels
Serilog uses levels as the primary means for assigning importance to log events. The levels in increasing order of importance are:
Next, I have written a helper class in which I have written code to centralize event logging.
| Name | Description |
| Verbose | tracing information and debugging minutiae; generally, only switched on in unusual situations |
| Debug | internal control flow and diagnostic state dumps to facilitate pinpointing of recognized problems |
| Information | events of interest or that have relevance to outside observers; the default enabled minimum logging level |
| Warning | indicators of possible issues or service/functionality degradation |
| Error | indicating a failure within the application or connected system |
| Fatal | critical errors causing complete failure of the application |
Reference link: - https://github.com/serilog/serilog/wiki/Writing-Log-Events
Serilog Logging in Text File
Let’s start understanding the code. I have created a static class with name helper such that it can be used without creating an object. Next case was to initialize this class only once that’s why I have to use a static constructor to initialize it. For logging in text file, we have created instance of LoggerConfiguration class and for logging error I have set Minimum level to error, we are going to write in text file write but where we are going to store it, it will be in folder right, for keep clean to maintain error I have created a main folder “ErrorLog” inside that folder I have to create subfolder according to levels “Debug, Error, Warning .. ” now we need to write message into this folder for doing that we need to set path for that we are going to use “WriteTo.File” method and pass path to it in string form next we cannot log error message a single large text file because I will not help us to track messaged logged easily another reason if file size gets large then we cannot open that file easily to overcome that scenario we can use “rollingInterval” and “rollOnFileSizeLimit” properties, in rollingInterval we can roll file using “RollingInterval” parameters such as (Infinite, Year, Month, Day, Hour, Minute) and in “rollOnFileSizeLimit” we can set file size limit in bytes for doing that we need to set property “fileSizeLimitBytes” and set rollOnFileSizeLimit to true. Now after creating an instance, I have created different methods according to different levels such that we can use different methods according to requirements.

Code Snippet of Helper Class
Hide Shrink Copy Code
using System;
using System.Collections.Generic;
using System.Linq;
using System.Web;
using Serilog;
using Serilog.Events;

namespace WebErrorLogging.Utilities
{
    public static class Helper
    {
        private static readonly ILogger Errorlog;
        private static readonly ILogger Warninglog;
        private static readonly ILogger Debuglog;
        private static readonly ILogger Verboselog;
        private static readonly ILogger Fatallog;

        static Helper()
        {

            // 5 MB = 5242880 bytes

            Errorlog = new LoggerConfiguration()
                .MinimumLevel.Error()
               .WriteTo.File(System.Web.Hosting.HostingEnvironment.MapPath("~/ErrorLog/Error/log.txt"),
                rollingInterval: RollingInterval.Day,
                fileSizeLimitBytes: 5242880,
                rollOnFileSizeLimit: true)
                .CreateLogger();

            Warninglog = new LoggerConfiguration()
                .MinimumLevel.Warning()
              .WriteTo.File(System.Web.Hosting.HostingEnvironment.MapPath("~/ErrorLog/Warning/log.txt"),
                    rollingInterval: RollingInterval.Day,
                    fileSizeLimitBytes: 5242880,
                    rollOnFileSizeLimit: true)
                .CreateLogger();

            Debuglog = new LoggerConfiguration()
                .MinimumLevel.Debug()
              .WriteTo.File(System.Web.Hosting.HostingEnvironment.MapPath("~/ErrorLog/Debug/log.txt"),
                    rollingInterval: RollingInterval.Day,
                    fileSizeLimitBytes: 5242880,
                    rollOnFileSizeLimit: true)
                .CreateLogger();

            Verboselog = new LoggerConfiguration()
                .MinimumLevel.Verbose()
              .WriteTo.File(System.Web.Hosting.HostingEnvironment.MapPath("~/ErrorLog/Verbose/log.txt"),
                    rollingInterval: RollingInterval.Day,
                    fileSizeLimitBytes: 5242880,
                    rollOnFileSizeLimit: true)
                .CreateLogger();

            Fatallog = new LoggerConfiguration()
                .MinimumLevel.Fatal()
              .WriteTo.File(System.Web.Hosting.HostingEnvironment.MapPath("~/ErrorLog/Fatal/log.txt"),
                    rollingInterval: RollingInterval.Day,
                    fileSizeLimitBytes: 5242880,
                    rollOnFileSizeLimit: true)
                .CreateLogger();

        }

        public static void WriteError(Exception ex, string message)
        {
            //Error - indicating a failure within the application or connected system
            Errorlog.Write(LogEventLevel.Error, ex, message);
        }

        public static void WriteWarning(Exception ex, string message)
        {
            //Warning - indicators of possible issues or service / functionality degradation
            Warninglog.Write(LogEventLevel.Warning, ex, message);
        }

        public static void WriteDebug(Exception ex, string message)
        {
            //Debug - internal control flow and diagnostic state dumps to facilitate
            //          pinpointing of recognised problems
            Debuglog.Write(LogEventLevel.Debug, ex, message);
        }

        public static void WriteVerbose(Exception ex, string message)
        {
            // Verbose - tracing information and debugging minutiae;
            //             generally only switched on in unusual situations
            Verboselog.Write(LogEventLevel.Verbose, ex, message);
        }

        public static void WriteFatal(Exception ex, string message)
        {
            //Fatal - critical errors causing complete failure of the application
            Fatallog.Write(LogEventLevel.Fatal, ex, message);
        }

        public static void WriteInformation(Exception ex, string message)
        {
            //Fatal - critical errors causing complete failure of the application
            Fatallog.Write(LogEventLevel.Fatal, ex, message);
        }

    }
}
After creating a helper, we are next going call this helper class in DefaultController index action method to test and log messages of all type.
Code Snippet of DefaultController
Hide Shrink Copy Code
using System;
using System.Collections.Generic;
using System.Linq;
using System.Web;
using System.Web.Mvc;
using WebErrorLogging.Utilities;

namespace WebErrorLogging.Controllers
{
    public class DefaultController : Controller
    {

        // GET: Default
        public ActionResult Index()
        {
            try
            {
                Helper.WriteDebug(null, "Debug ");
                Helper.WriteWarning(null, "Warning ");
                throw new NotImplementedException();
            }
            catch (Exception e)
            {
                Helper.WriteError(e, "Error");
                Helper.WriteFatal(e, "Fatal");
                Helper.WriteVerbose(e, "Verbose");
                throw;
            }

            return View();
        }
    }
}
After adding Helper Class to logging message in Default Controller next we are going save the application and test it.
Finally Output
Final output after logging message in a text file using Serilog.

After completing logging messages in a text file using Serilog next we are going to learn how to log message into SQL database using same Serilog but with another additional NuGet package.
Serilog Logging in Database
In this part, we are going to log messages into SQL database for doing that we are going to add new NuGet package “Serilog.Sinks.MSSqlServer” to an existing solution.
Adding Reference to project from NuGet

After installing NuGet package now we are going to write a similar helper class as we wrote for logging message in a text file, but this time we are going to logging message in the database.
For doing that we are going first to create a table.

The script for creating table
Hide Copy Code
CREATE TABLE [dbo].[Serilogs](
    [Id] [int] IDENTITY(1,1) NOT NULL Primary Key,
    [Message] [nvarchar](max) NULL,
    [MessageTemplate] [nvarchar](max) NULL,
    [Level] [nvarchar](128) NULL,
    [TimeStamp] [datetime] NULL,
    [Exception] [nvarchar](max) NULL,
    [Properties] [xml] NULL)
After creating table next we are going to write a helper class “HelperStoreSqlLog” where are going to centralize logging and storing message in Serilogs table.
There are 3 important points to focus while setting up logging in the database.
- Check proper connection string of your database in the web.config file
- Creating Serilogs table in the database.
- To Use WriteTo.MSSqlServer method to write messages and errors in the database this method takes 2 parameters as input one is connection string and another is your table.
Code Snippet
Hide Shrink Copy Code
using System;
using System.Collections.Generic;
using System.Configuration;
using System.Linq;
using System.Web;
using Serilog;
using Serilog.Events;

namespace WebErrorLogging.Utilities
{
    public static class HelperStoreSqlLog
    {
        private static readonly ILogger Errorlog;
        private static readonly ILogger Warninglog;
        private static readonly ILogger Debuglog;
        private static readonly ILogger Verboselog;
        private static readonly ILogger Fatallog;
        private static readonly string ConnectionString =
         ConfigurationManager.ConnectionStrings["ConnectionStringLogging"].ToString();

        static HelperStoreSqlLog()
        {

            Errorlog = new LoggerConfiguration()
                .MinimumLevel.Error()
                .WriteTo.MSSqlServer(ConnectionString, "Serilogs")
                .CreateLogger();

            Warninglog = new LoggerConfiguration()
                .MinimumLevel.Warning()
                .WriteTo.MSSqlServer(ConnectionString, "Serilogs")
                .CreateLogger();

            Debuglog = new LoggerConfiguration()
                .MinimumLevel.Debug()
                .WriteTo.MSSqlServer(ConnectionString, "Serilogs")
                .CreateLogger();

            Verboselog = new LoggerConfiguration()
                .MinimumLevel.Verbose()
                .WriteTo.MSSqlServer(ConnectionString, "Serilogs")
                .CreateLogger();

            Fatallog = new LoggerConfiguration()
                .MinimumLevel.Fatal()
                .WriteTo.MSSqlServer(ConnectionString, "Serilogs")
                .CreateLogger();

        }

        public static void WriteError(Exception ex, string message)
        {
            //Error - indicating a failure within the application or connected system
            Errorlog.Write(LogEventLevel.Error, ex, message);
        }

        public static void WriteWarning(Exception ex, string message)
        {
            //Warning - indicators of possible issues or service / functionality degradation
            Warninglog.Write(LogEventLevel.Warning, ex, message);
        }

        public static void WriteDebug(Exception ex, string message)
        {
            //Debug - internal control flow and diagnostic
            // state dumps to facilitate pinpointing of recognised problems
            Debuglog.Write(LogEventLevel.Debug, ex, message);
        }

        public static void WriteVerbose(Exception ex, string message)
        {
            // Verbose - tracing information and debugging minutiae;
            //   generally only switched on in unusual situations
            Verboselog.Write(LogEventLevel.Verbose, ex, message);
        }

        public static void WriteFatal(Exception ex, string message)
        {
            //Fatal - critical errors causing complete failure of the application
            Fatallog.Write(LogEventLevel.Fatal, ex, message);
        }

        public static void WriteInformation(Exception ex, string message)
        {
            //Fatal - critical errors causing complete failure of the application
            Fatallog.Write(LogEventLevel.Fatal, ex, message);
        }
    }
}
After creating HelperStoreSqlLog, we are next going call this HelperStoreSqlLog class in DefaultController index action method to test and log messages of all type.
Code Snippet
Hide Shrink Copy Code
using System;
using System.Collections.Generic;
using System.Linq;
using System.Web;
using System.Web.Mvc;
using WebErrorLogging.Utilities;

namespace WebErrorLogging.Controllers
{
    public class DefaultController : Controller
    {
        // GET: Default
        public ActionResult Index()
        {
            try
            {
                HelperStoreSqlLog.WriteDebug(null, "Debug ");
                HelperStoreSqlLog.WriteWarning(null, "Warning ");
                throw new NotImplementedException();
            }
            catch (Exception e)
            {
                HelperStoreSqlLog.WriteError(e, "Error");
                HelperStoreSqlLog.WriteFatal(e, "Fatal");
                HelperStoreSqlLog.WriteVerbose(e, "Verbose");
                throw;
            }
            return View();
        }
    }
}
After adding HelperStoreSqlLog Class to logging message in Default Controller next we are going save the application and test it.
Finally Output
Final output after logging message in Database using Serilog.

We have completed logging messages using Serilog’s next we are going see some configuration which we can do using appsettings in Serilog.
Serilog.Settings.AppSettings
Till now we have configured Serilog entirely using code now we are going to use appsettings for doing the same configuration of logging messages in a text file.

After installing the package next, we are going to make configuration setting in appsettings.
Appsettings for logging in the message in a text file using “Serilog.Settings.AppSettings”
Hide Copy Code
  <appSettings>

    <add key="webpages:Version" value="3.0.0.0" />
    <add key="webpages:Enabled" value="false" />
    <add key="ClientValidationEnabled" value="true" />
    <add key="UnobtrusiveJavaScriptEnabled" value="true" />

    <!-- appSettings for Serilog Storing in Text file  -->
    <add key="serilog:minimum-level" value="Verbose" />
    <add key="serilog:using:File" value="Serilog.Sinks.File" />
    <add key="serilog:write-to:File.path"

         value="E:\DemoProject\WebErrorLogging\WebErrorLogging\ErrorLog\Error\log.txt" />
    <add key="serilog:write-to:File.fileSizeLimitBytes" value="1234567" />
    <add key="serilog:write-to:RollingFile.retainedFileCountLimit" value="10" />
    <add key="serilog:write-to:File.rollingInterval" value="Day"/>
    <!-- appSettings for Serilog Storing in Text file  -->

  </appSettings>
After configuration in appsettings next, we are going make little change in the code to make it works for this configuration.
Code Snippet
The main part of the configuration in code is to use “.ReadFrom.AppSettings()” method to read configuration from appsettings which we have configured.
Hide Shrink Copy Code
using System;
using System.Collections.Generic;
using System.Linq;
using System.Web;
using System.Web.Mvc;
using Serilog;
using WebErrorLogging.Utilities;

namespace WebErrorLogging.Controllers
{
    public class DefaultController : Controller
    {
        private ILogger _errorlog;
        public ActionResult Index()
        {
            try
            {
                throw new NotImplementedException();
            }
            catch (Exception e)
            {
                _errorlog = new LoggerConfiguration()
                    .ReadFrom.AppSettings()
                    .CreateLogger();

                _errorlog.Error(e, "DefaultController");
                throw;
            }
            return View();
        }
    }
}
After adding Serilog.Settings.AppSettings next we are going save the application and test it.
Finally Output


Finally, we have completed with logging messages using serilog Next, we are going to have a look at the last Best logging option we have is ELMAH.
ELMAH
What is ELMAH?
Error Logging Modules and Handlers (ELMAH).
- Logging of nearly all unhandled exceptions.
- A web page to remotely view the entire log of recorded exceptions.
- A web page to remotely view the full details of any one logged exception, including coloured stack traces.
- In many cases, you can review the original yellow screen of death that ASP.NET generated for a given exception, even with custom Errors mode turned off.
- E-Mail notification of each error at the time it occurs.
- An RSS feed of the last 15 errors from the log.
Reference from: - https://code.google.com/archive/p/elmah/
We are going to see 1 way of logging in Elmah
- In Database
In this part, we are going to log the error into the database using ELMAH. For doing that first we need to install 2 packages of ELMAH from NuGet package.
ELMAH Logging in Database
Adding Reference to project from NuGet
1. Elmah.MVC

2. elmah.sqlserver
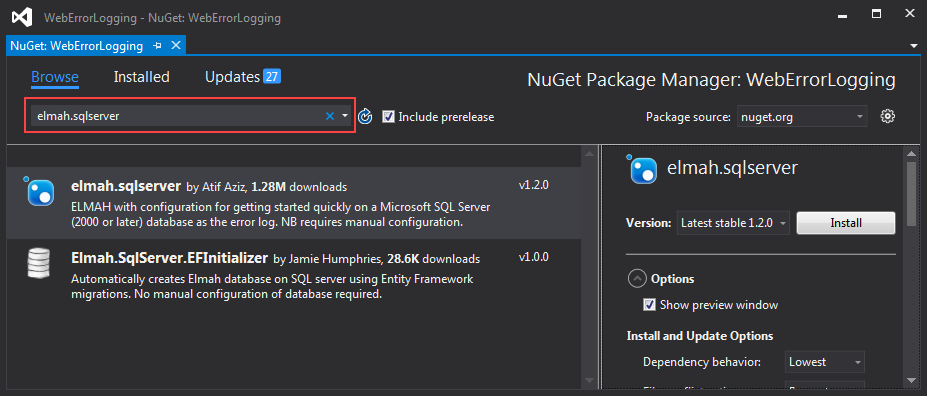
while installing elmah.sqlserver package it creates “App_Readme” folder and inside that folder, it adds SQL query script for creating tables and stored procedures of Elmah.

In a similar way, while installing elmah and elmah.sqlserver packages it adds XML configuration to a web.config file in that config file you will see “elmah-sqlserver” tag added inside connection string section here you need to provide your database connection settings.
A snippet of elmah-sqlserver tag which is added after installing elmah.sqlserver package.
Hide Copy Code
<connectionStrings>
  <!-- TODO: Replace the ****'s with the correct entries -->
  <add name="elmah-sqlserver"
       connectionString="Data Source=****;User ID=****;Password=****;Initial Catalog=****;"
       providerName="System.Data.SqlClient" />
</connectionStrings>
After replacing “****” with correct database credentials to connect to the database.
Hide Copy Code
  <connectionStrings>
    <!-- TODO: Replace the ****'s with the correct entries -->
    <add name="elmah-sqlserver"

         connectionString="Data Source=SAI-PC\SQLEXPRESS;User ID=sa;Password=Pass$123;
         Initial Catalog=LoggingDatabase;"

         providerName="System.Data.SqlClient" />
  </connectionStrings>
After setting connection string next you need to execute Elmah.Sqlserver script in the database for generating tables and stored procedure of Elmah.
Below is Snapshot after executing Elmah SqlServer Script

Now we have configured ELMAH lets create a default controller with index action method which will throw an error.
Hide Copy Code
using System;
using System.Collections.Generic;
using System.Linq;
using System.Web;
using System.Web.Mvc;

namespace WebErrorLogging.Controllers
{
    public class DefaultController : Controller
    {
        public ActionResult Index()
        {
            try
            {
                throw new NotImplementedException();
            }
            catch (Exception)
            {
                throw;
            }
            return View();
        }
    }
}
After adding Controller and Index action next, we are going save the application and test it.
Output
Final output after logging an error in Database using ELMAH.

Now we have stored error viewing this error on browser we need to do configuration in web.config file as shown below.
1. Snippet to Add in web.config under <system.web> element

Snippet
Hide Copy Code
<!--Newly Added-->
    <httpHandlers>
      <add verb="POST,GET,HEAD" path="elmah.axd" type="Elmah.ErrorLogPageFactory, Elmah" />
    </httpHandlers>
<!--Newly Added-->
2. Snippet to Add in web.config under <system.webServer> element

Snippet
Hide Copy Code
<!--Newly Added-->
<handlers>
  <add name="Elmah" verb="POST,GET,HEAD" path="elmah.axd"
       type="Elmah.ErrorLogPageFactory, Elmah" />
</handlers>
<!--Newly Added-->
3. Snippet to Add in the web.config <elmah> element

Snippet
Hide Copy Code
<elmah>
  <security allowRemoteAccess="0" />
  <errorLog type="Elmah.SqlErrorLog, Elmah" connectionStringName="elmah-sqlserver" />
</elmah>
What is allowRemoteAccess ?

As a default, remote access to /elmah.axd isn't allowed meaning that requesting that URL on everything else than localhost, returns an HTTP status code 403. It is not recommended to open up for remote access to the ELMAH UI, but in some situations, it may make sense. Setting allowRemoteAccess to 1 or true, makes /elmah.axd accessible on your public facing website.
Referenced from: - https://blog.elmah.io/elmah-security-and-allowremoteaccess-explained/
Now to see errors in on the web page you need to enter “elmah.axd” at end of your URL http://localhost:55946/elmah.axd as shown below.
If you have hosted your site in IIS then you need to enter URL such as http://xyz.com/elmah.axd
Finally Output

Finally, we have learned how to use all 4 loggers which are best for logging in ASP.NET MVC Application in a simple way. These loggers are been used in live production application by many companies. Thank you for spending your valuable time on this reading article.
Source code Link of Log4Net:- https://github.com/saineshwar/WebErrorLogging_Log4Net
Source code Link of NLog:- https://github.com/saineshwar/WebErrorLogging_NLog
Source code Link of Serilog:- https://github.com/saineshwar/WebErrorLogging_Serilog
Source code Link of ELMAH:- https://github.com/saineshwar/WebErrorLogging_ELMAH
License
This article, along with any associated source code and files, is licensed under The Code Project Open License (CPOL)


 14万+
14万+


 被折叠的 条评论
为什么被折叠?
被折叠的 条评论
为什么被折叠?
 到【灌水乐园】发言


