


1.我们登录老师页面,但是会出现无权访问的情况,是因为我们要判断是老师还是学生登录老师页面。
watch:{
    login(val){
      if(val){
        this.loadDetails();
      }
    }
  },
  methods:{
    loadDetails(){
        //判断是老师登录还是学生登录
        if(this.isTeacher){
           api.get("/teacher/detail",{headers:{Token:this.info.token}}).then(data =>{
             console.log(data);
           });
        }else{
       api.get("/student/detail",{headers:{Token:this.info.token}}).then(data=>{
          console.log(data);
          this.student.orgs=data.orgs;
          this.student.assignments=data.assignments;
          this.student.stats=data.stats;
        })
        }

    }
  }
2.我们现在data中初始化一下数据,在数据请求回来的时候,我们保存到data里面。
 data(){
    return{
      student:{
        orgs:[],//组织
        stats:{},//状态
        assignments:[]//所有作业的信息
      },
      teacher:{
        orgs:[],//组织
        assignments:[],//所有作业的信息
      }
    }
  }
if(this.isTeacher){
api.get("/teacher/detail",{headers:{Token:this.info.token}}).then(data =>{
this.teacher.orgs=data.orgs;
this.teacher.assignments=data.assignments;
});
}3.接下来就可以在页面上渲染数据了,首先要编写的是老师的头部信息,主要是一些Scss样式的书写,我们可以写成一个通用的类如:flexrow,以行来排列
  <div class="flexrow" v-if="isTeacher" >
           <h4>{{info.name}}</h4>
           <a-button class="out-center" icon="file-add" type="primary">新建作业</a-button>
          </div>
<template>
<a-layout id="App">
<a-layout-header class="header flexrow">
<h2>HappyStudy</h2>
<div class="flexrow" v-if="login">
<div class="flexrow" v-if="isTeacher" >
<h4>{{info.name}}</h4>
<a-button class="out-center" icon="file-add" type="primary">新建作业</a-button>
</div>
<div class="right" v-else>
<h4 class="flexcol">
<span>{{info.full_name}}</span>
<span>学号:{{info.name}}</span>
</h4>
<h5 class="flexcol">
<span v-for="(org,index) in student.orgs" :key="`${org}_${index}`">{{org}}</span>
</h5>
<div>
<span class="label">{{student.stats.uncommitted}}个作业待提交</span>
<span class="label">{{student.stats.revising}}个作业待批改</span>
<span class="label">{{student.stats.improvable}}个作业需完善</span>
<span class="label">{{student.stats.finished}}个作业已完成</span>
</div>
</div>
<a href="javascript:;">
<a-button icon="home" class="btn-space">代码仓库</a-button>
</a>
<a-button icon="logout" class="btn-space out-center" @click="$store.dispatch('user/logout')">退出</a-button>
</div>
</a-layout-header>
<a-layout-content>
<Author v-if="!login"></Author>
<div v-else>
<Teacher v-if="isTeacher"></Teacher>
<Student v-else :student="student"></Student>
</div>
</a-layout-content>
</a-layout>
</template>4.我们是在App.vue里面去接收到老师的数据,但是我们是在老师的页面去编写,所以我们要把数据传过去
<Teacher :teacher="teacher" v-if="isTeacher"></Teacher>4.1.然后在老师页面通过props去接收,然后测试一下请求了什么数据
<template>
    <div>{{teacher}}</div>
</template>
<script>
export default {
    props:["teacher"]
}
</script>
<style lang="scss">

</style>
4.2.去Network中看一下请求了什么数据
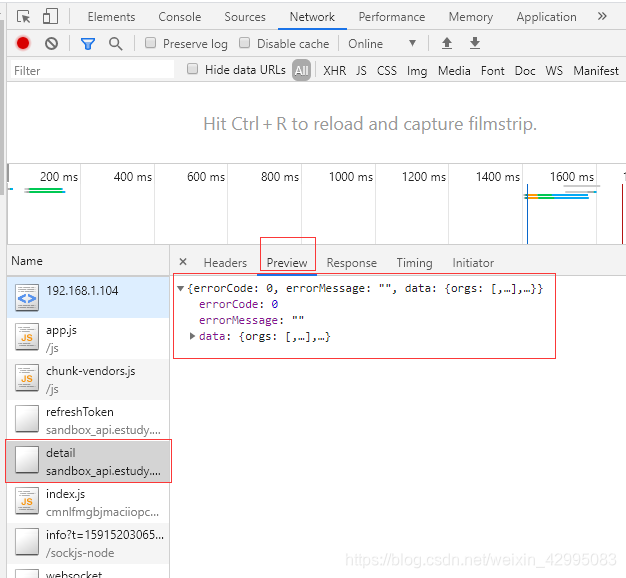
5.使用表格渲染作业数据

5.1. columns渲染每一列的基本信息
<template>
<div>
<a-table :dataSource="teacher.assignments" :columns="columns">
</a-table>
</div>
</template>
<script>
export default {
props:["teacher"],
data(){
return{
columns:[
]
}
}
}
</script>
<style lang="scss">
</style>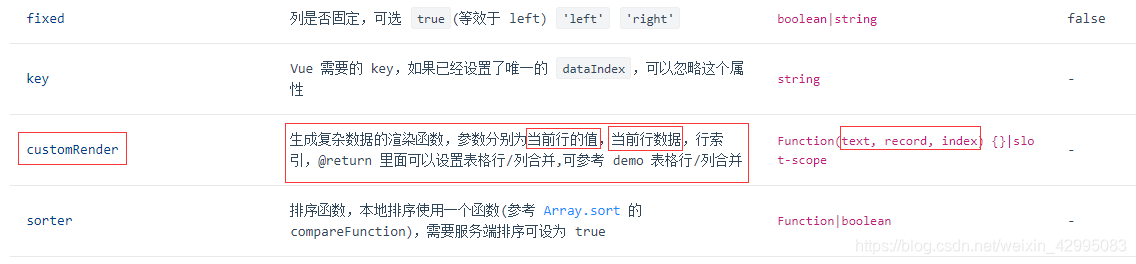 三目运算符判断,提交了显示更新时间,未提交不显示
data(){
        return{
            columns:[
               {
                   title:"课程",
                   dataIndex:"org_name"
               },
               {
                   title:"作业名称",
                   dataIndex:"name"
               },
               {
                   title:"开始-截止时间",
                   customRender(text, record, index){
                       console.log(text,record,index);
                       return `${record.start_time}~${record.end_time}`
                   }
               },
               {
                   title:"状态",
                  customRender(text, record, index){
                       console.log(text,record,index);
                       return `${record.student_count}个学员/${record.work_count}个提交`+
//三目运算符判断,提交了显示更新时间,未提交不显示
                       (record.work_count >0 ? ` - ${record.work_update_time}`:"")
                   }
               }
            ]
        }
}如果没有人提交,显示删除按钮,如果有人提交,显示展开和下载全部
 {
                   title:"操作",
                   scopedSlots:{
                       customRender:"operation"
                   }
               }
<template slot="operation" slot-scope="record">
<div v-if="record.work_count>0">
<a-button type="primary" icon="plus-square">展开</a-button>
<a-button icon="download">下载全部</a-button>
</div>
<div v-else>
<a-button icon="delete" type="danger">删除</a-button>
</div>
</template>删除功能
6. 删除功能会用到ant组件库的气泡确认框,删除要根据作业的id来删除,assignment_id
气泡确认框把删除按钮包裹住
 <div v-else >
                   <a-popconfirm title="确定删除改作业?" ok-text="确定" cancel-text="取消" @confirm="removeAssignments(record.assignment_id)">
                     <a-button icon="delete" type="danger">删除</a-button>
                   </a-popconfirm>
              </div>
methods:{
removeAssignments(id){
console.log(id);
}
}我们要去请求删除作业布置的接口
所以要用到axios
import { api } from '../utils/api';不仅要传id,也要传token,但是token定义在vuex中的info里面
要先引入
import {mapState} from "vuex"; computed:{
...mapState("user",["info"])
}然后使用
 methods:{
       removeAssignments(id){
          console.log(id);
          console.log(this.teacher.assignments.findIndex((assignment) =>{ return assignment.assignment_id ===id}));
          api.post("/teacher/deleteAssignment",{headers:{Token:this.info.token},id:id}).then(data=>{
              console.log(data);
              //删除成功,不仅要把后台数据库的数据删除掉,而且要把页面上的数据删除掉
              //要先找到要删掉的那行数据,通过findIndex找到索引
              //const index=this.teacher.assignments.findIndex((assignment) =>{ return assignment.assignment_id ===id})
          })
       }
    }
先打印一下能不能找出每一行的索引
console.log(this.teacher.assignments.findIndex((assignment) =>{ return assignment.assignment_id ===id}));methods:{
removeAssignments(id){
console.log(id);
console.log(this.teacher.assignments.findIndex((assignment) =>{ return assignment.assignment_id ===id}));
api.post("/teacher/deleteAssignment",{headers:{Token:this.info.token},id:id}).then(data=>{
console.log(data);
//删除成功,不仅要把后台数据库的数据删除掉,而且要把页面上的数据删除掉
//要先找到要删掉的那行数据,通过findIndex找到索引
const index=this.teacher.assignments.findIndex((assignment) =>{ return assignment.assignment_id ===id});
//把当前行删除掉
this.teacher.assignments.splice(index,1);
//提示:删除成功
this.$message.info("删除成功!");
})
}
}批量下载,批量下载的话,直接在后面拼接上all
7.下载学生作业
const HOST="http://sandbox_api.estudy.xyz";downloadHost:HOST+"/teacher/download"直接在下载全部外面包裹a标签
 <a :href="`${downloadHost}All?id=${record.assignment_id}`">
                      <a-button icon="download">下载全部</a-button>
                  </a>
展开
8.点击展开按钮,出现每个学生提交作业的信息
8.1.先在data中定义
revisingAssignment:false,一开始不显示
<a-table v-if="revisingAssignment">

        </a-table>
8.2.点击展开按钮,显示数据,并显示出收起按钮
<a-button v-if="!revisingAssignment" type="primary" icon="plus-square" @click="revisingAssignment=true">展开</a-button>
<a-button v-else type="primary" icon="minus-square" @click="revisingAssignment=false">收起</a-button>
存在问题
8.3.存在问题,点击展开按钮,全部学员的信息都展开,这个效果不是我们想要的
点击按钮要筛选数据,只显示我们点击这一项的数据
筛选功能也是antDesign组件库提供给我们的


8.4.但是我们的展开按钮和表头没有任何关系,我们可以用可控的筛选来做

点击展开按钮的时候,不仅仅要把下面的表格显示出来,还要保存当前行的数据
<a-button v-if="!revisingAssignment" type="primary" icon="plus-square" @click="revisingAssignment=record">展开</a-button>
<a-button v-else type="primary" icon="minus-square" @click="revisingAssignment=false">收起</a-button>注释掉data中定义的列写在计算属性里面,写一个函数,然后return一个数组
computed:{
     ...mapState("user",["info"]),
     columns(){
         return [
               {
                   title:"课程",
                   dataIndex:"org_name"
               },
               {
                   title:"作业名称",
                   dataIndex:"name"
               },
               {
                   title:"开始-截止时间",
                   customRender(text, record, index){
                       console.log(text,record,index);
                       return `${record.start_time}~${record.end_time}`
                   }
               },
               {
                   title:"状态",
                  customRender(text, record, index){
                       console.log(text,record,index);
                       return `${record.student_count}个学员/${record.work_count}个提交`+
                       (record.work_count >0 ? ` - ${record.work_update_time}`:"")
                   }
               },
               {
                   title:"操作",
                   scopedSlots:{
                       customRender:"operation"
                   }
               }
            ]
     },

    }
在操作里面控制展开和收起
 {
                   title:"操作",
                   scopedSlots:{
                       customRender:"operation"
                   },
                   //组件库提示务必指定 column.key
                   key:"operation",
                   //revisingAssignment,如果有的话,就显示,没有的话,就隐藏
                   filteredValue: this.revisingAssignment? [this.revisingAssignment.assignment_id]:null,
                   onFilter(value,record){
                       //当前的值是否等于当前点击的id,相等就匹配上
                       return value === record.assignment_id
                   }
               }
9.展开的思路:
点击展开的时候,让revisingAssignment变成当前这行的数据,由于revisingAssignment发生变化,计算属性重新计算,filteredValue就会重新去判断到底是null还是有对应的id,onFilter就会去每一行进行筛选并筛选出对应的Id并显示出来。
10.表格一定要绑定上id,:rowKey="assignment=>assignment.assignment_id"
<a-table :dataSource="teacher.assignments" :columns="columns" :rowKey="assignment=>assignment.assignment_id">
</a-table>
11.接下来编写点击展开按钮显示的数据
11.1. 我们之前把数据存在revisingAssignment里面
 <a-table v-if="revisingAssignment" :dataSource="revisingAssignment.works" :columns="workColumns">

        </a-table>
data(){
return{
revisingAssignment:false,
downloadHost:HOST+"/teacher/download",
workColumns:[
{
title:"学员名字",
dataIndex:"user.full_name"
},
{
title:"学号",
dataIndex:"user.name"
},
{
title:"提交的作业名称",
dataIndex:"student_upload_name"
},
{
title:"提交时间",
dataIndex:"commit_time"
},
{
title:"状态",
customRender(record){
console.log(record);
return work_status[record.status];
}
},
{
title:"操作",
//渲染operation的slot
scopedSlots:{
customRender:"operation"
}
}
]
}
}下载
11.2.完善一下展开按钮里面的页面信息,并通过get请求去下载作业
<a-table v-if="revisingAssignment" :dataSource="revisingAssignment.works" :columns="workColumns">
          <template slot="operation" slot-scope="record">
              <!-- 获取学生提交过来的作业,所以类型为学生 -->
              <a :href="`${downloadHost}?id=${record.id}&type=student`">
                  <a-button icon="download">下载</a-button>
              </a>
              <a-button icon="form" type="primary">批改</a-button>
          </template>
</a-table>
批改
12.1.现在data中定义revisingWork为false
12.2.

<a-modal :visible="revisingWork"></a-modal>12.3.点击批改的时候,显示模态框
<a-button icon="form" type="primary" @click="revisingWork=true">批改</a-button> <a-modal :visible="revisingWork" :footer="null" @cancel="revisingWork=false"></a-modal>使用表单
12.4.模态框里面是Form表单
状态
12.4.1.之前定义的work_status,也要放在data里面
const work_status={
    "0":"待批改",
    "1":"需完善",
    "2":"已完成"
};
12.4.2.这边定义work_status,是为了上面能够循环出数据
data(){
  return {
           work_status,
            //批改表单要提交的信息
            revisingForm:{
              status:"1"
            },
  }
}
<a-modal :visible="revisingWork" :footer="null" @cancel="revisingWork=false">
<form>
<a-form-item label="状态">
<a-select v-model="revisingForm.status">
<!-- 再次再data中定义work_status的目的,是为了在这边可以循环, -->
<a-select-option v-for="(status_name,status) in work_status" :value="status" :key="`${status_name}_${status}`">
{{status_name}}
</a-select-option>
</a-select>
</a-form-item>
</form>
</a-modal>批改意见
12.5.定义review
//批改表单要提交的信息
            revisingForm:{
              status:"1",
              review:""
            },
使用autoSize自适应宽高
<a-form-item label="批改意见">
                 <a-textarea v-model="revisingForm.review" autoSize></a-textarea>
                </a-form-item>
附件:要实现上传功能
12.6.1. data中定义上传地址
uploadHost:HOST+"/teacher/upload"12.6.2.请求头所需要的token在info里面,info定义在vuex里面所以要去vuex中取,我们点击批改要先获取所点击行的信息,不然拿不到当前行的id
<a-button icon="form" type="primary" @click="revisingWork=record" >批改</a-button>但是要给模态框做一个类型转换,否则会报错
<a-modal :visible="Boolean(revisingWork)" :footer="null" @cancel="revisingWork=false">
</a-modal>
<a-form-item label="附件">
<a-upload :action="uploadHost" :headers="{Token:info.token}" :data="{id:revisingWork.id}">
<a-button icon="upload">上传</a-button>
</a-upload>
</a-form-item>保存功能:批改作业
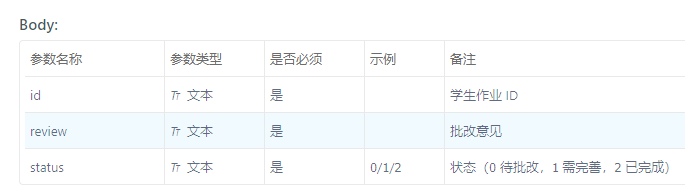
12.7.保存,需要这些参数
12.7.1.给保存加上点击事件
<a-form-item>
                    <a-button @click="save" type="primary">保存</a-button>
                </a-form-item>
12.7.2.然后在methods中,去请求接口,测试一下
注意:上面定义数据的时候,要加上this,否则获取不到
 save(){
            console.log(this.revisingForm);
           const form={
               id:this.revisingWork.id,//学生作业ID
               review:this.revisingForm.review,//批改意见
               status:this.revisingForm.status//状态(0 待批改,1 需完善,2 已完成)
           }
           api.post("/teacher/review",form).then(data=>{
               console.log(data);
           }).finally(()=>{
               this.revisingWork=false;
           })
        }
12.7.3.虽然我们点击保存,但是发现状态并没有改变
save(){
            console.log(this.revisingForm);
           const form={
               id:this.revisingWork.id,//学生作业ID
               review:this.revisingForm.review,//批改意见
               status:this.revisingForm.status//状态(0 待批改,1 需完善,2 已完成)
           }
           api.post("/teacher/review",form).then(data=>{
               console.log(data);
               //item[0]为key, item[1]为value
               //entries是把数据变为二维数组,然后循环
               //原来 {id:1,status:1}
               //现在 [[id:1],[status:1]]
               //我们想要把本地的数据this.revisingWork,替换成最新的数据
               Object.entries(data).forEach(item=>this.$set(this.revisingWork,item[0],item[1]))
           }).finally(()=>{
               this.revisingWork=false;
           })
        }
13.每次都报rowKey的错,我们给展开的那个表格加上就可以了
 <a-table v-if="revisingAssignment" :dataSource="revisingAssignment.works" :columns="workColumns" :rowKey="work=>work.id">
</a-table>
14.点击批改的时候,要显示之前已经批改过的批改意见
<a-button icon="form" type="primary" @click="revisingWork=record;revisingForm.review=record.teacher_review" >批改</a-button>


 1万+
1万+


 被折叠的 条评论
为什么被折叠?
被折叠的 条评论
为什么被折叠?
 到【灌水乐园】发言


