


以下链接是个人关于MVSNet(R-MVSNet)-多视角立体深度推导重建 所有见解,如有错误欢迎大家指出,我会第一时间纠正。有兴趣的朋友可以加微信:17575010159 相互讨论技术。若是帮助到了你什么,一定要记得点赞!因为这是对我最大的鼓励。 文末附带 \color{blue}{文末附带} 文末附带 公众号 − \color{blue}{公众号 -} 公众号− 海量资源。 \color{blue}{ 海量资源}。 海量资源。
训练
话不多说,先给大家
一个警告,
G
P
U
不过
11
G
的,跑不了
M
V
S
N
e
t
\color{red}{一个警告,GPU不过11G的,跑不了MVSNet}
一个警告,GPU不过11G的,跑不了MVSNet。在讲解之前,请大家按照前面的博客,下载好代码,然后我们从README.md文件开始。
注意,下面的讲解和报错都是
l
i
n
u
x
环境下,如果你使用的是
w
i
n
d
s
,或许会不一样。
\color{red}{注意,下面的讲解和报错都是linux环境下,如果你使用的是winds,或许会不一样。}
注意,下面的讲解和报错都是linux环境下,如果你使用的是winds,或许会不一样。
MVSNet报错解决
通过README.md,我们可以看到:
Download the preprocessed DTU training data (also available at Baiduyun, code: s2v2), and upzip it as the MVS_TRANING folder
Enter the MVSNet/mvsnet folder, in train.py, set dtu_data_root to your MVS_TRANING path
Create a log folder and a model folder in wherever you like to save the training outputs. Set the log_dir and save_dir in train.py correspondingly
Train MVSNet (GTX1080Ti): python train.py --regularization '3DCNNs'
Train R-MVSNet (GTX1080Ti): python train.py --regularization 'GRU'
所以我们通过上面的链接:
https://pan.baidu.com/s/1Wb9E6BWCJu4wZfwxm_t4TQ#list/path=%2F
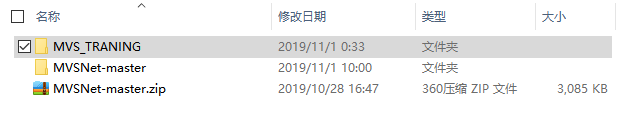
下载好数据,本人这里选择的是百度云的链接。并且下载完成之后,我把mvset文件夹重命名为MVS_TRANING,然后和源代码并列在一起,如下图:
这样,预备工作就完成了,下面我们开始训练代码,首先我们来训练MVSNet网络,在运行程序之前,我们需要对MVSNet-master/mvsnet/train.py进行一些修改:
#tf.app.flags.DEFINE_string('dtu_data_root', '/data/dtu/', """Path to dtu dataset.""")
tf.app.flags.DEFINE_string('dtu_data_root', '../../MVS_TRANING/training_data/dtu_training', """Path to dtu dataset.""")


#tf.app.flags.DEFINE_string('log_dir', '/data/tf_log',"""Path to store the log.""")
tf.app.flags.DEFINE_string('log_dir', './out_log_dir',"""Path to store the log.""")

#tf.app.flags.DEFINE_string('model_dir', '/data/tf_model',"""Path to save the model.""")
tf.app.flags.DEFINE_string('model_dir', './out_tf_model',"""Path to save the model.""")
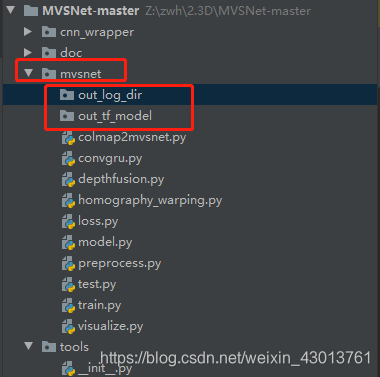
把原本的路径注释掉,然后更改成我们训练数据的路径,创建out_log_dir,out_tf_model两个目录,位置如下:
执行
python train.py --regularization 3DCNNs
报错一
raise _exceptions.DuplicateFlagError.from_flag(name, self)
absl.flags._exceptions.DuplicateFlagError: The flag 'log_dir' is defined twice. First from absl.logging, Second from train.py.  Description from first occurrence: directory to write logfiles into
其说log_dir这个变量已经被定义过了,所以更改如下(注释的为原代码):
#tf.app.flags.DEFINE_string('log_dir', '/data/tf_log',"""Path to store the log.""")
tf.app.flags.DEFINE_string('logdir', './out_log_dir',"""Path to store the log.""")


#summary_writer = tf.summary.FileWriter(FLAGS.log_dir, sess.graph)
summary_writer = tf.summary.FileWriter(FLAGS.logdir, sess.graph)
报错二
  File "train.py", line 204, in train
    for i in xrange(FLAGS.num_gpus):
NameError: name 'xrange' is not defined
该错误的原因是,源码使用的是python2,但是本人使用的为python3,出现了部分函数不兼容的现象,把xrange替换成range即可。
#for i in xrange(FLAGS.num_gpus):
for i in range(FLAGS.num_gpus):
报错三
  File "../cnn_wrapper/network.py", line 127, in feed
    if isinstance(fed_layer, basestring):
NameError: name 'basestring' is not defined
更改代码如下:
#if isinstance(fed_layer, basestring):
if isinstance(fed_layer, str):
报错四
  File "../cnn_wrapper/mvsnet.py", line 53, in setup
    .conv_gn(3, base_filter * 2, 2, center=True, scale=True, name='2dconv1_0')
  File "../cnn_wrapper/network.py", line 40, in layer_decorated
    layer_output = op(self, layer_input, *args, **kwargs)
  File "../cnn_wrapper/network.py", line 235, in conv_gn
    G = max(1, C / group_channel)
  File "/root/anaconda3/envs/zwh-mxnet/lib/python3.6/site-packages/tensorflow/python/framework/tensor_shape.py", line 532, in __truediv__
    "please use // instead".format(type(other).__name__))
找到报错的位置,把所有/替换成//即可。
报错五
ng error Internal: failed initializing StreamExecutor for CUDA device ordinal 0: Internal: failed call to cuDevicePrimaryCtxRetain: CUDA_ERROR_OUT_OF_MEMORY: out of memory; total memory reported: 11554717696
这是因为GPU0,再被使用,所以我加上如下代码,指定GPU1:
# 添加在导包处
os.environ["CUDA_VISIBLE_DEVICES"] = "1"

# 找到对应位置,修改GPU
        tower_grads = []
        #for i in xrange(FLAGS.num_gpus):
        for i in range(FLAGS.num_gpus):
            #with tf.device('/gpu:%d' % i):
            with tf.device('/gpu:1'):
报错六
    sys.exit(main(argv))
  File "train.py", line 356, in main
    train(sample_list)
  File "train.py", line 305, in train
    restorer.restore(sess, '-'.join([pretrained_model_path, str(FLAGS.ckpt_step)]))
加载预训练模型出错,那么我们先不加载预训练模型:
tf.app.flags.DEFINE_boolean('use_pretrain', False,"""Whether to train.""")
改写成False
报错七
  File "/root/anaconda3/envs/zwh-mxnet/lib/python3.6/codecs.py", line 321, in decode
    (result, consumed) = self._buffer_decode(data, self.errors, final)

UnicodeDecodeError: 'utf-8' codec can't decode byte 0x9a in position 21: invalid start byte
修改代码如下:
    #depth_image = load_pfm(open(data[2 * self.view_num]))
    depth_image = load_pfm(open(data[2 * self.view_num], 'rb'))
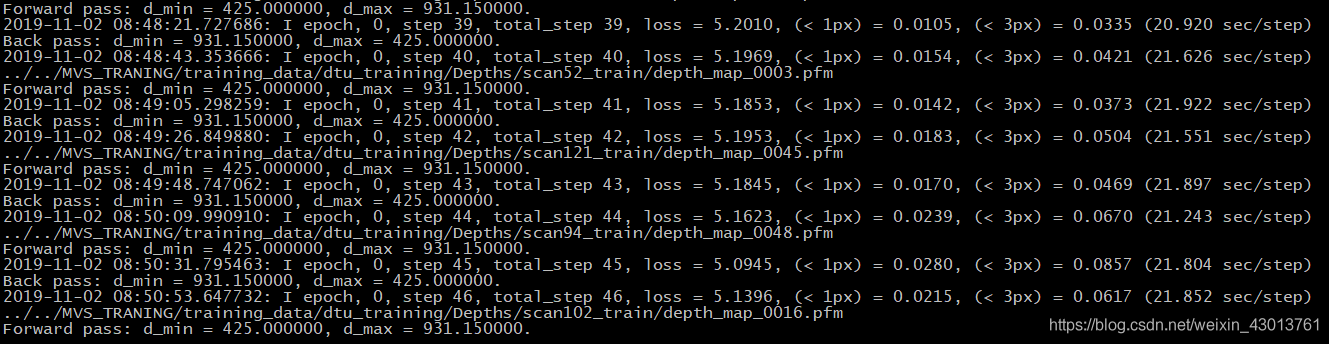
这样,本人的代码就能正常运行了,大致打印信息如下:

R-MVSNet报错解决
解决了MVSNet报错之后,我们来看看 R-MVSNet,根据前面README.md的信息,我们可以知道,需要执行:
python train.py --regularization 'GRU'
一些重复的错误,我这里就不列举了,本人在运行的时候发现,11G的单个GPU无法使用,最后禁用GPU,使用32G内存的CPU进行训练,然后正常打印如下:
到这里,我们的训练过程,基本就可以了。不过现在比较尴尬奥,上面的打印,有的都还看不懂是啥意思。不过没有关系,后面我会为大家详细讲解
测试
还是从READ.md开始:
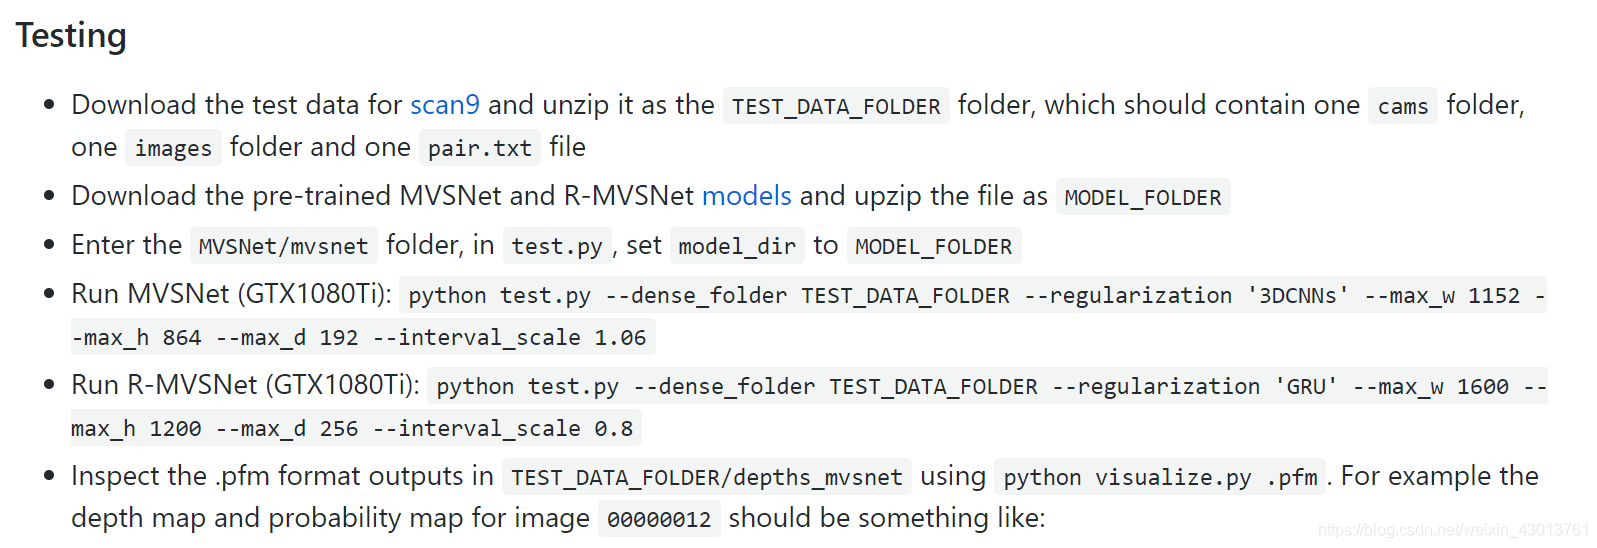
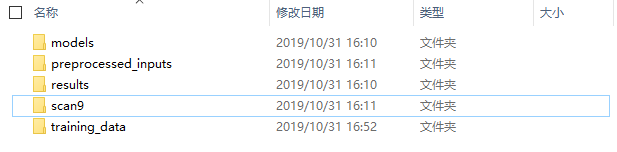
首先其要求下载scan9数据集,如果之前下载过数据集的可以知道,之前的数据集中,已经包含了scan9,以及模型,本人截图如下:
所以,这里就没有必要重新下载了,本人执行命令如下:
python test.py --dense_folder ../../MVS_TRANING/scan9/scan9 --model_dir ../../MVS_TRANING/models/tf_model_190307/tf_model/ --regularization '3DCNNs' --max_w 1152 --max_h 864 --max_d 192 --interval_scale 1.06
只需要指定数据路径(–dense_folder)和模型路径即可(–model_dir )
错误一
  File "/root/anaconda3/envs/zwh-mxnet/lib/python3.6/site-packages/tensorflow/python/util/compat.py", line 87, in as_text
    return bytes_or_text.decode(encoding)

UnicodeDecodeError: 'utf-8' codec can't decode byte 0xff in position 0: invalid start byte
修改源码如下:
    #cam_file = file_io.FileIO(data[2 * view + 1], mode='r')
    cam_file = file_io.FileIO(data[2 * view + 1], mode='rb')
错误二
  File "/root/anaconda3/envs/zwh-mxnet/lib/python3.6/site-packages/tensorflow/python/framework/ops.py", line 2005, in __init__
    self._traceback = tf_stack.extract_stack()
又是内存不够,我只能又去禁用GPU,使用32G的cpu。
然后就能正常运行了,打印如下:

然后我们换R-MVSNet模型,执行:
python test.py --dense_folder ../../MVS_TRANING/scan9/scan9 --model_dir ../../MVS_TRANING/models/tf_model_190307/tf_model/ --regularization 'GRU' --max_w 1152 --max_h 864 --max_d 192 --interval_scale 1.06
只要把之前的3DCNN换成GRU即可。
报错三
 File "/data/zwh/2.3D/MVSNet-master/mvsnet/model.py", line 456, in inference_winner_take_all
    , back_prop=False, parallel_iterations=1)
    param_name=input_name)
  File "/root/anaconda3/envs/zwh-mxnet/lib/python3.6/site-packages/tensorflow/python/framework/op_def_library.py", line 60, in _SatisfiesTypeConstraint
    ", ".join(dtypes.as_dtype(x).name for x in allowed_list)))
TypeError: Value passed to parameter 'multiples' has DataType float32 not in list of allowed values: int32, int64
根据提示,找到MVSNet-master/mvsnet/model.py文件,修改如下:
        #depth_interval = (depth_end - depth_start) / (tf.cast(depth_num, tf.float32) - 1)
        depth_interval = (depth_end - depth_start) // (tf.cast(depth_num, tf.float32) - 1)
报错四
  File "/data/zwh/2.3D/MVSNet-master/mvsnet/model.py", line 431, in body
    temp_depth_image, [1, feature_shape[1], feature_shape[2], 1])
  File "/root/anaconda3/envs/zwh-mxnet/lib/python3.6/site-packages/tensorflow/python/framework/op_def_library.py", line 60, in _SatisfiesTypeConstraint
    ", ".join(dtypes.as_dtype(x).name for x in allowed_list)))
TypeError: Value passed to parameter 'multiples' has DataType float32 not in list of allowed values: int32, int64
解决如下,还是修改MVSNet-master/mvsnet/model.py:
    #feature_shape = [FLAGS.batch_size, FLAGS.max_h/4, FLAGS.max_w/4, 32]
    feature_shape = [FLAGS.batch_size, FLAGS.max_h//4, FLAGS.max_w//4, 32]
然后就可以正常运行了,本人打印如下:

下面,我们开始看论文了,看完论文之后,我们分析源码,就知道打印的都是啥玩意了。


 2544
2544


 被折叠的 条评论
为什么被折叠?
被折叠的 条评论
为什么被折叠?
 到【灌水乐园】发言


