


1. 简介
Spring从3.1开始定义了org.springframework.cache.Cache和org.springframework.cache.CacheManager接口来统一不同的缓存技术,并支持使用JCache(JSR-107)注解简化开发。Cache接口为缓存的组件规范定义,包含缓存的各种操作集合,Cache接口下spring提供了各种xxCache的实现,如RedisCache、EhCache、ConcurrentMapCache等。
每次调用需要缓存功能的方法时,Spring会检查指定参数的指定的目标方法是否已经被调用过,如果有,就直接从缓存中获取方法调用后的结果,如果没有就调用方法并缓存结果后返回给用户,下次调用直接从缓存中获取.
使用spring缓存抽象时,需要关注一下两点:
1)确定方法需要被缓存以及他们的缓存策略
2)从缓存中读取之前缓存存储的数据
2. 整合Spring Cache简化开发
2.1 开发步骤
2.1.1 依赖引入
1)引入cache场景
<!-- 引入spring cache -->
<dependency>
    <groupId>org.springframework.boot</groupId>
    <artifactId>spring-boot-starter-cache</artifactId>
</dependency>
2)引入具体缓存组件
这里以redis为例
<!-- boot整合redis -->
<dependency>
    <groupId>org.springframework.boot</groupId>
    <artifactId>spring-boot-starter-data-redis</artifactId>
</dependency>
2.1.2 配置
1)boot的自动配置类CacheAutoConfiguration自动配置好缓存管理器
2)在application.yml中配置缓存组件类型
## 指定缓存组件类型
spring.cache.type=redis
注意:这个是最简单的配置,其他的都是用默认值
2.1.3 缓存相关注解
1)@Cacheable:触发将数据保存到缓存的操作
2)@CacheEvict:触发将数据从缓存中删除的操作
3)@CachePut:以不影响方法执行的方式更新缓存
4)@Caching:组合多个缓存操作
5)@CacheConfig:在类级别共享缓存的相同配置
2.1.4 测试使用缓存
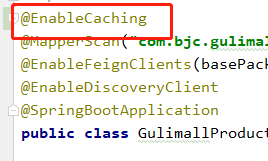
1)开启缓存功能
在启动类上使用注解@EnableCaching开启缓存功能
2)使用注解
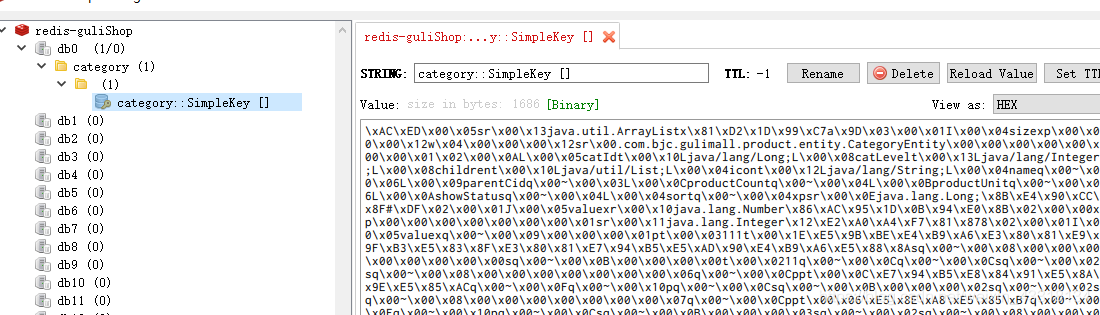
@Cacheable({"category"})   // 代表当前方法的结果需要缓存,如果缓存中有,方法不用调用,如果缓存中没有,会调用方法,最后将方法的结果放入缓存
public List<CategoryEntity> getLevel1Categorys() {
    List<CategoryEntity> entities = this.baseMapper.selectList(new QueryWrapper<CategoryEntity>().eq("parent_cid", 0));
    return entities;
}
测试:第一次访问从数据库查询,之后的访问都不会走数据库了,查看redis,缓存中有数据。
注意:
1)key默认自动生成,key的值为 “缓存的名称” + "::" + “SimpleKey[]”
2)缓存的value的值默认采用的是JDK序列化机制,将序列化后的数据存入redis
3)默认时间是-1,也就是永不过期
2.2 自定义设置
2.2.1 指定生成的缓存的key
注解@Cacheable还可以指定key的值,看其定义,如图:
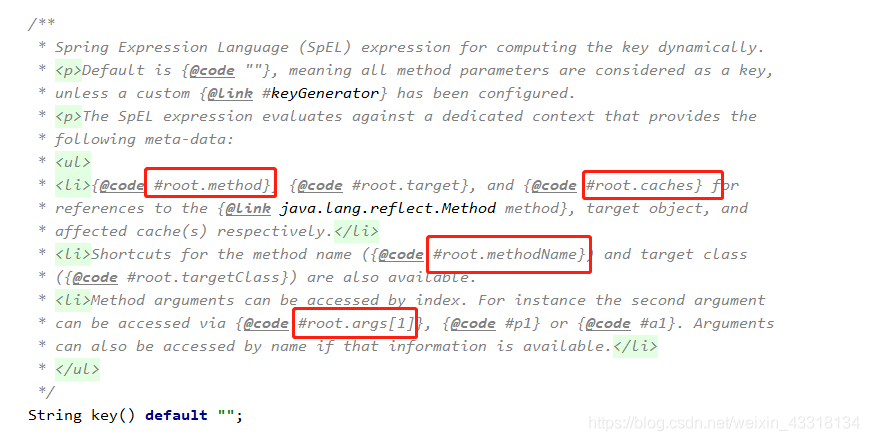
可以知道,key的值为一个SPEL表达式,我们可以动态的使用当前方法名来作为缓存的key,同时也可以指定我们自定义的字符串作为key的值,当使用字符串的时候,需要用单引号括起来。具体的表达式的写法可以参看spring Cache官方说明
例如:
1)动态使用当前方法名作为缓存的key
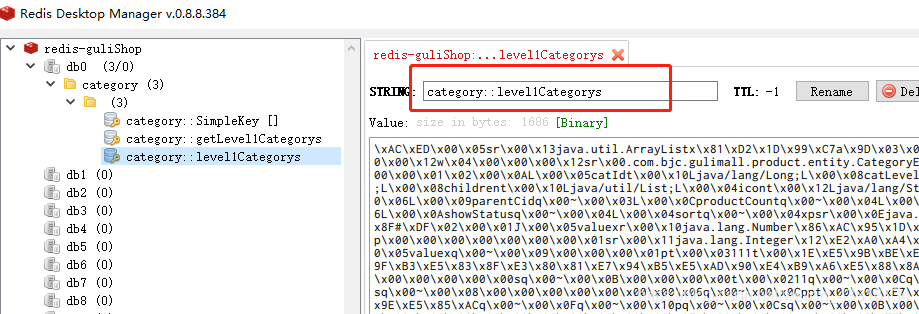
@Cacheable(value={"category"},key = "#root.methodName")
public List<CategoryEntity> getLevel1Categorys() {
    System.out.println("getLevel1Categorys...");
    List<CategoryEntity> entities = this.baseMapper.selectList(new QueryWrapper<CategoryEntity>().eq("parent_cid", 0));
    return entities;
}
redis缓存结果如图:

2)使用字符串作为缓存的key
@Cacheable(value={"category"},key = "'level1Categorys'")  // 代表当前方法的结果需要缓存,如果缓存中有,方法不用调用,如果缓存中没有,会调用方法,最后将方法的结果放入缓存
public List<CategoryEntity> getLevel1Categorys() {
    System.out.println("getLevel1Categorys...");
    List<CategoryEntity> entities = this.baseMapper.selectList(new QueryWrapper<CategoryEntity>().eq("parent_cid", 0));
    return entities;
}
redis缓存结果如图:
注意:
@Cacheable注解还有一个同步属性sync,默认是false,表示非同步,加上sync=true之后,当有并发缓存的时候,就会走加了锁的方法来缓存数据。
2.2.2 设置缓存有效期
设置缓存有效期为1小时
## 设置缓存过期时间 单位是毫秒
spring.cache.redis.time-to-live=3600000
修改缓存的key名称,再次访问,redis缓存如图:
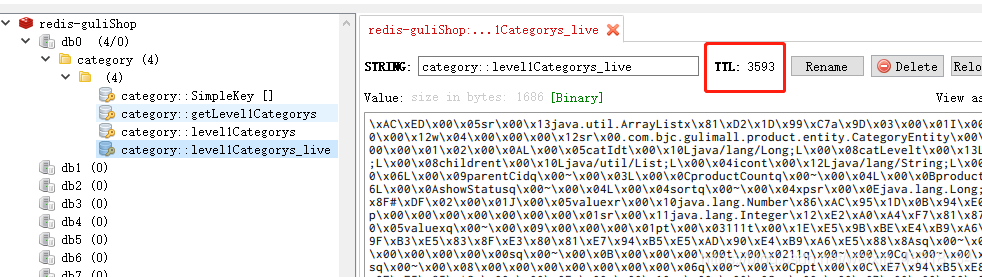
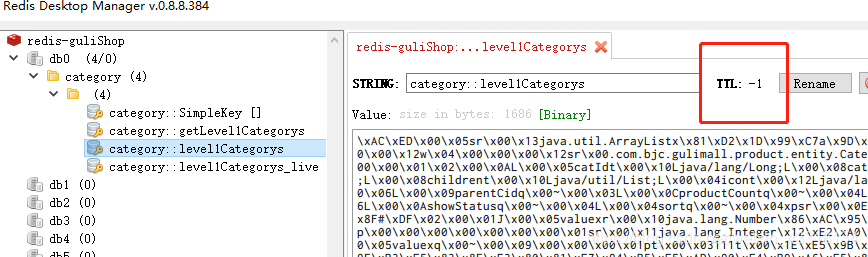
可以看到现在的TTL还剩下3593 说明设置生效。如果没有设置,那么TTL的值为-1,如图:
2.2.3 将数据保存为JSON格式
编写一个配置类,将缓存相关的配置都配置在该类上
/*
* 缓存相关的配置类
* 将所有与缓存相关的配置都写在该类下,包括开启缓存的注解@EnableCaching也从启动类移动到这里
 * */
@Configuration
@EnableCaching
public class MyCacheConfig {
    @Bean
    RedisCacheConfiguration redisCacheConfiguration(){
        RedisCacheConfiguration config = RedisCacheConfiguration.defaultCacheConfig();
        // 设置key的序列化机制  使用默认的
        // 接收一个RedisSerializer类型的序列化器
        config = config.serializeKeysWith(RedisSerializationContext.SerializationPair.fromSerializer(new StringRedisSerializer()));
        // 设置值的序列化器  使用fastJSON序列化器
        config = config.serializeValuesWith(RedisSerializationContext.SerializationPair.fromSerializer(new GenericFastJsonRedisSerializer()));
        return config;
    }
}
访问,redis结果如图:
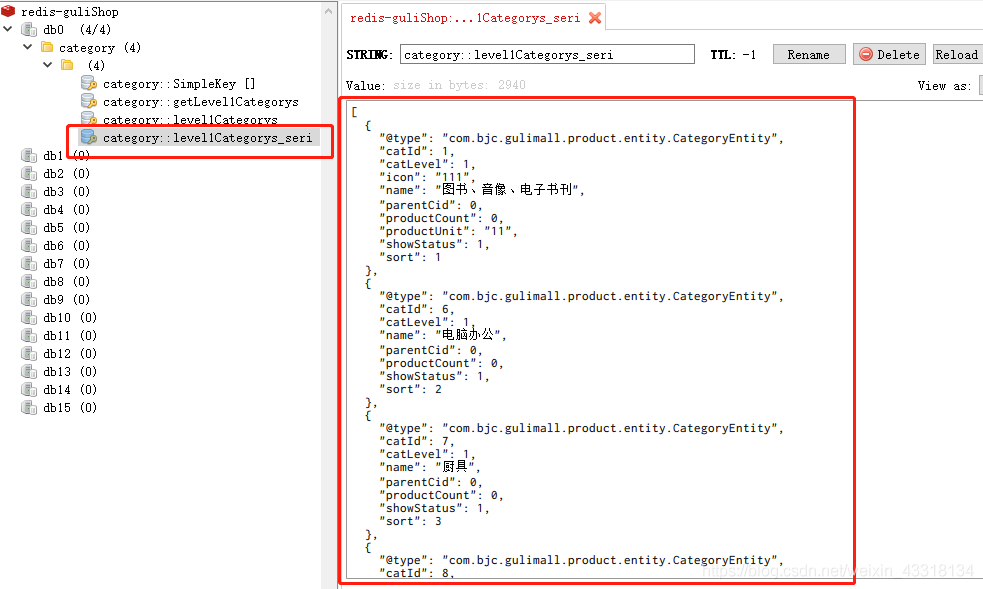
根据redis显示的信息,发现现在使用的是json序列化器了,但是,TTL又为-1了,这表明,指定了配置类之后,配置文件中的配置失效了,需要将配置文件中的设置在该类中进行设置。
步骤:
1)开启属性配置绑定功能
@EnableConfigurationProperties(CacheProperties.class)2)参数化CacheProperties
3)获取redisProperties
4)copy源代码中对配置类的处理
代码如下:
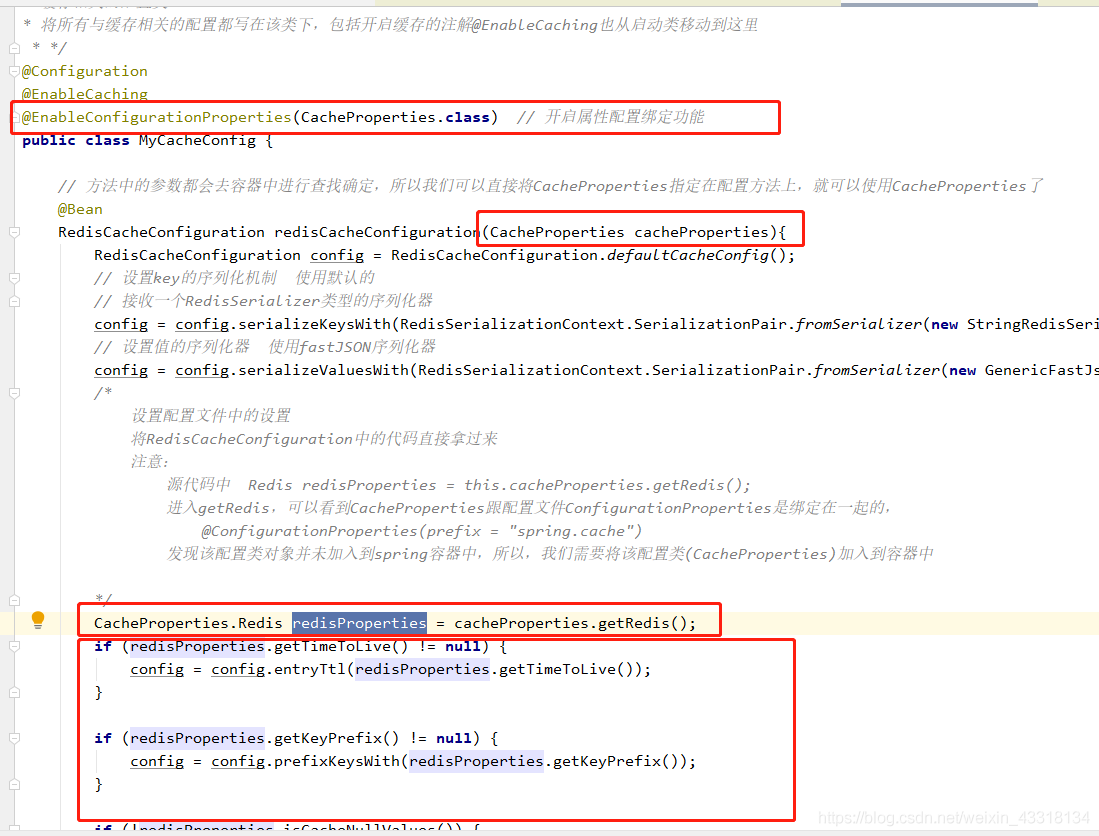
完整的配置如下:
package com.bjc.gulimall.product.config;

import com.alibaba.fastjson.support.spring.GenericFastJsonRedisSerializer;
import org.springframework.boot.autoconfigure.cache.CacheProperties;
import org.springframework.boot.context.properties.ConfigurationProperties;
import org.springframework.boot.context.properties.EnableConfigurationProperties;
import org.springframework.cache.annotation.EnableCaching;
import org.springframework.context.annotation.Bean;
import org.springframework.context.annotation.Configuration;
import org.springframework.data.redis.cache.RedisCacheConfiguration;
import org.springframework.data.redis.serializer.RedisSerializationContext;
import org.springframework.data.redis.serializer.StringRedisSerializer;

/*
* 缓存相关的配置类
* 将所有与缓存相关的配置都写在该类下,包括开启缓存的注解@EnableCaching也从启动类移动到这里
 * */
@Configuration
@EnableCaching
@EnableConfigurationProperties(CacheProperties.class)  // 开启属性配置绑定功能
public class MyCacheConfig {

    // 方法中的参数都会去容器中进行查找确定,所以我们可以直接将CacheProperties指定在配置方法上,就可以使用CacheProperties了
    @Bean
    RedisCacheConfiguration redisCacheConfiguration(CacheProperties cacheProperties){
        RedisCacheConfiguration config = RedisCacheConfiguration.defaultCacheConfig();
        // 设置key的序列化机制  使用默认的
        // 接收一个RedisSerializer类型的序列化器
        config = config.serializeKeysWith(RedisSerializationContext.SerializationPair.fromSerializer(new StringRedisSerializer()));
        // 设置值的序列化器  使用fastJSON序列化器
        config = config.serializeValuesWith(RedisSerializationContext.SerializationPair.fromSerializer(new GenericFastJsonRedisSerializer()));
        /*
            设置配置文件中的设置
            将RedisCacheConfiguration中的代码直接拿过来
            注意:
                源代码中  Redis redisProperties = this.cacheProperties.getRedis();
                进入getRedis,可以看到CacheProperties跟配置文件ConfigurationProperties是绑定在一起的,
                    @ConfigurationProperties(prefix = "spring.cache")
                发现该配置类对象并未加入到spring容器中,所以,我们需要将该配置类(CacheProperties)加入到容器中

        */
        CacheProperties.Redis redisProperties = cacheProperties.getRedis();
        if (redisProperties.getTimeToLive() != null) {
            config = config.entryTtl(redisProperties.getTimeToLive());
        }

        if (redisProperties.getKeyPrefix() != null) {
            config = config.prefixKeysWith(redisProperties.getKeyPrefix());
        }

        if (!redisProperties.isCacheNullValues()) {
            config = config.disableCachingNullValues();
        }

        if (!redisProperties.isUseKeyPrefix()) {
            config = config.disableKeyPrefix();
        }

        return config;
    }
}
重启,访问,redis如下:

2.2.4 其他设置
## 配置key的前缀
spring.cache.redis.key-prefix=CACHE_
## 配置key的前缀  如果指定了前缀,就用指定的,如果没有,就默认使用缓存的名字作为前缀
spring.cache.redis.use-key-prefix=true

## 是否缓存空值  配置之后可以解决《 缓存穿透 》问题
spring.cache.redis.cache-null-values=true
2.3 @CacheEvict注解使用
使用该注解就表示系统默认缓存策略为失效模式(也就是有更新先删除在缓存)
该注解的使用很简单,只需要在更新方法上加上注解,并指定与@Cacheable注解相同的value与key即可
例如:
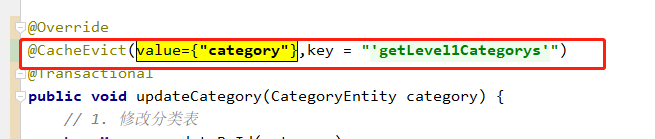
@Override
@CacheEvict(value={"category"},key = "'getLevel1Categorys'")
@Transactional
public void updateCategory(CategoryEntity category) {
    // 1. 修改分类表
    baseMapper.updateById(category);
    // 2. 修改品牌分类关系表
    if(StringUtils.isNotEmpty(category.getName())){
        CategoryBrandRelationEntity entity = new CategoryBrandRelationEntity();
        entity.setCatelogId(category.getCatId());
        entity.setCatelogName(category.getName());
        QueryWrapper<CategoryBrandRelationEntity> wraper = new QueryWrapper();
        wraper.eq("catelog_id",category.getCatId());
        categoryBrandRelationDao.update(entity,wraper);
    }

    // 3. TODO 修改其他分类关系
}
如图:
注意:因为在@Cacheable注解上,key的值为方法名,如图:

所以,这里的key也要指定为@Cacheable注解所在的方法的方法名,要记得,需要用单引号将方法名引起来,因为key跟的是SPEL表达式。
2.4 @Caching注解的使用
该注解可以组合多个缓存操作。当我们执行更新操作的时候,需要更新多个缓存的时候,这时候就需要使用该注解
2.4.1 方式一
指定多个
@Override
@Caching(evict = {
        @CacheEvict(value={"category"},key = "'getLevel1Categorys'"),
        @CacheEvict(value={"category"},key = "'getCatagoryJson'")
})
@Transactional
public void updateCategory(CategoryEntity category) {
    // 1. 修改分类表
    baseMapper.updateById(category);
    // 2. 修改品牌分类关系表
    if(StringUtils.isNotEmpty(category.getName())){
        CategoryBrandRelationEntity entity = new CategoryBrandRelationEntity();
        entity.setCatelogId(category.getCatId());
        entity.setCatelogName(category.getName());
        QueryWrapper<CategoryBrandRelationEntity> wraper = new QueryWrapper();
        wraper.eq("catelog_id",category.getCatId());
        categoryBrandRelationDao.update(entity,wraper);
    }

    // 3. TODO 修改其他分类关系
}
2.4.2 使用@CacheEvict指定分区
@CacheEvict(value = {"category"},allEntries = true)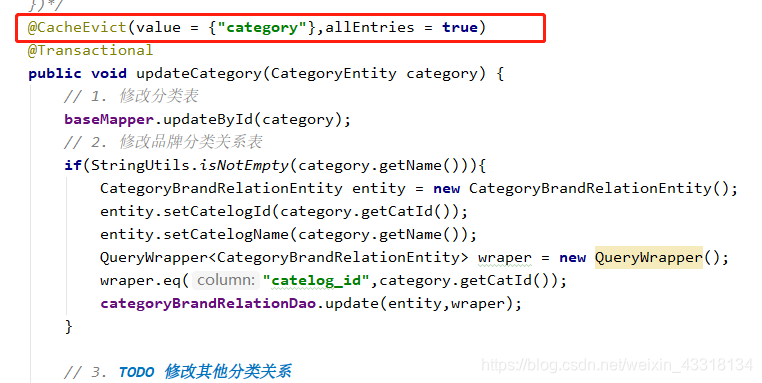
从这个例子,可以看出在使用缓存的时候,指定分区的必要性。因此,存储同一类型的数据,都可以指定成同一个分区
3. Spring Cache缓存的不足
对于读模式,sprig cache对缓存穿透、缓存击穿、缓存雪崩等场景都要考虑
1)缓存穿透:查询一个null数据,在SpringCache中,可以缓存空数据,通过配置spring.cache.redis.cache-null-values=true
2)缓存击穿:大量并发进来同时查询一个正好过期的数据。默认没有加锁,通过sync=true来解决
3)缓存雪崩:大量的key同时过期,指定过期时间spring.cache.redis.time-to-live=3600000来解决
但是对于写模式,没有过多考虑,所以,对于读多写少 即一致性要求不高的数据可以使用spring-cache,对于写比较多的场景,如果业务场景对一致性要求不高,只要缓存的数据设置了过期时间就足够了,对于那些对一致性要求比较高的数据,需要特殊设计


 1632
1632


 被折叠的 条评论
为什么被折叠?
被折叠的 条评论
为什么被折叠?
 到【灌水乐园】发言


