


 本文介绍了如何在Jenkins中通过Pipeline结合PublishOverSSH插件,实现从源代码构建、打包成.zip,再到Windows服务器的自动化部署。详细步骤包括:生成SSH密钥、配置Jenkins SSH全局设置、安装PowerShell Server、配置PublishOverSSH插件、编写Jenkinsfile文件以及执行构建和部署。示例中展示了Jenkinsfile的编写,涉及NuGet Restore、Build、Publish、Packzip和Deploy等阶段。
1.介绍
前面第6章介绍过使用pipeline编写各阶段,包括:checkout、nuget restore, Build, Publish。这些属于CI 也就是持续集成。在第9章介绍过多分支构建,本篇在6,9章基础上继续。
后续还需要的阶段包括:pack(打包),根据分支不同上传到不同的服务器再执行脚本部署,这些属于CD 也就是持续部署。
本节重点讲如何打包zip上传到目标服务器。使用 Publish Over SSH插件来实现。
准备工作包括:
1)用到的工具:PowerShell Server 2020
2)Jenkins插件:Publish Over SSH
2)部署环境:windows客户端(是jenkins本机属于内网)到windows服务端(iis目标服务器阿里云 windows server 2016) ip为131
3)生成秘钥
2. 秘钥生成
在jenkins本机上,cmd命令窗口中,使用ssh命令,必须先安装了OpenSSH
安装下载介绍: https://docs.microsoft.com/zh-cn/windows-server/administration/openssh/openssh_install_firstuse
步骤1 生成秘钥命令如下所示,其中 passphrase为1234567
C:\Users\AndyH>ssh-keygen -t rsa
Generating public/private rsa key pair.
Enter file in which to save the key (C:\Users\AndyH/.ssh/id_rsa):
C:\Users\AndyH/.ssh/id_rsa already exists.
Overwrite (y/n)? y
Enter passphrase (empty for no passphrase):
Enter same passphrase again:
Your identification has been saved in C:\Users\AndyH/.ssh/id_rsa.
Your public key has been saved in C:\Users\AndyH/.ssh/id_rsa.pub.
The key fingerprint is:
SHA256:tafBvaPd9LH9WOQDSdpBtS5Q6N+Zt6U7d50bhPXmp6Q mogultech\andyh@AndyH
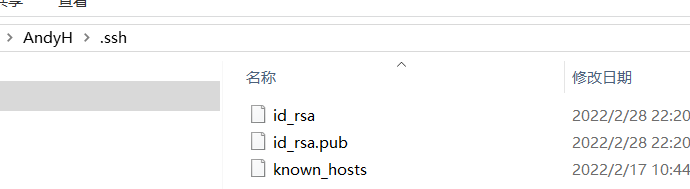
步骤2 公钥文件复制到131目标服务器
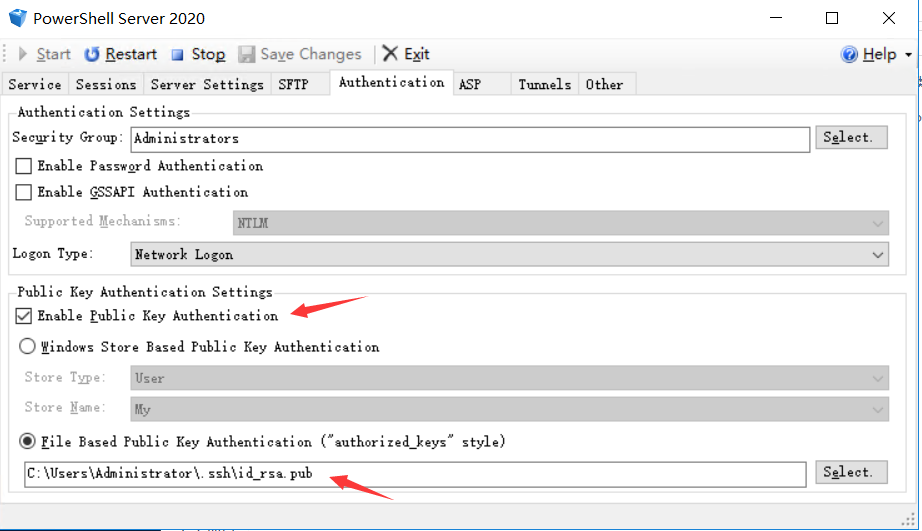
远程连接到目标服务器,将id_rsa.pub文件复制到目标服务器(自己选择存放目录),我这里放的位置是C:\Users\Administrator\.ssh\id_rsa.pub
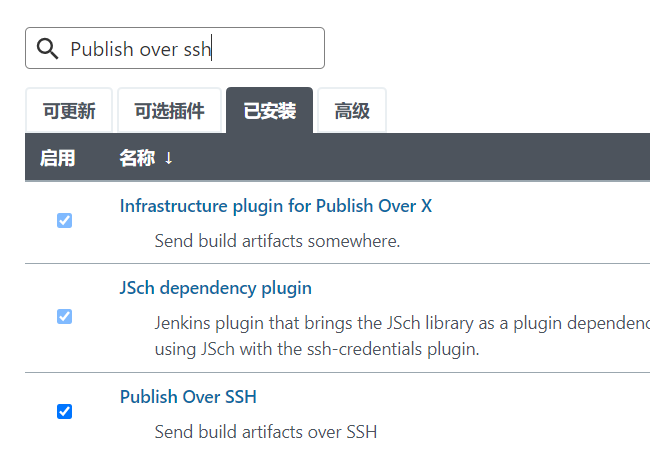
3.Publish Over SSH
Publish Over SSH是jenkins插件,主要的功能有两个:
把jenkins本机上的文件,传输到远程iis服务器的指定目录。
远程执行bat命令和脚本。
安装后如下所示:
4.PowerShell Server工具
官方解释:很容易安装和配置SSH 2.0服务器,使您能够从任何SSH客户端远程管理窗口,添加一个SFTP服务器窗口,和安全的远程访问本地资源。
下面解释一下服务端与客户端: 服务端是要部署的目标服务器131,需要安装powershell Server 2020。而jenkins要自动化部署到目标服务器,所以jenkins本机是客户端,需要安装Publish Over SSH插件。
目标服务器下载PowerShell Server 2020 试用版下载:https://www.nsoftware.com/powershell/server/download.aspx
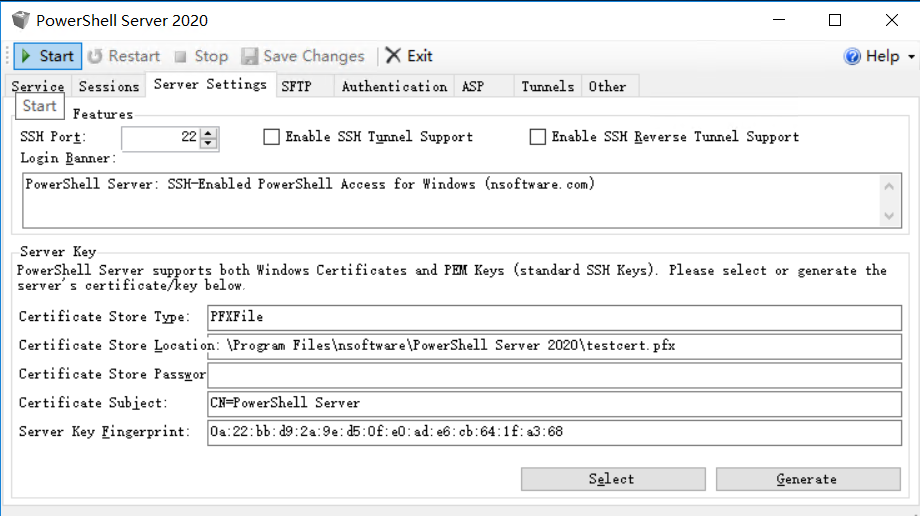
安装后,打开默认如下所示
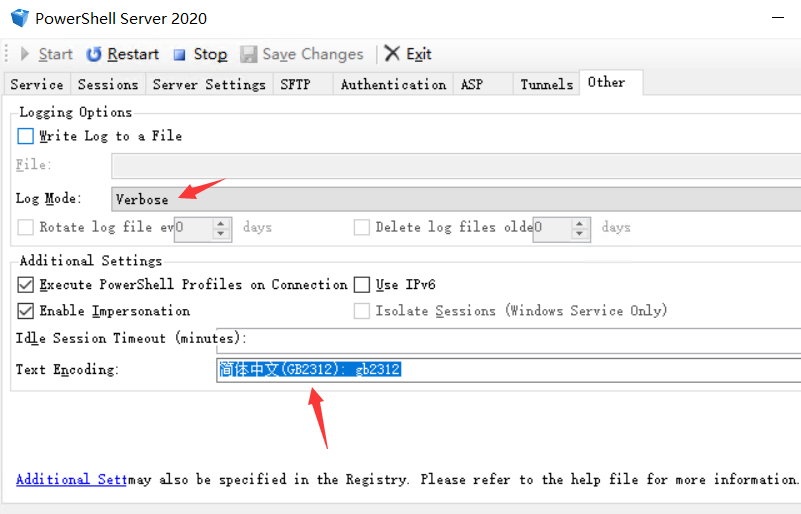
为了Jenkins不乱码,选择gb2312,并且log Mode选择"Verbose" 原因是能看到更多日志信息,帮助排错, 如下所示:
接着再设置SFTP目录,也是就jenkins要上传打包文件.zip的目录
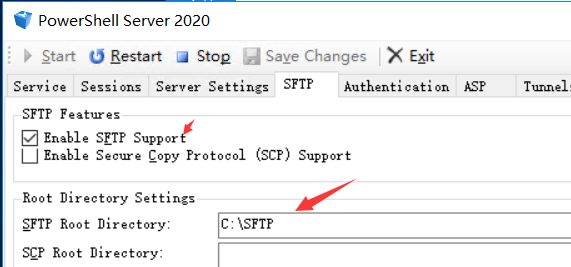
接着配置公钥Key,这里的key目录是上面2.2中已存放好的目录,并启动。
5.jenkins ssh全局配置
这里的目的:确保连够连接到目标服务器131
Manger Jenkins-->System Configuration-->Configure System
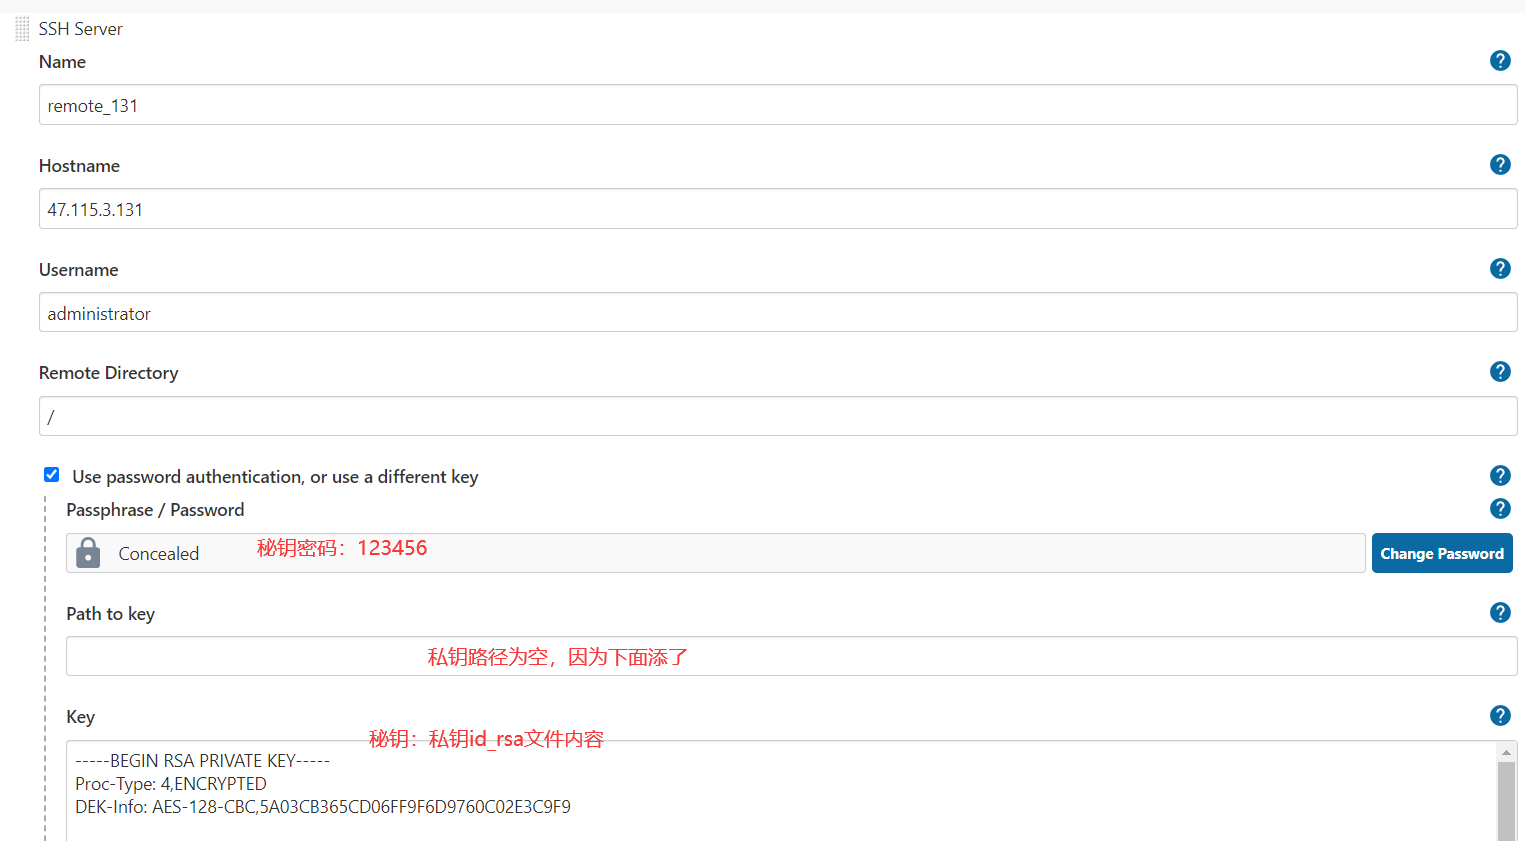
配置好后(秘钥密码是:1234567),进行测试成功,表示jenkins本机ssh已连接上了目标服务器131,如下所示

在131目标服务器的PowerShell Server中查看日志如下所示:

6.job ssh 传输配置
在前面第9章中,学习到了多分支构建,job项目为multibranch-jenkenhellowrold,下面包括master分支和develop分支, 上面目标服务器131用于部署master分支。在multibranch-jenkenhellowrold项目中进行配置。
配置路径:multibranch-jenkenhellowrold-->流水线语法-->片断生成器-->下拉中选择sshPublisher:Send build artifacts over SSH
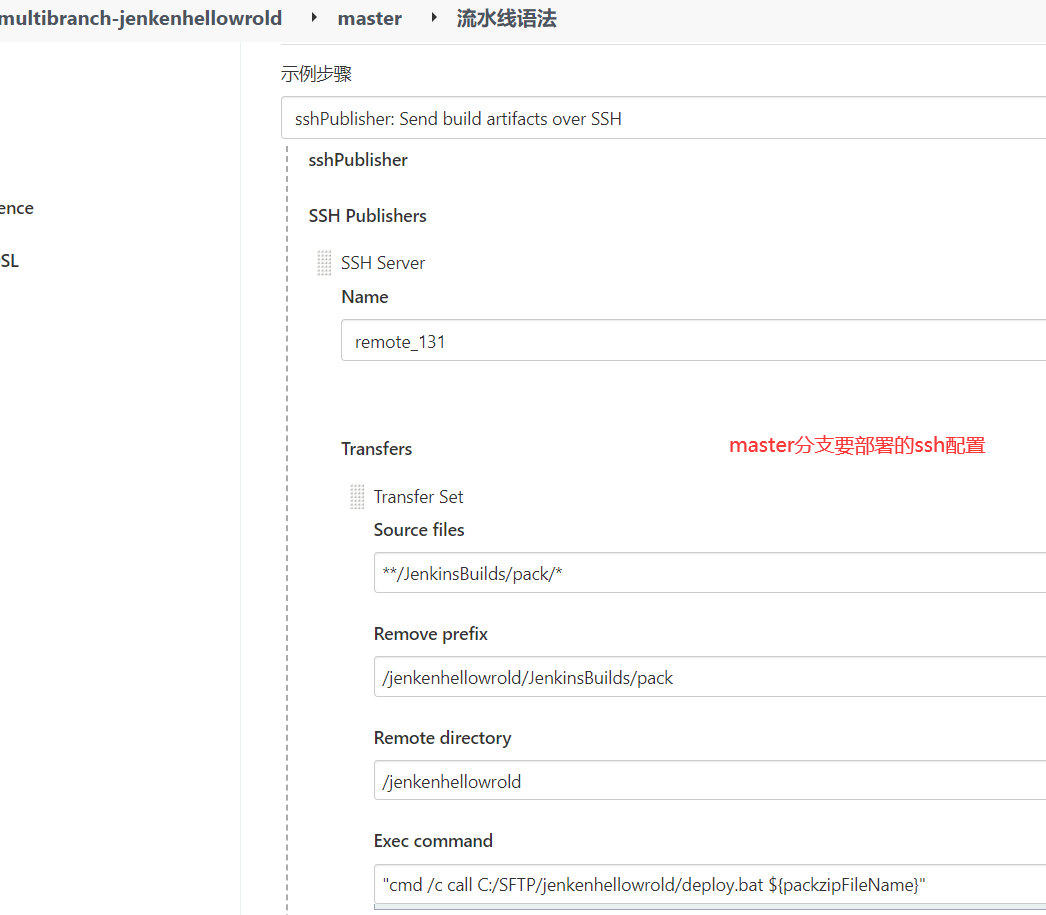
最后点击“生成流水线的脚本” 放入jenkinsfile文件中,配置的解释看下面介绍
https://www.cnblogs.com/zongyl/p/9157488.html
Publish Over SSH | Jenkins plugin
7.编写Jenkinsfile文件
def packzipFileName  //定义打包的文件名称 整个流水线共享变量,注意首行def定义的变量不能使用=赋值。

pipeline {

    agent any
    options{
     //pipeline超时时间
     timeout(time:10, unit:'MINUTES')
     //pipeline重试次数
     retry(1)
     //同一个pipeline,禁止同时执行
     disableConcurrentBuilds()
     //daysToKeepStr保持构建的天数,numToKeepStr保持构建的最大个数
     buildDiscarder logRotator(artifactDaysToKeepStr: '', artifactNumToKeepStr: '', daysToKeepStr: '3', numToKeepStr: '10')
    }

    environment{
        publishOutput='./jenkenhellowrold/JenkinsBuilds/'  //编译后发布的路径是指:C:\Users\AndyH\AppData\Local\Jenkins\.jenkins\workspace\branch-jenkenhellowrold_master_2\jenkenhellowrold
    }
    stages {
        stage('NuGet Restore') {
            steps {
               echo 'NuGet Restore Begin'
               //restore会从解决方案或项目的根目录寻找 NuGet.config 文件,如果找不到,则会使用全局的 NuGet.config,也可以自己指定NuGet.config路径
               //还可以是还原项目如:dotnet ./jenkenhellowrold/jenkenhellowrold.csproj
               //-nowarn不显示警告
               bat 'dotnet restore -nowarn:msb3202,nu1503,cs1591 jenkenhellowrold.sln'
               //清理解决方案中所有生成的文件,如obj和bin件
               bat 'dotnet clean --nologo jenkenhellowrold.sln'
               echo 'NuGet Restore End'
            }
        }

        stage('Bulid Project'){
            steps{
                echo 'Bulid Project Begin'
                //生成项目及其所有依赖项
                bat 'dotnet build -nowarn:msb3202,nu1503,cs1591 --no-restore jenkenhellowrold.sln'
                echo 'Bulid Project End'
            }
        }
        stage('Publish'){
            steps{
                 echo 'Publish Begin'
                 script
                 {
                  //每次先删除之前的所有发布文件
                  def publishOutputdir= env.publishOutput.replace("/","\\");
                  def exist=fileExists(publishOutputdir)
                  if(exist==true){
                    //echo "publishOutputdir:${exist}"
                    bat 'rd /S/Q '+publishOutputdir
                  }
                  def  output=env.publishOutput+env.GIT_BRANCH+env.BUILD_NUMBER
                 // echo "${output}"//使用变量时用双引号
                 //--nologo不显示启动版权标志或版权消息,。netcore 3.0可用
                 //-c|--configuration 指定是Debug或Release
                  bat 'dotnet publish --nologo -nowarn:msb3202,nu1503,cs1591 --no-restore  ./jenkenhellowrold/jenkenhellowrold.csproj -c Release  -o '+output
                }
                echo 'Publish End'
            }
        }
        stage('Pack zip')
        {
            steps{
               echo 'Pack zip Begin'
               script
               {
                  //定义打包的文件名
                  packzipFileName=env.GIT_BRANCH+env.BUILD_NUMBER+".zip"
                  //echo "aaaaa${packzipFileName}"
                  def packOutput=env.publishOutput.replace("/","\\")
                  //需要压缩的地址文件
                  def rarInFile=packOutput+env.GIT_BRANCH+env.BUILD_NUMBER
                  //压缩后存放的地址文件
                  def rarOutFile=packOutput+'\\pack\\'
                  def exist=fileExists(rarOutFile)
                  //echo "${exist}"
                  if(exist==false){
                   bat 'md '+rarOutFile
                  }
                  //打包前删除配置文件
                  delFilesForWeb = ["web.config","appsettings.json","appsettings.Development.json"] as String[]  //需要删除的文件
                  delFilesForWeb.each{
                   echo 'del file:'+it
                   bat 'del /f/q '+ rarInFile+'\\'+it
                  }
                 //rar 文件路径已添加到jenkins全局配置中,本机路径 D:\Program Files\WinRAR    a代表备份所有文件 ep是排除路径
                 bat  env.RAR_PATH+' a -r -ep ' +rarOutFile+packzipFileName+' '+rarInFile
               }
               echo 'Pack zip End'
            }
        }
        stage('Deploy To Dev'){
            when{
                branch 'develop'
            }
            steps{
                echo "Deploy To Dev"
            }
        }
       stage('Deploy To pro131'){
           when{
                branch  'master'
           }
           steps{
             echo "Deploy To pro131 Begin"
             //配置时有的目录是指jenkins服务器上的,有些是指目标服务器上的如131服务器
             //remoteDirectory: 131服务器目录文件夹,不存在会自动创建,服务器安装了PowerShell Server并指定的SFTP目录
             //removePrefix:上传到131服务器目录时,这里是移出多层目录,最终上传目录层次是:C:\SFTP\jenkenhellowrold\master56.zip
             //sourceFiles:填写jenkins服务器相对路径,根目录是C:\Users\AndyH\AppData\Local\Jenkins\.jenkins\workspace\branch-jenkenhellowrold_master_2
             //remoteDirectorySDF:true  远程目录使用日期格式,那么remoteDirectory也要配置格式
             //execCommand:转输文件后(.zip),要在131服务器执行的bat文件,这里指定服务器存放bat文件的目录
             sshPublisher(publishers: [sshPublisherDesc(configName: 'remote_131', transfers: [sshTransfer(cleanRemote: false, excludes: '', execCommand:"cmd /c call C:/SFTP/jenkenhellowrold/deploy.bat ${packzipFileName}", execTimeout: 120000, flatten: false, makeEmptyDirs: true, noDefaultExcludes: false, patternSeparator: '[, ]+', remoteDirectory: '/jenkenhellowrold', remoteDirectorySDF: false, removePrefix: '/jenkenhellowrold/JenkinsBuilds/pack', sourceFiles: '**/JenkinsBuilds/pack/*', useSftpForExec: false)], usePromotionTimestamp: false, useWorkspaceInPromotion: false, verbose: false)])
             echo 'Deploy To pro 131 End'
            }
        }
    }
    post{
        failure{
            echo 'ִfail send email'
        }
        success
        {
            echo 'ִsuccess send email'
        }
    }
}
ssh execCommand要执行的131上deploy.bat文件 如下所示:
@echo off
rem 该文件需要放入目标服务器, 用于jenkinfile文件的ssh execCommand 执行路径, cmd模拟执行:deploy.bat master146.zip
rem 停止iis应用程序池和站点
"C:\Windows\System32\inetsrv\appcmd.exe" stop apppool /apppool.name:"jenkinshelloworld"
"C:\\Windows\\System32\\inetsrv\\appcmd.exe" stop site jenkinshelloworld
rem 目标服务器是用的winrar解压
"C:\Program Files\WinRAR\WinRAR.exe" X -o C:\SFTP\jenkenhellowrold\%1   C:\IIS\jenkinshelloworld
rem 启动iis应用程序池和站点
"C:\Windows\System32\inetsrv\appcmd.exe" start apppool /apppool.name:"jenkinshelloworld"
"C:\\Windows\\System32\\inetsrv\\appcmd.exe" start site jenkinshelloworld
exit 0
8 .点击构建
查看日志重点的信息列出来
SSH: Connecting from host [AndyH]
SSH: Connecting with configuration [remote_131] ...
SSH: EXEC: completed after 401 ms
SSH: Disconnecting configuration [remote_131] ...
SSH: Transferred 1 file(s)
SSH: Transferred 1 file(s) 1代表上传到目标服务器一个文件
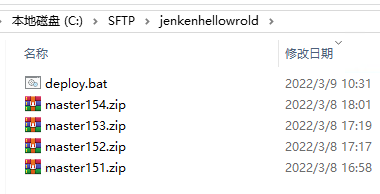
9.查看文件结果
1)jenkins服务器发布的目录,pack是打包存放文件夹,每次构建前都会先删除JenkinsBuilds下所有文件

2.目标服务器131上传的文件,deploy.bat文件作用:解压每次构建的.zip文件,解压到iis站点目录中
最终源码地址:https://git.code.tencent.com/Studies/pipeline-hello-world.git


 1771
1771

 被折叠的 条评论
为什么被折叠?
被折叠的 条评论
为什么被折叠?
 到【灌水乐园】发言


