


文章目录
一、集群环境准备
1.1 因为资源原因这里我就暂时先一台机器部署多个应用给大家演示
| 硬件资源 | 节点 | 角色-组件 |
|---|---|---|
| 8c16g 50 | node1-192.168.40.162 | controlplane、rancher、rke |
| 8c16g 50 | node1-192.168.40.163 | worker、docker |
| 8c16g 50 | node1-192.168.40.164 | etcd、docker |
二、初始化主机基本配置
2.1 主机名与IP地址解析(三台主机)
[root@node3 ~]# cat /etc/hosts
192.168.40.162 node1
192.168.40.163 node2
192.168.40.164 node3
2.2 配置三台主机IP为静态地址
[root@node1 ~]# vim /etc/sysconfig/network-scripts/ifcfg-ens33
TYPE="Ethernet"
PROXY_METHOD="none"
BROWSER_ONLY="no"
BOOTPROTO="none" # 修改为静态IP
DEFROUTE="yes"
IPV4_FAILURE_FATAL="no"
IPV6INIT="yes"
IPV6_AUTOCONF="yes"
IPV6_DEFROUTE="yes"
IPV6_FAILURE_FATAL="no"
IPV6_ADDR_GEN_MODE="stable-privacy"
NAME="ens33"
UUID="7dafc1c7-bb8d-48b7-91ee-846509e8fbc9"
DEVICE="ens33"
ONBOOT="yes"
#配置以下几行
IPADDR="192.168.40.162"
PREFIX="24"
GATEWAY="192.168.40.2" #虚拟机NAT网关IP
DNS1="8.8.8.8"
2.3 配置三台 主机 ip_forward及过滤机制 和关闭防火墙
#将桥接的IPv4流量传递到iptables的链
[root@node1 ~]# vim /etc/sysctl.conf
net.ipv4.ip_forward = 1
net.bridge.bridge-nf-call-ip6tables = 1
net.bridge.bridge-nf-call-iptables = 1
#加载模块并应用
[root@node1 ~]#  modprobe br_netfilter && sysctl -p /etc/sysctl.conf

#关闭防火墙
[root@node1 ~]# systemctl stop firewalld && setenforce 0 && systemctl disable firewalld
2.5 修改三台主机 Swap 分区设置 并配置时间同步
#临时关闭,不需要重启操作系统,即刻生效。
[root@node1 ~]#  swapoff -a
#永久关闭,需要重启操作系统生效
[root@node1 ~]#  sed -ri 's/.*swap.*/#&/' /etc/fstab
[root@node1 ~]#  cat /etc/fstab

[root@node1 ~]# free -h
              total        used        free      shared  buff/cache   available
Mem:           3.7G        323M        2.4G        189M        1.0G        2.9G
Swap:            0B          0B          0B

#删除本地时间time 并创建上海时区的软连
[root@node1 ~]# rm -f /etc/localtime && ln -s /usr/share/zoneinfo/Asia/Shanghai /etc/localtime
#查看
[root@node1 ~]#  date
二、Docker 、Docker-Compose 部署(三台主机)
2.1 配置 Docker YUM源
#下载 Docker-ce 镜像源
[root@node1 ~]# wget -O /etc/yum.repos.d/docker-ce.repo https://mirrors.aliyun.com/docker-ce/linux/centos/docker-ce.repo
#安装 Docker-Ce 不填版本号默认是最新版的,这里为了兼容我们用老版本的
[root@node1 ~]# yum install docker-ce-18.09.8-3.el7.x86_64 docker-ce-cli-18.09.8-3.el7.x86_64 -y
#启动 Docker 服务并设置开机自启动
[root@node1 ~]# systemctl start docker && systemctl enable docker
#配置 Docker 容器镜像加速器
[root@node1 ~]# vim /etc/docker/daemon.json
{
"registry-mirrors": ["https://s27w6kze.mirror.aliyuncs.com"]
}
#安装 Docker-Compose
[root@node1 ~]# curl -L https://get.daocloud.io/docker/compose/releases/download/1.25.1/docker-compose-`uname -s`-`uname -m` -o /usr/local/bin/docker-compose
[root@node1 ~]# chmod +x /usr/local/bin/docker-compose
#验证是否安装成功
[root@node1 ~]# docker-compose --version
docker-compose version 1.28.5, build c4eb3a1f
#添加 Rancher用户(所有主机)
[root@node1 ~]# useradd rancher && usermod -aG docker rancher
[root@node1 ~]# echo 123 | passwd --stdin rancher
Changing password for user rancher.
passwd: all authentication tokens updated successfully
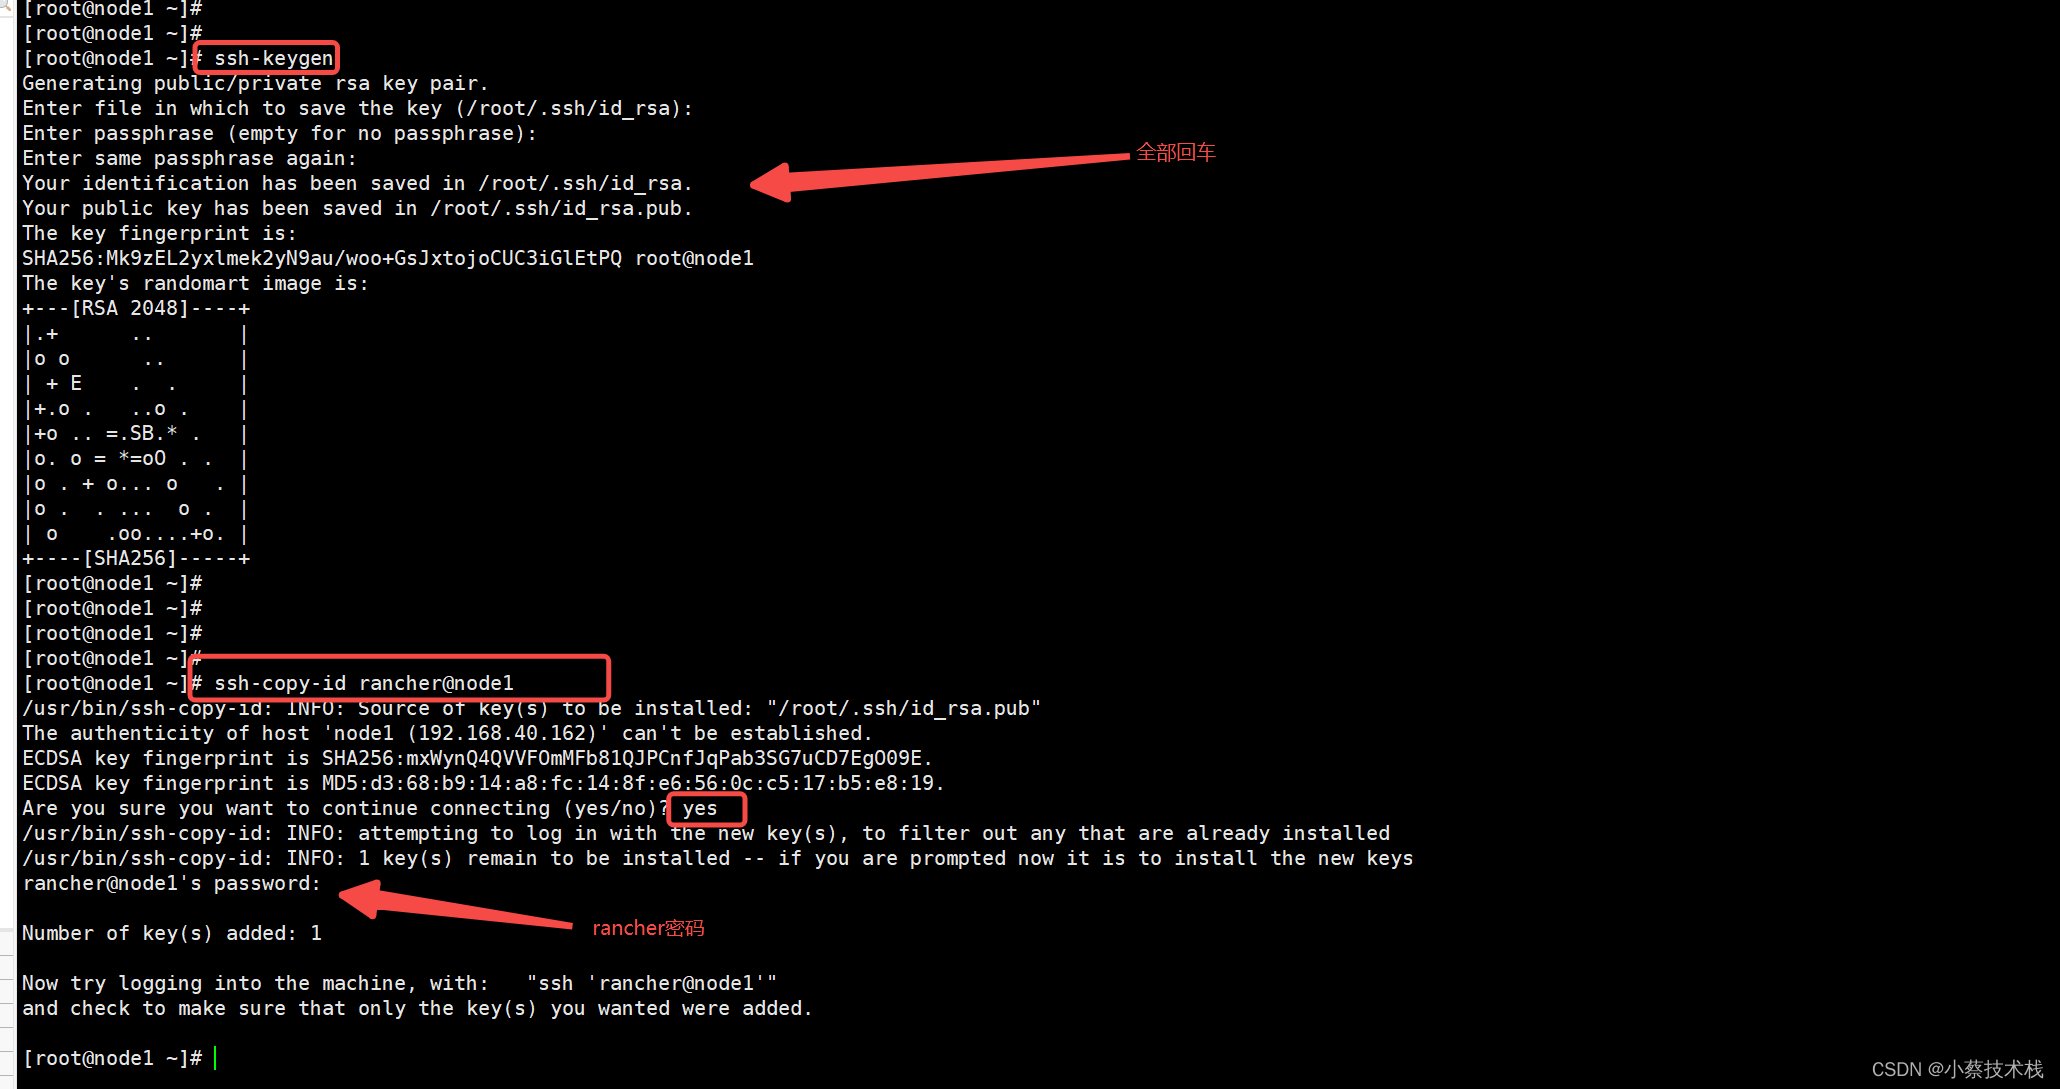
#生成ssh证书用于部署集群 rke二进制文件安装主机上创建密钥,即为control主机,用于部署集群,rke会使用racher 这个用户,rancher 去主机上操作的时候是需要认证的
[root@node1 ~]# ssh-keygen
Generating public/private rsa key pair.
Enter file in which to save the key (/root/.ssh/id_rsa): #回车
Enter passphrase (empty for no passphrase): #回车
Enter same passphrase again: #回车
Your identification has been saved in /root/.ssh/id_rsa.
Your public key has been saved in /root/.ssh/id_rsa.pub.
The key fingerprint is:
SHA256:Mk9zEL2yxlmek2yN9au/woo+GsJxtojoCUC3iGlEtPQ root@node1
The key's randomart image is:
+---[RSA 2048]----+
|.+ .. |
|o o .. |
| + E . . |
|+.o . ..o . |
|+o .. =.SB.* . |
|o. o = *=oO . . |
|o . + o... o . |
|o . . ... o . |
| o .oo....+o. |
+----[SHA256]-----+
#复制证书到集群中所有主机
[root@node1 ~]# ssh-copy-id rancher@node1
/usr/bin/ssh-copy-id: INFO: Source of key(s) to be installed: "/root/.ssh/id_rsa.pub"
The authenticity of host 'node1 (192.168.40.162)' can't be established.
ECDSA key fingerprint is SHA256:mxWynQ4QVVFOmMFb81QJPCnfJqPab3SG7uCD7EgO09E.
ECDSA key fingerprint is MD5:d3:68:b9:14:a8:fc:14:8f:e6:56:0c:c5:17:b5:e8:19.
Are you sure you want to continue connecting (yes/no)? yes
/usr/bin/ssh-copy-id: INFO: attempting to log in with the new key(s), to filter out any that are already installed
/usr/bin/ssh-copy-id: INFO: 1 key(s) remain to be installed -- if you are prompted now it is to install the new keys
rancher@node1's password: #输入rancher 密码
Number of key(s) added: 1
Now try logging into the machine, with: "ssh 'rancher@node1'"
and check to make sure that only the key(s) you wanted were added.
#同步到其他主机
[root@node1 ~]# ssh-copy-id rancher@node2
[root@node1 ~]# ssh-copy-id rancher@node3
#验证是否可用
[root@node1 ~]# ssh rancher@node2
[rancher@node2 ~]$
#racher 用户可以使用docker ps 命令及成功
[rancher@node2 ~]$ docker ps
CONTAINER ID IMAGE COMMAND CREATED STATUS PORTS NAMES
三、部署 RKE 工具(node1主机部署),通过RKE可以进行K8S的新增和删除节点等操作
3.1 下载 RKE (要看 rke 支持的 kubernetes 版本是否匹配)
[root@node1 ~]# wget http://github.com/rancher/rke/releases/download/v1.3.7/rke_linux-amd64
[root@node1 ~]# mv rke_linux-amd64 /usr/local/bin/rke
[root@node1 ~]# chmod +x /usr/local/bin/rke
[root@node1 ~]# rke --version
rke version v1.3.7
3.2 初始化 RKE 配置文件,如果后边有修改cluster.yml,必须重新执行 rke up 命令
[root@node1 ~]#  mkdir -p /app/rancher
[root@node1 ~]#  cd /app/rancher
[root@node1 rancher]# rke config --name cluster.yml

[+] Cluster Level SSH Private Key Path [~/.ssh/id_rsa]: #私钥位置,默认回车即可
[+] Number of Hosts [1]: 3 #本地部署K8S集群所使用的节点
[+] SSH Address of host (1) [none]: 192.168.40.162 #第一台主机节点
[+] SSH Port of host (1) [22]: 22 #默认
[+] SSH Private Key Path of host (192.168.40.162) [none]: ~/.ssh/id_rsa #私钥的位置
[+] SSH User of host (192.168.40.162) [ubuntu]: rancher #连接的用户为rancher
[+] Is host (192.168.40.162) a Control Plane host (y/n)? [y]: y #是否为Control,直接回车
[+] Is host (192.168.40.162) a Worker host (y/n)? [n]: n #是否为工作节点,直接回车
[+] Is host (192.168.40.162) an etcd host (y/n)? [n]: n #是否是etcd 节点,直接回车
[+] Override Hostname of host (192.168.40.162) [none]: #不覆盖现有主机名,直接回车
[+] Internal IP of host (192.168.40.162) [none]: #主机局域网IP地址,直接回车
[+] Docker socket path on host (192.168.40.162) [/var/run/docker.sock]: #连接docker,直接回车

--------第二台主机配置--------
[+] SSH Address of host (2) [none]: 192.168.40.163
[+] SSH Port of host (2) [22]: 22
[+] SSH Private Key Path of host (192.168.40.163) [none]:  ~/.ssh/id_rsa
[+] SSH User of host (192.168.40.163) [ubuntu]: rancher
[+] Is host (192.168.40.163) a Control Plane host (y/n)? [y]: n
[+] Is host (192.168.40.163) a Worker host (y/n)? [n]: y
[+] Is host (192.168.40.163) an etcd host (y/n)? [n]: n
[+] Override Hostname of host (192.168.40.163) [none]: n
[+] Internal IP of host (192.168.40.163) [none]:
[+] Docker socket path on host (192.168.40.163) [/var/run/docker.sock]:

--------第三台主机配置--------
[+] SSH Address of host (3) [none]: 192.168.40.164
[+] SSH Port of host (3) [22]: 22
[+] SSH Private Key Path of host (192.168.40.164) [none]: ~/.ssh/id_rsa
[+] SSH User of host (192.168.40.164) [ubuntu]: rancher
[+] Is host (192.168.40.164) a Control Plane host (y/n)? [y]: n
[+] Is host (192.168.40.164) a Worker host (y/n)? [n]: n
[+] Is host (192.168.40.164) an etcd host (y/n)? [n]: y
[+] Override Hostname of host (192.168.40.164) [none]:
[+] Internal IP of host (192.168.40.164) [none]:
[+] Docker socket path on host (192.168.40.164) [/var/run/docker.sock]:


--------集群级别配置--------
[+] Network Plugin Type (flannel, calico, weave, canal, aci) [canal]: #默认用canal,直接回车
[+] Authentication Strategy [x509]: #认证策略,默认x509即可,直接回车
[+] Authorization Mode (rbac, none) [rbac]: #认证模式,直接回车
[+] Kubernetes Docker image [rancher/hyperkube:v1.22.6-rancher1]: rancher/hyperkube:v1.21.9-rancher1 #1.22.6这里是最新的,我们用低版本的1.21.9的
[+] Cluster domain [cluster.local]: #集群域名,默认即可,直接回车
[+] Service Cluster IP Range [10.43.0.0/16]: #Service IP地址
[+] Enable PodSecurityPolicy [n]: #Pod安全策略是否开启,默认不开启,直接回车
[+] Cluster Network CIDR [10.42.0.0/16]: #集群Pod网络
[+] Cluster DNS Service IP [10.43.0.10]: #集群DNS Service IP地址
[+] Add addon manifest URLs or YAML files [no]: #是否增加插件manifest URL或配置文件
--------END--------
#配置文件,如果上面配错了,可以再以下配置文件中修改
[root@node1 rancher]# pwd
/app/rancher
[root@node1 rancher]# ll
total 8
-rw-r-----. 1 root root 6216 Apr 12 21:30 cluster.yml

#如果后面需要部署kubeflow或istio则一定要在cluster.yml配置以下参数
kube-controller:
 image: ""
 extra_args:
   # 如果后面需要部署kubeflow或istio则一定要配置以下参数
   cluster-signing-cert-file: "/etc/kubernetes/ssl/kube-ca.pem"
   cluster-signing-key-file: "/etc/kubernetes/ssl/kube-ca-key.pem"
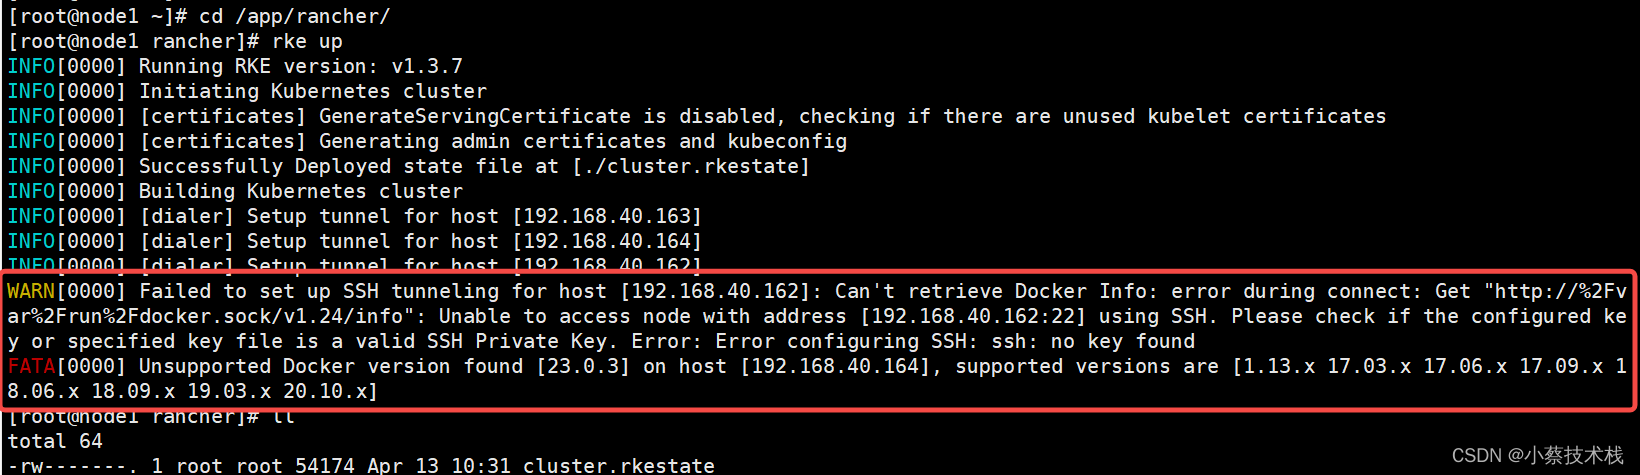
3.3 部署 k8s 集群
#进入rancher 目录
[root@node1 ~]# cd /app/rancher/
#执行命令,此命令执行过程比较长
[root@node1 rancher]# rke up
3.4 执行报错,提示 Private Key 没找到,Docker版本不支持
四、部署 kubectl客户端和配置(node1主机部署)
4.1 kubectl 下载并安装,k8s常用命令
[root@node1 ~]# wget https://storage.googleapis.com/kubernetes-release/release/v1.21.9/bin/linux/amd64/kubectl
#添加启动权限
[root@node1 ~]# chmod +x kubectl
[root@node1 ~]# mv kubectl /usr/local/bin/kubectl
#查看kubectl客户端版本
[root@node1 ~]# mkdir ./.kube
[root@node1 ~]# kubectl version --client
Client Version: version.Info{Major:"1", Minor:"21", GitVersion:"v1.21.9", GitCommit:"b631974d68ac5045e076c86a5c66fba6f128dc72", GitTreeState:"clean", BuildDate:"2022-01-19T17:51:12Z", GoVersion:"go1.16.12", Compiler:"gc", Platform:"linux/amd64"}


[root@node1 ~]# ls /app/rancher/
[root@node1 ~]# cp /app/rancher/kube_config_cluster.yml /root/.kube/config

#
[root@node1 ~]# kubectl get nodes
NAME             STATUS   ROLES          AGE   VERSION
192.168.40.162   Ready    controlplane   75m   v1.21.9
192.168.40.164   Ready    etcd           75m   v1.21.9
n                Ready    worker         75m   v1.21.9

#查看kubernetes 组件运行情况
[root@node1 rancher]# kubectl get pods -n kube-system
NAME                                       READY   STATUS             RESTARTS   AGE
calico-kube-controllers-5685fbd9f7-zlhst   1/1     Running            0          85m
canal-4khxr                                1/2     CrashLoopBackOff   3          70s
canal-9x5zq                                2/2     Running            0          85m
canal-nczfd                                2/2     Running            0          85m
canal-x8tph                                2/2     Running            0          85m
coredns-8578b6dbdd-w9fk9                   1/1     Running            0          85m
coredns-autoscaler-f7b68ccb7-cf59d         1/1     Running            0          85m
metrics-server-6bc7854fb5-f8rzl            1/1     Running            0          85m
rke-coredns-addon-deploy-job-l68hk         0/1     Completed          0          85m
rke-ingress-controller-deploy-job-w2kn9    0/1     Completed          0          85m
rke-metrics-addon-deploy-job-gdkb8         0/1     Completed          0          85m
rke-network-plugin-deploy-job-99g7g        0/1     Completed          0          85m
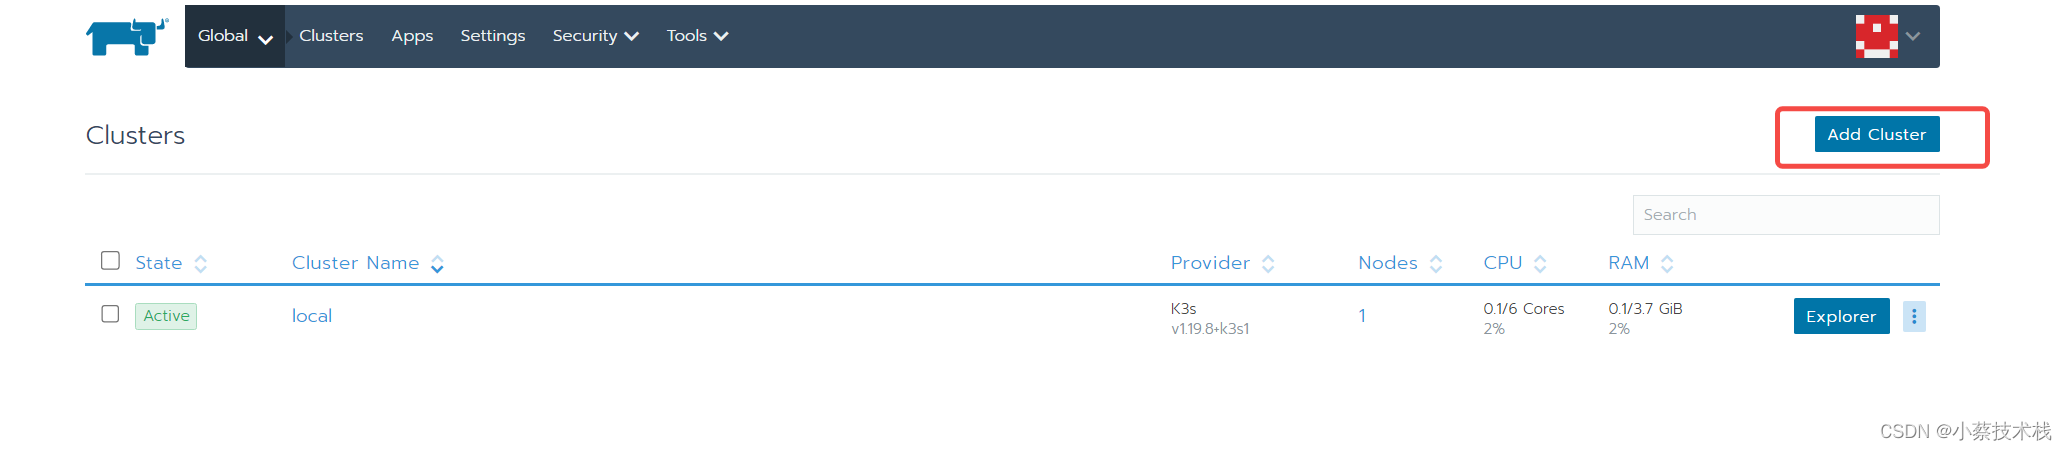
五、集群 Web 管理 Rancher,控制面板主要方便用于控制k8s集群,查看集群状态,编辑集群等。
5.1 使用docker run启动一个rancher (在node1 上面执行)
[root@node1 rancher]# docker run -d --restart=unless-stopped --privileged --name rancher -p 80:80 -p 443:443 rancher/rancher:v2.5.9
#查看docker 运行的进程
[root@node1 rancher]#  docker ps


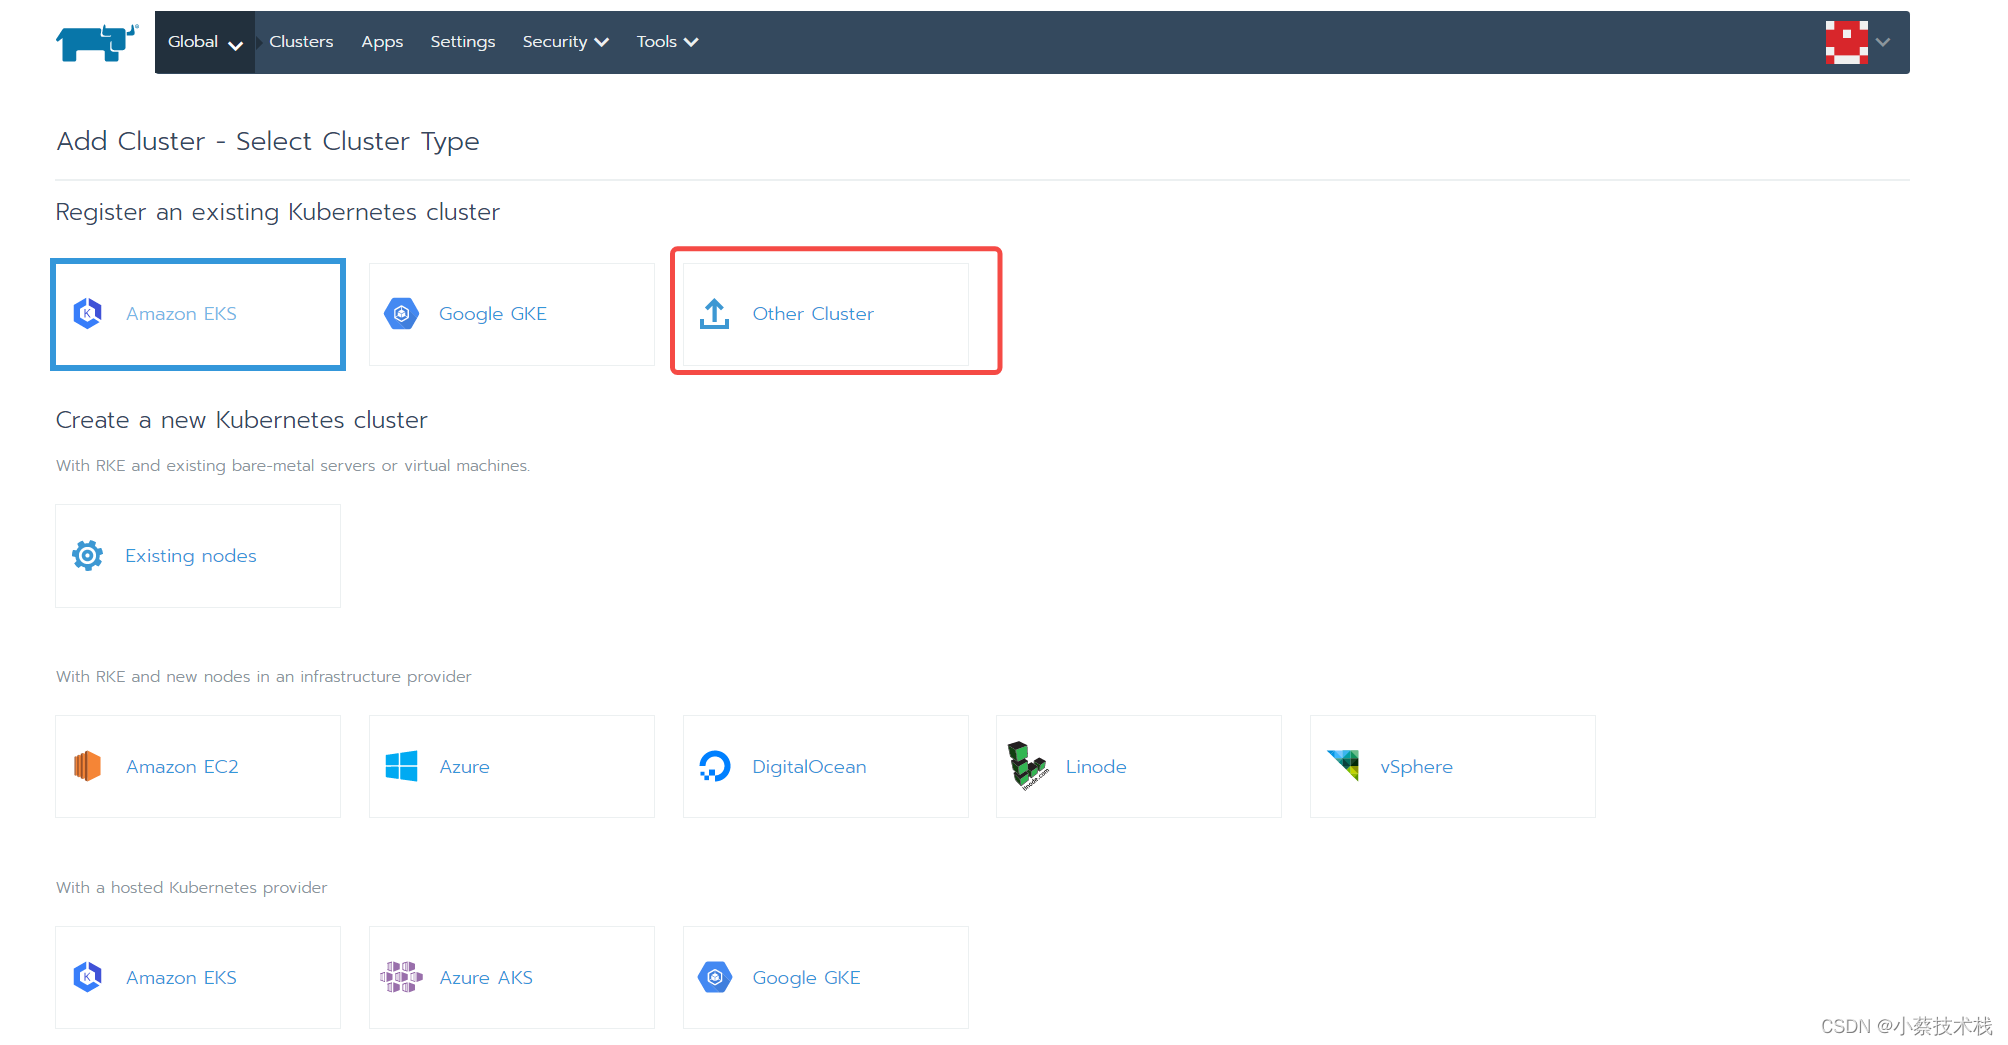
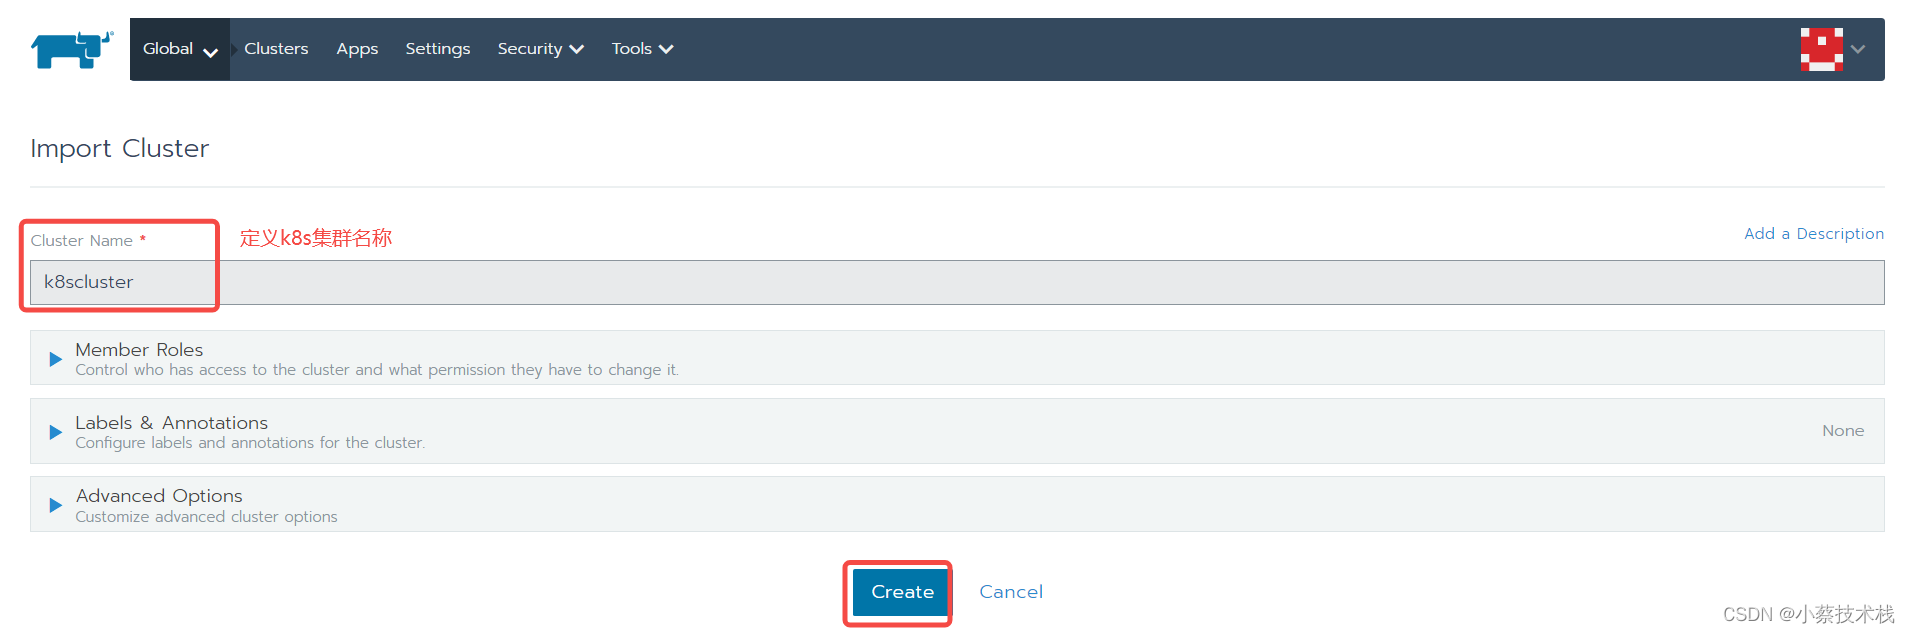
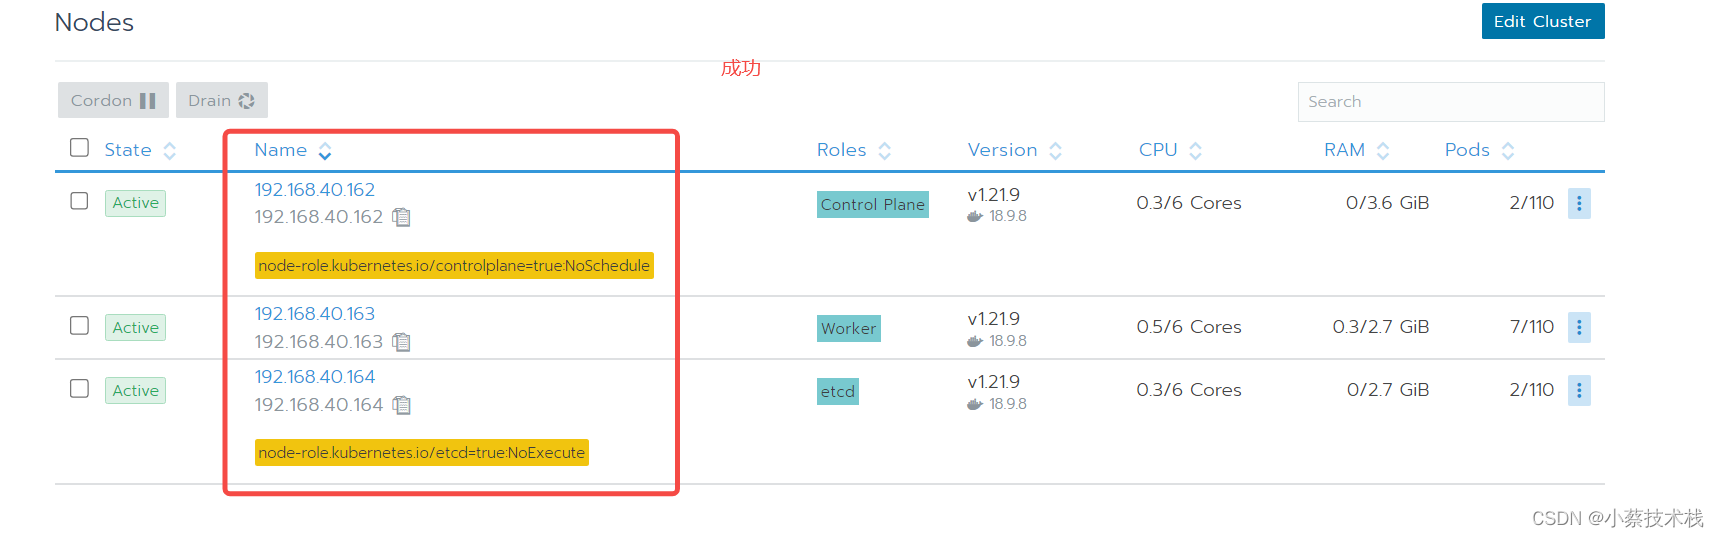
5.2 在rancher web界面添加kubernetes集群
5.3 在控制主机 node1 上执行命令
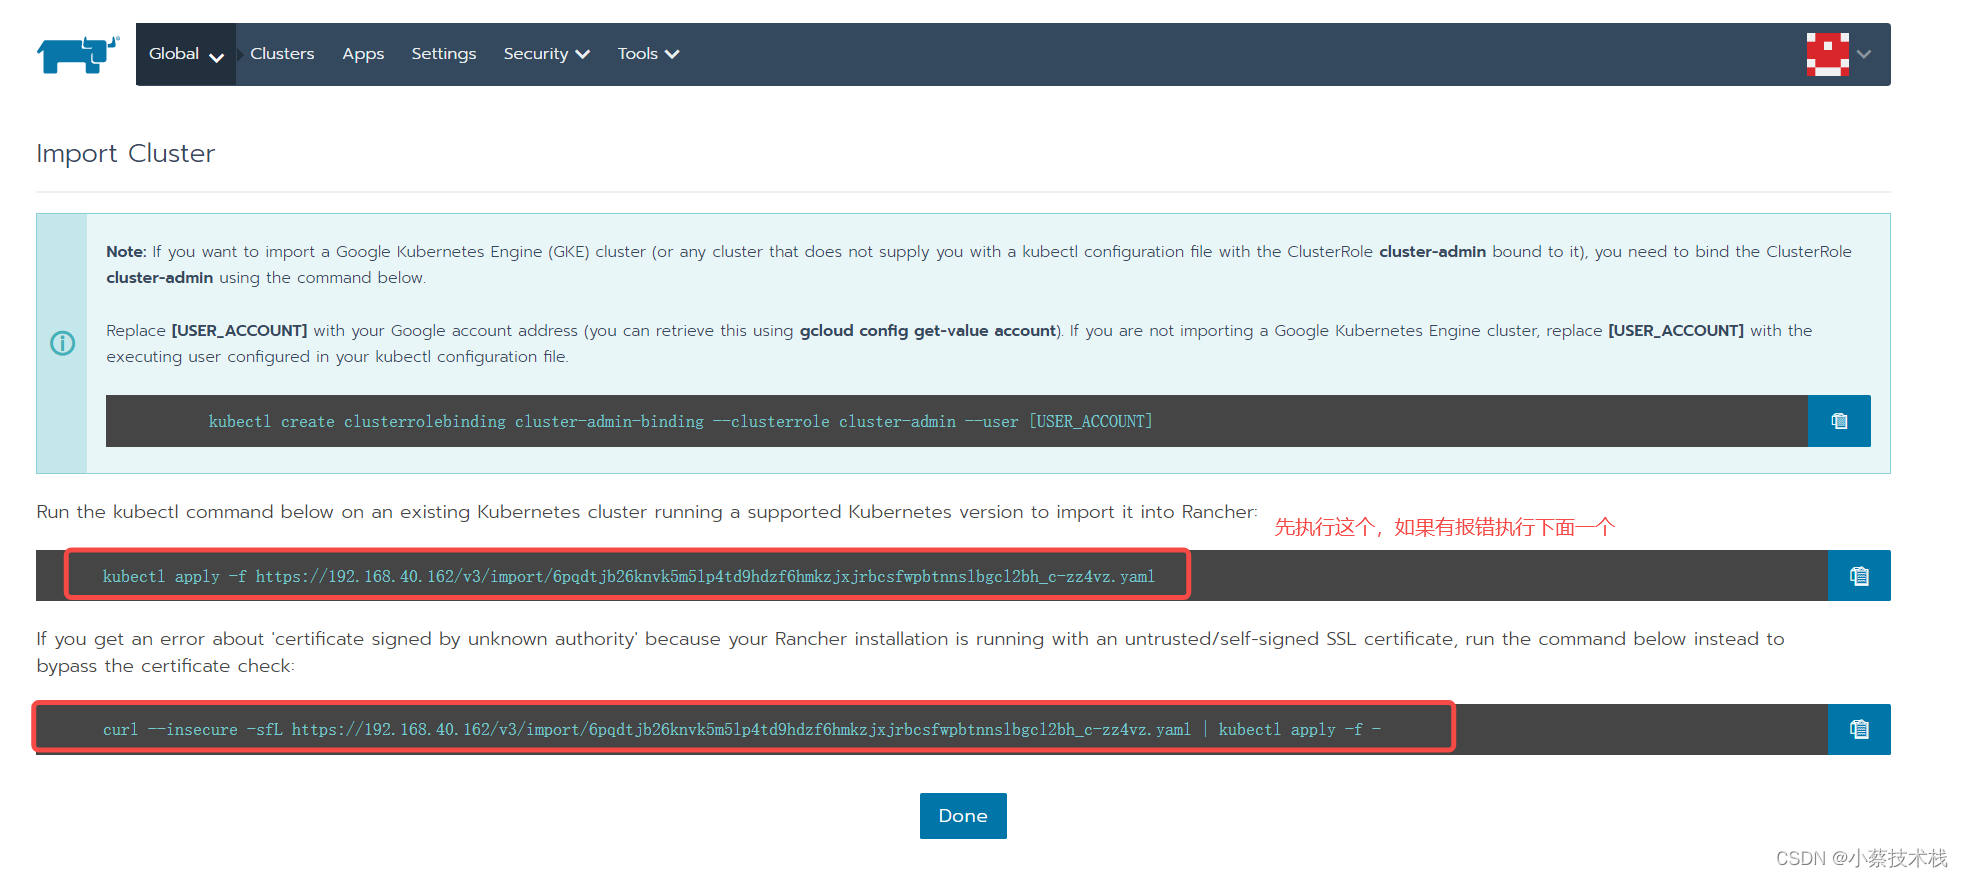
#执行第一次没起作用,可能跟认证策略有关系
[root@node1 rancher]# kubectl apply -f https://192.168.40.162/v3/import/6pqdtjb26knvk5m5lp4td9hdzf6hmkzjxjrbcsfwpbtnnslbgcl2bh_c-zz4vz.yaml
Unable to connect to the server: x509: certificate is valid for 127.0.0.1, 172.17.0.2, not 192.168.40.162

#执行第二条命令,还未起作用
[root@node1 rancher]# curl --insecure -sfL https://192.168.40.162/v3/import/6pqdtjb26knvk5m5lp4td9hdzf6hmkzjxjrbcsfwpbtnnslbgcl2bh_c-zz4vz.yaml | kubectl apply -f -
error: no objects passed to apply

#重新执行第二条命令,成功
[root@node1 rancher]# curl --insecure -sfL https://192.168.40.162/v3/import/6pqdtjb26knvk5m5lp4td9hdzf6hmkzjxjrbcsfwpbtnnslbgcl2bh_c-zz4vz.yaml | kubectl apply -f -
Warning: resource clusterroles/proxy-clusterrole-kubeapiserver is missing the kubectl.kubernetes.io/last-applied-configuration annotation which is required by kubectl apply. kubectl apply should only be used on resources created declaratively by either kubectl create --save-config or kubectl apply. The missing annotation will be patched automatically.
clusterrole.rbac.authorization.k8s.io/proxy-clusterrole-kubeapiserver configured
Warning: resource clusterrolebindings/proxy-role-binding-kubernetes-master is missing the kubectl.kubernetes.io/last-applied-configuration annotation which is required by kubectl apply. kubectl apply should only be used on resources created declaratively by either kubectl create --save-config or kubectl apply. The missing annotation will be patched automatically.
clusterrolebinding.rbac.authorization.k8s.io/proxy-role-binding-kubernetes-master configured
namespace/cattle-system created
serviceaccount/cattle created
clusterrolebinding.rbac.authorization.k8s.io/cattle-admin-binding created
secret/cattle-credentials-5df9824 created
clusterrole.rbac.authorization.k8s.io/cattle-admin created
deployment.apps/cattle-cluster-agent created

六、集群节点 更新/删除
6.1 删除 worker节点,RKE 支持为 worker 和 controlplane 主机添加或删除节点。
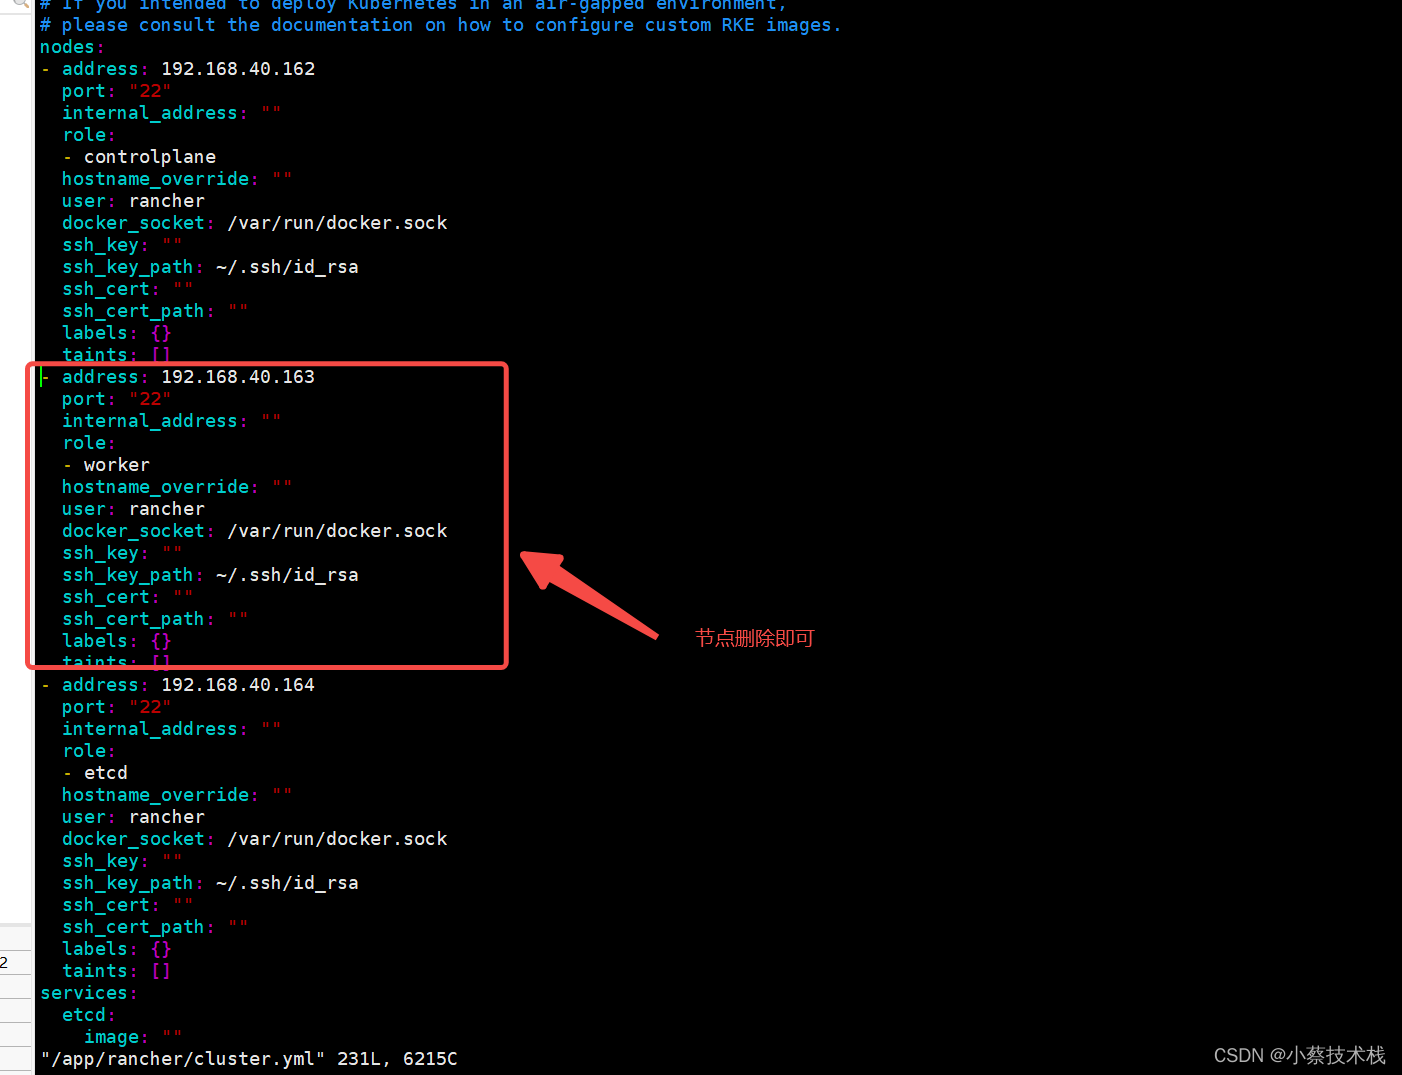
#修改文件将对应的节点配置文件删除即可,此步操作可适用节点 Down机 剔除主机
[root@node1 ~]# vim /app/rancher/cluster.yml
#更新完 cluster.yml 执行下面命令
[root@node1 ~]# rke up --update-only
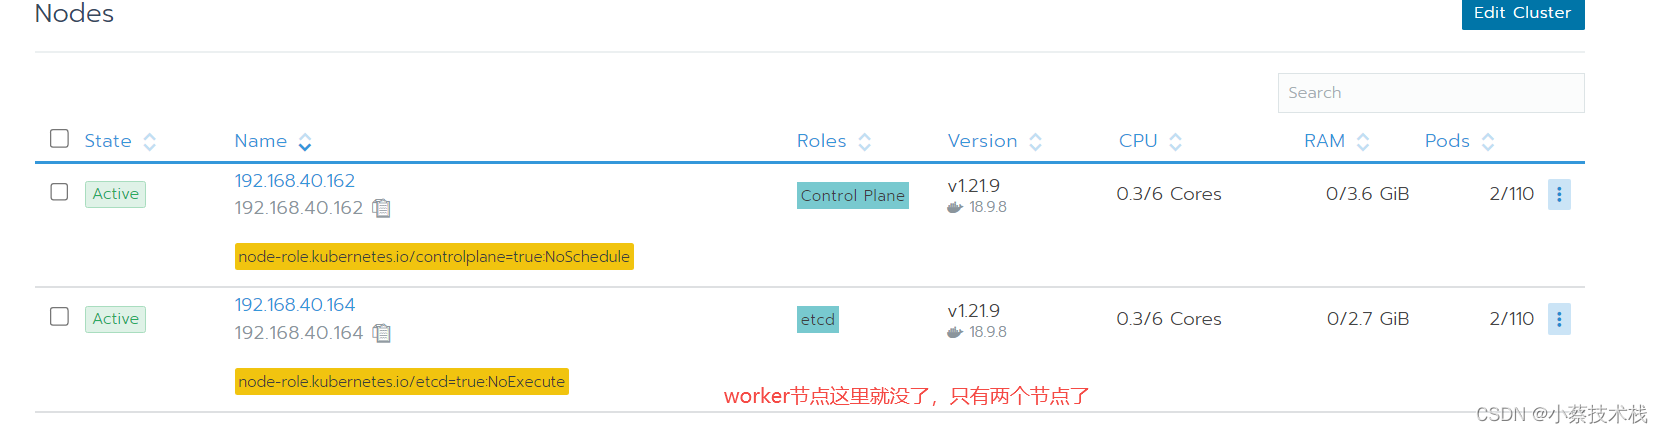
#查看集群是否加入进去
[root@node1 rancher]# kubectl get nodes
#节点没了,删除成功
[root@node1 rancher]# kubectl get nodes
NAME STATUS ROLES AGE VERSION
192.168.40.162 Ready controlplane 29m v1.21.9
192.168.40.164 Ready etcd 29m v1.21.9
6.2 新增 节点 (配置主机参考上面 二和三 大项 ) 我们从配置密钥开始配置
#从控制主机上node1 复制密钥到新加入的主机节点中
[root@node1 ~]#  ssh rancher@worker02

#编辑 cluster.yml文件,在文件中添加worker 节点
[root@node1 ~]#  vim /app/rancher/cluster.yml
......
#主机IP
- address: 192.168.10.13
  port: "22"
  internal_address: ""
  role: #角色
  - worker
  hostname_override:
  #操作用户
  user: "rancher"
  docker_socket: /var/run/docker.sock
  ssh_key: ""
  #密钥位置
  ssh_key_path: ~/.ssh/id_rsa
  ssh_cert: ""
  ssh_cert_path: ""
  labels: {}
  taints: []
......

#更新完 cluster.yml 执行下面命令
[root@node1 ~]#  rke up --update-only
#节点新增成功
[root@node1 rancher]# kubectl get nodes
NAME             STATUS   ROLES          AGE   VERSION
192.168.40.162   Ready    controlplane   37m   v1.21.9
192.168.40.163   Ready    worker         69s   v1.21.9
192.168.40.164   Ready    etcd           37m   v1.21.9
PS :可以通过修改cluster.yml文件的内容,添加额外的节点,并指定它们在 Kubernetes 集群中的角色;或从cluster.yml中的节点列表中删除节点信息,以达到删除节点的目的。
通过运行rke up --update-only,您可以运行rke up --update-only命令,只添加或删除工作节点。这将会忽略除了cluster.yml中的工作节点以外的其他内容。


 510
510


 被折叠的 条评论
为什么被折叠?
被折叠的 条评论
为什么被折叠?
 到【灌水乐园】发言


