


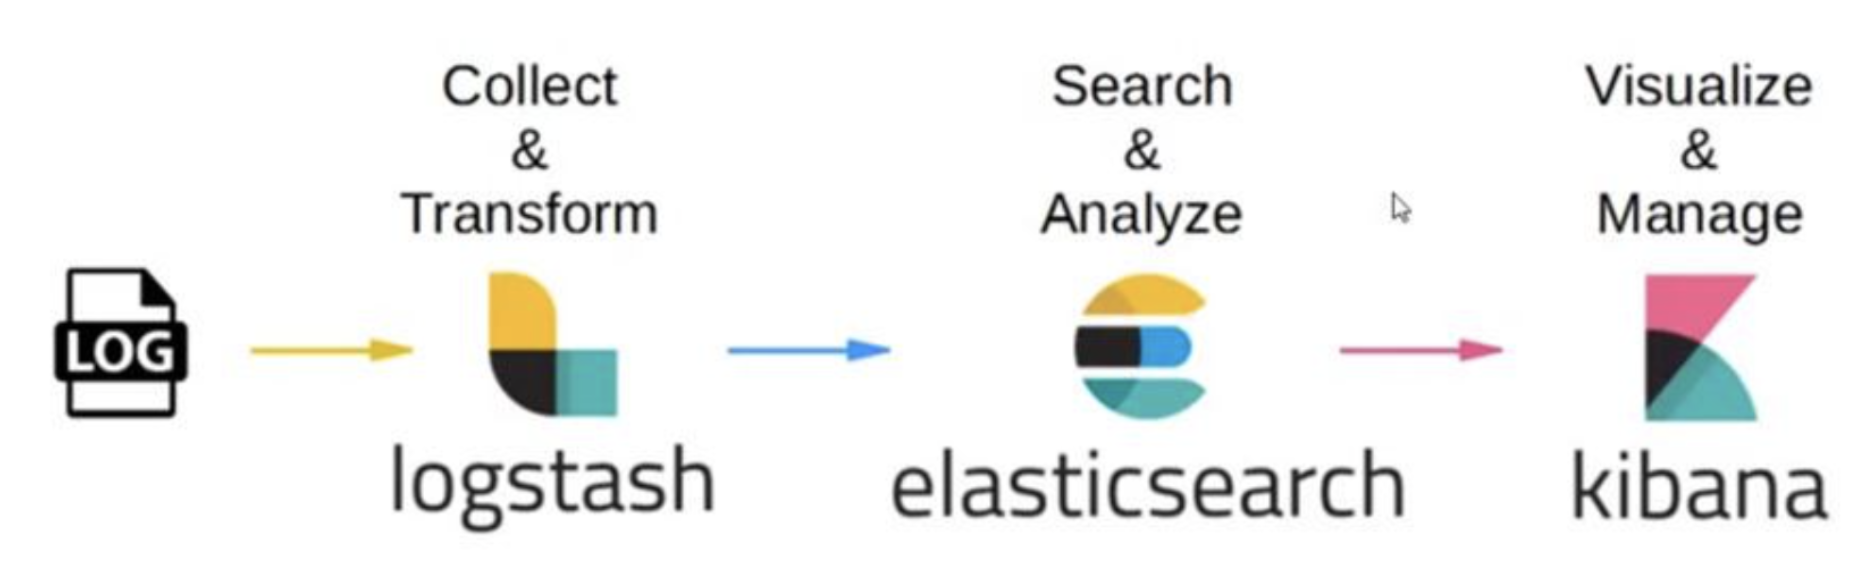
官方地址及流程说明
Install Kibana with RPM | Kibana Guide [8.8] | Elastic
Installing Logstash | Logstash Reference [8.8] | Elastic
安装kibana
下载kibana
wget https://artifacts.elastic.co/downloads/kibana/kibana-7.17.7-x86_64.rpm
sudo rpm --install kibana-7.17.7-x86_64.rpm

bin/elasticsearch-create-enrollment-token -s kibana
设置系统启动自动运行
sudo /bin/systemctl daemon-reload
sudo /bin/systemctl enable kibana.service
重启命令
sudo systemctl start kibana.service
sudo systemctl stop kibana.service
配置文件位置
vim /etc/kibana/kibana.yml
日志位置
tail -f /var/log/kibana/kibana.log
配置详情
# Kibana is served by a back end server. This setting specifies the port to use.
server.port: 5601

# Specifies the address to which the Kibana server will bind. IP addresses and host names are both valid values.
# The default is 'localhost', which usually means remote machines will not be able to connect.
# To allow connections from remote users, set this parameter to a non-loopback address.
#server.host: "localhost"
server.host: "0.0.0.0"

# Enables you to specify a path to mount Kibana at if you are running behind a proxy.
# Use the `server.rewriteBasePath` setting to tell Kibana if it should remove the basePath
# from requests it receives, and to prevent a deprecation warning at startup.
# This setting cannot end in a slash.
#server.basePath: ""

# Specifies whether Kibana should rewrite requests that are prefixed with
# `server.basePath` or require that they are rewritten by your reverse proxy.
# This setting was effectively always `false` before Kibana 6.3 and will
# default to `true` starting in Kibana 7.0.
#server.rewriteBasePath: false

# Specifies the public URL at which Kibana is available for end users. If
# `server.basePath` is configured this URL should end with the same basePath.
#server.publicBaseUrl: ""

# The maximum payload size in bytes for incoming server requests.
#server.maxPayload: 1048576

# The Kibana server's name.  This is used for display purposes.
#server.name: "your-hostname"

# The URLs of the Elasticsearch instances to use for all your queries.
elasticsearch.hosts: ["http://localhost:9200"]

# Kibana uses an index in Elasticsearch to store saved searches, visualizations and
# dashboards. Kibana creates a new index if the index doesn't already exist.
#kibana.index: ".kibana"

# The default application to load.
#kibana.defaultAppId: "home"

# If your Elasticsearch is protected with basic authentication, these settings provide
"/etc/kibana/kibana.yml" 116L, 5266C                                                                                                                            8,1          顶端
# Kibana is served by a back end server. This setting specifies the port to use.
server.port: 5601

# Specifies the address to which the Kibana server will bind. IP addresses and host names are both valid values.
# The default is 'localhost', which usually means remote machines will not be able to connect.
# To allow connections from remote users, set this parameter to a non-loopback address.
#server.host: "localhost"
server.host: "0.0.0.0"

# Enables you to specify a path to mount Kibana at if you are running behind a proxy.
# Use the `server.rewriteBasePath` setting to tell Kibana if it should remove the basePath
# from requests it receives, and to prevent a deprecation warning at startup.
# This setting cannot end in a slash.
#server.basePath: ""

# Specifies whether Kibana should rewrite requests that are prefixed with
# `server.basePath` or require that they are rewritten by your reverse proxy.
# This setting was effectively always `false` before Kibana 6.3 and will
# default to `true` starting in Kibana 7.0.
#server.rewriteBasePath: false

# Specifies the public URL at which Kibana is available for end users. If
# `server.basePath` is configured this URL should end with the same basePath.
#server.publicBaseUrl: ""

# The maximum payload size in bytes for incoming server requests.
#server.maxPayload: 1048576

# The Kibana server's name.  This is used for display purposes.
#server.name: "your-hostname"

# The URLs of the Elasticsearch instances to use for all your queries.
elasticsearch.hosts: ["http://localhost:9200"]

# Kibana uses an index in Elasticsearch to store saved searches, visualizations and
# dashboards. Kibana creates a new index if the index doesn't already exist.
#kibana.index: ".kibana"

# The default application to load.
#kibana.defaultAppId: "home"

# If your Elasticsearch is protected with basic authentication, these settings provide
# the username and password that the Kibana server uses to perform maintenance on the Kibana
# index at startup. Your Kibana users still need to authenticate with Elasticsearch, which
# is proxied through the Kibana server.
elasticsearch.username: "elastic"
elasticsearch.password: "3_J35UWr2sIUky"

# Kibana can also authenticate to Elasticsearch via "service account tokens".
# If may use this token instead of a username/password.
# elasticsearch.serviceAccountToken: "my_token"

# Enables SSL and paths to the PEM-format SSL certificate and SSL key files, respectively.
# These settings enable SSL for outgoing requests from the Kibana server to the browser.
#server.ssl.enabled: false
#server.ssl.certificate: /path/to/your/server.crt
#server.ssl.key: /path/to/your/server.key

# Optional settings that provide the paths to the PEM-format SSL certificate and key files.
# These files are used to verify the identity of Kibana to Elasticsearch and are required when
# xpack.security.http.ssl.client_authentication in Elasticsearch is set to required.
#elasticsearch.ssl.certificate: /path/to/your/client.crt
#elasticsearch.ssl.key: /path/to/your/client.key

# Optional setting that enables you to specify a path to the PEM file for the certificate
# authority for your Elasticsearch instance.
#elasticsearch.ssl.certificateAuthorities: [ "/path/to/your/CA.pem" ]

# To disregard the validity of SSL certificates, change this setting's value to 'none'.
#elasticsearch.ssl.verificationMode: full
.........  后面的不用在配置                                                                                                                   8,1          顶端
界面展示
安装logstash(yum安装)
在/etc/yum.repos.d/ 目录下创建 logstash.repo文件,内容如下:
vim /etc/yum.repos.d/logstash.repo

[logstash-7.17.7]
name=Elastic repository for 7.x packages
baseurl=https://artifacts.elastic.co/packages/7.x/yum
gpgcheck=1
gpgkey=https://artifacts.elastic.co/GPG-KEY-elasticsearch
enabled=1
autorefresh=1
type=rpm-md
执行安装命令
sudo yum install logstash
配置logStash
配置文件说明
| 文件 | 描述 |
|---|---|
| logstash.yml | Logstash的yml,在/etc/logstash/logstash.yml下配置启动参数,主要配置pipeline。 |
| pipelines.yml | 包含在单个Logstash实例中运行多个管道的框架和说明。 |
| jvm.options | 在/etc/logstash/jvm.options下配置jvm参数,使用此文件设置总堆空间的初始值和最大值,此文件中的所有其他设置都被视为专家设置。 |
| log4j2.properties | 包含log4j 2库的默认设置。 |
| conf.d | 在/etc/logstash/conf.d下配置采集配置文件; |
logstash.yml
# ------------ Data path ------------------
#
# Which directory should be used by logstash and its plugins
# for any persistent needs. Defaults to LOGSTASH_HOME/data
#
path.data: /var/lib/logstash
#
# ------------ Pipeline Settings --------------
#
# The ID of the pipeline.
#
pipeline.id: main
#
# Set the number of workers that will, in parallel, execute the filters+outputs
# stage of the pipeline.
#
# This defaults to the number of the host's CPU cores.
#
pipeline.workers: 4
#
# How many events to retrieve from inputs before sending to filters+workers
#
# pipeline.batch.size: 125
#
# How long to wait in milliseconds while polling for the next event
# before dispatching an undersized batch to filters+outputs
#
pipeline.batch.delay: 50
#
# Force Logstash to exit during shutdown even if there are still inflight
# events in memory. By default, logstash will refuse to quit until all
# received events have been pushed to the outputs.
#
# WARNING: enabling this can lead to data loss during shutdown
#
pipeline.unsafe_shutdown: false
#
# Set the pipeline event ordering. Options are "auto" (the default), "true" or "false".
# "auto" will  automatically enable ordering if the 'pipeline.workers' setting
# is also set to '1'.
# "true" will enforce ordering on the pipeline and prevent logstash from starting
# if there are multiple workers.
# "false" will disable any extra processing necessary for preserving ordering.
#
pipeline.ordered: auto
配置说明
| 配置 | 描述 | 默认值 |
|---|---|---|
| node.name | 节点的名称。 | 计算机的主机名 |
| path.data | Logstash及其插件用于任何持久需求的目录。 | LOGSTASH_HOME/data |
| pipeline.id | 管道的ID。 | main |
| pipeline.workers | 设置output或filter插件的工作线程数。 | 主机cpu数 |
| pipeline.batch.size | 单个工作线程从输入收集的最大事件数。 | 125 |
| pipeline.batch.delay | 创建管道事件批处理时,在将较小的批处理发送给管道工作人员之前,等待每个事件的时间(毫秒)。 | 50 |
| pipeline.unsafe_shutdown | logstash在关闭时,默认会等到所有被处理的event都通过output输出后再执行关闭操作;如果设置为true,则允许强制关闭,而不必等待event处理完毕,此时可能会丢失数据。 | false |
| pipeline.plugin_classloaders | 在独立的类加载器中加载Java插件以隔离它们的依赖项。 | false |
| pipeline.ordered | 设置管道事件顺序。有效选项包括: auto-如果是管道,则自动启用排序。workers设置为1,否则禁用。 true-在管道上强制排序,如果有多个工作线程则阻止Logstash启动。 false-禁用保持顺序所需的处理。 | auto |
| pipeline.ecs_compatibility | 为ecs_compatibility设置管道的默认值,该设置可用于实现ecs兼容模式的插件,以便与Elastic Common Schema一起使用。 | disabled |
| path.config | Logstash的配置路径。 | LOGSTASH_HOME/config |
| config.string | 用于主管道的管道配置的字符串。 | N/A |
| config.test_and_exit | 设置为true时,检查配置是否有效,然后退出。请注意,使用此设置不会检查grok模式的正确性。Logstash可以从一个目录中读取多个配置文件。如果将此设置与日志相结合。level:debug,Logstash将记录组合的配置文件,并用源文件注释每个配置块。 | false |
| config.reload.automatic | 当设置为true时,定期检查配置是否已更改,并在更改时重新加载配置。这也可以通过SIGHUP信号手动触发。 | false |
| config.reload.interval | Logstash检查配置文件更改的频率(以秒为单位)。请注意,单元限定符是必需的。 | 3s |
| config.debug | 设置为true时,将完全编译的配置显示为调试日志消息。还必须设置日志。级别:调试。警告:日志消息将包括以明文形式传递给插件配置的任何密码选项,并可能导致明文密码出现在日志中! | false |
| config.support_escapes | 当设置为true时,带引号的字符串将处理以下转义序列:\n成为文字换行符(ASCII 10)。\r变成文字回车符(ASCII 13)。\t变为文字选项卡(ASCII 9)。\变成文字反斜杠\“变为文字双引号。'变为文字引号。 | false |
| queue.type | 用于事件缓冲的内部队列模型。可选项:memory -内存,persisted-持久化。 | memory |
| path.queue | 启用持久队列时存储数据文件的目录路径(queue.type:persisted)。 | path.data/queue |
| queue.page_capacity | 启用持久队列时使用的页面数据文件的大小(queue.type:persisted)。队列数据由仅追加数据文件组成,这些文件被分隔成页面。 | 64mb |
| queue.max_events | 启用持久队列时队列中未读事件的最大数量(queue.type:persisted)。 | 0 (unlimited) |
| queue.max_bytes | 队列的总容(queue.type:persisted)(字节数)。 | 1024mb (1g) |
| queue.checkpoint.acks | 启用持久队列时,强制检查点之前确认的最大事件数(queue.type:persisted)。指定queue.checkpoint。acks:0将此值设置为无限制。 | 1024 |
| queue.checkpoint.writes | 启用持久队列时,在强制检查点之前写入的最大事件数(queue.type:persisted)。指定queue.checkpoint。写入:0以将此值设置为无限制。 | 1024 |
| queue.checkpoint.retry | 启用后,对于任何失败的检查点写入,Logstash将在每次尝试检查点写入时重试四次。不会重试任何后续错误。对于只有在Windows平台、具有非标准行为(如SAN)的文件系统上才能看到的失败的检查点写入,这是一种解决方法,除非在这些特定情况下,否则不建议使用。(queue.type:持久化) | true |
| queue.drain | 启用后,Logstash会等待持久队列(queue.type:persisted)清空后再关闭。 | false |
| dead_letter_queue.enable | 指示Logstash启用插件支持的DLQ功能的标志。 | false |
| dead_letter_queue.max_bytes | 每个死信队列的最大大小。如果条目会将死信队列的大小增加到超过此设置,则会删除这些条目。 | 1024mb |
| dead_letter_queue.storage_policy | 定义在执行dead_letter_queue时要执行的操作。达到maxbytes设置:dropnewer停止接受会使文件大小超过限制的新值,dropolder删除最旧的事件,为新事件腾出空间。 | drop_newer |
| path.dead_letter_queue | 为死信队列存储数据文件的目录路径。 | path.data/dead_letter_queue |
| api.enabled | 默认情况下启用HTTP API。它可以被禁用,但依赖它的功能将无法按预期工作。 | true |
| api.environment | API返回所提供的字符串作为其响应的一部分。设置环境可能有助于消除生产环境和测试环境中名称相似的节点之间的歧义。 | production |
| api.http.host | HTTP API端点的绑定地址。默认情况下,Logstash HTTP API仅绑定到本地环回接口。安全配置后(api.ssl.enabled:true和api.auth.type:basic),HTTP api绑定到所有可用接口。 | “127.0.0.1” |
| api.http.port | HTTP API端点的绑定端口。 | 9600-9700 |
| api.ssl.enabled | 设置为true可在HTTP API上启用SSL。这样做需要同时使用api.ssl.keystore。路径和api.ssl.keystore。要设置的密码。 | false |
| api.ssl.keystore.path | 用于保护Logstash API的有效JKS或PKCS12密钥库的路径。密钥库必须受密码保护,并且必须包含单个证书链和私钥。除非api.ssl,否则将忽略此设置。enabled设置为true。 | N/A |
| api.ssl.keystore.password | api.ssl.keystore.path提供的密钥库密码。除非api.ssl,否则将忽略此设置。enabled设置为true。 | N/A |
| api.auth.type | 设置为basic以要求使用随API.auth.basic.username和API.auth.basic.password提供的凭据在API上进行HTTP basic身份验证。 | none |
| api.auth.basic.username | HTTP Basic身份验证所需的用户名已忽略,除非是api.auth。type设置为basic。 | N/A |
| api.auth.basic.password | HTTP Basic身份验证所需的密码。除非api.auth,否则忽略。type设置为basic。它应该符合默认密码策略,该策略要求非空的最少8个字符字符串,包括数字、大写字母和小写字母。可以通过以下选项自定义默认密码策略: 设置api.auth.basic.password_policy.include。digit REQUIRED(默认)只接受包含至少一个数字的密码,或OPTIONAL(可选)从要求中排除。 设置api.auth.basic.password_policy.include。upper REQUIRED(默认)只接受包含至少一个大写字母的密码,或OPTIONAL(可选)从要求中排除。 设置api.auth.basic.password_policy.include。较低的REQUIRED(默认)只接受包含至少一个小写字母的密码,或OPTIONAL(可选)不接受要求。 设置api.auth.basic.password_policy.include。symbol REQUIRED只接受包含至少一个特殊字符的密码,或OPTIONAL(默认)不接受要求。 设置api.auth.basic.password_policy.length。如果希望密码的默认设置超过8个字符,则最小值为9到1024。 | N/A |
| api.auth.basic.password_policy.mode | 当不满足密码要求时,引发WARN或ERROR消息。 | WARN |
| log.level | 日志级别。有效选项包括: - fatal- error- warn- info- debug- trace | info |
| log.format | 日志格式。设置为json以json格式登录,或设置为plain以使用Object#.inspect。 | plain |
| path.logs | Logstash将其日志写入的目录。 | LOGSTASH_HOME/logs |
| pipeline.separate_logs | 这是一个布尔设置,用于在不同的日志文件中按管道分隔日志。如果启用,Logstash将使用管道为每个管道创建不同的日志文件。id作为文件名。目标目录取自`path。日志设置。当Logstash中配置了许多管道时,如果您需要对单个管道中发生的情况进行故障排除,而不受其他管道的干扰,那么将每个管道中的日志行分开可能会很有帮助。 | false |
| path.plugins | 插件路径。 | |
| allow_superuser | 设置为true允许或false阻止以超级用户身份运行Logstash。 | true |
conf.d:
方式一:配置某一台服务器为logstash服务,接受业务系统退过来的日志,再将日志推送到ES。
input {
  tcp {
    mode => "server"
    host => "0.0.0.0"
    port => 4560
    codec => json_lines
  }
}

output {
  elasticsearch {
    hosts => ["192.168.1.200:9200"]
    index => "%{[spring.application.name]}-%{+YYYY.MM.dd}"
    user => "elasticUser"
    password => "elasticPassword"
  }
}
方式二:每台服务器配置一个logstash,让logstash自己去收集后,推送给ES。
可配置为一个文件,也可以配置为多个文件。
注意:多个配置文件时,type类型必须存在,logstash会合并配置。
# 一次配置多个input
input {
  file {
    path => ["/data/logs/gateway-server.log","/data/logs/logistics-server.log"]
    start_position => "beginning"
    sincedb_path => "/dev/null"
    codec => multiline {
      pattern => "^%{TIMESTAMP_ISO8601}"
      negate => true
      what => "previous"
    }
  }
}

filter {
  grok {
    match => { "message" => "%{TIMESTAMP_ISO8601:timestamp} | %{LOGLEVEL:loglevel} %{INT:pid} | %{WORD:thread} [%{INT:tid}] %{DATA:logger} | %{GREEDYDATA:message}%{GREEDYDATA:exception}" }
    add_field => { "received_at" => "%{@timestamp}" }
  }
  date {
    match => [ "timestamp", "yyyy-MM-dd HH:mm:ss.SSS" ]
    target => "@timestamp"
  }
}

output {
  if "_grokparsefailure" not in [tags] {
      if "gateway-server.log" in [path] {
      elasticsearch {
        hosts => ["192.168.1.200:9200"]
        index => "gateway-server-%{+YYYY.MM.dd}"
        user => "elasticUser"
        password => "elasticPassword"
      }
    }
    if "logistics-server.log" in [path] {
      elasticsearch {
        hosts => ["192.168.1.200:9200"]
        index => "logistics-server-%{+YYYY.MM.dd}"
        user => "elasticUser"
        password => "elasticPassword"
      }
    }
  }
}

# 一次配置一个input
input {
  file {
    path => "/home/service/tms/base/logs/*/*.log"
    start_position => "beginning"
    sincedb_path => "/dev/null"
    type=>"tms_base"
  }
  file {
    path => "/home/service/tms/carrier/logs/*/*.log"
    start_position => "beginning"
    sincedb_path => "/dev/null"
    type=>"tms_carrier"
  }
}
output {
  if [type]=="base" {
    elasticsearch {
      hosts => ["192.168.1.200:9200"]
      user => "elasticUser"
      password => "elasticPassword"
      index => "tms-base-service-%{+YYYY.MM.dd}"
    }
  }
  if [type]=="carrier" {
    elasticsearch {
      hosts => ["192.168.1.200:9200"]
      user => "elasticUser"
      password => "elasticPassword"
      index => "tms-carrier-service-%{+YYYY.MM.dd}"
    }
  }
}
启动命令
systemctl start logstash.service
systemctl stop logstash.service
systemctl restart logstash.service
systemctl enable logstash.service
systemctl is-enabled logstash.service
日志路径
/var/log/logstash/
# 启动中碰到的问题需在此日志下查看
/var/log/logstash/logstash-plain.log


 1万+
1万+

 被折叠的 条评论
为什么被折叠?
被折叠的 条评论
为什么被折叠?
 到【灌水乐园】发言


