


一、nacos启动问题
需要看官网的准备工作,认真看,版本问题卡了两天
https://doc.ruoyi.vip/ruoyi-cloud/document/hjbs.html#%E5%87%86%E5%A4%87%E5%B7%A5%E4%BD%9C
1.下载nacos,版本需要对应上
2.记得运行数据库,nacos读取的是ry-config数据库
数据库位置在 /RuoYi-Cloud/sql 下
3.nacos启动不成功
- 版本问题
- 配置的数据库错误没连上
配置:位置在nacos安装包下config/application.properties
spring.datasource.platform=mysql
db.num=1
db.url.0=jdbc:mysql://127.0.0.1:3306/ry-config?characterEncoding=utf8&connectTimeout=1000&socketTimeout=3000&autoReconnect=true&useUnicode=true&useSSL=false&serverTimezone=UTC
db.user=root
db.password=root
4.nacos报用户名密码错误
ps: 装错版本nacos1.4.8,换了几个版本之后就遇到这个问题。
解决办法:应该是清除浏览器缓存
mac方法:
打开Chrome 网络浏览器。 之后,打开一个新选项卡并按Shift+Command+删除 键盘上的按键。
window: ctrl+shift+delete,(没试过,我用的mac)
二、启动
打开运行基础模块(启动没有先后顺序):
RuoYiGatewayApplication (网关模块 必须)
RuoYiAuthApplication (认证模块 必须)
RuoYiSystemApplication (系统模块 必须)
RuoYiMonitorApplication (监控中心 可选)
RuoYiGenApplication (代码生成 可选)
RuoYiJobApplication (定时任务 可选)
RuoYFileApplication (文件服务 可选)
1.启动其中一个模块,运行失败,模块注册nacos失败
使用nacos2.2.0版本,idea控制台报错如下
nacos registry, ruoyi-auth register failed…
另外,本人nacos是运行成功的
以下命令基于mac系统,在/nacos/bin目录下
##启动命令,使用单机模式-m standalone:
sh startup.sh -m standalone
##停止:
sh shutdown.sh

解决办法:
文件位置:/RuoYi-Cloud/pom.xml
SpringCloud Alibaba版本原来2021.0.5,改成2021.0.1.0
引用文章:https://blog.csdn.net/weixin_39886835/article/details/138166995
三、前端运行
# 进入项目目录
cd ruoyi-ui

# 安装依赖
npm install

# 强烈建议不要用直接使用 cnpm 安装,会有各种诡异的 bug,可以通过重新指定 registry 来解决 npm 安装速度慢的问题。
npm install --registry=https://registry.npmmirror.com

# 本地开发 启动项目
npm run dev
1.npm下载依赖包
报错:Could not resolve dependency
npm install --legacy-peer-deps
2.又又又又问题,页面打开报404,或405
不使用80端口,而且我网关的端口改成8085了,前端端口8087
原因是代理没配置好,错误如下:
很明显接口http://localhost:8087/dev-api/system/user/getInfo,拿到了前端的端口8087去处理,需要配置代理。

1)配置前端端口8087

2)网关端口8085
位置:ruoyi-gateway/src/main/resources/bootstrap.yml
# Tomcat
server:
  port: 8085
3)重点,配置代理
位置:ruoyi-ui/vue.config.js
网关的地址:http://127.0.0.1:8085,处理请求地址/dev-api
http://localhost:8080 => http://127.0.0.1:8085
devServer: {
    host: '0.0.0.0',
    port: port,
    open: true,
    proxy: {
      // detail: https://cli.vuejs.org/config/#devserver-proxy
      [process.env.VUE_APP_BASE_API]: {
        target: `http://127.0.0.1:8085`,
        changeOrigin: true,
        pathRewrite: {
          ['^' + process.env.VUE_APP_BASE_API]: ''
        }
      }
    }
四、新建项目
ps:也有一段时间没接触了,可能说的不准确。之前通过Ruoyi里面的代码生成模块,新建了一个student的模块,能够成功注册nacos,并启动成功。
1.新建模块
基于ruoyi-modules下
鼠标右键ruoyi-modules,new > module

2.生成代码
略。
涉及三部分:sql执行新增表(在ruoyi-cloud数据库)、vue代码复制到对应文件、java代码。
3.代码
1.启动类
@EnableCustomConfig
@EnableRyFeignClients
@SpringBootApplication
public class RuoYiStudentApplication {
    public static void main(String[] args) {

        SpringApplication.run(RuoYiStudentApplication.class, args);
        System.out.println("学生!");
    }
}
2.将ruoyi-job的resources里面的文件,下面⬇️
文字替换ruoyi-job替换成ruoyi-student.
- banner.txt
- bootstrap.yml,
- logback.xml
修改端口bootstrap.ym
# Tomcat
server:
  port: 9204
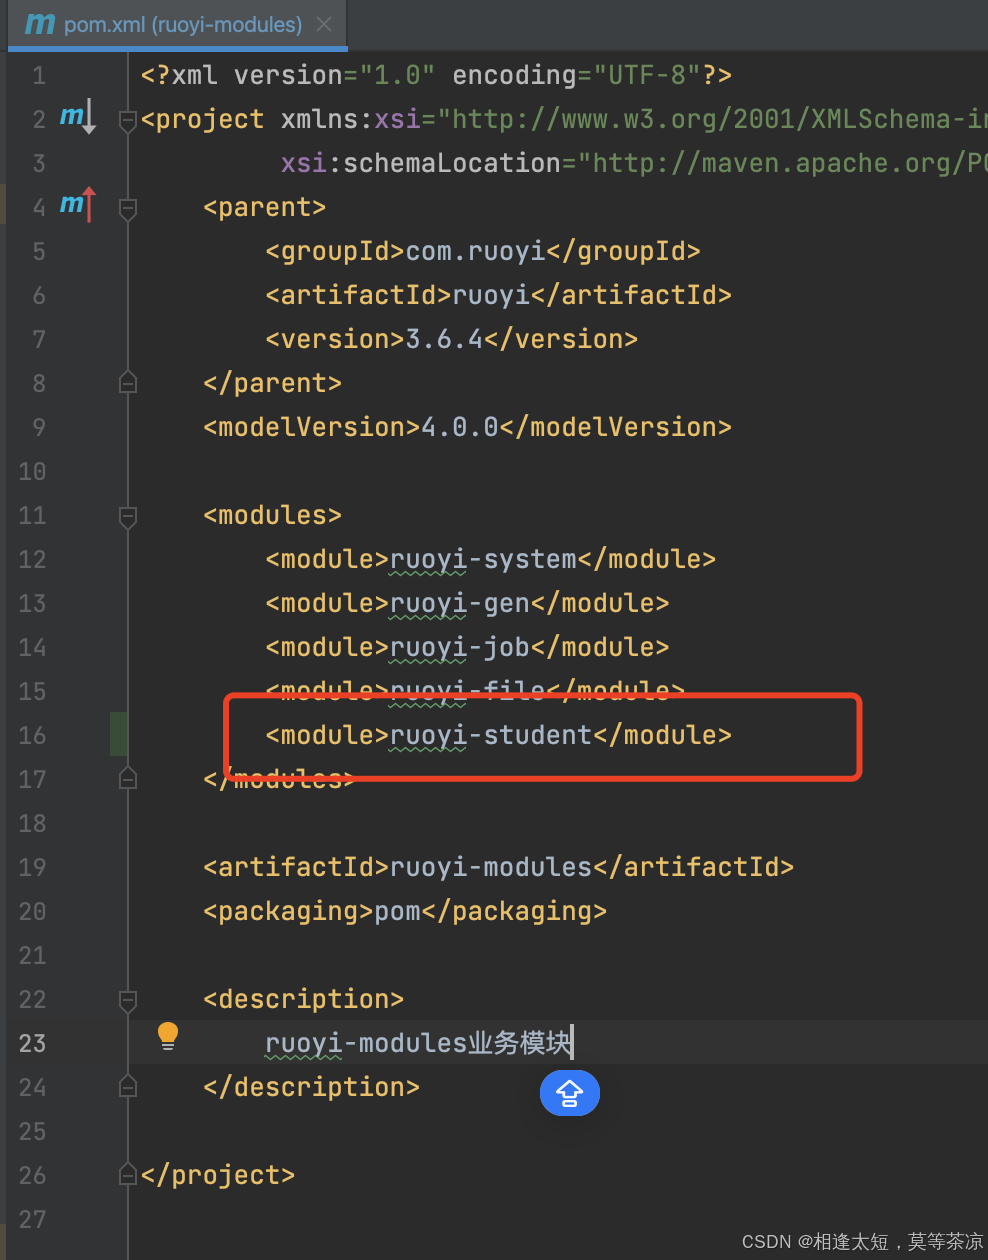
3.ruoyi-modules/ruoyi-student/pom.xml
<module>ruoyi-student</module>
4.nacos配置
4.1 克隆配置ruoyi-job-dev.yml
命名为ruoyi-student-dev.yml(名字决定于项目名称➕启动环境,spring.profiles.active=dev)
编辑,其他配置原封不动,只修改mybatis配置-指定包别名。
# mybatis配置
mybatis:
    # 搜索指定包别名
    typeAliasesPackage: com.ruoyi.student
    # 配置mapper的扫描,找到所有的mapper.xml映射文件
    mapperLocations: classpath:mapper/**/*.xml
4.2 ruoyi-gateway-dev.yml修改
新增服务
复制文件服务配置,修改类似以下
        # 学生服务
        - id: ruoyi-student
          uri: lb://ruoyi-student
          predicates:
            - Path=/student/**
          filters:
            - StripPrefix=1
5.启动模块
略。
主要注意要先启动网关那些需要依赖到的各模块,再启动新建的模块。


 9828
9828

 被折叠的 条评论
为什么被折叠?
被折叠的 条评论
为什么被折叠?
 到【灌水乐园】发言


