


详细步骤:VS2017 C++调用函数python,并且成功运行YOLOv3以及踩过的坑
前言
由于实验室的要求,需要将很多用python写的算法移植到qt上,于是准备先在vs2017进行测试。
网上做C++嵌入pyhton的案例不多,资料也很零零散散,在调试的过程中遇到了很多bug,经过一番令人头秃的调试,最后运行成功了,这里整合了网上的一些资源和自己的一些经验,希望对大家有所帮助。
环境
Visual Studio 2017
python3.6.8
YOLOv3-keras-tensorflow及其对应的anaconda环境
一、简单.py文件的调用
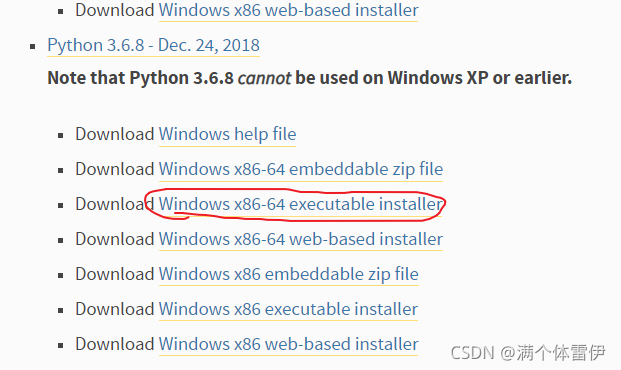
1、安装python
安装python,下载地址pyhton官方下载
我用的是python3.6.8
安装的时候要勾选
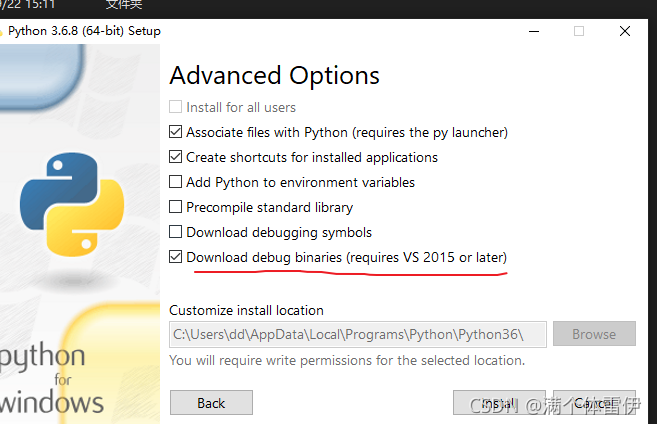
否则会提示找不到dll文件(这步很关键)
2、配置vs2017
首先找到刚才python的安装目录,我的是
C:\Users\dd\AppData\Local\Programs\Python\Python36
复制里面的四个dll文件到项目目录下(不是解决方案目录),并添加

配置附加包含目录

配置库目录
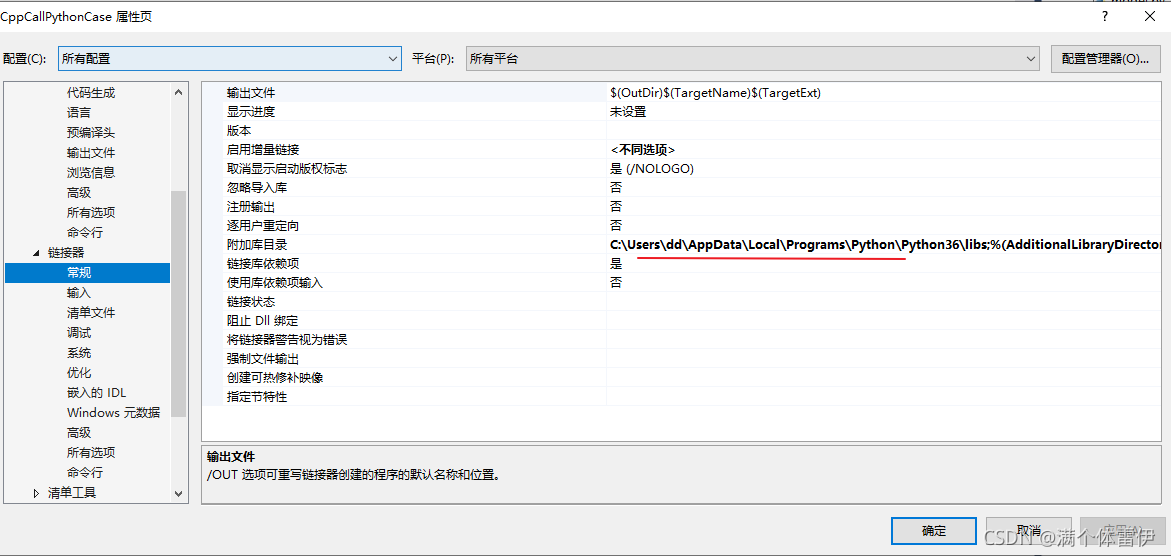
添加lib文件
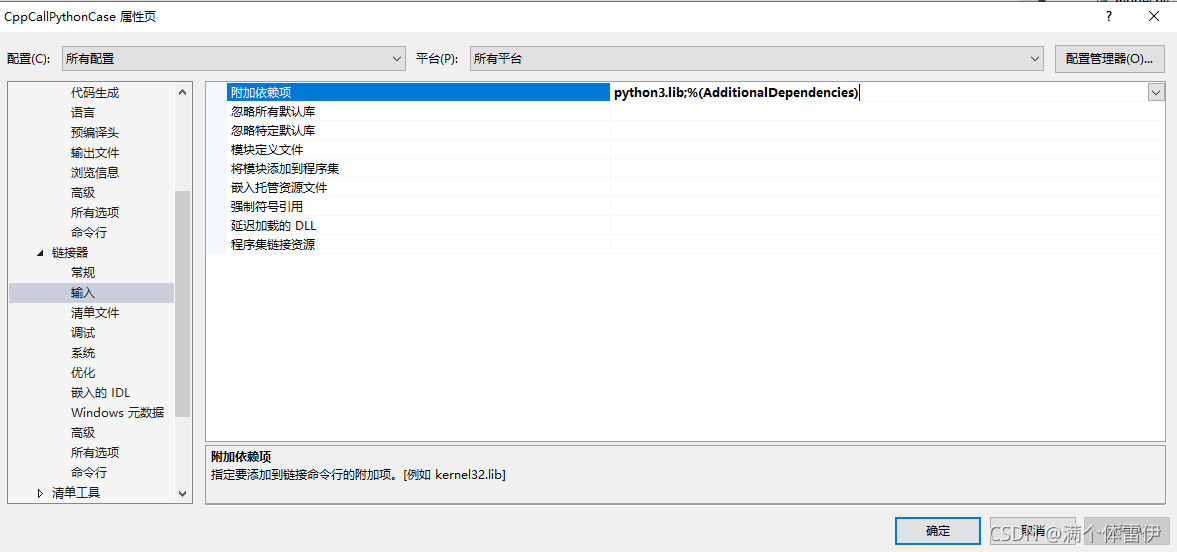
release添加python3.lib,如果用debug则添加python3_d.lib
3、用CPython调用python的类和方法
main.cpp
#include "pch.h"
#include <iostream>

#include "Python.h"
//#include "numpy/ndarrayobject.h"
//#include "opencv2/opencv.hpp"
using namespace std;
int main()
{
	Py_Initialize();
	PyRun_SimpleString("import sys");
	PyRun_SimpleString("print(sys.path)");
	PyRun_SimpleString("sys.path.append('./')");
	PyRun_SimpleString("print(sys.path)");


	if (!Py_IsInitialized())
	{
		printf("初始化失败!");
		return 0;
	}

	PyObject * pModule = NULL;
	PyObject * pFunc = NULL;
	PyObject* pDict = NULL;
	PyObject* pClass = NULL;
	PyObject* pIns = NULL;
	PyRun_SimpleString("import sys");
	pModule = PyImport_ImportModule("hello");
	assert(pModule != NULL);

	PyRun_SimpleString("import sys");
	pDict = PyModule_GetDict(pModule);
	assert(pDict != NULL);

	PyRun_SimpleString("import sys");
	pClass = PyDict_GetItemString(pDict, "math");
	assert(pClass != NULL);

	PyRun_SimpleString("import sys");
	pIns = PyObject_CallObject(pClass, nullptr);
	assert(pIns != NULL);

	PyRun_SimpleString("import sys");
	auto result = PyObject_CallMethod(pIns, "add", "(ii)", 1, 2);


	Py_DECREF(pIns);
	Py_Finalize();
	std::cout << "程序结束!\n";
	return 0;

}
hello.py:
import A
class math:
    def __init__(self):
        self.test = '<ceshi>'

    def add(self, num1, num2):
        print (self)
        print ("add functin start:", self.test)
        print (num1 + num2)
        print ("add functin end:<", self.test + ">")
        A.add(1,2)
        return num1 + num2
可以调用另一个py文件中的方法,但注意要将两个py文件放置于同一级目录下
A.py:
def add(x,y):
    print('我是函数A的输出:%d'%(x+y))
测试运行:调取成功
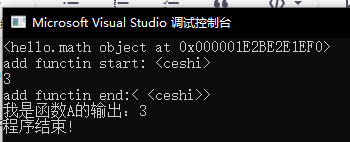
需要注意点有
1、python要用debug版本的,也就是要勾选这个

2、include和libs配置成功的话基本就不会有问题
二、调用YOLOv3
1.配置环境
找到anaconda中envs目录下yolov3对应的虚拟环境
我的是
C:\Users\dd(对应你的用户名)\anaconda3\envs\tensorflow112
然后找到刚才安装python的目录
我的是
C:\Users\dd\AppData\Local\Programs\Python
把tensorflow112文件夹整个复制过去
然后把它的名称改成python36
之所以这么做是因为如果将vs2017的include、libs改成anaconda中的路径
程序会报模块未找到的问题
而模块未找到的问题一般都是python环境没配好导致的
这里采用的 方法其实是 一种笨办法,大家也可以从修改系统的环境变量入手来解决这个问题
接下来我也会尝试这种方法,成功的话会在这里更新的
这里参考了这位大佬的博客
vs2017引用anaconda虚拟环境中的python第三方库
2.代码
这里参考了这位大佬的博客
C++调用python&Yolov3的千万难 最后成功!!!
main函数代码:不用改,还是可以用上面的,我们可以修改的是hello.py
这里在hello.py中调用了yolo的一个main方法
import A
import yolo
class math:
    def __init__(self):
        self.test = '<ceshi>'

    def add(self, num1, num2):
        print (self)
        print ("add functin start:", self.test)
        print (num1 + num2)
        print ("add functin end:<", self.test + ">")
        A.add(1,2)
        yolo.main()
        return num1 + num2
yolo.py
# -*- coding: utf-8 -*-
"""
Class definition of YOLO_v3 style detection model on image and video
"""

import colorsys
import os
from timeit import default_timer as timer

import numpy as np
from keras import backend as K
from keras.models import load_model
from keras.layers import Input
from PIL import Image, ImageFont, ImageDraw

from model import yolo_eval, yolo_body, tiny_yolo_body
from utils import letterbox_image
#import os
from keras.utils import multi_gpu_model
#hh
class YOLO(object):
    _defaults = {
        "model_path": r'你的路径',
        "anchors_path": r'你的路径',
        "classes_path": r'你的路径',
        #上面试我的绝对路径,大家替换成自己的
        "score" : 0.3,
        "iou" : 0.45,
        "model_image_size" : (416, 416),
        "gpu_num" : 1,
    }

    @classmethod
    def get_defaults(cls, n):
        if n in cls._defaults:
            return cls._defaults[n]
        else:
            return "Unrecognized attribute name '" + n + "'"

    def __init__(self, **kwargs):
        self.__dict__.update(self._defaults) # set up default values
        #self.__dict__.update(kwargs) # and update with user overrides
        self.class_names = self._get_class()
        self.anchors = self._get_anchors()
        self.sess = K.get_session()
        self.boxes, self.scores, self.classes = self.generate()

    def _get_class(self):
        classes_path = os.path.expanduser(self.classes_path)
        with open(classes_path) as f:
            class_names = f.readlines()
        class_names = [c.strip() for c in class_names]
        return class_names

    def _get_anchors(self):
        anchors_path = os.path.expanduser(self.anchors_path)
        with open(anchors_path) as f:
            anchors = f.readline()
        anchors = [float(x) for x in anchors.split(',')]
        return np.array(anchors).reshape(-1, 2)

    def generate(self):
        model_path = os.path.expanduser(self.model_path)
        assert model_path.endswith('.h5'), 'Keras model or weights must be a .h5 file.'

        # Load model, or construct model and load weights.
        num_anchors = len(self.anchors)
        num_classes = len(self.class_names)
        is_tiny_version = num_anchors==6 # default setting
        try:
            self.yolo_model = load_model(model_path, compile=False)
        except:
            self.yolo_model = tiny_yolo_body(Input(shape=(None,None,3)), num_anchors//2, num_classes) \
                if is_tiny_version else yolo_body(Input(shape=(None,None,3)), num_anchors//3, num_classes)
            self.yolo_model.load_weights(self.model_path) # make sure model, anchors and classes match
        else:
            assert self.yolo_model.layers[-1].output_shape[-1] == \
                num_anchors/len(self.yolo_model.output) * (num_classes + 5), \
                'Mismatch between model and given anchor and class sizes'

        print('{} model, anchors, and classes loaded.'.format(model_path))

        # Generate colors for drawing bounding boxes.
        hsv_tuples = [(x / len(self.class_names), 1., 1.)
                      for x in range(len(self.class_names))]
        self.colors = list(map(lambda x: colorsys.hsv_to_rgb(*x), hsv_tuples))
        self.colors = list(
            map(lambda x: (int(x[0] * 255), int(x[1] * 255), int(x[2] * 255)),
                self.colors))
        np.random.seed(10101)  # Fixed seed for consistent colors across runs.
        np.random.shuffle(self.colors)  # Shuffle colors to decorrelate adjacent classes.
        np.random.seed(None)  # Reset seed to default.

        # Generate output tensor targets for filtered bounding boxes.
        self.input_image_shape = K.placeholder(shape=(2, ))
        if self.gpu_num>=2:
            self.yolo_model = multi_gpu_model(self.yolo_model, gpus=self.gpu_num)
        boxes, scores, classes = yolo_eval(self.yolo_model.output, self.anchors,
                len(self.class_names), self.input_image_shape,
                score_threshold=self.score, iou_threshold=self.iou)
        return boxes, scores, classes

    def detect_image(self, image):
        start = timer()

        if self.model_image_size != (None, None):
            assert self.model_image_size[0]%32 == 0, 'Multiples of 32 required'
            assert self.model_image_size[1]%32 == 0, 'Multiples of 32 required'
            boxed_image = letterbox_image(image, tuple(reversed(self.model_image_size)))
        else:
            new_image_size = (image.width - (image.width % 32),
                              image.height - (image.height % 32))
            boxed_image = letterbox_image(image, new_image_size)
        image_data = np.array(boxed_image, dtype='float32')

        print(image_data.shape)
        image_data /= 255.
        image_data = np.expand_dims(image_data, 0)  # Add batch dimension.

        out_boxes, out_scores, out_classes = self.sess.run(
            [self.boxes, self.scores, self.classes],
            feed_dict={
                self.yolo_model.input: image_data,
                self.input_image_shape: [image.size[1], image.size[0]],
                K.learning_phase(): 0
            })

        print('Found {} boxes for {}'.format(len(out_boxes), 'img'))

        font = ImageFont.truetype(font=r'你的绝对路径/FiraMono-Medium.otf',
        #这个地方也很关键,当时就是没改这里导致查错查了好久
                    size=np.floor(3e-2 * image.size[1] + 0.5).astype('int32'))
        thickness = (image.size[0] + image.size[1]) // 300

        for i, c in reversed(list(enumerate(out_classes))):
            predicted_class = self.class_names[c]
            box = out_boxes[i]
            score = out_scores[i]

            label = '{} {:.2f}'.format(predicted_class, score)
            draw = ImageDraw.Draw(image)
            label_size = draw.textsize(label, font)

            top, left, bottom, right = box
            top = max(0, np.floor(top + 0.5).astype('int32'))
            left = max(0, np.floor(left + 0.5).astype('int32'))
            bottom = min(image.size[1], np.floor(bottom + 0.5).astype('int32'))
            right = min(image.size[0], np.floor(right + 0.5).astype('int32'))
            print(label, (left, top), (right, bottom))

            if top - label_size[1] >= 0:
                text_origin = np.array([left, top - label_size[1]])
            else:
                text_origin = np.array([left, top + 1])

            # My kingdom for a good redistributable image drawing library.
            for i in range(thickness):
                draw.rectangle(
                    [left + i, top + i, right - i, bottom - i],
                    outline=self.colors[c])
            draw.rectangle(
                [tuple(text_origin), tuple(text_origin + label_size)],
                fill=self.colors[c])
            draw.text(text_origin, label, fill=(0, 0, 0), font=font)
            del draw

        end = timer()
        print(end - start)
        return image

    def close_session(self):
        self.sess.close()

def detect_video(yolo, video_path, output_path=""):
    import cv2
    vid = cv2.VideoCapture(video_path)
    if not vid.isOpened():
        raise IOError("Couldn't open webcam or video")
    video_FourCC    = int(vid.get(cv2.CAP_PROP_FOURCC))
    video_fps       = vid.get(cv2.CAP_PROP_FPS)
    video_size      = (int(vid.get(cv2.CAP_PROP_FRAME_WIDTH)),
                        int(vid.get(cv2.CAP_PROP_FRAME_HEIGHT)))
    isOutput = True if output_path != "" else False
    if isOutput:
        print("!!! TYPE:", type(output_path), type(video_FourCC), type(video_fps), type(video_size))
        out = cv2.VideoWriter(output_path, video_FourCC, video_fps, video_size)
    accum_time = 0
    curr_fps = 0
    fps = "FPS: ??"
    prev_time = timer()
    while True:
        return_value, frame = vid.read()
        image = Image.fromarray(frame)
        image = yolo.detect_image(image)
        result = np.asarray(image)
        curr_time = timer()
        exec_time = curr_time - prev_time
        prev_time = curr_time
        accum_time = accum_time + exec_time
        curr_fps = curr_fps + 1
        if accum_time > 1:
            accum_time = accum_time - 1
            fps = "FPS: " + str(curr_fps)
            curr_fps = 0
        cv2.putText(result, text=fps, org=(3, 15), fontFace=cv2.FONT_HERSHEY_SIMPLEX,
                    fontScale=0.50, color=(255, 0, 0), thickness=2)
        cv2.namedWindow("result", cv2.WINDOW_NORMAL)
        cv2.imshow("result", result)
        if isOutput:
            out.write(result)
        if cv2.waitKey(1) & 0xFF == ord('q'):
            break
    yolo.close_session()

def detect_img(yolo):
    while True:
        img = input('Input image filename:')
        try:
            image = Image.open(img)
        except:
            print('Open Error! Try again!')
            continue
        else:
            r_image = yolo.detect_image(image)
            r_image.show()
    yolo.close_session()

def main():
    #img = input('输入路径')
    image = Image.open(r'你图片的绝对路径')
    yolo = YOLO()
    r_image=yolo.detect_image(image)
    r_image.show()
yolo里面的model.py和utils.py也要添加到项目下,里面没有什么修改的地方,yolo会调用这两个文件,只要注意导包的相对位置就好了,这里就不贴出来了。
此外,里面涉及到路径的地方一定都要改成绝对路径,否则会报错
thread.lock object at 0x000001DA121A1170


 2204
2204


 被折叠的 条评论
为什么被折叠?
被折叠的 条评论
为什么被折叠?
 到【灌水乐园】发言


