


一、简介
ORM(Object Relational Mapping)关系映射库,在Sqlite上提供了一层封装,优化数据库操作的便捷性。
Room的架构图如下所示:
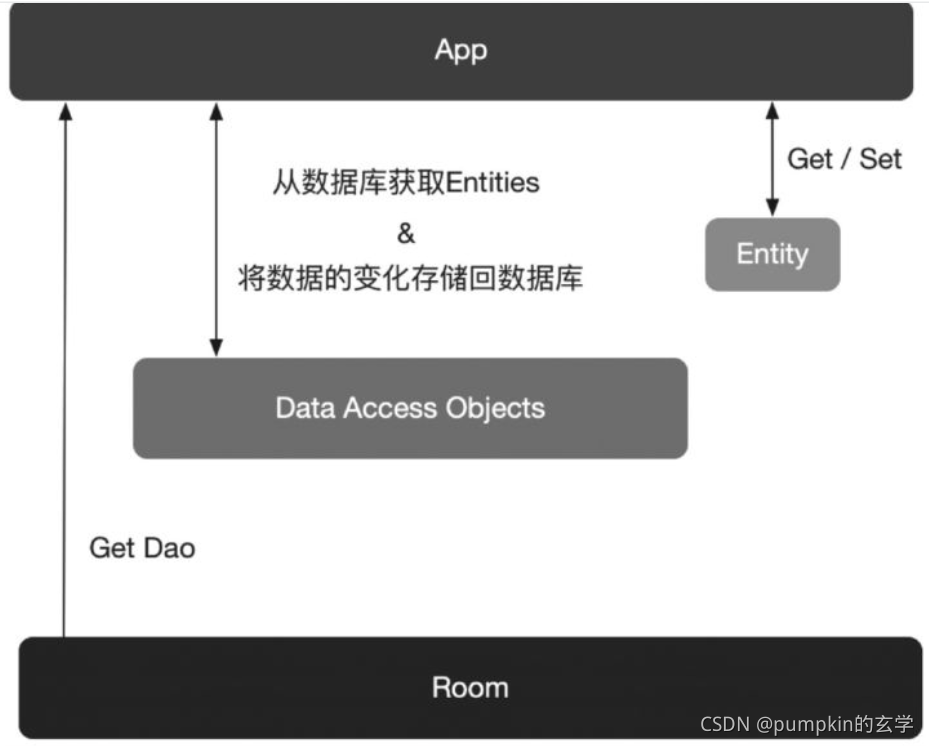
- Entity:一个Entity对应于数据库的一张表。Entity类是Sqlite表结构对Java类的映射,在Java中可以被看作一个Model类。
- Dao:即 Data Access Objects,数据访问对象。顾名思义,我们可以通过它访问对象。
一个Entity对应一张表,而每张表都需要一个Dao对象,用于对表的增删改查。Room对象被实例化之后,我们就可以通过数据库实例得到Dao对象(Get Dao),然后通过Dao对象对表中的数据进行操作。
依赖
buildscript {
    //android room version
    ext.room_version = '2.3.0'
}
// room
implementation "androidx.room:room-runtime:$room_version"
kapt "androidx.room:room-compiler:$room_version"
// optional - room kotlin 扩展
implementation "androidx.room:room-ktx:$room_version"
二、Room使用指南
Room使用
通过创建一个简单的学生数据库表,来熟悉Room的基本使用。
-
创建一个关于学生的Entity,即创建一张学生表SimpleStudentEntity。
Entity标签用于将SimpleStudent类与Room中的数据表对应起来。tableName属性可以为数据表设置表名,若不设置,则表名与类名相同。
PrimaryKey标签用于指定该字段作为表的主键。 autoGenerate = true Set to true to let SQLite generate the unique id.(设置为 true 让 SQLite 生成唯一的 id。)
ColumnInfo标签可用于设置该字段存储在数据库表中的名字,并指定字段的类型。
同时为了,其他地方对于表明以及字段相关的引用,我们这里声明为顶层常量(java 的静态常量),方便引用。
/**
 * 表名字相关,统一定义.
 */
const val SIMPLE_STUDENT_TABLE_NAME = "simple_student"
const val SIMPLE_STUDENT_TABLE_STUDENT_ID = "student_id"
const val SIMPLE_STUDENT_TABLE_STUDENT_NAME = "student_name"
const val SIMPLE_STUDENT_TABLE_STUDENT_AGE = "student_age"
完整的SimpleStudentEntity.kt文件代码如下所示:
@Entity(tableName = SIMPLE_STUDENT_TABLE_NAME) data class SimpleStudentEntity( @NonNull @PrimaryKey(autoGenerate = true) @ColumnInfo( name = SIMPLE_STUDENT_TABLE_STUDENT_ID, typeAffinity = ColumnInfo.INTEGER ) val id: Int = 0,//该值设置为自增的主键,默认会在数据库中自增,这里随便设置一个默认值就可以 @NonNull @ColumnInfo(name = SIMPLE_STUDENT_TABLE_STUDENT_NAME, typeAffinity = ColumnInfo.TEXT) val name: String?, @NonNull @ColumnInfo(name = SIMPLE_STUDENT_TABLE_STUDENT_AGE, typeAffinity = ColumnInfo.TEXT) val age: String? ) /** * 表名字相关,统一定义. */ const val SIMPLE_STUDENT_TABLE_NAME = "simple_student" const val SIMPLE_STUDENT_TABLE_STUDENT_ID = "student_id" const val SIMPLE_STUDENT_TABLE_STUDENT_NAME = "student_name" const val SIMPLE_STUDENT_TABLE_STUDENT_AGE = "student_age" -
针对上面这个学生Entity,我们需要定义一个Dao接口文件,以便对Entity进行访问。注意,在接口文件的上方,需要加入**@Dao**标签。
增删改查分别使用 Insert、Delete、Update、Query标记。可以在查询前面添加冒号 (
:) 来引用查询中的 Kotlin 值(例如,函数参数中的:id)查询需要传入sql语句,不了解sql的可以google了解一下。
@Dao interface SimpleStudentDao { @Insert fun insertStudent(studentEntity: SimpleStudentEntity) @Insert fun insertStudentAll(studentEntity: List<SimpleStudentEntity>) @Delete fun deleteStudent(studentEntity: SimpleStudentEntity) @Update fun updateStudent(studentEntity: SimpleStudentEntity) @Query("select * from $SIMPLE_STUDENT_TABLE_NAME") fun getStudentAll(): List<SimpleStudentEntity> @Query("select * from $SIMPLE_STUDENT_TABLE_NAME where $SIMPLE_STUDENT_TABLE_STUDENT_ID = :id") fun getStudentById(id: Int): List<SimpleStudentEntity> } -
定义好Entity和Dao后,接下来是创建数据库。
Database标签用于告诉系统这是Room数据库对象。entities属性用于指定该数据库有哪些表,若需要建立多张表,则表名以逗号相隔开。
version属性用于指定数据库版本号,后面数据库的升级正是依据版本号进行判断的。
数据库类需要继承自RoomDatabase,并通过Room.databaseBuilder()结合单例设计模式完成创建。
另外,之前创建的Dao对象,在此以抽象方法的形式返回,所以自定义的Database是一个抽象类。
@Database(entities = arrayOf(SimpleStudentEntity::class), version = 1)
abstract class SimpleMyDataBase : RoomDatabase() {

    companion object {
        private const val DATA_NAME = "simple_db"

        @Volatile
        private var INSTANCE: SimpleMyDataBase? = null

        /**
         * 双重校验锁单例,返回数据库实例
         */
        fun getDataBase(): SimpleMyDataBase = INSTANCE ?: synchronized(this) {
            val instance = INSTANCE ?: Room
                .databaseBuilder(AppUtil.application, SimpleMyDataBase::class.java, DATA_NAME)
                .build().also {
                    INSTANCE = it
                }
            instance
        }
    }

    /**
     * 返回 SimpleStudentDao Dao对象
     */
    abstract fun simpleStudentDao(): SimpleStudentDao

}
验证
以上,数据库和表的创建工作就完成了。下面来看看如何对数据库进行增/删/改/查了吧。
需要注意的是,不能直接在UI线程中执行这些操作,所有操作都需要放在工作线程中进行。
写一个Activity,对上面的代码做一些测试。
定义ViewModel文件。Jetpack:ViewModel使用指南,实现原理详细解析!
class SimpleViewModel(private val simpleStudentDao: SimpleStudentDao) : ViewModel() {

    fun insertStudent(studentEntity: SimpleStudentEntity) {
        viewModelScope.launch(Dispatchers.Default) {
            simpleStudentDao.insertStudent(studentEntity)
        }
    }

    fun insertStudentAll(studentEntity: List<SimpleStudentEntity>) {
        viewModelScope.launch(Dispatchers.Default) {
            simpleStudentDao.insertStudentAll(studentEntity)
        }
    }

    fun deleteStudent(studentEntity: SimpleStudentEntity) {
        viewModelScope.launch(Dispatchers.Default) {
            simpleStudentDao.deleteStudent(studentEntity)
        }
    }

    fun updateStudent(studentEntity: SimpleStudentEntity) {
        viewModelScope.launch(Dispatchers.Default) {
            simpleStudentDao.updateStudent(studentEntity)
        }
    }

    suspend fun getStudentAll(): List<SimpleStudentEntity> {
        //使用主从作用域
        return supervisorScope {
            val students = async(Dispatchers.IO) {
                simpleStudentDao.getStudentAll()
            }
            students.await()
        }
    }

    suspend fun getStudentById(id: Int): List<SimpleStudentEntity> {
        //使用主从作用域
        return supervisorScope {
            val students = async(Dispatchers.IO) {
                simpleStudentDao.getStudentById(id)
            }
            students.await()
        }
    }


    override fun onCleared() {
        super.onCleared()

    }
}

/**
 * 自定义工厂,可传入Dao参数
 */
class MyViewModelFactory(private val dao: SimpleStudentDao) : ViewModelProvider.Factory {
    override fun <T : ViewModel?> create(modelClass: Class<T>): T {
        if (modelClass.isAssignableFrom(SimpleViewModel::class.java)) {
            @Suppress("UNCHECKED_CAST")
            return SimpleViewModel(dao) as T
        }
        throw IllegalArgumentException("Unknown ViewModel class.")
    }

}
Activity
class SimpleRoomDemoActivity : AppCompatActivity() {

    /**
     * binding
     */
    private var _binding: ActivitySimpleUseRoomBinding? = null
    private val binding get() = _binding!!

    /**
     * 数据库dao
     */
    private val simpleDao: SimpleStudentDao by lazy(LazyThreadSafetyMode.NONE) {
        SimpleMyDataBase.getDataBase().simpleStudentDao()
    }

    /**
     * viewModel
     */
    lateinit var viewModel: SimpleViewModel

    override fun onCreate(savedInstanceState: Bundle?) {
        super.onCreate(savedInstanceState)
        _binding = ActivitySimpleUseRoomBinding.inflate(layoutInflater)
        setContentView(binding.root)
        initParam()
        initView()
    }

    private fun initParam() {
        viewModel = ViewModelProvider(
            this,
            //传入自己的工厂
            MyViewModelFactory(simpleDao)
        )[SimpleViewModel::class.java]
    }

    private fun initView() {
        with(binding) {
            btnInsert.setOnClickListener {
                viewModel.insertStudent(SimpleStudentEntity(0, "zxf", "18"))
            }
            btnInsertAll.setOnClickListener {
                viewModel.insertStudentAll(
                    arrayListOf(
                        SimpleStudentEntity(0, "liSi", "18"),
                        SimpleStudentEntity(0, "wangWu", "18")
                    )
                )
            }
            //delete 和 update 是根据什么来的  看了源码生成的sql默认根据主键来的
            btnDelete.setOnClickListener {
                viewModel.deleteStudent(SimpleStudentEntity(2, "delete", "99"))
//                viewModel.deleteStudent(SimpleStudentEntity(199,"update","99"))
            }
            btnUpdate.setOnClickListener {
                //所以我们这里面可以直接写一个默认的id去设置,不需要非要拿到查询的对象
//                viewModel.updateStudent(SimpleStudentEntity(1,"update","99"))
                viewModel.updateStudent(SimpleStudentEntity(199, "update", "99"))
            }
            //看了一下查询生成的源代码,对于对象来说直接new了,所以不会返回null,但是对象的值,没有就是null,需要声明为可null类型
            btnGetId.setOnClickListener {
                lifecycleScope.launch {
                    displayToTextView(viewModel.getStudentById(5))
                }
            }
            btnGetAll.setOnClickListener {
                lifecycleScope.launch {
                    displayToTextView(viewModel.getStudentAll())
                }
            }
        }
    }

    private fun displayToTextView(students: List<SimpleStudentEntity>) {
        val string = students.joinToString(
            """

        """.trimIndent()
        )
        binding.text.text = string
    }

    /**
     * 释放binding
     */
    override fun onDestroy() {
        super.onDestroy()
        _binding = null
    }
}
结果

三、Room踩坑解答
1.为什么不可以在主线程,进行数据库操作呢?如果非要使用会发生什么?
关于这一点我起初猜想应该和LiveData一样在方法执行的时候,首先对线程做了判断。比如LiveData的setVaule方法,在第一步就判断了,如果不是主线程则抛异常。这个应该也差不多。Jetpack:LiveData使用指南,实现原理详细解析!
我们在生成的Dao实现类里面找一下代码,比如上方我们的Dao接口叫做SimpleStudentDao,通过注解处理器生成了SimpleStudentDao_Impl类,随便找一个方法,比如insert吧,看一下源码:
public void insertStudent(final SimpleStudentEntity studentEntity) {
	__db.assertNotSuspendingTransaction();
	__db.beginTransaction();
	try {
		__insertionAdapterOfSimpleStudentEntity.insert(studentEntity);
		__db.setTransactionSuccessful();
	} finally {
    __db.endTransaction();
	}
}
第一个assertNotSuspendingTransaction验证阻塞函数是否处于正确的作用域中(kotlin协程+room造成的事务问题,后面会有文章介绍到,持续关注哈!),如果没有这个验证的话会造成死锁。
看第二个beginTransaction干了什么吧
public void beginTransaction() {
	assertNotMainThread();
    ...
}
public void assertNotMainThread() {
    ...
    if (isMainThread()) {
        throw new IllegalStateException("Cannot access database on the main thread 			since it may potentially lock the UI for a long period of time.");
    }
}
所以不可能在主线程进行数据库操作,否则直接就抛出异常😥。
2.看一下查询的方法,如果没有查询到数据会返回什么?空指针吗?还是什么,声明字段需要注意什么?
上面的代码都是用kotlin写的,我们知道kotlin有非空和可空两种类型,那如果没有查询到,**Room返回的是null的话,就需要在将声明的字段或者返回类型声明为可空类型了,不然将null赋值给kotlin的非空类型会抛出异常的!**所以我们需要知道,没有查询到结果的话会返回什么,我们继续看源码,看一下查询的方法。
public List<SimpleStudentEntity> getStudentAll() {
    final String _sql = "select * from simple_student";
    final RoomSQLiteQuery _statement = RoomSQLiteQuery.acquire(_sql, 0);
    __db.assertNotSuspendingTransaction();
    final Cursor _cursor = DBUtil.query(__db, _statement, false, null);
    try {
      final int _cursorIndexOfId = CursorUtil.getColumnIndexOrThrow(_cursor, "student_id");
      final int _cursorIndexOfName = CursorUtil.getColumnIndexOrThrow(_cursor, "student_name");
      final int _cursorIndexOfAge = CursorUtil.getColumnIndexOrThrow(_cursor, "student_age");
      final List<SimpleStudentEntity> _result = new ArrayList<SimpleStudentEntity>(_cursor.getCount());
      while(_cursor.moveToNext()) {
        final SimpleStudentEntity _item;
        final int _tmpId;
        _tmpId = _cursor.getInt(_cursorIndexOfId);
        final String _tmpName;
        if (_cursor.isNull(_cursorIndexOfName)) {
          _tmpName = null;
        } else {
          _tmpName = _cursor.getString(_cursorIndexOfName);
        }
        final String _tmpAge;
        if (_cursor.isNull(_cursorIndexOfAge)) {
          _tmpAge = null;
        } else {
          _tmpAge = _cursor.getString(_cursorIndexOfAge);
        }
        _item = new SimpleStudentEntity(_tmpId,_tmpName,_tmpAge);
        _result.add(_item);
      }
      return _result;
    } finally {
      _cursor.close();
      _statement.release();
    }
  }
很明显的看到,即使一个数据也查不到,也会返回一个List对象,所以返回的类型不需要声明为可空类型,对于实体类,也是提前创建好的对象,将查到的数据赋值进去,**但是引用类型如果没有查到,则字段会赋值为空。所以在创建Entity的时候,需要将字段声明为可空类型!**如上面的实体类声明所示:
3.对于update和delete方法,是通过那个字段判断的,Dao里面接口的代码写道需要传入一个Entity类,难道需要先查询,在进行delete和update的操作?
同样,看源码。就看delete吧
  public void deleteStudent(final SimpleStudentEntity studentEntity) {
    ...
    try {
      __deletionAdapterOfSimpleStudentEntity.handle(studentEntity);
      __db.setTransactionSuccessful();
    }
    ...
  }
    this.__deletionAdapterOfSimpleStudentEntity = new EntityDeletionOrUpdateAdapter<SimpleStudentEntity>(__db) {
      @Override
      public String createQuery() {
        return "DELETE FROM `simple_student` WHERE `student_id` = ?";
      }

      @Override
      public void bind(SupportSQLiteStatement stmt, SimpleStudentEntity value) {
        stmt.bindLong(1, value.getId());
      }
    };
很明显可以看到一个sql语句“DELETE FROM simple_student WHERE student_id = ?”;
update在同样的地方sql语句为“UPDATE OR ABORT simple_student SET student_id = ?,student_name = ?,student_age = ? WHERE student_id = ?”。
所以在默认的情况下,是根据主键(上面设置的PrimaryKey)来进行判断,对于delete和update,只需要知道对应的主键就可以进行操作了,并不需要专门先查询出对应的对象,然后在进行对应的操作(之前在别的博客看到的🤣),比如上面的代码就是直接写死的id,新创建的对象进行操作的!


 361
361


 被折叠的 条评论
为什么被折叠?
被折叠的 条评论
为什么被折叠?
 到【灌水乐园】发言


