


安装serial,用于串口通信
sudo apt-get install python-serial
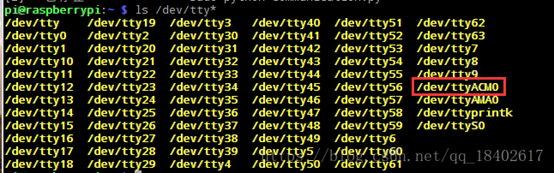
将Arduino用USB线连接到树莓派的USB,在树莓派中输入(注意ls后有一个空格)
Ls /dev/tty*
查看两者连接端口的名字。查看是否出现ttyACM0或ttyUSB0。连接uno出现ttyACM0,连接mega2560出现ttyUSB0。看到ttyACM0或ttyUSB0就说明二者可以通讯了(树莓派上安装了arduino IDE的也可以通过它看开发板的串口号)
另外硬件通信要用到树莓派的GPIO,那嚒需要安装GPIO库。树莓派中安装python的GPIO模块(库文件),在树莓派中总链接不上,所以建议直接登录网址手动下载,并且可以选择最新版本(博主此时用的是RPi.GPIO-0.6.3)
https://sourceforge.net/projects/raspberry-gpio-python/files/
通过SSH方式(不在此介绍,博主用的是filezilla进行SSH传输)传输到树莓派中
tar xvzf RPi.GPIO-0.6.3.tar.gz(tar解压)
cd RPi.GPIO-0.6.3 (进入解压后的文件夹)
sudo python setup.py install (安装GPIO库文件
作者:GPNU-IOT先生
来源:CSDN
原文:https://blog.csdn.net/qq_18402617/article/details/81414541
版权声明:本文为博主原创文章,转载请附上博文链接!
代码例一
编写arduino端通信代码
void setup()
{
Serial.begin(9600); // 9600 bps
}
void loop()
{
if ( Serial.available())
{
if(‘s’ == Serial.read())
Serial.println(“Hello Raspberry,I am Arduino.”);
}
}
编写树莓派端代码(写到python文件中,保存为xxx.py)
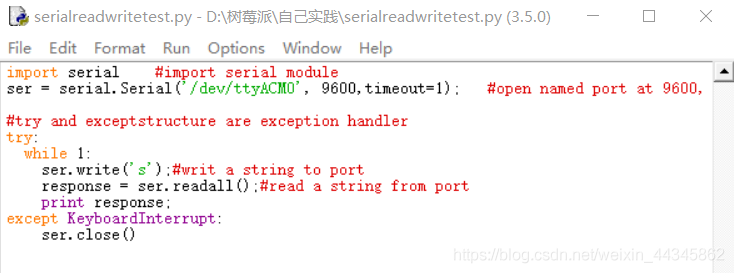
import serial #import serial module
ser = serial.Serial(’/dev/ttyACM0’, 9600,timeout=1); #open named port at 9600,1s timeot
#try and exceptstructure are exception handler
try:
while 1:
ser.write(‘s’);#writ a string to port
response = ser.readall();#read a string from port
print response;
except KeyboardInterrupt:
ser.close()
上面代码在树莓派中保存为communication.py文件。注:这里千万不要命名为serial.py,否则后面运行会出现 AttributeError: ‘module’ object has no attribute ‘Serial’ 的错误。
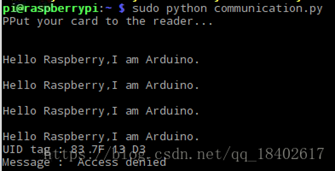
对代码的简单说明:树莓派向arduino发送一个字符‘s’,arduino向树莓派回复字符串“hello raspberry,i am arduino” 在树莓派终端运行
sudo python communication.py
代码例二
arduino端通信代码
int temp,data;
void setup() {
// put your setup code here, to run once:
Serial.begin(9600);
}
void loop() {
// put your main code here, to run repeatedly:
temp=analogRead(0);
temp = (long)100*temp/1024;
Serial.print(“db:”);
Serial.println(temp);
delay(1000);
}
树莓派代码:(写到python文件中,保存为xxx.py)
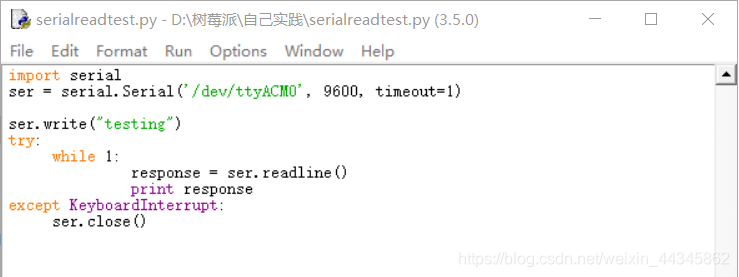
import serial
ser = serial.Serial(’/dev/ ttyACM0’, 9600, timeout=1)
ser.write(“testing”)
try:
while 1:
response = ser.readline()
print response
except KeyboardInterrupt:
ser.close()
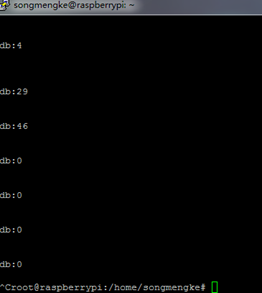
然后将Arduino的程序上传到开发板,连接好电路之后运行树莓派的程序,运行截图如下:


 2万+
2万+


 被折叠的 条评论
为什么被折叠?
被折叠的 条评论
为什么被折叠?
 到【灌水乐园】发言


