


点击上方“Java基基”,选择“设为星标”
做积极的人,而不是积极废人!
每天 14:00 更新文章,每天掉亿点点头发...
源码精品专栏
采集器的获取器、获取器的获取方法都将通过获取方法来获取。setter 方法处理成前端所需要的 VO 对象。
public UserInfoVO originalCopyItem(UserDTO userDTO){
    UserInfoVO userInfoVO = new UserInfoVO();
    userInfoVO.setUserName(userDTO.getName());
    userInfoVO.setAge(userDTO.getAge());
    userInfoVO.setBirthday(userDTO.getBirthday());
    userInfoVO.setIdCard(userDTO.getIdCard());
    userInfoVO.setGender(userDTO.getGender());
    userInfoVO.setIsMarried(userDTO.getIsMarried());
    userInfoVO.setPhoneNumber(userDTO.getPhoneNumber());
    userInfoVO.setAddress(userDTO.getAddress());
    return userInfoVO;
}
传统的方法一般是采用硬件编码,将每个人的价值都逐一设置。当然,为了偷走也可以使用一些BeanUtil 使用普通的方法:
public UserInfoVO utilCopyItem(UserDTO userDTO){
    UserInfoVO userInfoVO = new UserInfoVO();
    //采用反射、内省机制实现拷贝
    BeanUtils.copyProperties(userDTO, userInfoVO);
    return userInfoVO;
}
像,BeanUtils 实现了通过反射、内省的框架,加速上会带来比较重大的影响。尤其是对于一些大容量、大对象而言,这个等的缺陷会越来越明显。这块代码我是专门进行了测试,对的setter使用拷贝以及次要查看本结构的方法进行了一次截图。
| 运行次数 | 设置方法 | BeanUtil 发光 | MapperStruct 拷贝 |
|---|---|---|---|
| 1 | 2921528(1) | 3973292(1.36) | 2989942(1.023) |
| 10 | 2362724(1) | 66402953(28.10) | 3348099(1.417) |
| 100 | 2500452(1) | 71741323(28.69) | 2120820(0.848) |
| 1000 | 3187151(1) | 157925125(49.55) | 5456290(1.711) |
| 10000 | 5722147(1) | 300814054(52.57) | 5229080(0.913) |
| 100000 | 19324227(1) | 244625923(12.65) | 12932441(0.669) |
比方毫微秒的方法。附近的单位可以为当前组件的比值十倍、二十倍。这样,很简单的 BeanUtils 确实给服务的性能带来了很大的压力。而 MapperStruct 复制则可以很好地解决这个问题。
下面就来介绍一下MapperStruct这个我们很好的提升我们代码效率的工具。
使用教程
maven依赖
首先要导入 map 的 maven 依赖,这里我们选择最新的版本 1.5.0.RC1。
...
<properties>
    <org.mapstruct.version>1.5.0.RC1</org.mapstruct.version>
</properties>
...

//mapStruct maven依赖
<dependencies>
    <dependency>
        <groupId>org.mapstruct</groupId>
        <artifactId>mapstruct</artifactId>
        <version>${org.mapstruct.version}</version>
    </dependency>
</dependencies>
...

//编译的组件需要配置
<build>
    <plugins>
        <plugin>
            <groupId>org.apache.maven.plugins</groupId>
            <artifactId>maven-compiler-plugin</artifactId>
            <version>3.8.1</version>
            <configuration>
                <source>1.8</source> <!-- depending on your project -->
                <target>1.8</target> <!-- depending on your project -->
                <annotationProcessorPaths>
                    <path>
                        <groupId>org.mapstruct</groupId>
                        <artifactId>mapstruct-processor</artifactId>
                        <version>${org.mapstruct.version}</version>
                    </path>
                    <!-- other annotation processors -->
                </annotationProcessorPaths>
            </configuration>
        </plugin>
    </plugins>
</build>
在引入 maven 依赖,我们首先来定义需要的 DTO 及 VO 信息,主要包含的信息是姓名、年龄转换、生日、性别等信息。
@Data
public class UserDTO {
    private String name;

    private int age;

    private Date birthday;

    //1-男 0-女
    private int gender;

    private String idCard;

    private String phoneNumber;

    private String address;

    private Boolean isMarried;
}
@Data
public class UserInfoVO {
    private String userName;

    private int age;

    private Date birthday;

    //1-男 0-女
    private int gender;

    private String idCard;

    private String phoneNumber;

    private String address;

    private Boolean isMarried;
}
接下来需要编写相应的mapper类,以便生成相应的编译类。
@Mapper
public interface InfoConverter {

    InfoConverter INSTANT = Mappers.getMapper(InfoConverter.class);

    @Mappings({
            @Mapping(source = "name", target = "userName")
    })
    UserInfoVO convert(UserDTO userDto);
}
需要说明的是,DTO 中注意的名称因为的其实是 VO 中的。因此需要在声明中显示转换器的用户名。在执行完之后的文件,需要 maven 的 Complie 格式的 IDE 编译生成的 Impl 。(自动生成)
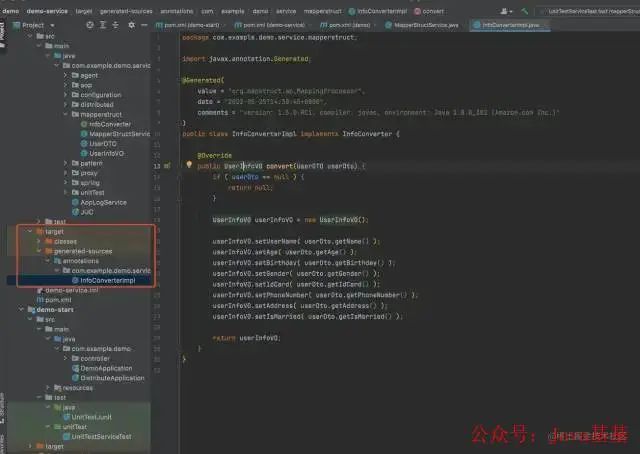
到这里,mapperStruct 的访问者就可以完成了~。我们就可以在我们的代码中使用这个拷贝了。
public UserInfoVO newCopyItem(UserDTO userDTO, int times) {
    UserInfoVO userInfoVO = new UserInfoVO();
    userInfoVO = InfoConverter.INSTANT.convert(userDTO);
    return userInfoVO;
}
怎么样,访问是不是很简单~
基于 Spring Boot + MyBatis Plus + Vue & Element 实现的后台管理系统 + 用户小程序,支持 RBAC 动态权限、多租户、数据权限、工作流、三方登录、支付、短信、商城等功能
项目地址:https://gitee.com/zhijiantianya/ruoyi-vue-pro
视频教程:https://doc.iocoder.cn/video/
常问问题
1、这个访问项目时,发现并没有生成的编译对象类,是什么原因?
问:可能的原因有以下几个:
忘记写的@Mapper注解,没有生成的@Mapper
没有配置上面提到的插件 maven-compiler-plugin
没有执行 maven 的 Compile,IDE 没有进行相应编译
2、接入项目后发现,我项目内的龙目岛、@Data注解不好使了,这怎么办呢?
Lombok 本身是对 AST 进行修改的,但地图结构在执行的时候并不能检测到 Lombok,因此需要额外的引入 maven lombok-mapstruct-binding。
......
    <org.mapstruct.version>1.5.0.RC1</org.mapstruct.version>
    <lombok-mapstruct-binding.version>0.2.0</lombok-mapstruct-binding.version>
    <lombok.version>1.18.20</lombok.version>
......

......
<dependency>
    <groupId>org.mapstruct</groupId>
    <artifactId>mapstruct</artifactId>
    <version>${org.mapstruct.version}</version>
</dependency>
<dependency>
    <groupId>org.projectlombok</groupId>
    <artifactId>lombok-mapstruct-binding</artifactId>
    <version>${lombok-mapstruct-binding.version}</version>
</dependency>
<dependency>
    <groupId>org.projectlombok</groupId>
    <artifactId>lombok</artifactId>
    <version>${lombok.version}</version>
</dependency>
更详细的,mapperStruct 在官网中还提供了一个实现 Lombok 及 mapStruct 并存的案例
「3、更多问题:」
欢迎查看 MapStruct 文档,里面对各种官网文档有更详细的解释及解答问题。
基于 Spring Cloud Alibaba + Gateway + Nacos + RocketMQ + Vue & Element 实现的后台管理系统 + 用户小程序,支持 RBAC 动态权限、多租户、数据权限、工作流、三方登录、支付、短信、商城等功能
项目地址:https://gitee.com/zhijiantianya/yudao-cloud
视频教程:https://doc.iocoder.cn/video/
实现原理
在聊到 mapstruct 的代码原理时,我们就需要先回顾一下 JA 运行的流程。之前的执行生成的流程大致如下:

可以按照程序的不同方式看到,如果我们想通过编码的修改来进行相应的增强,可以考虑对提取的语法树进行相应的增强。而地图结构正是做的。具体的执行逻辑显示:
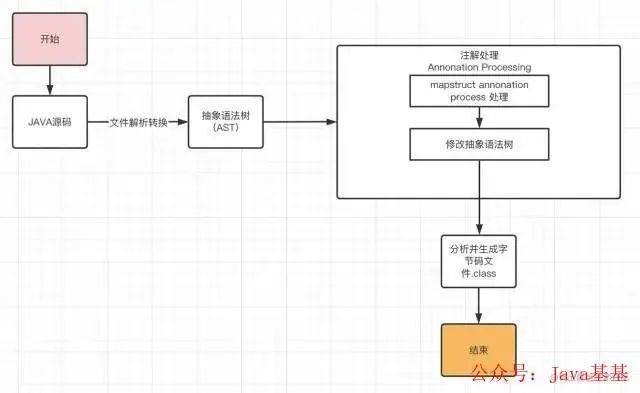
为了该方法,mapstruct 基于 JSR 269 实现了代码。JSR 269 是 JDK 引入的一种添加规范。有了它,能够在编译期处理说明,并且可以读取、修改和语法树中的内容。JSR 269使用 Annotation 在编译过程中处理几个解,Annotation Processor 相当于编译的一种插件,因此又称为实现器式注解。JSR 269,主要有以下处理步骤:
继承类,继承处理方法和处理方法,在过程中实现自己的注解处理逻辑。
在 META-INF/services 目录下创建 javax.annotation.processing.Processor 文件注册自己实现的 Annotation Processor。
通过AbstractProcessor,在进行修改的时候,进行相应的实现AST。从而达到目的。
public void compile(List<JavaFileObject> sourceFileObjects,
                    List<String> classnames,
                    Iterable<? extends Processor> processors)
{
    if (processors != null && processors.iterator().hasNext())
        explicitAnnotationProcessingRequested = true;
    // as a JavaCompiler can only be used once, throw an exception if
    // it has been used before.
    if (hasBeenUsed)
        throw new AssertionError("attempt to reuse JavaCompiler");
    hasBeenUsed = true;

    // forcibly set the equivalent of -Xlint:-options, so that no further
    // warnings about command line options are generated from this point on
    options.put(XLINT_CUSTOM.text + "-" + LintCategory.OPTIONS.option, "true");
    options.remove(XLINT_CUSTOM.text + LintCategory.OPTIONS.option);

    start_msec = now();

    try {
        initProcessAnnotations(processors);

        //此处会调用到mapStruct中的processor类的方法.
        delegateCompiler =
            processAnnotations(
                enterTrees(stopIfError(CompileState.PARSE, parseFiles(sourceFileObjects))),
                classnames);

        delegateCompiler.compile2();
        delegateCompiler.close();
        elapsed_msec = delegateCompiler.elapsed_msec;
    } catch (Abort ex) {
        if (devVerbose)
            ex.printStackTrace(System.err);
    } finally {
        if (procEnvImpl != null)
            procEnvImpl.close();
    }
}关键代码,在mapstruct-processor包中修改,分类的类MappingProcessor继承了 AbstractProcessor,并实现其方法方法。通过对 AST 进行相应的代码增强,确定对编译的对象进行的最终实现。
@SupportedAnnotationTypes({"org.mapstruct.Mapper"})
@SupportedOptions({"mapstruct.suppressGeneratorTimestamp", "mapstruct.suppressGeneratorVersionInfoComment", "mapstruct.unmappedTargetPolicy", "mapstruct.unmappedSourcePolicy", "mapstruct.defaultComponentModel", "mapstruct.defaultInjectionStrategy", "mapstruct.disableBuilders", "mapstruct.verbose"})
public class MappingProcessor extends AbstractProcessor {
public boolean process(Set<? extends TypeElement> annotations, RoundEnvironment roundEnvironment) {
if (!roundEnvironment.processingOver()) {
RoundContext roundContext = new RoundContext(this.annotationProcessorContext);
Set<TypeElement> deferredMappers = this.getAndResetDeferredMappers();
this.processMapperElements(deferredMappers, roundContext);
Set<TypeElement> mappers = this.getMappers(annotations, roundEnvironment);
this.processMapperElements(mappers, roundContext);
} else if (!this.deferredMappers.isEmpty()) {
Iterator var8 = this.deferredMappers.iterator();
while(var8.hasNext()) {
MappingProcessor.DeferredMapper deferredMapper = (MappingProcessor.DeferredMapper)var8.next();
TypeElement deferredMapperElement = deferredMapper.deferredMapperElement;
Element erroneousElement = deferredMapper.erroneousElement;
String erroneousElementName;
if (erroneousElement instanceof QualifiedNameable) {
erroneousElementName = ((QualifiedNameable)erroneousElement).getQualifiedName().toString();
} else {
erroneousElementName = erroneousElement != null ? erroneousElement.getSimpleName().toString() : null;
}
deferredMapperElement = this.annotationProcessorContext.getElementUtils().getTypeElement(deferredMapperElement.getQualifiedName());
this.processingEnv.getMessager().printMessage(Kind.ERROR, "No implementation was created for " + deferredMapperElement.getSimpleName() + " due to having a problem in the erroneous element " + erroneousElementName + ". Hint: this often means that some other annotation processor was supposed to process the erroneous element. You can also enable MapStruct verbose mode by setting -Amapstruct.verbose=true as a compilation argument.", deferredMapperElement);
}
}
return false;
}
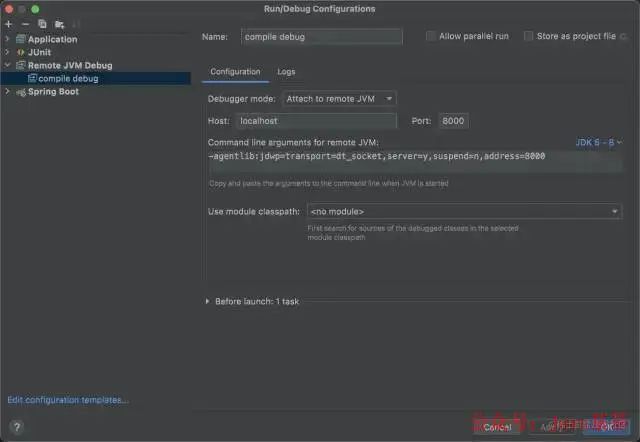
}「如何断点调试:」
因为注解能力是处理器在解析->编译的过程完成,跟普通的jar包这样的异常情况,我们ven框架为提供了调试入口,需要用maven实现调试。所以需要在编译打开调试才可以调试。
在项目的 pom 文件所在目录执行 mvnDebug compile
选择用打开,添加一个远程,端口为8000的idea项目
打上断点,远程运行智能调试。
附录
测试代码如下,Spock框架 + JAVA代码采用。Spock 框架作为当前最火热的测试框架,你应该学习一下。Spock 框架初体验:更优雅地写好你的单元测试
//    @Resource
    @Shared
    MapperStructService mapperStructService

    def setupSpec() {
        mapperStructService = new MapperStructService()
    }

    @Unroll
    def "test mapperStructTest times = #times"() {
        given: "初始化数据"
        UserDTO dto = new UserDTO(name: "笑傲菌", age: 20, idCard: "1234",
                phoneNumber: "18211932334", address: "北京天安门", gender: 1,
                birthday: new Date(), isMarried: false)

        when: "调用方法"
//        传统的getter、setter拷贝
        long startTime = System.nanoTime();
        UserInfoVO oldRes = mapperStructService.originalCopyItem(dto, times)
        Duration originalWasteTime = Duration.ofNanos(System.nanoTime() - startTime);

//        采用工具实现反射类的拷贝
        long startTime1 = System.nanoTime();
        UserInfoVO utilRes = mapperStructService.utilCopyItem(dto, times)
        Duration utilWasteTime = Duration.ofNanos(System.nanoTime() - startTime1);

        long startTime2 = System.nanoTime();
        UserInfoVO mapStructRes = mapperStructService.newCopyItem(dto, times)
        Duration mapStructWasteTime = Duration.ofNanos(System.nanoTime() - startTime2);

        then: "校验数据"
        println("times = "+ times)
        println("原始拷贝的消耗时间为: " + originalWasteTime.getNano())
        println("BeanUtils拷贝的消耗时间为: " + utilWasteTime.getNano())
        println("mapStruct拷贝的消耗时间为: " + mapStructWasteTime.getNano())
        println()

        where: "比较不同次数调用的耗时"
        times || ignore
        1     || null
        10    || null
        100   || null
        1000  || null
    }
测试服务如下所示:
public class MapperStructService {

    public UserInfoVO newCopyItem(UserDTO userDTO, int times) {
        UserInfoVO userInfoVO = new UserInfoVO();
        for (int i = 0; i < times; i++) {
            userInfoVO = InfoConverter.INSTANT.convert(userDTO);
        }
        return userInfoVO;
    }

    public UserInfoVO originalCopyItem(UserDTO userDTO, int times) {
        UserInfoVO userInfoVO = new UserInfoVO();
        for (int i = 0; i < times; i++) {
            userInfoVO.setUserName(userDTO.getName());
            userInfoVO.setAge(userDTO.getAge());
            userInfoVO.setBirthday(userDTO.getBirthday());
            userInfoVO.setIdCard(userDTO.getIdCard());
            userInfoVO.setGender(userDTO.getGender());
            userInfoVO.setIsMarried(userDTO.getIsMarried());
            userInfoVO.setPhoneNumber(userDTO.getPhoneNumber());
            userInfoVO.setAddress(userDTO.getAddress());
        }
        return userInfoVO;
    }

    public UserInfoVO utilCopyItem(UserDTO userDTO, int times) {
        UserInfoVO userInfoVO = new UserInfoVO();
        for (int i = 0; i < times; i++) {
            BeanUtils.copyProperties(userDTO, userInfoVO);
        }
        return userInfoVO;
    }
}欢迎加入我的知识星球,一起探讨架构,交流源码。加入方式,长按下方二维码噢:

已在知识星球更新源码解析如下:

最近更新《芋道 SpringBoot 2.X 入门》系列,已经 101 余篇,覆盖了 MyBatis、Redis、MongoDB、ES、分库分表、读写分离、SpringMVC、Webflux、权限、WebSocket、Dubbo、RabbitMQ、RocketMQ、Kafka、性能测试等等内容。
提供近 3W 行代码的 SpringBoot 示例,以及超 6W 行代码的电商微服务项目。
获取方式:点“在看”,关注公众号并回复 666 领取,更多内容陆续奉上。
文章有帮助的话,在看,转发吧。
谢谢支持哟 (*^__^*)


 1151
1151


 被折叠的 条评论
为什么被折叠?
被折叠的 条评论
为什么被折叠?
 到【灌水乐园】发言


