


ROS 从入门到放弃 - 入门
- 1. Installing and Configuring Your ROS Environment
- 2. Navigating the ROS Filesystem
- 3. Creating a ROS Package
- 4. Building a ROS Package
- 5. Understanding ROS Nodes
- 6. Understanding ROS Topics
- 7. Understanding ROS Services and Parameters
- 8. Using rqt_console and roslaunch
- 9. Using rosed to edit files in ROS
- 10. Creating a ROS msg and srv
- 11. Writing a Simple Publisher and Subscriber (Python)
- 12. Examining the Simple Publisher and Subscriber
- 15. Writing a Simple Service and Client (Python)
- 16. Examining the Simple Service and Client
- 17. Recording and playing back data
- 18. Reading messages from a bag file
- 19. Getting started with roswtf
- 20. Navigating the ROS wiki
- 21. Where Next?
- 最后:
- 附录:Terminal的命令合集:
本教程参考
本教程针对Python。
1. Installing and Configuring Your ROS Environment
- 创建工作空间(Work Space):
$ mkdir -p ~/catkin_ws/src
$ cd ~/catkin_ws/
$ catkin_make
如果需要在ROS Melodic及之前的版本中运用Python3,则需要
catkin_make -DPYTHON_EXECUTABLE=/usr/bin/python3
- 在工作空间的位置(如/home/frank/catkin_ws)下添加环境变量:
source devel/setup.bash
此操作等价于
. ~/catkin_ws/devel/setup.bash
之后可以通过echo $ROS_PACKAGE_PATH查看当前环境变量:
之前:
/home/frank/tutorial_ws/src:/opt/ros/kinetic/share
之后:
/home/frank/catkin_ws/src:/home/frank/tutorial_ws/src:/opt/ros/kinetic/share
- each path separated by a colon ‘:’
source环境变量的作用:Sourcing any of these files will overlay this workspace on top of your environment.
2. Navigating the ROS Filesystem
本节需要预先导入材料:
sudo apt-get install ros-<distro>-ros-tutorials
Packages & Manifests:
Packages: Packages are the software organization unit of ROS code. Each package can contain libraries, executables, scripts, or other artifacts.
Manifests (package.xml): A manifest is a description of a package. It serves to define dependencies between packages and to capture meta information about the package like version, maintainer, license, etc…
文件管理操作:
rospack find [package_name]: 查找某个包的位置
注意:will only find ROS packages that are within the directories listed in your ROS_PACKAGE_PATH.rospack depends1 rospy[pkgname]: 查看某个包的依赖项,注意要在环境中添加当前的wsrospack depends [pkgname]找pkg的所有依赖,如我们定义时可能只写了依赖rospy,但此时会把rospy需要的包都显示出来rospack depends1 pkg名字:First-order dependencies,直接需要的包
roscd [locationname[/subdir]]: 移动到一个包的位置
roscd roscpp/cmake:可以移动到roscpp下的camke文件夹。
roscd log: 只有运行ROS程序才可以去到程序存储log文件的地方,否则会报错。
可以通过echo $ROS_PACKAGE_PATH来查看环境变量ROS_PACKAGE_PATH,如果我们的Worksapce不在里面,需要用1.2中的方法添加环境变量。
4. rosls [pkgname]
3. Creating a ROS Package
3.1 Package的组成:
- 一定要包含的文件:
- package.xml: provides meta information about the package.
- CMakeLists.txt: which uses catkin.
- 其他:
- If it is a catkin metapackage it must have the relevant boilerplate CMakeLists.txt file.
- Each package must have its own folder: This means no nested packages nor multiple packages sharing the same directory.
3.2 一个Worksapce的组成
例如一个Workspace(WS)的目录:
workspace_folder/        -- WORKSPACE
  src/                   -- SOURCE SPACE
    CMakeLists.txt       -- 'Toplevel' CMake file, provided by catkin
    package_1/
      CMakeLists.txt     -- CMakeLists.txt file for package_1
      package.xml        -- Package manifest for package_1
    ...
    package_n/
      CMakeLists.txt     -- CMakeLists.txt file for package_n
      package.xml        -- Package manifest for package_n
3.3 创建一个Package
-
在src中文件目录下使用:
catkin_create_pkg <package_name> [depend1] [depend2] [depend3]
后面的depend是它依赖的包,如下面的命令创建了一个依赖std_msgs, roscpp和rospy名为beginner_tutorials的包:catkin_create_pkg beginner_tutorials std_msgs rospy roscpp
Rq:
- 运行完后会在src文件夹里出现一个’beginner_tutorials’的文件夹
- 因为之前source过,也可以用
rosls beginner_tutorials来显示内部内容 - 一般pkg的名字只用小写。
-
创建完pkg之后,要回到ws的进行catkin_make:
$ cd ~/catkin_ws $ catkin_make -
再source一下:
. ~/catkin_ws/devel/setup.bashRq:
rospack depends: 找各种包的Dependencies
rospack depends1 pkg名字:First-order dependencies,直接需要的包可以用对应的pkg中的package.xml来验证:
<package format="2"> ... <buildtool_depend>catkin</buildtool_depend> <build_depend>roscpp</build_depend> <build_depend>rospy</build_depend> <build_depend>std_msgs</build_depend> ... </package> -
查看各个由
catkin_create_pkg生成的文件:
package.xml中各tag的介绍:
<description>The beginner_tutorials package</description>:描述pkg按照惯例,第一句话应该简短,但要涵盖整个包装范围。<maintainer email="user@todo.todo">user</maintainer>:维护者的tag<license>TODO</license>:版权协议。常见的为BSD。<build_depend>roscpp</build_depend>:pkg的依赖- The dependencies are split into build_depend, buildtool_depend, exec_depend, test_depend
4. Building a ROS Package
确认已经source:
$ source /opt/ros/kinetic/setup.bash
catkin_make: 用于build放在src中的文件。- Build之后ws的情况:出现3个文件夹。
- src
- devel: The devel folder is the default location of the devel space, which is where your executables and libraries go before you install your packages.
- build: The build folder is the default location of the build space and is where cmake and make are called to configure and build your packages.
5. Understanding ROS Nodes
5.1 Quick Overview of Graph Concepts:
- Nodes: A node is an executable that uses ROS to communicate with other nodes.
- Messages: ROS data type used when subscribing or publishing to a topic.
- Topics: Nodes can publish messages to a topic as well as subscribe to a topic to receive messages.
- Master: Name service for ROS (i.e. helps nodes find each other)
- rosout: ROS equivalent of stdout/stderr
- roscore: Master + rosout + parameter server (parameter server will be introduced later)
5.2 详细介绍Node:
- 功能:
Nodes can publish or subscribe to a Topic. Nodes can also provide or use a Service. - Client Libraries:
ROS client libraries允许Node可以用其他变成语言编写。- rospy = python client library
- roscpp = c++ client library
5.3 roscore
- The first thing you should run when using ROS.
5.4 rosnode
rosnode list:查看当前运行的node。rosnode info /rosout:查看/rosout这个node的info格式。
5.5 rosrun
rosrun [package_name] [node_name]:运行某一个pkg的node- EX:
$ rosrun turtlesim turtlesim_node,此时的rosnode list为:
/rosout /turtlesim- EX:
rosrun turtlesim turtlesim_node __name:=my_turtle: 更改node的名字,此时的rosnode list为:/my_turtle /rosoutrosnode ping my_turtle:测试node是否正常工作。
6. Understanding ROS Topics
6.0 准备工作:
- Ter1:
rosrun turtlesim turtlesim_node - Ter2:
rosrun turtlesim turtle_teleop_key遥控乌龟 - 基本原理:
- 两个node通过一个topic进行互相沟通。
turtle_teleop_key–/turtle1/command_velocity–>turtlesim_node- 实际上各个node的名字(因为我们可以改名字)为:
/teleop_turtle–/turtle1/command_velocity–>/turtlesim
前者发消息给topic/turtle1/command_velocity,/turtlesim来接受信息。
6.1 ROS Topic:
6.1.1 Using rqt_graph:
- 安装:distro==kinetic
  $ sudo apt-get install ros-<distro>-rqt
  $ sudo apt-get install ros-<distro>-rqt-common-plugins
- 使用:
rosrun rqt_graph rqt_graph
6.1.2 rostopic: 用于咨询Topic
-
rostopic bw: display bandwidth used by topic -
rostopic echo [topic]:显示published到一个topic上的信息
如rostopic echo /turtle1/cmd_vel -
rostopic list [/topic]- 显示当前运行的所有的topic的名字:
rostopic list - 列出每个Topic的Sub和Pub数量:
rostopic list -v - 列出有Sub的Topic的名字:
rostopic list -s - 列出有Pub的Topic的名字:
rostopic list -p
- 显示当前运行的所有的topic的名字:
-
rostopic type [topic]: 显示某个topic接受的消息(topic的消息类型由publiser发布的消息类型决定)
如rostopic type /turtle1/cmd_vel -
rostopic pub [topic] [msg_type] [args]: 向某个Topic发布消息- 单次执行发送:
rostopic pub -1 /turtle1/cmd_vel geometry_msgs/Twist -- '[2.0, 0.0, 0.0]' '[0.0, 0.0, 1.8]'
其中-1表示单次执行,发送一次消息之后就退出了,后面的是YAML格式的消息。 - 以一定频率发送信息:
rostopic pub /turtle1/cmd_vel geometry_msgs/Twist -r 1 -- '[2.0, 0.0, 0.0]' '[0.0, 0.0, -1.8]'
以1HZ的频率发布信息
- 单次执行发送:
-
rostopic hz [topic]:显示消息的发送频率
例如我们可以检验上面的是否真的是以1hz的频率发布消息到/turtle1/cmd_vel,结果中的average rate的单位是hz。$ rostopic hz /turtle1/cmd_vel average rate: 1.000 min: 1.000s max: 1.000s std dev: 0.00000s window: 2
6.1.3 Using rqt_plot:
rosrun rqt_plot rqt_plot
6.1.4 rosmsg: ROS Messages
Topic通讯实现方式是通过不同node间相互发送ROS消息来实现的。Sub和Pub的消息类型必须相同。topic的消息类型由publiser发布的消息类型决定。
rostopic type [topic]:查询消息类型。rosmsg show geometry_msgs/Twist:查看某个消息类型的定义:$ rostopic type /turtle1/cmd_vel | rosmsg show- 顺势将一个topic的消息类型的定义查出,他只是把查询到的type(geometry_msgs/Twist)放在了show后面用于查询最底层定义。
7. Understanding ROS Services and Parameters
除了通过Topic之外,另一种Node之间相互通信的办法,允许Node发出一条request和接受一条response。
7.1 rosservice
基本方法概览:
rosservice list         print information about active services
rosservice call        call the service with the provided args
rosservice type       print service type
rosservice find        find services by service type
rosservice uri          print service ROSRPC uri
rossrv show (类似于rosmsg show) 展示某一种服务类型的输入和输出
具体介绍:
rosservice list:列出当前ros的所有servicerosservice type [service] | rossrv show:查看某个service的类型
EX1:无输入/输出
说明:it takes no arguments (i.e. it sends no data when making a request and receives no data when receiving a response).rosservice type /clear 结果: std_srvs/Empty
EX2:
说明:调用该服务需要一个x,y,theta和放置的新乌龟的名字(可选),返回值为放置的乌龟的名字。$ rosservice type /spawn | rossrv show 结果: float32 x float32 y float32 theta string name --- string namerosservice call [service] [args]: 调用某一个服务
EX1:无输入的service
EX2: 需要有输入的service$ rosservice call /clear$ rosservice call /spawn 2 2 0.2 ""
7.2 rosparam
功能:
- Store and manipulate data on the ROS Parameter Server.
- 使用YAML作为syntax. In simple cases, YAML looks very natural: 1 is an integer, 1.0 is a float, one is a string, true is a boolean, [1, 2, 3] is a list of integers, and {a: b, c: d} is a dictionary.
- 基本方法:
rosparam set             set parameter
rosparam get             get parameter
rosparam load           load parameters from file
rosparam dump         dump parameters to file
rosparam delete        delete parameter
rosparam list              list parameter names
rosparam listrosparam set [param_name]
EX:$ rosparam set /background_r 150 $ rosservice call /clear #用于更新画布背景rosparam get [param_name]:获取当前各个参数的值$ rosparam get /:输出所有的内容。
rosparam dump [file_name] [namespace]: 输出当前的param到文件
EX:
存储格式是yaml,存储路径是当前路径,大致长这样:$ rosparam dump params.yamlrosparam load [file_name] [namespace]: 把param的文件导入到参数服务器c
EX1:直接导入
EX2:这样设置属性名字前会多一项/copy/$ rosparam load params.yaml $ rosservice call /clear #会得到保存前的效果$ rosparam load params.yaml copy $ rosparam get /copy/background_b
8. Using rqt_console and roslaunch
8.0 准备工作
$ sudo apt-get install ros--rqt ros--rqt-common-plugins ros--turtlesim
(可以多次安装)
8.1 rqt_console & rqt_logger_level
调用方法:rosrun A A
rqt_console: 可以查看各种ROS节点的信息、警告(用rqt_logger_level进行选择)
attaches to ROS’s logging framework to display output from nodes.rqt_logger_level: allows us to change the verbosity level (DEBUG, WARN, INFO, and ERROR) of nodes as they run.- Logging levels are prioritized in the following order:
把level选择成Warn则可以得到Fatal Error Warn Info DebugWarn, Error, and Fatal等更高级别的消息。
8.2 roslaunch:
roslaunch [package] [filename.launch]
创建launch文件的步骤:
- 在pkg的文件夹里创建launch文件夹:
  $ roscd pkgname
  $ mkdir launch
  $ cd launch
注意:launch文件夹并不是必须的,事实上ros会自己在传入的pkg中寻找launch文件。
- 创建launch文件:
$ touch turtlemimic.launch
并在其中写入:
<launch>
<group ns="turtlesim1">
<node pkg="turtlesim" name="sim1" type="turtlesim_node"/>
</group>
<group ns="turtlesim2">
<node pkg="turtlesim" name="sim2" type="turtlesim_node"/>
</group>
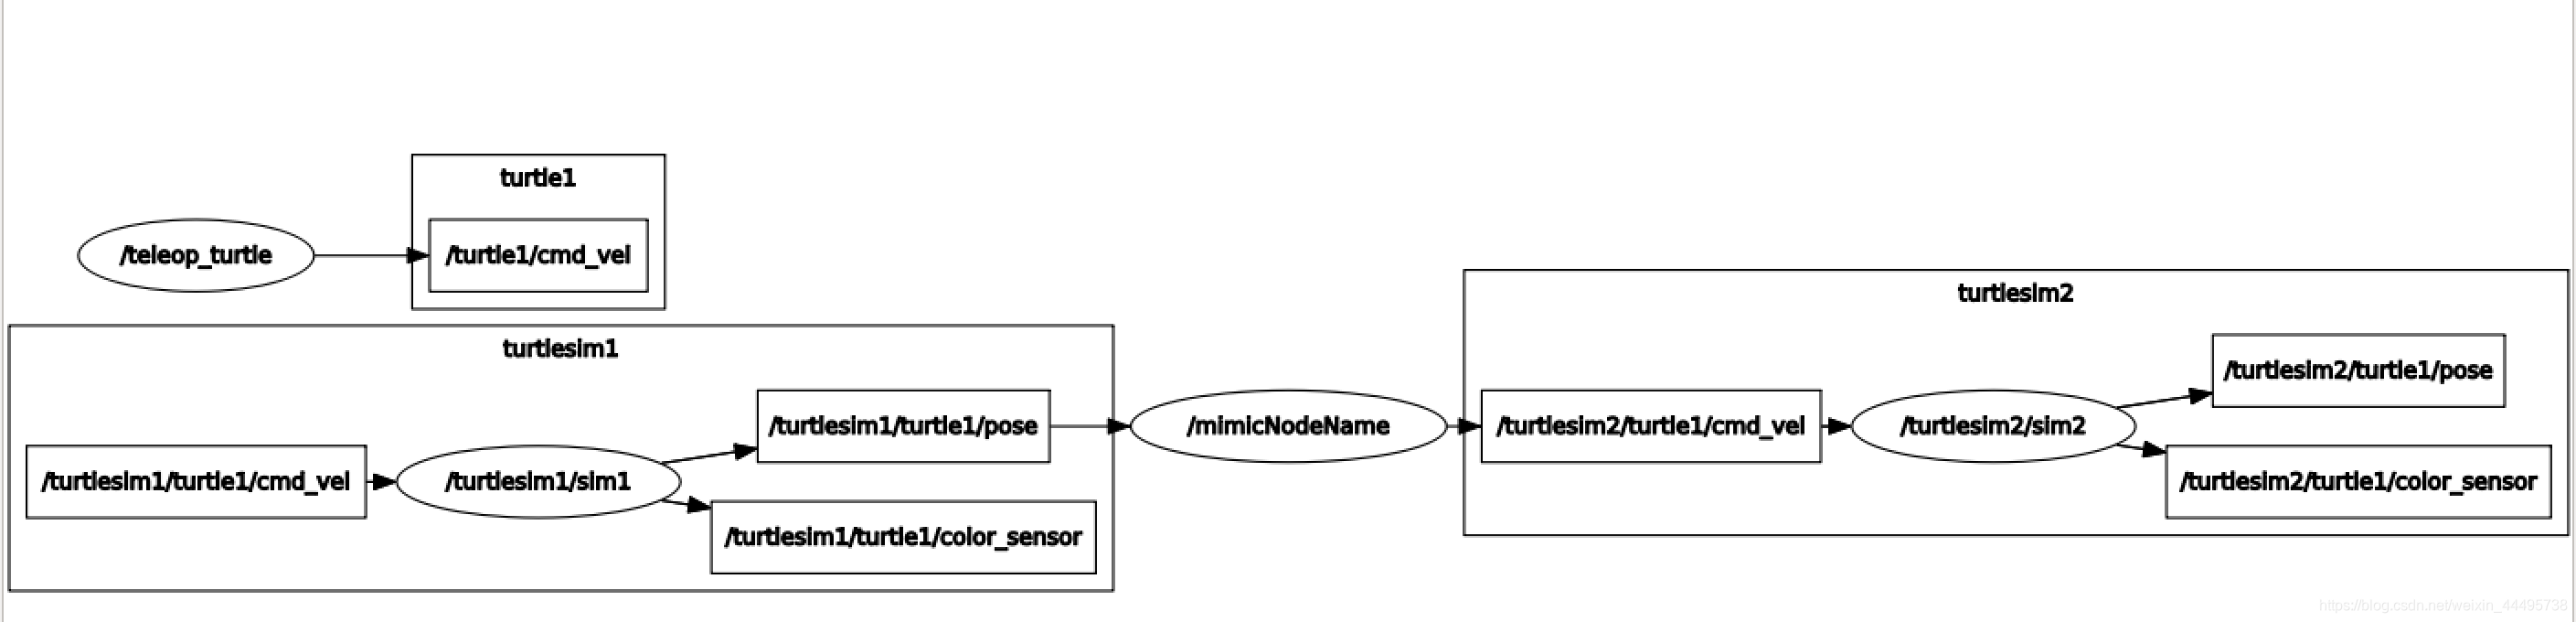
<node pkg="turtlesim" name="mimicNodeName" type="mimic">
<remap from="input" to="turtlesim1/turtle1"/>
<remap from="output" to="turtlesim2/turtle1"/>
</node>
</launch>
- ns是namespace,这里一个是turtlesim1,另一个是turtlesim2,所以不会打架,用于开启两个simulator。
- 回顾一下,我们可以用以下命令创建一个乌龟的Simulation:
其中如果不指定my_turtle的node名字,则默认为/turtlesimrosrun [pkg] [可执行文件名字] rosrun turtlesim turtlesim_node
每次创建一个simulation,都会让node(如/turtlesim)订阅/turtle1/cmd_vel,并将一些内容发布到/turtle1/color_sensor和/turtle1/pose上面。 - 创建了一个名字为mimic的node,用于把turtlesim1的结果给到turtlesim2
<node pkg="turtlesim" name="sim1" type="turtlesim_node"/>:
感觉等价于:rosrun turtlesim turtlesim_node __name:=sim1<node pkg="turtlesim" name="mimicNodeName" type="mimic">:- 根据上面的说法,这个等价于:
rosrun turtlesim mimic __name:=mimicNodeName- name: node的名字,这个东西一般和type后面输入的内容一样,type需要被赋值为节点对应的可执行文件的名字,name则是节点的名字。具体区别是你在CMakeLists.txt文件里编译文件的命令:
add_executable(abc ABC.cpp)中abc就是你需要填写在type后的内容,而填写在name后的内容,就是你的节点名字,自行选择,你ros程序中ros::init(argc, argv, "abcde");的这一行的abcde也是节点名。简言之,name就是节点名字,type就是可执行文件的名字。name可以自己随便来,type跟pkg中的程序有关 - 我们可以观察到,mimic这个节点定义式就是订阅了
/input/pose,输出到/output/cmd_vel <remap from="input" to="turtlesim1/turtle1"/>:相当于把这个节点订阅的topic中的input替换成了turtlesim1/turtle1,所以最后订阅的topic是/turtlesim1/turtle1/pose
- name: node的名字,这个东西一般和type后面输入的内容一样,type需要被赋值为节点对应的可执行文件的名字,name则是节点的名字。具体区别是你在CMakeLists.txt文件里编译文件的命令:
- 一个重要的例子,下面这个例子中调用了两个脚本,其中
output="screen"是在屏幕上显示输出,name是创建节点的名字,可以覆盖掉py文件中自己写的那个!
  <launch>
  <node pkg="beginner_tutorials" name="ControlTest" type="Control.py" output="screen"> </node>
  <node pkg="beginner_tutorials" name="joystickControlTest" type="joystickControl.py" output="screen"> </node>
  </launch>
9. Using rosed to edit files in ROS
$ rosed [package_name] [filename]: 用于编辑一个Package中的文件,直接输入文件名字即可。
- 需要提前装好vim.
- EX1:
$ rosed roscpp Logger.msg
- EX2: 显示一个pkg内部的所有文件
$ rosed beginner_tutorials <tab>*2
- 更换编辑器:
export EDITOR='nano -w' - 查看当前编辑器:
$ echo $EDITOR
10. Creating a ROS msg and srv
10.1 Introduction to msg and srv
msg
- 介绍:
msg files are simple text files that describe the fields of a ROS message. They are used to generate source code for messages in different languages. - 存储位置:
一个pkg中的msg文件夹内 - 组成:
每一行包含一个field type和field name,Field种类如下:
int8, int16, int32, int64 (plus uint*)
float32, float64
string
time, duration
other msg files(如:geometry_msgs/PoseWithCovariance)
variable-length array[] and fixed-length array[C]
header
注意:header是ROS中的特殊类型,它包含时间戳(timestamp)和坐标。经常会在msg中的第一行出现。
- 例子:
  Header header
  string child_frame_id
  geometry_msgs/PoseWithCovariance pose
  geometry_msgs/TwistWithCovariance twist
或者
string first_name
string last_name
uint8 age
uint32 score
srv
- 介绍:
An srv file describes a service. It is composed of two parts: arequestand aresponse.
Request和Response之间用---隔开。 - 存储位置:
一个pkg中的srv文件夹内 - 例子:
int64 A
int64 B
---
int64 Sum
10.2 Using msg
定义一条msg
- 进入一个pkg:
$ roscd beginner_tutorials - 创建一个msg的文件夹:
$ mkdir msg - 创建信息,例如:
$ echo "int64 num" > msg/Num.msg
- 打开package.xml (为了能让我们的msg文件变成source code for C++ 和 Python),添加:
<build_depend>message_generation</build_depend>
<exec_depend>message_runtime</exec_depend>
- 修改CMakelist,
- 在find package最后一行添加
message_generation:
find_package(catkin REQUIRED COMPONENTS roscpp rospy std_msgs message_generation )- Export
message_runtimedependency,在catkin specific configuration中
catkin_package(CATKIN_DEPENDS message_runtime)- 找到:
将其变成,以自己之前在msg文件夹中创建的Num.msg为例:# add_message_files( # FILES # Message1.msg # Message2.msg # )add_message_files( FILES Num.msg )- 确保
generate_messages()被调用,找到:
将其变成:# generate_messages( # DEPENDENCIES # std_msgs # )generate_messages( DEPENDENCIES std_msgs )- 最后的最后一定要注意:catkin_package要放在generate_messages后面。实际上第一块中也有一个caktin_package,但我们一开始要改的应该是catkin specific configuration中的。
generate_messages( DEPENDENCIES std_msgs ) catkin_package(CATKIN_DEPENDS message_runtime) - 在find package最后一行添加
rosmsg:
- 用
rosmsg -h找到基本操作:rosmsg show Show message description rosmsg list List all messages rosmsg md5 Display message md5sum rosmsg package List messages in a package rosmsg packages List packages that contain messages $ rosmsg show [message type]:显示某一个消息的类型,只要在一个文件夹里有这个msg的文本文件就可以了,不一定要做后面更改package.xml等工作。
rosmsg show beginner_tutorials/Num
或者直接输入消息的名字(Num.msg):
rosmsg show Num
10.3 Using srv
roscp
roscp [package_name] [file_to_copy_path] [copy_path]
定义一个srv
- 在pkg内创建一个文件夹
srv:mkdir srv - 从
rospy_tutorials里抄一个srv:$ roscp rospy_tutorials AddTwoInts.srv srv/AddTwoInts.srv,实际上这个srv文件里面就是:
int64 a
int64 b
---
int64 sum
- 跟创建
msg一样,在pkg中的package.xml中确保
<build_depend>message_generation</build_depend>
<exec_depend>message_runtime</exec_depend>
没有被注释掉。
- 跟创建
msg一样,在pkg中的CMakeLists中添加:message_generation
find_package(catkin REQUIRED COMPONENTS
roscpp
rospy
std_msgs
message_generation
)
- 跟创建
msg一样,在pkg中的CMalists的find_package中添加message_generation.
find_package(catkin REQUIRED COMPONENTS
  roscpp
  rospy
  std_msgs
  message_generation
)
在catkin_package中添加CATKIN_DEPENDS message_runtime
将generate_messages的注释去掉:
generate_messages(
  DEPENDENCIES
  std_msgs
)
- 跟创建
msg类似,在pkg中的CMakeLists中取消注释:
add_service_files{
FILES
AddTwoInts.srv
}
rossrv
$ rossrv show <service type>:展示某一个srv的文本内容。
$ rossrv show beginner_tutorials/AddTwoInts
或者直接写srv的名字:
$ rossrv show AddTwoInts
10.4 创建msg和srv的共同步骤
接在10.2和10.3对应操作的后面
- CMakeLists中:
generate_messages(
DEPENDENCIES
std_msgs
)
- 在一切妥当之后,回到ws的目录下使用
catkin_make - 所有在msg文件夹中的msg都会为C++或者python的文件创造code。
这里的beginner_tutorials是我们pkg的名字。
C++的在~/my_ws/devel/include/beginner_tutorials/: Num.h
Python script在~/my_ws/devel/lib/python2.7/dist-packages/beginner_tutorials/msg
lisp file 在~/my_ws/devel/share/common-lisp/ros/beginner_tutorials/msg/:Num.lisp
至于srv,
C++和msg放在一起,
Python,lisp都放在msg旁边的一个srv文件夹里面
-
注意事项:
If you are building C++ nodes which use your new messages, you will also need to declare a dependency between your node and your message, as described in the catkin msg/srv build documentation. -
在Python中调用消息,以调用beginner_tutorials这个pkg中的ControlInfo.msg为例子
from beginner_tutorials.msg import ControlInfo
11. Writing a Simple Publisher and Subscriber (Python)
11.0 Node的定义
Node的含义就是一个连接到ROS Network的可执行文件,在这个部分,我们主要考虑Publisher这个Node。
11.1 创建一个Publisher Node
- 找一个pkg,(如roscd beginner_tutorials),在pkg中新建一个名为scripts的文件夹:
roscd beginner_tutorials
mkdir scripts
cd scripts
- 新建一个名为talker.py的文件,一定要注意加操作权限
chmod +x talker.py使得节点变得Executable:
#!/usr/bin/env python
# 每个Python的ROS节点都需要写上面这个声明,以确保这个文件被当作Python script来执行。

import rospy
from std_msgs.msg import String
def talker():
	pub = rospy.Publisher('chatter', String, queue_size=10)
	# 以String类型发布到chatter这个topic上面
	# queue_size limits the amount of queued messages if any subscriber is not receiving them fast enough.

	rospy.init_node('talker', anonymous=True)
	# 告诉了ROS我的节点(Node)名字,这里是talker。
	# 为自动在节点后面添加随机数字以确保节点的名字唯一,如果两个node名字相同,第一个会被挤下线。

	rate = rospy.Rate(10) # 以10hz的频率刷新。

	while not rospy.is_shutdown():
		hello_str = "hello world %s" % rospy.get_time()
		rospy.loginfo(hello_str) # ROS里面的print函数。
          pub.publish(hello_str)
          rate.sleep() #程序会自动休息直到达到所设定的频率。
if __name__ == '__main__':
	try:
		talker()
	except rospy.ROSInterruptException:
		pass
- 给这个文件加权限
chmod +x talker.py
- 在pkg的CMakeLists中添加
catkin_install_python(PROGRAMS scripts/talker.py
  DESTINATION ${CATKIN_PACKAGE_BIN_DESTINATION}
)
或者长成这样(只要去除注释即可)
install(PROGRAMS scripts/talker.py
   DESTINATION ${CATKIN_PACKAGE_BIN_DESTINATION}
)
- 回到当前工作空间如
cd ~/catkin_ws,然后catkin_make即可。 - 一个terminal使用
roscore,另一个使用rosrun beginner_tutorials talker.py(beginner_tutorials是pkg的名字)。
- Rq:
- 关于msg的一些说明:
msg = String(): 可以创建一个空的Stringmsg.data = str: 因为String.msg的定义是string data。
11.2 创建一个Subscriber Node
- 前面依旧一样,在pkg的scripts文件夹里创建如下listener.py文件:
#!/usr/bin/env python
import rospy
from std_msgs.msg import String
#回调函数
def process(data):
    rospy.loginfo(rospy.get_caller_id() + "I heard %s", data.data)
    # 这里data的类型是String,而又因为String的定义里面有一项是data,所以这里写的是data.data
    # rospy.get_caller_id() 显示的是调用它的Node,这里是我们的/listener。

def listener():
    rospy.init_node('listener', anonymous=True)
    rospy.Subscriber("chatter", String, callback=process)

    # spin() simply keeps python from exiting until this node is stopped
    rospy.spin()
if __name__ == '__main__':
    listener()
- 修改权限:
chmod +x listener.py
- 回到ws,
catkin_make roscore+rosrun [pkg] [.py]
12. Examining the Simple Publisher and Subscriber

具体操作是
- Terminal 1
roscore
- Terminal 2
cd ~/catkin_ws
source /devel/setup.bash
rosrun [pkg Name] talker.py
- Terminal 3
cd ~/catkin_ws
source /devel/setup.bash
rosrun [pkg Name] listener.py
- Terminal 4
rosrun rqt_graph rqt_graph
15. Writing a Simple Service and Client (Python)
在这部分,我们希望创建一个给两个int,返回它的值的Service Node。
我们需要用到第10节中导入的AddTwoInts这个.srv文件。
我们回顾一下这个srv AddTwoInts
[myfirstpkg/AddTwoInts]:
int64 a
int64 b
---
int64 sum
15.1 创建一个Service Node
- 在pkg的scripts里面添加一个python文件,名为
add_two_ints_server.py
from __future__ import print_function

# 导入的化使用pkg.srv
from beginner_tutorials.srv import AddTwoInts,AddTwoIntsResponse
import rospy

def handle_add_two_ints(req):
    print("Returning [%s + %s = %s]"%(req.a, req.b, (req.a + req.b)))
    # 因为req是AddTwoInts这个srv,它的定义里为a和b
    # 直接打印的效果和log_info差不多

    return AddTwoIntsResponse(req.a + req.b)

def add_two_ints_server():
    rospy.init_node('add_two_ints_server')
    s = rospy.Service('add_two_ints', AddTwoInts, handle_add_two_ints)
    # Service的名字为add_two_ints,service的srv是AddTwoInts.srv,回调函数是handle_add_two_ints。
    print("Ready to add two ints.")
    rospy.spin()

if __name__ == "__main__":
    add_two_ints_server()
chmod +x add_two_ints_server.py
15.2 创建一个Client Node
- 在pkg的scripts里面添加一个python文件,名为
add_two_ints_client.py
#!/usr/bin/env python

from __future__ import print_function

import sys
import rospy
from beginner_tutorials.srv import *

def add_two_ints_client(x, y):
    rospy.wait_for_service('add_two_ints') # 调用名字为add_two_ints的service
    try:
        add_two_ints = rospy.ServiceProxy('add_two_ints', AddTwoInts) #把它当作一个函数来用,x,y就是req的参数
        resp1 = add_two_ints(x, y) #resp1是一个 AddTwoIntsResponse 的 object
        return resp1.sum # 因为AddTwoInts的返回变量的名字是sum
    except rospy.ServiceException as e:
        print("Service call failed: %s"%e)

def usage():
    return "%s [x y]"%sys.argv[0] # sys.argv[0]运行程序的名字,sys.argv[1..]是它的参数

if __name__ == "__main__":
    if len(sys.argv) == 3:
        x = int(sys.argv[1])
        y = int(sys.argv[2])
    else:
        print(usage())
        sys.exit(1)
    print("Requesting %s+%s"%(x, y))
    print("%s + %s = %s"%(x, y, add_two_ints_client(x, y)))
16. Examining the Simple Service and Client
- Terminal 1
roscore
- Terminal 2
rosrun beginner_tutorials add_two_ints_server.py
会得到反馈:
Ready to add two ints.
- Terminal 3
这里后面跟的两个数就可以直接把参数输进去。
rosrun beginner_tutorials add_two_ints_client.p 4 5
反馈:
Requesting 4+5
4 + 5 = 9
如果少一个参数:
rosrun beginner_tutorials add_two_ints_client.p 4
反馈:
... scripts/add_two_ints_client.py [x y]
17. Recording and playing back data
目的:
记录ROS中的data作为一个.bag文件,然后重新播放这些数据。
我们也可以看另外的一个教程。
17.1 创建一个.bag文件 [记录数据]
核心就是
rosbag record -a : 记录所有信息
rosbag record -O subset [topic 1 name] [topic 2 name]:只记录若干个topic。
Terminal 1:
roscore
Terminal 2:
rosrun turtlesim turtlesim_node
Terminal 3:
rosrun turtlesim turtle_teleop_key
接着我们可以看看当前有哪些正在运行的topic,以及每个topic有几个subscriber和publisher
rostopic list -v
结果:
Published topics:
 * /turtle1/color_sensor [turtlesim/Color] 1 publisher
 * /turtle1/cmd_vel [geometry_msgs/Twist] 1 publisher
 * /rosout [rosgraph_msgs/Log] 2 publishers
 * /rosout_agg [rosgraph_msgs/Log] 1 publisher
 * /turtle1/pose [turtlesim/Pose] 1 publisher

Subscribed topics:
 * /turtle1/cmd_vel [geometry_msgs/Twist] 1 subscriber
 * /rosout [rosgraph_msgs/Log] 1 subscriber
我们只可能记录published topics,因为我们只能记录published messages。
其中/turtle1/cmd_vel这个是我们键盘发布信息到的topic,而/turtle1/color_sensor和/turtle1/pose是turtlesim的输出。
为了记录数据,我们需要创建一个文件夹,进入其中再开始记录:
mkdir ~/bagfiles
cd ~/bagfiles
rosbag record -a
-a的意思是所有发布的话题都应该被写进bag文件中。
之后我们移动小乌龟若干秒,然后关掉rosbag。之后,我们应该会在bagfiles中找到一个记录的文件。
文件的名字为开始记录的时刻.bag
17.2 检查与播放bag文件
rosbag info <bafile>:返回bag文件信息,如:
path:        2014-12-10-20-08-34.bag
version:     2.0
duration:    1:38s (98s)
start:       Dec 10 2014 20:08:35.83 (1418270915.83)
end:         Dec 10 2014 20:10:14.38 (1418271014.38)
size:        865.0 KB
messages:    12471
compression: none [1/1 chunks]
types:       geometry_msgs/Twist [9f195f881246fdfa2798d1d3eebca84a]
             rosgraph_msgs/Log   [acffd30cd6b6de30f120938c17c593fb]
             turtlesim/Color     [353891e354491c51aabe32df673fb446]
             turtlesim/Pose      [863b248d5016ca62ea2e895ae5265cf9]
topics:      /rosout                    4 msgs    : rosgraph_msgs/Log   (2 connections)
             /turtle1/cmd_vel         169 msgs    : geometry_msgs/Twist
             /turtle1/color_sensor   6149 msgs    : turtlesim/Color
             /turtle1/pose           6149 msgs    : turtlesim/Pose
rosbag play <bagfile>: 可以用空格暂停,s一步步播放。
rosbag play -r 2 <bagfile>:所有信息的发布时刻减半(速度加快2倍)
17.3 Recording a subset of the data
rosbag record -O subset /turtle1/cmd_vel /turtle1/pose
17.4 The limitations of rosbag record/play
即不能完美呈现完全相同的操作。
在上一节中,您可能已经注意到乌龟的路径可能未完全映射到原始键盘输入-粗略形状应该是相同的,但是乌龟可能未完全跟踪相同的路径。 原因是,turtlesim跟踪的路径对系统时序中的细微变化非常敏感,并且rosbag在rosbag记录和处理消息的时间方面精确复制正在运行的系统行为的能力受到限制。 记录,以及使用rosbag播放时生成和处理消息的时间。 对于turtlesim之类的节点,在处理命令消息时,时间上的微小变化会微妙地改变行为,因此用户不应期望模仿行为完美。
18. Reading messages from a bag file
学习两种从bag文件的指定topic里面得到msgs,包括使用ros_readbagfile script。
首先,让我们下载一个demo.bag(696.2 MB),下载在Terminal的当前目录下:
wget https://open-source-webviz-ui.s3.amazonaws.com/demo.bag
18.1 播放消息并在多个终端中查看输出
核心是
roscore
rostopic echo [/topic1] | tee topic1.yaml
rostopic echo [/topic2] | tee topic2.yaml
之后我们只发布给我们想看的node 一些msgs。
time rosbag play --immediate demo.bag --topics [/topic1] [/topic2] [/topic3] [/topicN]
- 让我们首先观察一下这个bag文件,这里的time无非是让结果多出了最后三行:
(1) real:从进程 ls 开始执行到完成所耗费的 CPU 总时间。该时间包括 ls 进程执行时实际使用的 CPU 时间,ls 进程耗费在阻塞上的时间(如等待完成 I/O 操作)和其他进程所耗费的时间(Linux 是多进程系统,ls 在执行过程中,可能会有别的进程抢占 CPU)。
(2) user:进程 ls 执行用户态代码所耗费的 CPU 时间。该时间仅指 ls 进程执行时实际使用的 CPU 时间,而不包括其他进程所使用的时间和本进程阻塞的时间。
(3) sys:进程 ls 在内核态运行所耗费的 CPU 时间,即执行内核系统调用所耗费的 CPU 时间。
time rosbag info demo.bag
# OR (if you know part of the topic names of interest before-hand):
time rosbag info mybag.bag | grep -E "(topic1|topic2|topic3)"
- 我们下面观察只有30条msgs的topic : /obs1/gps/fix 和 40条topoic的 /diagnostics_agg。
Terminal 1:
roscore
Terminal 2: 订阅/obs1/gps/fix
rostopic echo /obs1/gps/fix | tee topic1.yaml
Terminal 3: 订阅/diagnostics_agg
rostopic echo /diagnostics_agg | tee topic2.yaml
因为此时还没有发布数据(播放bag文件),所以会有一个Warning。
18.2 ros_readbagfile script
ros_readbagfile [mybagfile.bag] [topic1] [topic2] [topic3] […]
- 关掉所有的terminal(特别是roscore那个),下载并安装
ros_readbagfile.py:
# Download the file
wget https://raw.githubusercontent.com/ElectricRCAircraftGuy/eRCaGuy_dotfiles/master/useful_scripts/ros_readbagfile.py
# Make it executable
chmod +x ros_readbagfile.py
# Ensure you have the ~/bin directory for personal binaries
mkdir -p ~/bin
# Move this executable script into that directory as `ros_readbagfile`, so that it will
# be available as that command
mv ros_readbagfile.py ~/bin/ros_readbagfile
# Re-source your ~/.bashrc file to ensure ~/bin is in your PATH, so you can use this
# new `ros_readbagfile` command you just installed
. ~/.bashrc
- 确定我们要观察的话题
time ros_readbagfile demo.bag /obs1/gps/fix /diagnostics_agg | tee topics.yaml
Rq:
注意,并不是所有的输出结果都符合YAML,例如分隔符“====”,我们可以通过修改ros_readbagfile.py将其去掉。
18.3 为什么rostopic echo -b 不好?
因为rostopic每次只能得到一个topic,而ros_readbagfile可以一口气处理多个文件,因此速度更快。
19. Getting started with roswtf
首先确保roscore没有在运行。
roswtf用于检测系统是否存在问题。
19.1 检查安装
roscd rosmaster
roswtf
安装正常的输出:
Package: rosmaster
================================================================================
Static checks summary:

No errors or warnings
================================================================================

ROS Master does not appear to be running.
Online graph checks will not be run.
ROS_MASTER_URI is [http://localhost:11311]
- Package: 说明了我们是在rosmaster这个package里面调用的roswtf
- Static checks summary
- ROS Master does not appear to be running.: the roscore isn’t running. roswtf didn’t do any online checks.
19.2 Trying it online
- Terminal 1
roscore
- Terminal 2
roscd
roswtf
结果:
No package or stack in context
======================================================
Static checks summary:

No errors or warnings
======================================================
Beginning tests of your ROS graph. These may take awhile...
analyzing graph...
... done analyzing graph
running graph rules...
... done running graph rules

Online checks summary:

Found 1 warning(s).
Warnings are things that may be just fine, but are sometimes at fault

WARNING The following node subscriptions are unconnected:
 * /rosout:
   * /rosout
- 鉴于
roscd并没有把我们带到一个pkg中,所以显示No package or stack in context - Warning说rosout这个node订阅了一个没人发布消息的topic.
19.3 Errors
- 停止roscore,把ROS_PACKAGE_PATH临时设置为一个错误的值。然后让roswtf发现错误
roscd
ROS_PACKAGE_PATH=bad:$ROS_PACKAGE_PATH roswtf
输出
Stack: ros
======================================================
Static checks summary:

Found 1 error(s).

ERROR Not all paths in ROS_PACKAGE_PATH [bad] point to an existing directory:
 * bad

======================================================

Cannot communicate with master, ignoring graph checks
roswtf指出了ROS_PACKAGE_PATH的问题。
20. Navigating the ROS wiki
ROS wiki
Navigating the ROS wiki
21. Where Next?
21.1 Launching a Simulator
PR2 simulator
Turtlebot simulator
Search for other robots
21.2 RViz
用于查看内部运行的数据。
RViz
21.3 Understanding TF
Transforms between different coordinate frames used by your robot and keeps track of these transforms over time.
TF
学完TF之后可以学习URDF。
21.4 Going Deeper
actionlib:actionlib软件包提供了用于与可抢占任务进行接口的标准化接口。
navigation:map-building and path planning
MoveIt: 用于控制机械臂。
最后:
终于,我们的ROS从入门到放弃的第一步入门就完成了!非常感谢你能看到这里!
如果不出意外的话,接下来我们会看看
Turtlebot simulator
RViz
navigation:map-building and path planning
那就让我们在下一次的ROS从入门到放弃的文章中
再见
附录:Terminal的命令合集:
cat
- cat主要有三大功能:
- 一次显示整个文件。
$ cat filename,像txt,md这种问题不大,否则会乱码 - 从键盘创建一个文件。
$ cat > filename
只能创建新文件,不能编辑已有文件. - 将几个文件合并为一个文件:
$cat file1 file2 > file
- 例子:
把 textfile1 的档案内容加上行号后输入 textfile2 这个档案里cat -n textfile1 > textfile2
- 一次显示整个文件。
cp:
cp A.txt B.txt:把A的内容复制到B中去
rm:
rm A.txt
ls:
- ls foldername: 查询foldername下的文件
echo:
echo "int64 num" > msg/Num.msg: 在msg文件夹中创建Num.msg并且往里面添加内容’int64 num’。
tar –xf [Compressed-filename]: 解压.xz的文件夹。- 环境管理:
printenv | grep ROS,若ROS_ROOT和ROS_PACKAGE_PATH还没有设置,则需要进行source操作。解决方案:source /opt/ros/<distro>/setup.bash,distro为自己安装的版本,如kinectic。 - 将一个文件变成可执行的(executable):
chmod +x talker.py


 1204
1204


 被折叠的 条评论
为什么被折叠?
被折叠的 条评论
为什么被折叠?
 到【灌水乐园】发言


