


. 线性布局
线性布局是Android开发中常见的一种布局方式,它是按照水平或者垂直方向来布局,通过属性orientation 来设置线性布局的方向的。它的属性值有垂直(vertical)和水平(horizontal)。
- 垂直布局
LinearLayout使用线性布局;TextView:文本控件;layout_width="match_parent"设置宽度占满整行;layout_height="wrap_content"设置高度自适应;orientation="vertical"设置布局方式为垂直布局;text="测试1":设置文本内容; textColor="@color/black":设置文本颜色;textSize="26sp":设置文本大小 sp为单位。
<LinearLayout
    android:layout_width="match_parent"
    android:layout_height="wrap_content"
    android:orientation="vertical">
    <TextView
        android:layout_width="match_parent"
        android:layout_height="wrap_content"
        android:text="测试1"
        android:textColor="@color/black"
        android:textSize="26sp"/>
    <TextView
        android:layout_width="match_parent"
        android:layout_height="wrap_content"
        android:text="测试2"
        android:textColor="@color/black"
        android:textSize="26sp"/>
</LinearLayout>
- 水平布局
与上面的布局类似,将垂直布局改成的水平布局。orientation="horizontal"设置水平布局;layout_marginLeft="10dp"设置所在控件的左边距 dp为单位。
<LinearLayout
    android:layout_width="match_parent"
    android:layout_height="wrap_content"
    android:orientation="horizontal">
    <TextView
        android:layout_width="wrap_content"
        android:layout_height="wrap_content"
        android:text="测试1"
        android:textColor="@color/black"
        android:textSize="26sp"/>
    <TextView
        android:layout_width="wrap_content"
        android:layout_height="wrap_content"
        android:text="测试2"
        android:layout_marginLeft="10dp"
        android:textColor="@color/black"
        android:textSize="26sp"/>
</LinearLayout>
-
相对布局
线性布局用起来很方便也很简单,但是如果我们完成如下的布局该怎么办呢?使用线性布局中的水平布局,然后在使用右外边距?这样好像也可以,但是有一个比较麻烦,那就是边距该是多少?需要慢慢调。但是我们用相对布局的话就不存在这个问题了。

RelativeLayout:使用相对布局;RadioGroup:单选按钮组控件;RadioButton:单选按钮控件;layout_marginTop="20dp":设置外上边距;layout_alignParentRight="true":设置是否相对于父容器的右边。
<RelativeLayout
    android:layout_width="match_parent"
    android:layout_height="wrap_content"
    android:layout_marginTop="20dp">
    <TextView
        android:layout_width="wrap_content"
        android:layout_height="wrap_content"
        android:text="性别"
        android:textColor="@color/black"
        android:textSize="26sp"/>
    <RadioGroup
        android:layout_width="wrap_content"
        android:layout_height="wrap_content"
        android:orientation="horizontal"
        android:layout_alignParentRight="true">
        <RadioButton
            android:layout_width="wrap_content"
            android:layout_height="wrap_content"
            android:textSize="26sp"
            android:text="男"/>
        <RadioButton
            android:layout_width="wrap_content"
            android:layout_height="wrap_content"
            android:textSize="26sp"
            android:text="女"/>
    </RadioGroup>
</RelativeLayout>
相对布局的其他属性:
相对于父容器的属性
layout_centerInParent="true":是否在父容器的中间;layout_alignParentTop="true":是否在父容器的顶部;layout_alignParentBottom="true":是否在父容器的底部;layout_alignParentLeft="true":是否在父容器的左边;layout_alignParentRight="true":是否在父容器的右边;layout_centerHorizontal="true":是否水平居中;layout_centerVertical="true:是否垂直居中;
相对于指定元素的属性: @id/iv_relative_img:指定元素的id
layout_below="@id/iv_relative_img":在指定元素的下方,默认为指定元素的下方的最左边;
layout_above="@id/iv_relative_img":在指定元素的上方,默认为指定元素的上方的最左边;
layout_toLeftOf="@id/iv_relative_img":在指定元素的左边,默认为指定元素的左边的最上方;
layout_toRightOf="@id/iv_relative_img":在指定元素的左边,默认为指定元素的左边的最上方;
相对布局和线性布局一样,都是Android开发中常见的一种布局方式。在平时开发中也不会单单只用一种布局方式进行开发,一般都是两者嵌套开发的。
-
约束布局
约束布局(constraintlayout)是Google现在推荐的布局方式,是一个ViewGroup,可以在API9以上的系统上使用它。也是Android studio2.3起默认的一种布局方式。它出现的目的是为了减少布局嵌套过多的问题。允许以灵活的方式定位和调整小部件的大小。它使用起来相对于线性布局和相对布局更困难,但是不可否认的是它的功能也很强大。
约束布局文档:ConstraintLayout
使用约束布局不像线性布局和相对布局一样,它必须指定一些约束。
layout_constraintTop_toTopOf="parent / @id/xxx":当前控件的上边置于父容器/指定控件的上边;layout_constraintBottom_toBottomOf="parent / @id/xxx":当前控件的下边置于父容器/指定控件的下边;layout_constraintLeft_toLeftOf="parent / @id/xxx":当前控件的左边置于父容器/指定控件的左边;layout_constraintRight_toRightOf="parent / @id/xxx":当前控件的右边置于父容器/指定控件的右边;这四个属性配合起来一般都可以让该控件和指定控件处于同一行/列。
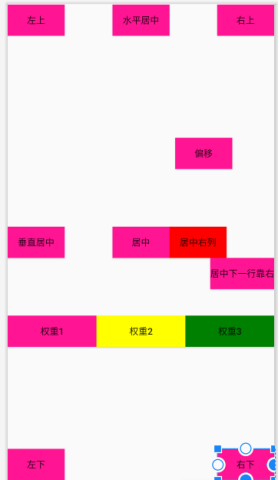
   <Button
        android:layout_width="wrap_content"
        android:layout_height="wrap_content"
        android:background="@color/deeppink"
        android:text="左上"
        app:layout_constraintTop_toTopOf="parent"
        app:layout_constraintLeft_toLeftOf="parent"/>
    <Button
        android:layout_width="wrap_content"
        android:layout_height="wrap_content"
        android:background="@color/deeppink"
        android:text="左下"
        app:layout_constraintBottom_toBottomOf="parent"
        app:layout_constraintLeft_toLeftOf="parent"/>
    <Button
        android:layout_width="wrap_content"
        android:layout_height="wrap_content"
        android:background="@color/deeppink"
        android:text="右上"
        app:layout_constraintTop_toTopOf="parent"
        app:layout_constraintRight_toRightOf="parent"/>
    <Button
        android:layout_width="wrap_content"
        android:layout_height="wrap_content"
        android:background="@color/deeppink"
        android:text="右下"
        app:layout_constraintBottom_toBottomOf="parent"
        app:layout_constraintRight_toRightOf="parent"/>
居中:当控件上边与下边同时与父容器的上边与下边对齐时,就达到了垂直居中的效果;当控件右边与左边同时与父容器的右边与左边对齐时,就达到了水平居中的效果;当控件的四边都与控件的四边对齐时,就达到了整体居中的效果。
<Button
        android:layout_width="wrap_content"
        android:layout_height="wrap_content"
        android:background="@color/deeppink"
        android:text="垂直居中"
        app:layout_constraintBottom_toBottomOf="parent"
        app:layout_constraintTop_toTopOf="parent"
        app:layout_constraintLeft_toLeftOf="parent"/>
    <Button
        android:layout_width="wrap_content"
        android:layout_height="wrap_content"
        android:background="@color/deeppink"
        android:text="水平居中"
        app:layout_constraintLeft_toLeftOf="parent"
        app:layout_constraintRight_toRightOf="parent"
        app:layout_constraintTop_toTopOf="parent"/>
    <Button
        android:id="@+id/btn_center"
        android:layout_width="wrap_content"
        android:layout_height="wrap_content"
        android:background="@color/deeppink"
        android:text="居中"
        app:layout_constraintTop_toTopOf="parent"
        app:layout_constraintLeft_toLeftOf="parent"
        app:layout_constraintBottom_toBottomOf="parent"
        app:layout_constraintRight_toRightOf="parent"/>
下一行: layout_constraintTop_toBottomOf="@id/btn_center":该控件的上边置于居中控件的下边,就达到了该控件置于居中控件下一行的效果;
下一列:app:layout_constraintLeft_toRightOf="@id/btn_center":该控件的左边置于居中控件的右边,就达到了该控件置于居中控件下一列的效果;
上一行/列与这类似,上下左右的位置调换一下就好了。
  <Button
        android:layout_width="wrap_content"
        android:layout_height="wrap_content"
        android:background="@color/deeppink"
        android:text="居中下一行靠右"
        app:layout_constraintTop_toBottomOf="@id/btn_center"
        app:layout_constraintRight_toRightOf="parent"/>
    <Button
        android:layout_width="wrap_content"
        android:layout_height="wrap_content"
        android:background="@color/red"
        android:text="居中右列"
        app:layout_constraintLeft_toRightOf="@id/btn_center"
        app:layout_constraintTop_toTopOf="parent"
        app:layout_constraintBottom_toBottomOf="parent"/>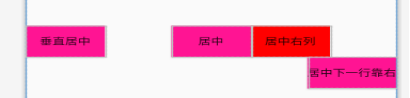
水平偏移:layout_constraintHorizontal_bias="0.8": 水平方向偏移0.8;要想使用水平偏移必须先设置水平方向的约束;
垂直偏移:layout_constraintVertical_bias="0.3":垂直方向偏移0.3 ;要想使用垂直偏移必须先设置垂直方向的约束;
  <!--偏移-->
    <Button
        android:layout_width="wrap_content"
        android:layout_height="wrap_content"
        android:background="@color/deeppink"
        android:text="偏移"
        app:layout_constraintTop_toTopOf="parent"
        app:layout_constraintLeft_toLeftOf="parent"
        app:layout_constraintBottom_toBottomOf="parent"
        app:layout_constraintRight_toRightOf="parent"
        app:layout_constraintHorizontal_bias="0.8"
app:layout_constraintVertical_bias="0.3"/>权重:layout_constraintHorizontal_weight="1":设置权重值,权重值相等则平分,不相等则根据所在权重值分。使用约束布局的权重与线性布局不一样,在约束布局中使用权重必须先声明约束链;及声明每个控件的左边是谁,右边是谁。
layout_constraintRight_toLeftOf="@id/bt_btn2":控件权重1的右边控件是权重2的左边;
   <!--权重-->
    <Button
        android:id="@+id/bt_btn1"
        android:layout_width="0dp"
        app:layout_constraintHorizontal_weight="1"
        android:layout_height="wrap_content"
        android:background="@color/deeppink"
        android:text="权重1"
        app:layout_constraintTop_toTopOf="parent"
        app:layout_constraintBottom_toBottomOf="parent"
        app:layout_constraintLeft_toLeftOf="parent"
        app:layout_constraintRight_toLeftOf="@id/bt_btn2"
        app:layout_constraintVertical_bias="0.7"/>
layout_constraintLeft_toRightOf="@id/bt_btn1":控件权重2的左边控件是权重1的右边;
layout_constraintRight_toLeftOf="@id/bt_btn2":控件权重2的右边控件是权重3的左边;
    <Button
        android:id="@+id/bt_btn2"
        android:layout_width="0dp"
        app:layout_constraintHorizontal_weight="1"
        android:layout_height="wrap_content"
        android:background="@color/yellow"
        android:text="权重2"
        app:layout_constraintTop_toTopOf="parent"
        app:layout_constraintBottom_toBottomOf="parent"
        app:layout_constraintLeft_toRightOf="@id/bt_btn1"
        app:layout_constraintRight_toLeftOf="@id/bt_btn3"
        app:layout_constraintVertical_bias="0.7"/>
layout_constraintLeft_toRightOf="@id/bt_btn3":控件权重3的左边控件是权重2的右边;
    <Button
        android:id="@+id/bt_btn3"
        android:layout_width="0dp"
        app:layout_constraintHorizontal_weight="1"
        android:layout_height="wrap_content"
        android:background="@color/green"
        android:text="权重3"
        app:layout_constraintTop_toTopOf="parent"
        app:layout_constraintBottom_toBottomOf="parent"
        app:layout_constraintRight_toRightOf="parent"
        app:layout_constraintLeft_toRightOf="@id/bt_btn2"
        app:layout_constraintVertical_bias="0.7"/>
设置好约束链和权重值之后就可以看到效果了


 1153
1153


 被折叠的 条评论
为什么被折叠?
被折叠的 条评论
为什么被折叠?
 到【灌水乐园】发言


