


一、spring体验
1、导包
<dependencies>
        <!-- https://mvnrepository.com/artifact/org.springframework/spring-webmvc -->
        <dependency>
            <groupId>org.springframework</groupId>
            <artifactId>spring-webmvc</artifactId>
            <version>5.3.7</version>
        </dependency>
        <dependency>
            <groupId>junit</groupId>
            <artifactId>junit</artifactId>
            <version>4.12</version>
        </dependency>
    </dependencies>
2、实体类
public class hello {
    private String str;

    public String getStr() {
        return str;
    }

    public void setStr(String str) {
        this.str = str;
    }

    @Override
    public String toString() {
        return "hello{" +
                "str='" + str + '\'' +
                '}';
    }
}
3、xml中注册bean
<?xml version="1.0" encoding="UTF-8"?>
<beans xmlns="http://www.springframework.org/schema/beans"
       xmlns:xsi="http://www.w3.org/2001/XMLSchema-instance"
       xsi:schemaLocation="http://www.springframework.org/schema/beans
       https://www.springframework.org/schema/beans/spring-beans.xsd ">
    <!--使用Spring来创建对象,在Spring这些都成为bean-->
    <bean id="hello" class="com.lc.demo01.hello">
        <property name="str" value="Spring"></property>
    </bean>
</beans>
4、测试
public class MyTest {
    public static void main(String[] args) {
        //获取Spring的上下文对象!
        ApplicationContext context = new ClassPathXmlApplicationContext("beans.xml");
        //我们的对象现在都在Spring中管理,要使用,直接从容器中去就行。
        hello  h = (hello)context.getBean("hello");
        System.out.println(h.toString());
    }
}
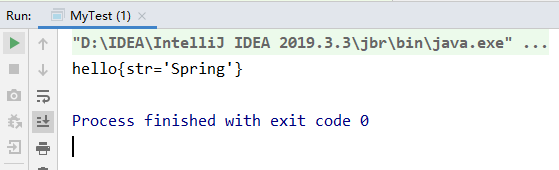
5、结果
6、maven-compiler-plugin 版本错误解决方法【pom.xml】
<build>
    <plugins>
        <plugin>
            <groupId>org.apache.maven.plugins</groupId>
            <artifactId>maven-compiler-plugin</artifactId>
            <version>3.8.1</version>
            <configuration>
                <!--根据个人需要自己修改-->
                <source>9</source>
                <target>9</target>
            </configuration>
        </plugin>
    </plugins>
    </build>
二、spring配置说明
1、别名
- 可以通过别名来获取这个bean
<bean id="user" class="com.lc.demo01.User">
        <property name="name" value="lincong"/>
</bean>
<!--别名-->
<alias name="user" alias="user0"/>
2、Bean的配置
- id:唯一标识符,相当于对象名
- class:bean对象所对应的:包名+类型
- name:也是别名,可以取多个(通过逗号,分号,空格,隔开即可)
<bean id="userT3" class="com.lc.dao.UserT" name="T1 T2,T3;T4">
</bean>
3、import
- 一般用于团队开发,可将多个配置文件合并为一个。
<import resource="beans1.xml"/>
相关资源: 学习狂神说 学习地址(以上仅为笔记)


 1230
1230


 被折叠的 条评论
为什么被折叠?
被折叠的 条评论
为什么被折叠?
 到【灌水乐园】发言


