利用 jQuery 操作页面元素的方法,实现电商网站购物车页面商品数量的增加和减少操作,要求单项价格和总价随着数量的改变而改变

查看本章节

查看作业目录


需求说明:

  • 利用 jQuery 操作页面元素的方法,实现电商网站购物车页面商品数量的增加和减少操作,要求单项价格和总价随着数量的改变而改变
  • 当用户单击“+”按钮时,文本框中的商品数量增加 1,单项价格和总价相应地增加
  • 点击“-”按钮,文本框中的数量减 1(不能小于 1),单项价格和总价相应地减少
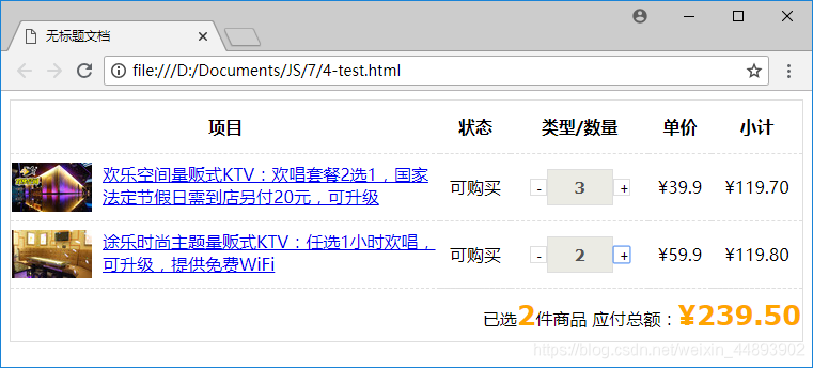
实现思路:

  1. 声明 calPrice() 函数,根据商品的单价和数量计算单项价格,当点击改变数量的按钮时,调用 calPrice() 函数,及时刷新单项价格
  2. 声明 calTotalPrice() 函数,计算所有商品的总价格。当点击改变数量的按钮时,调用 calTotalPrice() 函数,及时刷新所有商品的应付总额
  3. 在页面加载完毕事件中,给“+”按钮的点击事件绑定方法,实现在原基础上数量增加 1 的功能,并调用calPrice() 和 calTotalPrice() 方法实现价格和数量的联动
  4. 在页面加载完毕事件中,给“-”按钮的点击事件绑定方法,实现在原基础上数量减少 1 的功能,并调用calPrice() 和 calTotalPrice() 方法实现价格和数量的联动

实现代码:

<!DOCTYPE html>
<html>
	<head>
		<meta charset="UTF-8">
		<title></title>
		<style type="text/css">
			table{
				border: 1px solid #dedede;
				border-collapse: collapse;
				width: 100%;
			}
			table tr{
				height: 50px;
				border-bottom: 1px dashed #DEDEDE;
			}
			table td,th{
				text-align: center;
				vertical-align: middle;
			}
			table td.item{
				width: 400px;
				height: 60px;
				text-align: left;
			}
			table td.item img{
				margin-right: 10px;
				vertical-align: middle;
			}
			table tr td.cal{
				text-align: right;
			}
			table tr td.cal span{
				font: bold 25px geneva,verdana,sans-serif;
				color: orange;
			}
			table .btn{
				border: 1px solid #dedede;
				background-color: white;
				width: 16px;
				height: 16px;
			}
			table .txt{
				width: 60px;
				height: 30px;
				border: 1px solid #dedede;
				text-align: center;
				font: bold 15px/30px geneva,verdana,sans-serif;
			}
			table .txt:hover{
				border: 1px solid red;
			}
		</style>
		<script src="js/jquery-3.3.1.js" type="text/javascript" charset="utf-8"></script>
		<script type="text/javascript">
			$(function(){
				//在增加数量的按钮上绑定单击事件
				$(".btnAdd").click(function(){
					var txtObj = $(this).siblings("input[type='text']");//获取输入框
					console.log(txtObj);
					var number = parseInt(txtObj.val());
					txtObj.val(number+1);
					//计算单个商品价格
					calPrice($(this),number+1);
					//计算商品总价
					calTotalPrice();
				});
						
				//在减少的数量的按钮上绑定单击事件
				$(".btnMinus").click(function(){
					var txtObj = $(this).siblings("input[type='text']");//获取输入框
					var number = parseInt(txtObj.val());
					if(number>1){
						txtObj.val(number-1);
						//计算单个商品价格
						calPrice($(this),number-1);
						//计算商品总价
						calTotalPrice();
					};
				})
				//参数$btnObj代表增减数量的按钮,number是商品的数量
				function calPrice($btnObj,number){
					var $tdObj = $btnObj.parent().next(); //获取显示商品单价的td单元格
					var price = parseFloat($tdObj.text().substr(1));//从¥截取,获取单价
					var $tdTotal = $tdObj.next();//获取紧邻的同胞元素,即显示商品小计的单元格
					var total = price*number;//计算单个商品价格
					$($tdTotal).html("&yen;"+total.toFixed(2));//商品小计保留小数点后两位
				}
				//计算商品列表中所有商品的总价
				function calTotalPrice(){
					//保存总价
					var sum = 0;
					//遍历表格中title=‘price’属性的单元格
					$("td[title='price']").each(function(index,element){
						sum += parseFloat($(this).text().substr(1));//价格累加
					});
					//显示总价
					$("#spanTotal").html("&yen;"+sum.toFixed(2));
				}
			});
		</script>
	</head>
	<body>
		<table id="tabOrder">
			<th>项目</th>
			<th>状态</th>
			<th>类型、数量</th>
			<th>单价</th>
			<th>小计</th>
			<tr>
				<td class="item">
					<a href="#">
						<img src="img/img_1.jpg" align="left" width="100px"/>
						欢乐空间量版式KTV:欢唱套餐2选1,国家法定节假日需到店另付20元,可升级
					</a>
				</td>
				<td>可购买</td>
				<td>
					<input type="button" value="-" class="btnMinus"/>
					<input type="text" class="text" value="1" disabled="disabled"/>
					<input type="button"  value="+" class="btnAdd"/>
				</td>
				<td>&yen;39.9</td>
				<td title="price">&yen;39.9</td>
			</tr>
			<tr>
				<td class="item">
					<a href="#">
						<img src="img/img_2.jpg" align="left" width="100px"/>
						途乐时尚主题量版式KTV,任选1小时欢唱可升级,提供免费WiFi
					</a>
				</td>
				<td>可购买</td>
				<td>
					<input type="button" value="-" class="btnMinus"/>
					<input type="text" class="text" value="1" disabled="disabled"/>
					<input type="button"  value="+" class="btnAdd"/>
				</td>
				<td>&yen;59.9</td>
				<td title="price">&yen;59.9</td>
			</tr>
			<tr >
				<td colspan="5" class="cal">
					已选<span>2</span>件商品 应付金额:<span id="spanTotal">&yen;99.8</span>
				</td>
			</tr>
		</table>
	</body>
</html>


  • 3
    点赞
  • 19
    收藏
    觉得还不错? 一键收藏
  • 打赏
    打赏
  • 3
    评论
实现简单购物车加减商品结算,可以按照以下步骤进行: 1. 创建一个商品类,包含商品名称、商品价格商品数量等属性。 ``` public class Goods { private String name; private double price; private int quantity; public Goods(String name, double price, int quantity) { this.name = name; this.price = price; this.quantity = quantity; } // getter和setter方法 } ``` 2. 在Activity中创建一个列表,用于展示购物车中的商品。 ``` List<Goods> goodsList = new ArrayList<>(); ``` 3. 创建一个适配器,将商品列表展示到RecyclerView中。 ``` public class GoodsAdapter extends RecyclerView.Adapter<GoodsAdapter.ViewHolder> { private List<Goods> mGoodsList; static class ViewHolder extends RecyclerView.ViewHolder { TextView goodsName; TextView goodsPrice; TextView goodsQuantity; public ViewHolder(View view) { super(view); goodsName = view.findViewById(R.id.goods_name); goodsPrice = view.findViewById(R.id.goods_price); goodsQuantity = view.findViewById(R.id.goods_quantity); } } public GoodsAdapter(List<Goods> goodsList) { mGoodsList = goodsList; } @Override public ViewHolder onCreateViewHolder(ViewGroup parent, int viewType) { View view = LayoutInflater.from(parent.getContext()).inflate(R.layout.goods_item, parent, false); ViewHolder holder = new ViewHolder(view); return holder; } @Override public void onBindViewHolder(ViewHolder holder, int position) { Goods goods = mGoodsList.get(position); holder.goodsName.setText(goods.getName()); holder.goodsPrice.setText(String.valueOf(goods.getPrice())); holder.goodsQuantity.setText(String.valueOf(goods.getQuantity())); } @Override public int getItemCount() { return mGoodsList.size(); } } ``` 4. 在布局文件中添加RecyclerView和结算按钮。 ``` <androidx.recyclerview.widget.RecyclerView android:id="@+id/goods_list" android:layout_width="match_parent" android:layout_height="wrap_content" android:layout_marginTop="16dp" /> <Button android:id="@+id/checkout_button" android:layout_width="match_parent" android:layout_height="wrap_content" android:layout_margin="16dp" android:text="结算" /> ``` 5. 在Activity中初始化RecyclerView和适配器。 ``` RecyclerView recyclerView = findViewById(R.id.goods_list); LinearLayoutManager layoutManager = new LinearLayoutManager(this); recyclerView.setLayoutManager(layoutManager); GoodsAdapter adapter = new GoodsAdapter(goodsList); recyclerView.setAdapter(adapter); ``` 6. 添加添加商品和删除商品的功能。 ``` // 添加商品 goodsList.add(new Goods("商品1", 10.0, 1)); adapter.notifyDataSetChanged(); // 删除商品 goodsList.remove(position); adapter.notifyItemRemoved(position); ``` 7. 添加加减商品数量的功能。 ``` // 商品数量加1 goods.setQuantity(goods.getQuantity() + 1); adapter.notifyItemChanged(position); // 商品数量减1 if (goods.getQuantity() > 0) { goods.setQuantity(goods.getQuantity() - 1); adapter.notifyItemChanged(position); } ``` 8. 添加结算功能。 ``` double totalPrice = 0; for (Goods goods : goodsList) { totalPrice += goods.getPrice() * goods.getQuantity(); } Toast.makeText(this, "总价为:" + totalPrice, Toast.LENGTH_SHORT).show(); ``` 这样,一个简单的购物车加减商品结算就实现了。

“相关推荐”对你有帮助么?

  • 非常没帮助
  • 没帮助
  • 一般
  • 有帮助
  • 非常有帮助
提交
评论 3
添加红包

请填写红包祝福语或标题

红包个数最小为10个

红包金额最低5元

当前余额3.43前往充值 >
需支付:10.00
成就一亿技术人!
领取后你会自动成为博主和红包主的粉丝 规则
hope_wisdom
发出的红包

打赏作者

明金同学

你的鼓励将是我创作的最大动力

¥1 ¥2 ¥4 ¥6 ¥10 ¥20
扫码支付:¥1
获取中
扫码支付

您的余额不足,请更换扫码支付或充值

打赏作者

实付
使用余额支付
点击重新获取
扫码支付
钱包余额 0

抵扣说明:

1.余额是钱包充值的虚拟货币,按照1:1的比例进行支付金额的抵扣。
2.余额无法直接购买下载,可以购买VIP、付费专栏及课程。

余额充值