


网页内容访问 、 部署动态网站 、 安全Web服务案例
1 案例1:配置网页内容访问
1.1 问题
本例要求在 Web 网站 http://server0.example.com 的 DocumentRoot 目录下创建一个名为 private 的子目录,要求如下:
从 http://classroom/pub/materials/private.html 下载一个文件副本到这个目录,重命名为 index.html
不要对文件 index.html 的内容作任何修改
从 server0 上,任何人都可以浏览 private 的内容,但是从其他系统不能访问这个目录的内容
1.2 方案
配置Web内容的访问控制需要添加Directory区段,主要形式可参考
<Directory “父目录路径”>
Require all denied //上层目录拒绝任何访问
<Directory “子目录1路径”>
Require all granted //子目录1允许任何访问
<Directory “子目录2路径”>
Require ip IP或网段地址 … … //子目录2允许少数客户机
1.3 步骤
实现此案例需要按照如下步骤进行。
步骤一:部署网页子目录及文档
1)建立子目录
[root@server0 ~]# mkdir /var/www/html/private
2)部署网页
[root@server0 ~]# cd /var/www/html/private
[root@server0 private]# wget http://classroom/pub/materials/private.html -O index.html
… …
2016-11-26 20:30:28 (1.90 MB/s) - ‘index.html’ saved [14/14]
[root@server0 private]# cat index.html //检查网页文件
Private Site.
步骤二:为指定的网页子目录限制访问
在httpd服务的标准配置中,根目录 / 默认拒绝任何访问,但网页目录/var/www/默认允许任何访问。因此,只需要为个别子目录增加访问控制即可。
1)调整虚拟站点server0.example.com的配置文件
[root@server0 ~]# vim /etc/httpd/conf.d/00-default.conf
… …
<Directory “/var/www/html/private”>
Require ip 127.0.0.1 ::1 172.25.0.11
2)重启系统服务httpd
[root@server0 ~]# systemctl restart httpd
步骤三:测试目录访问限制
1)从desktop0上访问http://server0.example.com/private/被拒绝
[root@desktop0 ~]# elinks -dump http://server0.example.com/private/
Forbidden
You don’t have permission to access /private/ on this server.
2)从desktop0上访问http://server0.example.com/仍然是正常的
[root@desktop0 ~]# elinks -dump http://server0.example.com/
Default Site.
3)从server0本机上访问http://server0.example.com/private/也不受限制
[root@server0 ~]# elinks -dump http://server0.example.com/private/
Private Site.
2 案例2:使用自定Web根目录
2.1 问题
本例要求调整 Web 站点 http://server0.example.com 的网页目录,要求如下:
新建目录 /webroot,作为此站点新的网页目录
从 http://classroom/pub/materials/station.html 下载一个文件副本到这个目录,重命名为 index.html
不要对文件 index.html 的内容作任何修改
确保站点 http://server0.example.com 仍然可访问
2.2 方案
在SELinux强制启用模式下,增加新的合规网页目录的方法:
1)参照标准目录,重设新目录的属性
chcon [-R] --reference=模板目录 新目录
或者
2)将新目录增加到预设的标准Web目录范围
semanage fcontext -a -t httpd_sys_content_t ‘新目录(/.*)?’
2.3 步骤
实现此案例需要按照如下步骤进行。
步骤一:部署网页目录及文档
1)建立网页目录
[root@server0 ~]# mkdir /webroot
2)部署网页文件
[root@server0 ~]# cd /webroot/
[root@server0 webroot]# wget http://classroom/pub/materials/station.html -O index.html
… …
2016-11-26 20:01:14 (826 KB/s) - ‘index.html’ saved [14/14]
[root@server0 webroot]# cat index.html //检查网页文件
Default Site.
步骤二:调整虚拟站点http://server0.example.com/的配置
1)修改配置文件
[root@server0 ~]# vim /etc/httpd/conf.d/00-default.conf
<VirtualHost *:80>
ServerName server0.example.com
DocumentRoot /webroot
… …
2)重启系统服务httpd
[root@server0 ~]# systemctl restart httpd
步骤三:确保虚拟站点http://server0.example.com/仍然可以访问
1)未调整网页目录SELinux上下文件的情况
为虚拟站点http://server0.example.com/更换了新的网页目录以后,从浏览器访问将会失败,只能看到红帽测试页。
[root@desktop0 ~]# elinks -dump http://server0.example.com/
Red Hat Enterprise Linux Test Page
This page is used to test the proper operation of the Apache HTTP server
after it has been installed. If you can read this page, it means that the
Apache HTTP server installed at this site is working properly.
… …
针对此问题,可以参考目录/var/www的属性为网页目录/webroot设置SELinux安全上下文。
[root@server0 ~]# chcon -R --reference=/var/www /webroot/
[root@server0 ~]# ls -Z /webroot/index.html //确认结果
-rw-r–r–. root root system_u:object_r:httpd_sys_content_t:s0 /webroot/index.html
2)未配置目录内容访问的情况
尽管已经调整过/webroot的SELinux安全上下文,但是从浏览器访问此虚拟站点时仍然会被拒绝,还是只能看到红帽测试页。
还需要修改对应的配置文件,添加内容访问控制:
[root@server0 ~]# vim /etc/httpd/conf.d/00-default.conf
<VirtualHost *:80>
ServerName server0.example.com
DocumentRoot /webroot
<Directory “/webroot”>
Require all granted
<Directory “/webroot/private”>
Require ip 127.0.0.1 ::1 172.25.0.11
[root@server0 ~]# systemctl restart httpd //重启httpd服务
若要保持原有private子目录,建议也拷贝过来:
[root@server0 ~]# cp -rf /var/www/html/private/ /webroot/
3)最终访问测试
从浏览器能成功访问调整后的虚拟站点http://server0.example.com/。
[root@desktop0 ~]# elinks -dump http://server0.example.com/
Default Site.
3 案例3:部署并测试WSGI站点
3.1 问题
本例要求为站点 webapp0.example.com 配置提供动态Web内容,要求如下:
此虚拟主机侦听在端口8909
测试网页从以下地址下载,不要作任何更改http://classroom/pub/materials/webinfo.wsgi
从浏览器访问 http://webapp0.example.com:8909 可接收到动态生成的 Web 页面
此站点必须能被 example.com 域内的所有系统访问
3.2 方案
为httpd增加对Python网页程序的支持,可以安装mod_wsgi模块。关于此模块的配置说明,建议参考软件包提供的readme文档。
在SELinux处于Enforcing模式时,若要开放非80、81等常规Web端口,需要调整SELinux保护策略。
3.3 步骤
实现此案例需要按照如下步骤进行。
步骤一:部署动态网页文档
1)创建网页目录
[root@server0 ~]# mkdir /var/www/webapp0
2)部署webinfo.wsgi网页程序
[root@server0 ~]# cd /var/www/webapp0
[root@server0 webapp0]# wget http://classroom/pub/materials/webinfo.wsgi
… …
2016-11-27 01:52:26 (16.0 MB/s) - ‘webinfo.wsgi’ saved [397/397]
[root@server0 webapp0]# cat webinfo.wsgi //检查下载文件
#!/usr/bin/env python
import time
… …
步骤二:配置新的虚拟主机http://webapp0.example.com:8909/
1)安装mod_wsgi模块软件包
[root@server0 ~]# yum -y install mod_wsgi
… …
2)为新虚拟主机建立配置
[root@server0 ~]# vim /etc/httpd/conf.d/02-webapp0.conf
Listen 8909
<VirtualHost *:8909>
DocumentRoot /var/www/webapp0
ServerName webapp0.example.com
WSGIScriptAlias / /var/www/webapp0/webinfo.wsgi
3)调整SELinux策略,允许Web服务使用8909端口
列出当前许可的Web端口:
[root@server0 ~]# semanage port -l | grep ^http_port
http_port_t tcp 80, 81, 443, 488, 8008, 8009, 8443, 9000
添加新的Web端口:
[root@server0 ~]# semanage port -a -t http_port_t -p tcp 8909
[root@server0 ~]#
确认配置结果:
[root@server0 ~]# semanage port -l | grep ^http_port
http_port_t tcp 8909, 80, 81, 443, 488, 8008, 8009, 8443, 9000
4)重启系统服务httpd
[root@server0 ~]# systemctl restart httpd
[root@server0 ~]# netstat -antpu | grep httpd //确认已监听8909端口
tcp6 0 0 :::443 ::😗 LISTEN 2477/httpd
tcp6 0 0 :::8909 ::😗 LISTEN 2477/httpd
tcp6 0 0 :::80 ::😗 LISTEN 2477/httpd
步骤三:测试动态网页效果
使用elinks或firefox访问此动态站点http://webapp0.example.com:8909/。
多刷新访问几次,每次看到的是动态网页内容,内容并不固定。
[root@desktop0 ~]# elinks -dump http://webapp0.example.com:8909/
UNIX EPOCH time is now: 1480184916.52 //第1次访问
[root@desktop0 ~]# elinks -dump http://webapp0.example.com:8909/
UNIX EPOCH time is now: 1480184919.21 //第2次访问
[root@desktop0 ~]# elinks -dump http://webapp0.example.com:8909/
UNIX EPOCH time is now: 1480184951.99 //第3次访问
4 案例4:配置安全Web服务
4.1 问题
本例要求为站点 http://server0.example.com 配置TLS加密
一个已签名证书从以下地址获取 http://classroom/pub/tls/certs/server0.crt
此证书的密钥从以下地址获取 http://classroom/pub/tls/private/server0.key
此证书的签名授权信息从以下地址获取http://classroom/pub/example-ca.crt
4.2 方案
安全Web传输协议及端口:TCP 443
访问HTTP站点(未加密):http://server0.example.com/
访问HTTPS站点(加密):https://server0.example.com/
为httpd服务端实现TLS加密的条件:1)启用一个 mod_ssl 模块;2)提供加密的素材:网站服务器的数字证书、网站服务器的私钥、根证书(证书颁发机构的数字证书)
TLS证书部署位置:/etc/pki/tls/certs/*.crt
TLS私钥部署位置:/etc/pki/tls/private/*.key
4.3 步骤
实现此案例需要按照如下步骤进行。
步骤一:配置HTTPS网站服务器
1)安装mod_ssl模块软件包
[root@server0 ~]# yum -y install mod_ssl
… …
2)部署密钥、证书等素材
[root@server0 ~]# cd /etc/pki/tls/certs/
[root@server0 certs]# wget http://classroom/pub/example-ca.crt
… …
2016-11-27 01:04:51 (116 MB/s) - ‘example-ca.crt’ saved [1220/1220]
[root@server0 certs]# wget http://classroom/pub/tls/certs/server0.crt
… …
2016-11-27 01:04:06 (62.1 MB/s) - ‘server0.crt’ saved [3505/3505]
[root@server0 certs]# ls *.crt //确认部署结果
ca-bundle.crt example-ca.crt server0.crt
ca-bundle.trust.crt localhost.crt
[root@server0 certs]# cd /etc/pki/tls/private/
[root@server0 private]# wget http://classroom/pub/tls/private/server0.key
… …
2016-11-27 01:07:09 (39.0 MB/s) - ‘server0.key’ saved [916/916]
3)为SSL加密网站配置虚拟主机
[root@server0 ~]# vim /etc/httpd/conf.d/ssl.conf
Listen 443 https
… …
DocumentRoot “/var/www/html” //网页目录
ServerName server0.example.com:443 //站点的域名
… …
SSLCertificateFile /etc/pki/tls/certs/server0.crt //网站证书
… …
SSLCertificateKeyFile /etc/pki/tls/private/server0.key //网站私钥
… …
SSLCACertificateFile /etc/pki/tls/certs/example-ca.crt //根证书
4)重启系统服务httpd
[root@server0 ~]# systemctl restart httpd
[root@server0 ~]# netstat -antpu | grep httpd //确认已监听80、443端口
tcp6 0 0 :::443 ::😗 LISTEN 7954/httpd
tcp6 0 0 :::80 ::😗 LISTEN 7954/httpd
步骤二:验证HTTPS加密访问
使用firefox浏览器访问加密站点https://server0.example.com/,可以看到页面提示未信任连接“Untrusted Connection”(如图-2所示)。
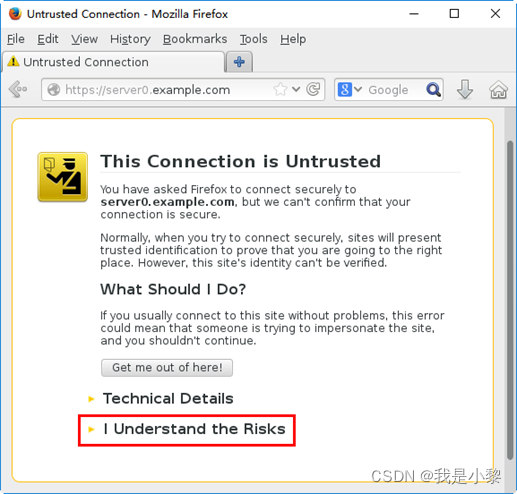
图-2
若要继续访问,需要在页面下方单击超链接“I Understand the Risks”,表示用户已理解相关风险。然后在展开的页面内点击“Add Exception”按钮(如图-3所示)。
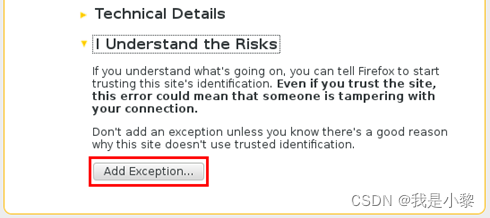
图-3
弹出添加安全例外对话窗口(如图-4所示),单击界面左下角的“Confirm Security Exception”按钮确认安全例外。
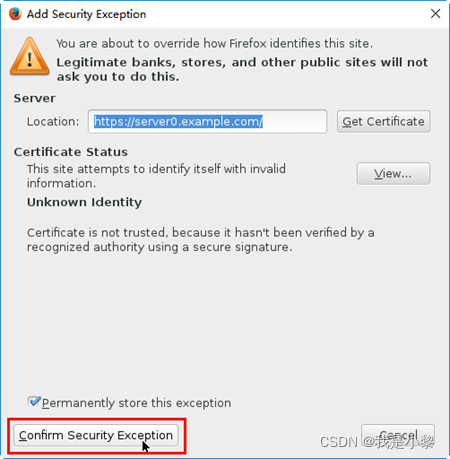
图-4
确认成功后即可看到对应的网页内容(如图-5所示)。
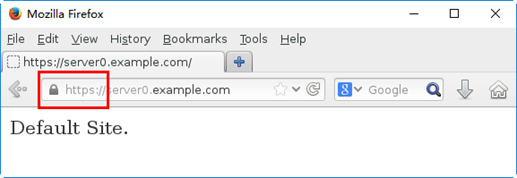
图-5
————————————————
版权声明:本文为CSDN博主「我爱DC」的原创文章,遵循CC 4.0 BY-SA版权协议,转载请附上原文出处链接及本声明。
原文链接:https://blog.csdn.net/qq_36345864/article/details/104828333


 1747
1747


 被折叠的 条评论
为什么被折叠?
被折叠的 条评论
为什么被折叠?
 到【灌水乐园】发言


