


写在前面:
思考:springboot配置文件的配置是哪里来的?
application.properties 有很多配置文件,例如修改端口,这些配置详细解释在下面这个网址都可以找到。Spring Boot Reference Guide
官方其实推荐使用yaml配置文件:application.yaml
----------------------------------------------------------------------------------------------------------------
配置文件
SpringBoot使用一个全局的配置文件 , 配置文件名称是固定的
-
application.properties
-
语法结构 :key=value
-
-
application.yml
-
语法结构 :key:空格 value
-
配置文件的作用 :修改SpringBoot自动配置的默认值,因为SpringBoot在底层都给我们自动配置好了;
比如我们可以在配置文件中修改Tomcat 默认启动的端口号!测试一下!
server.port=8081--------------------------------------------------------------------------------------
yaml概述
YAML是 "YAML Ain't a Markup Language" (YAML不是一种标记语言)的递归缩写。在开发的这种语言时,YAML 的意思其实是:"Yet Another Markup Language"(仍是一种标记语言)
这种语言以数据作为中心,而不是以标记语言为重点!
以前的配置文件,大多数都是使用xml来配置;比如一个简单的端口配置,我们来对比下yaml和xml
传统xml配置:
<server><port>8081<port></server>
yaml配置:
server:prot: 8080
yaml基础语法
说明:语法要求严格!
1、空格不能省略
2、以缩进来控制层级关系,只要是左边对齐的一列数据都是同一个层级的。
3、属性和值的大小写都是十分敏感的。
字面量:普通的值 [ 数字,布尔值,字符串 ]
字面量直接写在后面就可以 , 字符串默认不用加上双引号或者单引号;
k: v注意:
-
“ ” 双引号,不会转义字符串里面的特殊字符 , 特殊字符会作为本身想表示的意思;
比如 :name: "kuang \n shen" 输出 :kuang 换行 shen
-
'' 单引号,会转义特殊字符 , 特殊字符最终会变成和普通字符一样输出
比如 :name: ‘kuang \n shen’ 输出 :kuang \n shen
Map:
# Map格式和对象写法:它们2个写法一样k:v1:v2:
对象:在下一行来写对象的属性和值的关系,注意缩进;比如:
student:name: qinjiangage: 3
行内写法
student: {name: qinjiang,age: 3}数组( List、set )
用 - 值表示数组中的一个元素,比如:
pets:- cat- dog- pig
行内写法
pets: [cat,dog,pig]修改SpringBoot的默认端口号
配置文件中添加,端口号的参数,就可以切换端口;
server:port: 8082
注入配置文件
yaml文件更强大的地方在于,他可以给我们的实体类直接注入匹配值!
yaml注入配置文件
1、在springboot项目中的resources目录下新建一个文件 application.yml
2、编写一个实体类 Dog;
package com.kuang.springboot.pojo;
@Component  //注册bean到容器中public class Dog {
    private String name;
    private Integer age;

    //有参无参构造、get、set方法、toString()方法
}
3、思考,我们原来是如何给bean注入属性值的!@Value,给狗狗类测试一下:
@Component //注册beanpublic class Dog {@Value("阿黄")private String name;@Value("18")private Integer age;}
4、在SpringBoot的测试类下注入狗狗输出一下;
package com.yff.springboot02config;

import com.yff.springboot02config.pojo.Dog;
import org.junit.jupiter.api.Test;
import org.springframework.beans.factory.annotation.Autowired;
import org.springframework.boot.test.context.SpringBootTest;

@SpringBootTest
class Springboot02ConfigApplicationTests {

	@Autowired    //自动装配
	Dog dog;

	@Test
	void contextLoads() {
		System.out.println(dog);
	}

}
结果成功输出,@Value注入成功,这是我们原来的办法对吧。

5、我们在编写一个复杂一点的实体类:Person 类
@Component //注册bean到容器中public class Person {private String name;private Integer age;private Boolean happy;private Date birth;private Map<String,Object> maps;private List<Object> lists;private Dog dog;//有参无参构造、get、set方法、toString()方法}
6、之前我们最原始的注入值的方式是new出来赋值,后面我们学会使用@value注入,现在我们来使用yaml配置的方式进行注入,大家写的时候注意区别和优势,我们编写一个yaml配置!
person:name: qinjiangage: 3happy: falsebirth: 2000/01/01maps: {k1: v1,k2: v2} //map是键值对,其实就是一个对象,与对象的yaml写法相同lists:- code- girl- musicdog:name: 旺财age: 1
7、我们刚才已经把person这个对象的所有值都写好了,我们现在来注入到我们的类中!(注意springboot自动扫描启动类的层级及其下层级的包)
/*@ConfigurationProperties作用:将配置文件中配置的每一个属性的值,映射到这个组件中;告诉SpringBoot将本类中的所有属性和配置文件中相关的配置进行绑定参数 prefix = “person” : 将配置文件中的person下面的所有属性一一对应*/@Component //注册bean@ConfigurationProperties(prefix = "person")public class Person {private String name;private Integer age;private Boolean happy;private Date birth;private Map<String,Object> maps;private List<Object> lists; private Dog dog; //有参无参构造、get、set方法、toString()方法 }
8、如果我们没有配置会报红,IDEA 提示,springboot配置注解处理器没有找到,让我们看文档,我们可以点击进入查看文档,找到一个依赖!其实这个可配可不配,并不影响程序执行。


<!-- 导入配置文件处理器,配置文件进行绑定就会有提示,需要重启 --><dependency><groupId>org.springframework.boot</groupId><artifactId>spring-boot-configuration-processor</artifactId><optional>true</optional></dependency>
9、确认以上配置都OK之后,我们去测试类中测试一下:
package com.yff.springboot02config;

import com.yff.springboot02config.pojo.Dog;
import com.yff.springboot02config.pojo.Person;
import org.junit.jupiter.api.Test;
import org.springframework.beans.factory.annotation.Autowired;
import org.springframework.boot.test.context.SpringBootTest;

@SpringBootTest
class Springboot02ConfigApplicationTests {

	@Autowired
	Dog dog;
	@Autowired
	Person person;

	@Test
	void contextLoads() {
		System.out.println(dog);
		System.out.println(person);
	}

}
结果:所有值全部注入成功!

yaml配置注入到实体类完全OK!
课堂测试:
1、将配置文件的key 值 和 属性的值设置为不一样,则结果输出为null,注入失败
2、在配置一个person2,然后将 @ConfigurationProperties(prefix = "person2") 指向我们的person2;
总结:我们这里使用yaml文件注入值,在我们的配置类中很常用,比如mybatis!!!
------------------------------------------------------------------------------------------------------------------
重点:yaml可以使用 ${}
1、yaml配置文件占位符,配置文件还可以编写占位符生成随机数
2、yml定义属性,下文中可以使用${} 引用,所以我们在springcloudconfig中最后一节学到的通过@value("${spring.application.name}")注入属性值时,这里的${}就是用到了这个。
person:name: qinjiang${random.uuid} # 随机uuidage: ${random.int} # 随机inthappy: falsebirth: 2000/01/01maps: {k1: v1,k2: v2}lists:- code- girl- musicdog:name: ${person.hello:other}_旺财age: 1
运行结果:
Person{name='yffd9a530f4-0a79-4da9-b928-252fbe7da592', age=1981379893, happy=false, birth=Mon Jul 05 00:00:00 CST 2021, maps={k1=v1, k2=v2}, lists=[code, music, gril], dog=Dog{name='other_wangcai', age=2}}Properties方式加载指定的配置文件
第一步设置编码格式:
 @PropertySource :加载指定的配置文件;
@configurationProperties:默认从全局配置文件中获取值;
1、我们去在resources目录下新建一个application.properties文件
name=kuangshen2、然后在我们的代码中指定加载application.properties文件
package com.yff.springboot02config.pojo;

import org.springframework.beans.factory.annotation.Value;
import org.springframework.boot.context.properties.ConfigurationProperties;
import org.springframework.context.annotation.PropertySource;
import org.springframework.stereotype.Component;

import java.util.Date;
import java.util.List;
import java.util.Map;
@Component
//javaconfig绑定我们配置文件的值,可以通过以下2种方式!!!

//yaml的注入方式
//@ConfigurationProperties(prefix = "person")

//properties的注入方式
//指定加载配置文件,配置文件名称可以自定义
@PropertySource(value = "classpath:application.properties")
public class Person {
    //通过${}取出配置文件的值
    @Value("${name}")
    private String name;
    private Integer age;
    private boolean happy;
    private Date birth;
    private Map<String,Object> maps;
    private List<Object> lists;
    private Dog dog;

    public Person() {
    }

    public Person(String name, Integer age, boolean happy, Date birth, Map<String, Object> maps, List<Object> lists, Dog dog) {
        this.name = name;
        this.age = age;
        this.happy = happy;
        this.birth = birth;
        this.maps = maps;
        this.lists = lists;
        this.dog = dog;
    }

    public String getName() {
        return name;
    }

    public void setName(String name) {
        this.name = name;
    }

    public Integer getAge() {
        return age;
    }

    public void setAge(Integer age) {
        this.age = age;
    }

    public boolean isHappy() {
        return happy;
    }

    public void setHappy(boolean happy) {
        this.happy = happy;
    }

    public Date getBirth() {
        return birth;
    }

    public void setBirth(Date birth) {
        this.birth = birth;
    }

    public Map<String, Object> getMaps() {
        return maps;
    }

    public void setMaps(Map<String, Object> maps) {
        this.maps = maps;
    }

    public List<Object> getLists() {
        return lists;
    }

    public void setLists(List<Object> lists) {
        this.lists = lists;
    }

    public Dog getDog() {
        return dog;
    }

    public void setDog(Dog dog) {
        this.dog = dog;
    }

    @Override
    public String toString() {
        return "Person{" +
                "name='" + name + '\'' +
                ", age=" + age +
                ", happy=" + happy +
                ", birth=" + birth +
                ", maps=" + maps +
                ", lists=" + lists +
                ", dog=" + dog +
                '}';
    }
}
3、再次输出测试一下:指定配置文件绑定成功!

回顾properties配置
我们上面采用的yaml方法都是最简单的方式,开发中最常用的;也是springboot所推荐的!那我们来唠唠其他的实现方式,道理都是相同的;写还是那样写;配置文件除了yml还有我们之前常用的properties , 我们没有讲,我们来唠唠!
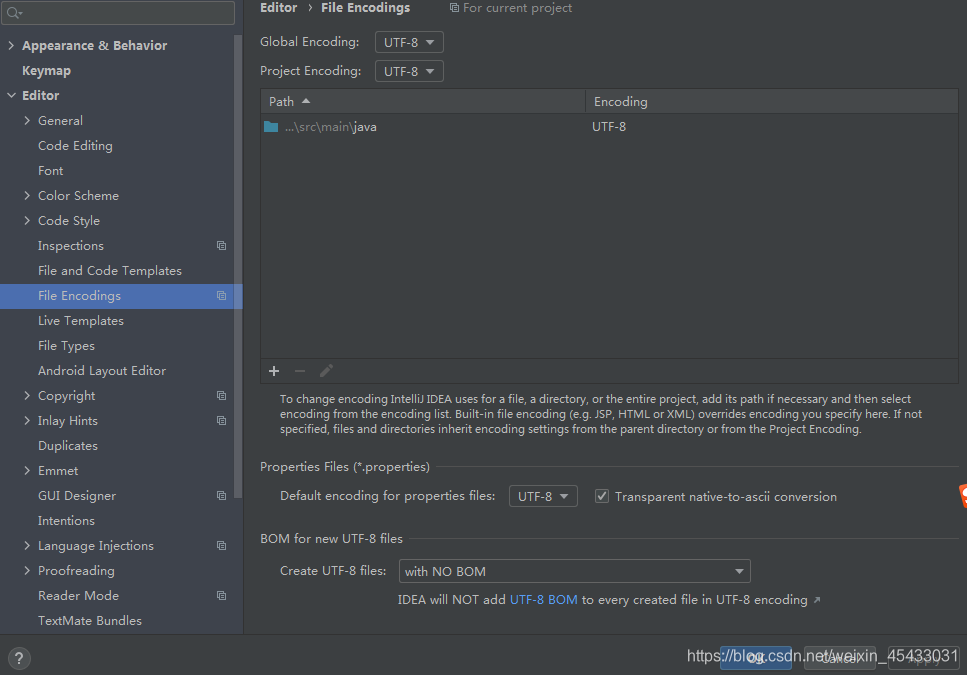
【注意】properties配置文件在写中文的时候,会有乱码 , 我们需要去IDEA中设置编码格式为UTF-8;
settings-->FileEncodings 中配置;

测试步骤:
1、新建一个实体类User
@Component //注册beanpublic class User {private String name;private int age;private String sex; //有参 无参 set get方法,tostring等}
2、编辑配置文件 user.properties
user1.name=kuangshenuser1.age=18user1.sex=男
3、我们在User类上使用@Value来进行注入!
@Component //注册bean@PropertySource(value = "classpath:user.properties")public class User {//直接使用@value@Value("${user.name}") //从配置文件中取值private String name;@Value("#{9*2}") // #{SPEL} Spring表达式private int age;@Value("男") // 字面量private String sex;}
4、Springboot测试
@SpringBootTestclass DemoApplicationTests {@AutowiredUser user;@Testpublic void contextLoads() {System.out.println(user);}}
结果正常输出:

对比小结
@Value这个使用起来并不友好!我们需要为每个属性单独注解赋值,比较麻烦;我们来看个功能对比图,(@ConfigurationProperties和@Value二选一即可)

结论:
1、@ConfigurationProperties只需要写一次即可 , @Value则需要每个字段都添加
2、配置yml和配置properties都可以获取到值 , 强烈推荐 yml;
3、如果我们在某个业务中,只需要获取配置文件中的某个值,可以使用一下 @value;
如果说,我们专门编写了一个JavaBean来和配置文件进行一一映射,就直接@configurationProperties,不要犹豫!
4、复杂类型封装,yml中可以封装对象 , 使用value就不支持
------------------------------------------------------------------------------------------------------------------------
二、松散绑定(nacos不支持松散绑定):这个什么意思呢? 比如我的yml中写的last-name,我们类中属性为驼峰命名法的lastName,这2个还是可以绑定起来的,不影响赋值。这就是松散绑定。可以测试一下
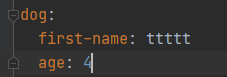
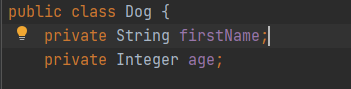
测试结果:Dog{firstName='ttttt', age=4}
-----------------------------------------------------------------------------------------------------------------------
三、JSR303数据校验: 这个就是我们可以在字段是增加一层过滤器验证 , 可以保证数据的合法性(JSR303有spring包下的,也有javax包下的,下面举例是spring下的)
JSR-303 是JAVA EE 6 中的一项子规范,叫做Bean Validation,Hibernate Validator 是 Bean Validation 的参考实现 . Hibernate Validator 提供了 JSR 303 规范中所有内置 constraint 的实现,除此之外还有一些附加的 constraint。
SpringBoot中使用JSR303需要加入启动器:
<dependency>
   <groupId>org.springframework.boot</groupId>
   <artifactId>spring-boot-starter-validation</artifactId>
   <version>2.5.2</version>
</dependency>


 255
255

 被折叠的 条评论
为什么被折叠?
被折叠的 条评论
为什么被折叠?
 到【灌水乐园】发言


