


关于JPEG的简要介绍
JPEG( Joint Photographic Experts Group)即联合图像专家组,是用于连续色调静态图像压缩的一种标准,文件后缀名为,jpg或,jpeg,是最常用的图像文件格式。其主要是采用预测编码(DPCM)、离散余弦变换(DCT)以及熵编码的联合编码方式,以去除冗余的图像和彩色数据,属于有损压缩格式,它能够将图像压缩在很小的储存空间,一定程度上会造成图像数据的损伤。尤其是使用过高的压缩比例,将使最终解压缩后恢复的图像质量降低,如果追求高品质图像,则不宜采用过高的压缩比例。
JPEG编码原理
其编码过程的流程图如下
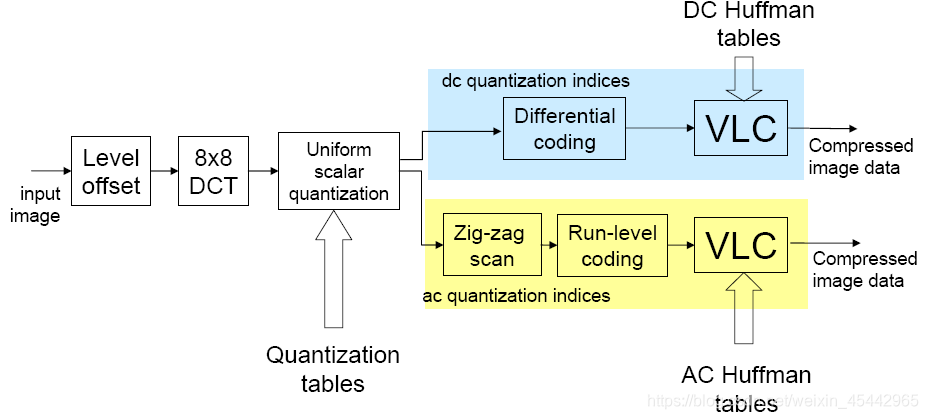
以下做详细说明:
快捷键目录标题文本样式列表链接代码片表格注脚注释自定义列表LaTeX 数学公式插入甘特图插入UML图插入Mermaid流程图插入Flowchart流程图
标题复制
1.零偏置(Level Offset)
对于灰度级是2n的像素,通过减去2n-1,将无符号的整数 值变成有符号数
对于n=8,即将0~255的值域,通过减去128,转换为值域在 128~127]内
其目的在于使像素的绝对值出现3位10进制的概率大大减少。
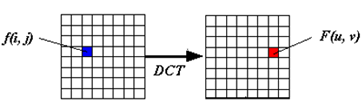
2.dct变换
对每个单独的彩色图像分量,把整个分量图像分成8×8的 图像块,如图所示,并作为两维离散余弦变换DCT的输入
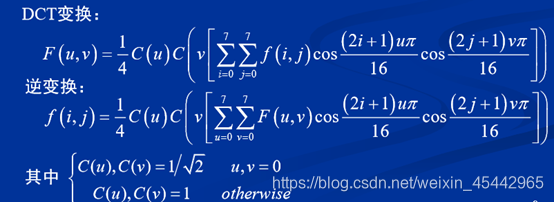
上图给出了dct变换的公式,由过往学习经验我们知道,dct变换是一种无损变换,但是方便了我们做量化工作。
3.量化
因为人眼对亮度信号比对色差信号更敏感,因此使用了两 种量化表:亮度量化值和色差量化值
根据人眼的视觉特性(对低频敏感,对高频不太敏感)对低频分量采取较细的量化,对高频分量采取较粗的量化
如果原始图象中细节丰富,则去掉的数据较多,量化后的系数与 量化前差别
反之,细节少的原始图象在压缩时去掉的数据少些
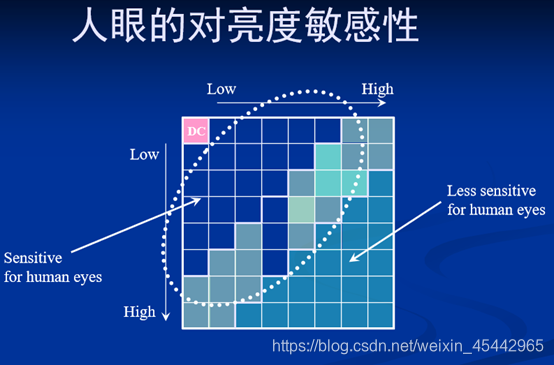
JPEG标准中采用中平型均匀量化,由于人眼对低频分量的敏感程度远高于高频分量,且对亮度的敏感程度远高于色度,因而标准中据此设计了2张量化表(亮度、色差各一张),使低频细量化,高频粗量化,亮度细量化,色差粗量化,以减少视觉冗余。
4.DC系数的差分编码
8×8图像块经过DCT变换之后得到的DC直流系数有两个特点
1.系数的数值比较大
2.相邻8×8图像块的DC系数值变化不大:冗余
根据这个特点,JPEG算法使用了差分脉冲调制编码 (DPCM)技术,对相邻图像块之间量化DC系数的差值DIFF 进行编码:
DIFE(k)=DC(k)-DC(k-1)
5.AC系数的游程编码
在JPEG和MPEG编码中规定为:(run, level)
◼ 表示连续run个0,后面跟值为level的系数
◼ 如: −3 0 −3 −2 −6 2 −4 1 −4 1 1 5 1 2 −1 1 −1 2 0 0 0 0 0 −1 −1 EOB
◼ 表示为(0,-3) ; (1,-3) ; (0,-2) ; (0,-6) ; (0,2) ; (0,-4) ; (0,1) ; (0,-4) ; (0,1) (0,1) ; (0,5) ; (0,1); (0,2) ; (0,-1) ; (0,1) ; (0,-1) ; (0,2) ; (5,-1) ; (0,-1) ; EOB
编码:
◼ Run: 最多15个,用4位表示Z
◼ Level:类似DC
◼ 分成16个类别,用4位表示表示类别号C
◼ 类内索引
◼ 对(Z, C)联合用Huffman编码
◼ 对类内索引用定长码编码
6.AC系数的huffman编码
对DC系数DPCM的结果和AC系数RLE的结果进行Huffman编码,类别ID采用一元码编码,类内索引采用定长码编码。以DC系数为例:
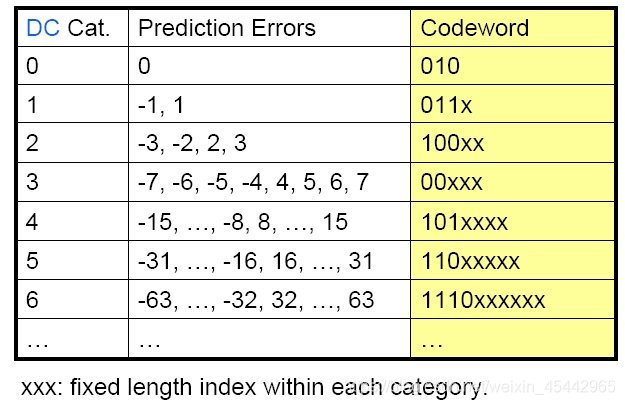
以上为DC系数Huffman编码表
例如差值DIFF=3 \text {DIFF} = 3DIFF=3,对应的类别ID = 2,类内索引 = 3,则码字为100 11。
共有亮度DC、亮度AC、色差DC、色差AC四张Huffman编码表。
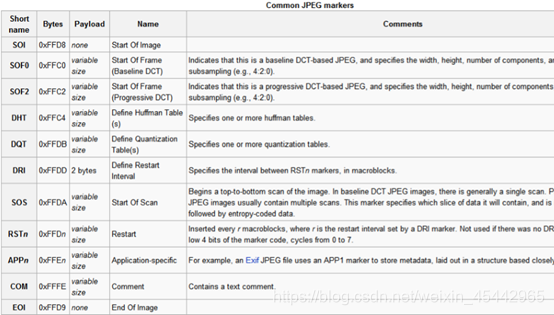
JPEG文件格式
定义了一系列标记(Markers)
均以0xFF开始,后跟1字节的标记标识符和2字节的标记 长度以及该标记所对应的payload
标记长度部分高位在前,低位在后,不包含该标记的头两个字节
熵编码部分的数据在0xFF后由编码器插入0x00,解码器解码时跳过此字节不予处理
SOI( Start Of Image)和EOI( End Of Image)标记没有 payload
以下为常见的marker:
JPEG解码流程及代码解释
三个结构体
struct huffman_table:存储Huffman码表。
struct huffman_table
{
  /* Fast look up table, using HUFFMAN_HASH_NBITS bits we can have directly the symbol,
   * if the symbol is <0, then we need to look into the tree table */
  short int lookup[HUFFMAN_HASH_SIZE];
  /* code size: give the number of bits of a symbol is encoded */
  unsigned char code_size[HUFFMAN_HASH_SIZE];
  /* some place to store value that is not encoded in the lookup table
   * FIXME: Calculate if 256 value is enough to store all values
   */
  uint16_t slowtable[16-HUFFMAN_HASH_NBITS][256];
};
struct component:储存当前8×8像块中有关解码的信息。
struct component
{
  unsigned int Hfactor;
  unsigned int Vfactor;
  float *Q_table;		/* Pointer to the quantisation table to use */
  struct huffman_table *AC_table;
  struct huffman_table *DC_table;
  short int previous_DC;	/* Previous DC coefficient */
  short int DCT[64];		/* DCT coef */
#if SANITY_CHECK
  unsigned int cid;
#endif
};
struct jdec_private:JPEG数据流结构体,用于存储JPEG图像宽高、数据流指针、Huffman码表等内容。
struct jdec_private
{
  /* Public variables */
  uint8_t *components[COMPONENTS];
  unsigned int width, height;	/* Size of the image */
  unsigned int flags;

  /* Private variables */
  const unsigned char *stream_begin, *stream_end;
  unsigned int stream_length;

  const unsigned char *stream;	/* Pointer to the current stream */
  unsigned int reservoir, nbits_in_reservoir;

  struct component component_infos[COMPONENTS];
  float Q_tables[COMPONENTS][64];		/* quantization tables */
  struct huffman_table HTDC[HUFFMAN_TABLES];	/* DC huffman tables   */
  struct huffman_table HTAC[HUFFMAN_TABLES];	/* AC huffman tables   */
  int default_huffman_table_initialized;
  int restart_interval;
  int restarts_to_go;				/* MCUs left in this restart interval */
  int last_rst_marker_seen;			/* Rst marker is incremented each time */

  /* Temp space used after the IDCT to store each components */
  uint8_t Y[64*4], Cr[64], Cb[64];

  jmp_buf jump_state;
  /* Internal Pointer use for colorspace conversion, do not modify it !!! */
  uint8_t *plane[COMPONENTS];

};
解码整体流程
int convert_one_image(const char *infilename, const char *outfilename, int output_format)
{
  FILE *fp;
  unsigned int length_of_file;  // 文件大小
  unsigned int width, height;   // 图像宽、高
  unsigned char *buf;   // 缓冲区
  struct jdec_private *jdec;
  unsigned char *components[3];

  /* 将JPEG读入缓冲区 */
  fp = fopen(infilename, "rb");
  if (fp == NULL)
    exitmessage("Cannot open filename\n");
  length_of_file = filesize(fp);
  buf = (unsigned char *)malloc(length_of_file + 4);
  if (buf == NULL)
    exitmessage("Not enough memory for loading file\n");
  fread(buf, length_of_file, 1, fp);
  fclose(fp);

  /* Decompress it */
  jdec = tinyjpeg_init();   // 初始化
  if (jdec == NULL)
    exitmessage("Not enough memory to alloc the structure need for decompressing\n");

  /* 解析JPEG文件头 */
  if (tinyjpeg_parse_header(jdec, buf, length_of_file)<0)
    exitmessage(tinyjpeg_get_errorstring(jdec));

  /* 计算图像宽高 */
  tinyjpeg_get_size(jdec, &width, &height);

  snprintf(error_string, sizeof(error_string),"Decoding JPEG image...\n");
  if (tinyjpeg_decode(jdec, output_format) < 0) // 解码实际数据
    exitmessage(tinyjpeg_get_errorstring(jdec));

  /*
   * Get address for each plane (not only max 3 planes is supported), and
   * depending of the output mode, only some components will be filled
   * RGB: 1 plane, YUV420P: 3 planes, GREY: 1 plane
   */
  tinyjpeg_get_components(jdec, components);

  /* 按照指定的输出格式保存输出文件 */
  switch (output_format)
   {
    case TINYJPEG_FMT_RGB24:
    case TINYJPEG_FMT_BGR24:
      write_tga(outfilename, output_format, width, height, components);
      break;
    case TINYJPEG_FMT_YUV420P:
      write_yuv(outfilename, width, height, components);
      break;
    case TINYJPEG_FMT_GREY:
      write_pgm(outfilename, width, height, components);
      break;
   }

  /* Only called this if the buffers were allocated by tinyjpeg_decode() */
  tinyjpeg_free(jdec);
  /* else called just free(jdec); */

  free(buf);
  return 0;
}
将输出文件保存为.yuv格式
需要添加部分代码
static void write_yuv(const char* filename, int width, int height, unsigned char** components) {
    FILE* F;
    char temp[1024];

    snprintf(temp, 1024, "%s.Y", filename);
    F = fopen(temp, "wb");
    fwrite(components[0], width, height, F);
    fclose(F);
    snprintf(temp, 1024, "%s.U", filename);
    F = fopen(temp, "wb");
    fwrite(components[1], width * height / 4, 1, F);
    fclose(F);
    snprintf(temp, 1024, "%s.V", filename);
    F = fopen(temp, "wb");
    fwrite(components[2], width * height / 4, 1, F);
    fclose(F);
//以下为添加部分
    snprintf(temp, 1024, "%s.YUV", filename);
    F = fopen(temp, "wb");
    fwrite(components[0], width, height, F);
    fwrite(components[1], width * height / 4, 1, F);
    fwrite(components[2], width * height / 4, 1, F);
    fclose(F);
}
得到yuv文件如下
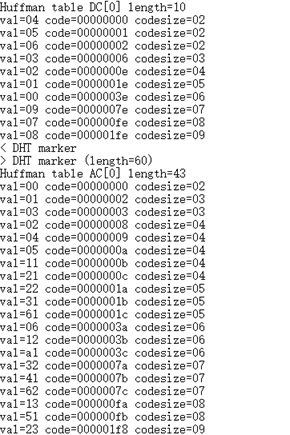
TRACE
执行程序后,得到的trace_jpeg.txt文件,包含了huffman码表等信息
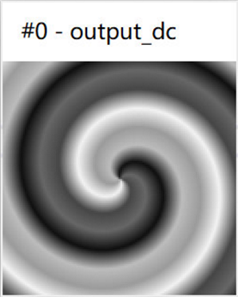
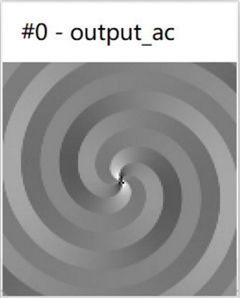
输出DC、AC图像
首先在 tinyjpeg.h 中添加全局变量声明
    FILE* dcImgFilePtr; // DC图像文件指针
    FILE* acImgFilePtr; // AC图像文件指针
并且在下面的函数中添加代码
int tinyjpeg_decode(struct jdec_private* priv, int pixfmt)
{
		...
    unsigned char* dcImgBuff;
    unsigned char* acImgBuff;
    unsigned char* uvBuff = 128;
    int count = 0;

    /* 对每个像块进行解码(8x8 / 8x16 / 16x16) */
    for (y = 0; y < priv->height / ystride_by_mcu; y++) {
        ...
        for (x = 0; x < priv->width; x += xstride_by_mcu) {
            decode_MCU(priv);

            dcImgBuff = (unsigned char)((priv->component_infos->DCT[0] + 512.0) / 4 + 0.5);  // DCT[0]为DC系数;DC系数范围-512~512;变换到0~255
            acImgBuff = (unsigned char)(priv->component_infos->DCT[1] + 128);   // 选取DCT[1]作为AC的observation;+128便于观察
            fwrite(&dcImgBuff, 1, 1, dcImgFilePtr);
            fwrite(&acImgBuff, 1, 1, acImgFilePtr);
            count++;
						...
                }
            }
        }
    }
		...
    for (int i = 0; i < count / 4 * 2; i++) {
        fwrite(&uvBuff, sizeof(unsigned char), 1, dcImgFilePtr);
        fwrite(&uvBuff, sizeof(unsigned char), 1, acImgFilePtr);
    }
    return 0;
}
在loadjpeg.c中添加
int main(int argc, char *argv[]) {
  ...
  const char* dcImgFileName = "test_decoded_dc.yuv";    // DC图像文件名
  const char* acImgFileName = "test_decoded_ac.yuv";    // AC图像文件名
  ...
  fopen_s(&dcImgFilePtr, dcImgFileName, "wb");    // 打开DC图像文件
  fopen_s(&acImgFilePtr, acImgFileName, "wb");    // 打开AC图像文件
  ...
  fclose(dcImgFilePtr);
  fclose(acImgFilePtr);


  return 0;
}
得到dc和ac图像


 1236
1236


 被折叠的 条评论
为什么被折叠?
被折叠的 条评论
为什么被折叠?
 到【灌水乐园】发言


