


作者:busyboxs
百度 AI 目前提供了智能写作的接口,主要包括智能写诗接口与智能春联接口。具体的使用说明可以参考 http://ai.baidu.com/docs#/IntelligentWriting-API/f85d34cc
智能写作接口说明
智能春联接口
智能春联是指根据用户输入的命题关键词自动生成一副春联,包括上联、下联和横批。
智能春联的请求参数如下表:

上面两个字符段是接口的输入,text 字数小于 5 个,是春联的主题。 index 可以用来指定生成的对联,不同的 index 可能会生成不同的对联。
智能春联的返回参数如下表:
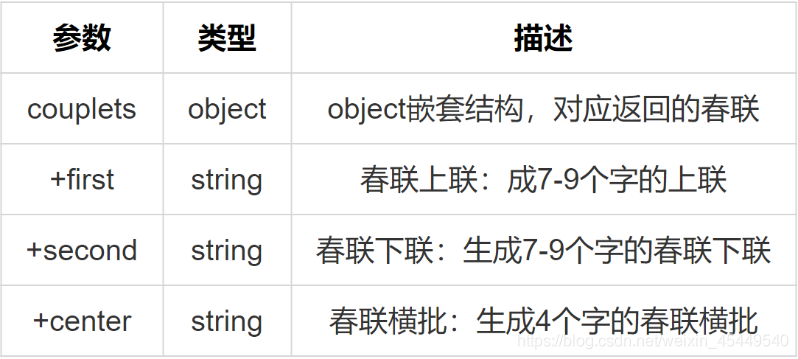
其输出为 json 字符串。例如:“春节”对应的一个输出为
{‘couplets’: {‘center’: ‘迎春接福’, ‘first’: ‘春节迎春新世纪’, ‘second’: ‘福音报福小康年’}}
智能写诗接口
智能写诗是指根据用户输入的命题关键词自动生成一首7言绝句。
智能写诗的请求参数如下表:

这两个输入字段和智能春联的两个输入字段相同,只是,text 代表诗的主题
智能写诗的返回参数如下表: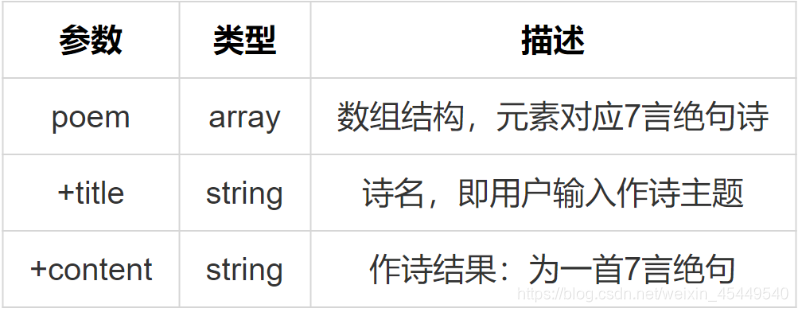
其输出也是 json 字符串,例如:“百度”对应的一个输出为
{‘poem’: [{‘content’: ‘神州崛起宏图展\t华夏腾飞巨浪狂\t万里江山添锦绣\t千秋百度铸辉煌\t’, ‘title’: ‘百度’}]}
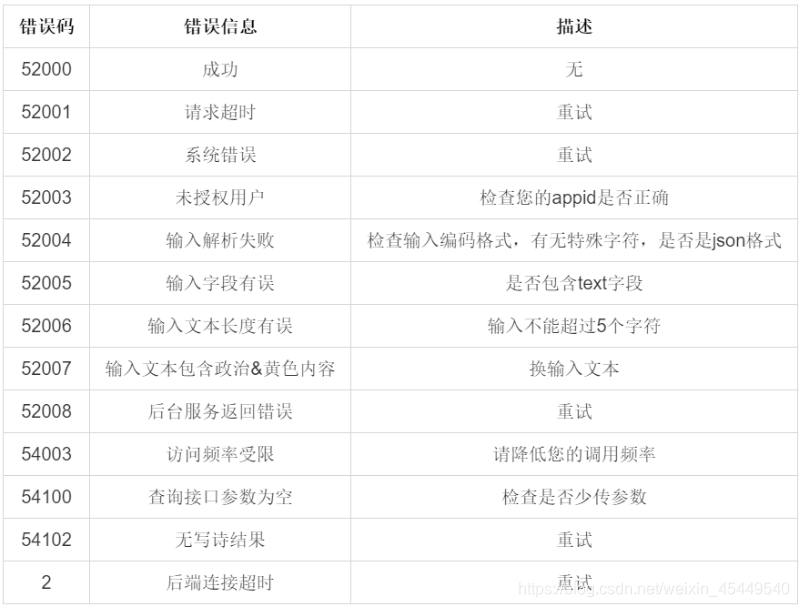
错误码说明
代码实现
本文使用 python3 来调用智能春联和智能写诗接口,接下来一步一步进行说明。
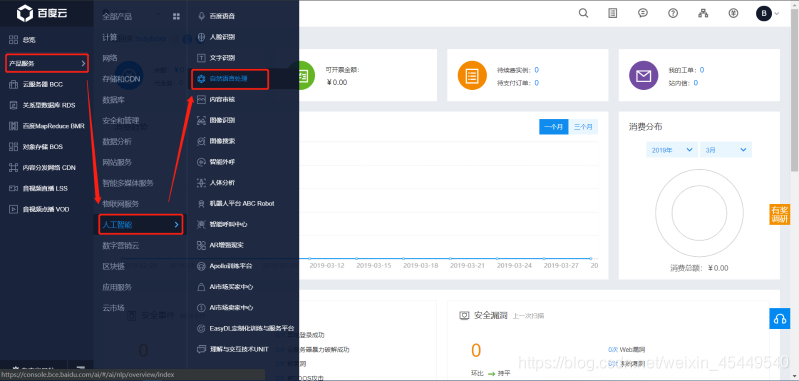
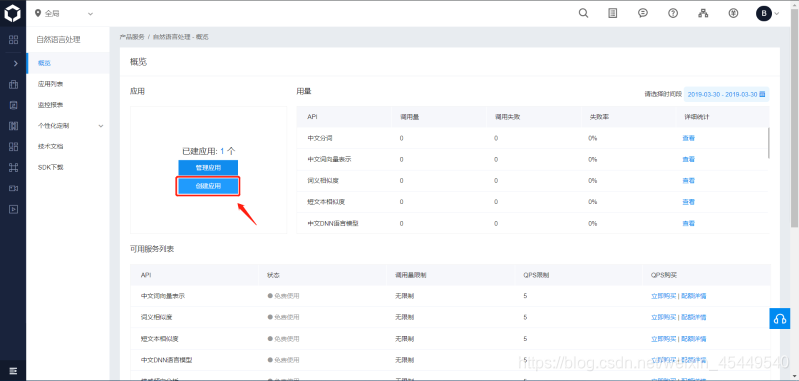
创建应用
首先进入到控制台,然后在“总览”下找到“产品服务” -> “人工智能” -> “自然语言处理”。
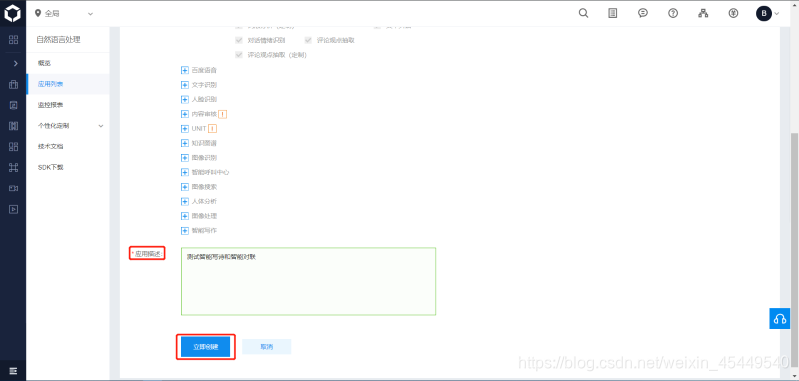
然后点击创建应用,填写好“应用名称”、“应用描述”,其他默认就行,然后点击“创建”。
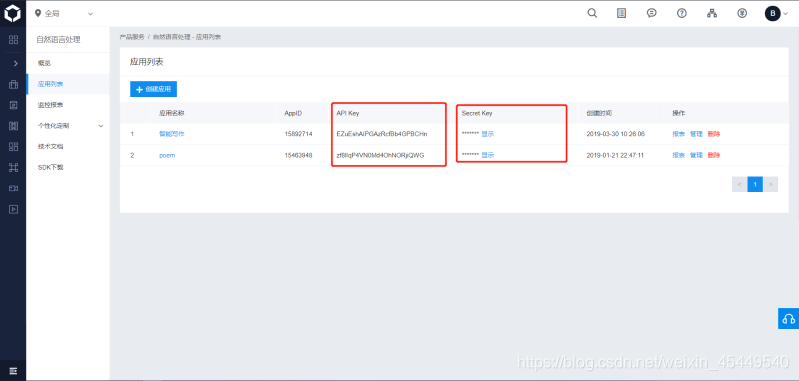
创建好应用之后,进入“应用列表”,就能看到应用的相关信息,我们需要的是 API Key 和 Secret Key。
获取 access token
通过 API Key 和 Secret Key 获取的 access_token。更多关于 access_token 的获取方法参考 http://ai.baidu.com/docs#/Auth/top
下面代码是 python3 获取 access_token 的代码
# 获取 token
def get_token_key():
    token_key = ''
    # client_id 为官网获取的AK, client_secret 为官网获取的SK
    client_id = '【百度云应用的AK】'
    client_secret = '【百度云应用的SK】'

    host = f'https://aip.baidubce.com/oauth/2.0/token?grant_type=client_credentials' \
        f'&client_id={client_id}&client_secret={client_secret}'

    request = Request(host)
    request.add_header('Content-Type', 'application/json; charset=UTF-8')
    response = urlopen(request)
    token_content = response.read()
    if token_content:
        token_info = json.loads(token_content)
        token_key = token_info['access_token']
    return token_key
token_content 中包含很多信息,例如输出如下(为了我个人信息安全,部分内容 用 * 代替):
{'access_token': '****************************************',
 'expires_in': 2592000,
 'refresh_token': '*******************************************',
 'scope': 'brain_nlp_sentiment_classify_custom public nlp_simnet nlp_wordemb '
          'nlp_comtag nlp_dnnlm_cn brain_nlp_lexer brain_all_scope '
          'brain_nlp_comment_tag brain_nlp_dnnlm_cn brain_nlp_word_emb_vec '
          'brain_nlp_word_emb_sim brain_nlp_sentiment_classify '
          'brain_nlp_simnet brain_nlp_depparser brain_nlp_wordembedding '
          'brain_nlp_dnnlm_cn_legacy brain_nlp_simnet_legacy '
          'brain_nlp_comment_tag_legacy brain_nlp_lexer_custom '
          'brain_nlp_keyword brain_nlp_topic brain_nlp_ecnet brain_nlp_emotion '
          'brain_nlp_comment_tag_custom wise_adapt lebo_resource_base '
          'lightservice_public hetu_basic lightcms_map_poi kaidian_kaidian '
          'ApsMisTest_Test权限 vis-classify_flower lpq_开放 cop_helloScope '
          'ApsMis_fangdi_permission smartapp_snsapi_base iop_autocar '
          'oauth_tp_app smartapp_smart_game_openapi oauth_sessionkey '
          'smartapp_swanid_verify smartapp_opensource_openapi',
 'session_key': '*****************************',
 'session_secret': '*******************************'}
而我们需要的只是 access_token,因此只需获取该字段就行。
调用智能春联接口
调用智能春联接口的 python3 实现代码如下:
# 调用百度 AI 智能春联接口(用于测试)
def get_couplets(text, token_key, index=0):
    """
    调用百度AI智能春联接口,并生成横批、上联和下联
    :param text: 智能春联的主题(官方限制不超过5个字)
    :param token_key: 通过调用 get_token_key() 获取的 token
    :param index: 不同的 index 会生成不同的春联
    :return: 调用智能春联生成的数据
    """
    request_url = 'https://aip.baidubce.com/rpc/2.0/nlp/v1/couplets'
    params_d = dict()
    params_d['text'] = text
    params_d['index'] = index
    params = json.dumps(params_d).encode('utf-8')
    access_token = token_key
    request_url = request_url + "?access_token=" + access_token
    request = Request(url=request_url, data=params)
    request.add_header('Content-Type', 'application/json')
    response = urlopen(request)
    content = response.read()
    if content:
        data = json.loads(content)
        return data

# 解析生成的春联
def parse_couplets(data):
    """
    解析调用智能春联生成的数据
    :param data: 调用智能春联生成的有效数据
    :return: 横批(center)、上联(first)和下联(second)
    """
    center = data['couplets']['center']
    first = data['couplets']['first']
    second = data['couplets']['second']
    # print(f'上联:{first}')
    # print(f'下联:{second}')
    # print(f'横批:{center}')
    return center, first, second
get_couplets 函数调用接口得到返回的值,parse_couplets 函数解析调用智能春联生成的有效数据。这里所说的有效数据是指调用接口没有发生错误的情况。在正确调用接口时,data 输出示例如下:
{‘couplets’: {‘center’: ‘迎春接福’, ‘first’: ‘春节迎春新世纪’, ‘second’: ‘福音报福小康年’}}
是一个字典型数据,直接进行解析就能得到横批、上联和下联。如果想要获取同一主题不同的对联,可以尝试不同的 index。
当调用接口失败时,就会得到无效的 data,通过解析 data,能够获得错误信息,下面是解析错误的代码,能够返回对应错误的中文描述。
# 错误代码
ERROR_DICT = {
    '2': '后端连接超时请重试',
    '52001': '请求超时请重试',
    '52002': '系统错误请重试',
    '52003': '未授权用户',
    '52004': '输入解析失败',
    '52005': '输入字段有误',
    '52006': '输入文本长度不超过5',
    '52007': '输入文本包含政治&黄色内容',
    '52008': '后台服务返回错误请重试',
    '54003': '访问频率受限',
    '54100': '查询接口参数为空',
    '54102': '无写诗结果请重试'
}

# 解析是否调用接口错误,如果有返回对应的提示,没有返回None
def parse_error(data):
    """
    解析是否调用接口错误
    :param data: 调用接口生成的数据
    :return: 如果出错,返回对应的错误信息,否则返回None
    """
    if 'error_code' in data:
        code = data['error_code']
        error = ERROR_DICT[str(code)]
        return error
    return None
调用智能写诗接口
调用智能写诗接口的 python3 实现代码如下:
# 调用百度 AI 智能写诗接口(用于测试)
def get_poem(text, token_key, index=0):
    """
    调用百度AI智能写诗接口,并生成七言诗
    :param text: 智能写诗的主题(官方限制不超过5个字)
    :param token_key: 通过调用 get_token_key() 获取的 token
    :param index: 不同的 index 会生成不同的七言诗
    :return: 调用智能写诗生成的数据
    """
    request_url = 'https://aip.baidubce.com/rpc/2.0/nlp/v1/poem'
    params_d = dict()
    params_d['text'] = text
    params_d['index'] = index
    params = json.dumps(params_d).encode('utf-8')
    access_token = token_key
    request_url = request_url + "?access_token=" + access_token
    request = Request(url=request_url, data=params)
    request.add_header('Content-Type', 'application/json')
    response = urlopen(request)
    content = response.read()
    if content:
        data = json.loads(content)
        return data


# 解析生成的诗句
def parse_poem(data):
    """
    解析调用智能写诗生成的数据
    :param data: 调用智能写诗生成的有效数据
    :return: 诗的题目(title)和诗的内容(content)
    """
    title = data['poem'][0]['title']
    poem = data['poem'][0]['content'].replace('\t', '\n')
    # print(title)
    # print(poem)
    return title, poem
在正确调用接口时,data 输出如下:
{‘poem’: [{‘content’: ‘神州崛起宏图展\t华夏腾飞巨浪狂\t万里江山添锦绣\t千秋百度铸辉煌\t’, ‘title’: ‘百度’}]}
是一个字典型数据,直接进行解析就能得到题目和内容。如果想要获取同一主题不同的诗,可以尝试不同的 index。
实例应用
本文进一步通过网页的形式将上述功能进行实现,使用Flask来部署。
首先创建一个文件夹 flaskr,该文件夹下有一个名为 static 的文件夹,用于存放css样式和背景图片,还有一个文件夹名为templates用于存放html网页,另外还有一个python文件,用于执行flask。
以下是 Flask 相关代码
from flask import Flask, render_template, request, redirect, url_for, session
from flaskr.poem import nlp_result, parse_error, parse_couplets, parse_poem
import random

app = Flask(__name__)

token_key = '【你获取的token】'


@app.route("/", methods=('GET', 'POST'))
def index():
    if request.method == 'POST':
        couplets = request.form.get('couplets')
        if couplets is not None:
            return redirect(url_for('get_couplets'))
        poem = request.form.get('poem')
        if poem is not None:
            return redirect(url_for('get_poem'))

    return render_template('couplets/index.html')


@app.route("/couplets", methods=('GET', 'POST'))
def get_couplets():
    if request.method == 'POST':
        center = None
        first = None
        second = None
        title = request.form.get('theme')
        back = request.form.get('back')
        if back == '返回':
            return redirect(url_for('index'))
        index = random.randint(0, 10)
        data = nlp_result(title, token_key, index, way='couplets')
        error = parse_error(data)
        if not error:
            center, first, second = parse_couplets(data)
        return render_template('couplets/show.html',
                               center=center,
                               first=first,
                               second=second,
                               title=title,
                               error=error)
    return render_template('couplets/base.html')


@app.route("/poem", methods=('GET', 'POST'))
def get_poem():
    if request.method == 'POST':
        title = None
        poem = None
        title = request.form.get('theme')
        back = request.form.get('back')
        if back == '返回':
            return redirect(url_for('index'))
        index = random.randint(0, 10)
        data = nlp_result(title, token_key, index, way='poem')
        error = parse_error(data)
        if not error:
            title, poem = parse_poem(data)
        return render_template('couplets/poem_show.html',
                               title=title,
                               poem=poem,
                               error=error)
    return render_template('couplets/poem_index.html')


if __name__ == '__main__':
    app.run(debug=True)
该代码中有三个函数,分别对应三个界面,如果运行地址为 http://127.0.0.1:5000/ ,那么三个界面对应的网址分别为 http://127.0.0.1:5000/ 、http://127.0.0.1:5000/couplets 和 http://127.0.0.1:5000/poem 表示主页、对联页和写诗页。
其效果展示如下:
处理错误信息的效果展示如下:
完整代码请移步 https://github.com/busyboxs/couplet-and-poem


 1835
1835


 被折叠的 条评论
为什么被折叠?
被折叠的 条评论
为什么被折叠?
 到【灌水乐园】发言


