


Chapter 4. Setup设置
4.1.Bochs需要什么?
These are the minimum requirements for running an OS inside of Bochs:
以下是在Bochs内部运行操作系统的最低要求:
- Bochs可执行文件
- BIOS映像(通常称为BIOS最新bochs) (usually called BIOS-bochs-latest)
- VGA BIOS映像(e.g. VGABIOS-lgpl-latest or VGABIOS-elpin-2.40)
- 至少一个可引导介质,可以是磁盘映像(软盘、硬盘或CD-ROM)或物理磁盘(软盘或CD-ROM)
注: VGA BIOS版本和ROM BIOS都是Bochs软件包的一部分。无需单独下载。详见第4.2节。
注意:如果您想使用Cirrus SVGA适配器而不是VGA+Bochs VBE,您应该查看第9.19节。
In that case you have to pass the configuration options on the command line or to use the configuration interface to set up Bochs for the simulation. Running Bochs is easier if you use a configuration file (we call it bochsrc). See Section 4.3 for all supported options.
\qquad 在这种情况下,您必须在命令行上传递配置选项,或者使用配置界面为模拟设置Bochs。如果使用配置文件(我们称之为bochsrc),运行Bochs会更容易。有关所有支持的选项,请参见第4.3节。
The easiest way to setup Bochs for the first time is to use the example configuration file called bochsrc-sample.txt. Locate that file (location depends on the (host) OS and on the installation facility used) and copy it to a location where Bochs looks for that file, see Section 5.2.
\qquad 首次设置Bochs的最简单方法是使用名为bochsrc-sample.txt的示例配置文件。找到该文件(位置取决于(主机)操作系统和所使用的安装设施),并将其复制到Bochs查找该文件的位置,请参阅第5.2节。
The next step is to change the configuration so that it fits your needs: You most likely want to setup a hard disk (see Section 9.22 and Section 4.3.21), and install some OS on it using either a set of floppy disks (see Section 4.3.19) or a CD-ROM (see Section 4.3.21 again) as installation media. Make sure you boot the emulation from the media you want, using the right setting as boot option.
\qquad 下一步是更改配置,使其符合您的需求:您很可能想要设置一个硬盘(见第9.22节和第4.3.21节),并使用一套软盘(见第4.3.19节)或CD-ROM(再次见第4.3.21章)作为安装介质在硬盘上安装一些操作系统。确保使用正确的设置作为引导选项,从所需的介质引导模拟。
If your keyboard output inside of Bochs is wrong, you may also need a keymap file to remap your keyboard layout to the U.S. layout. A set of keymap files for the X window system and SDL (Linux port) is distributed with Bochs. If your keyboard layout is not supported yet, you can create your own one by following the instructions given in Section 4.4.
\qquad 如果Bochs内部的键盘输出错误,您可能还需要一个键盘映射文件来将键盘布局重新映射到美国布局。X窗口系统和SDL(Linux端口)的一组密钥映射文件与Bochs一起分发。如果您的键盘布局还不受支持,您可以按照第4.4节中给出的说明创建自己的键盘布局。
A collection of disk images of different operating systems can be found at http://bochs.sourceforge.net/diskimages.html. Some disk images are the size of a floppy disk (1 meg compressed) and others are gigantic (160 meg compressed). If you want to create a disk image yourself, please see Section 9.2.
\qquad 不同操作系统的磁盘映像集合可以在http://bochs.sourceforge.net/diskimages.html.一些磁盘映像是软盘大小(压缩1兆字节),而另一些则是巨大的(压缩160兆字节)。如果您想自己创建磁盘映像,请参阅第9.2节。
4.2. ROM images
Just like a real PC, Bochs needs a system BIOS and VGA BIOS to initialize the machine when it powers on or after a hardware reset. Bochs needs to load them from image file into the emulated memory. The Bochs package contains a set of system BIOS and VGA BIOS images.
\qquad 就像真正的PC一样,Bochs需要一个系统BIOS和VGA BIOS来在机器开机或硬件重置后初始化机器。Bochs需要将它们从映像文件加载到模拟内存中。Bochs软件包包含一组系统BIOS和VGA BIOS映像。
表4-1。系统和VGA BIOS映像
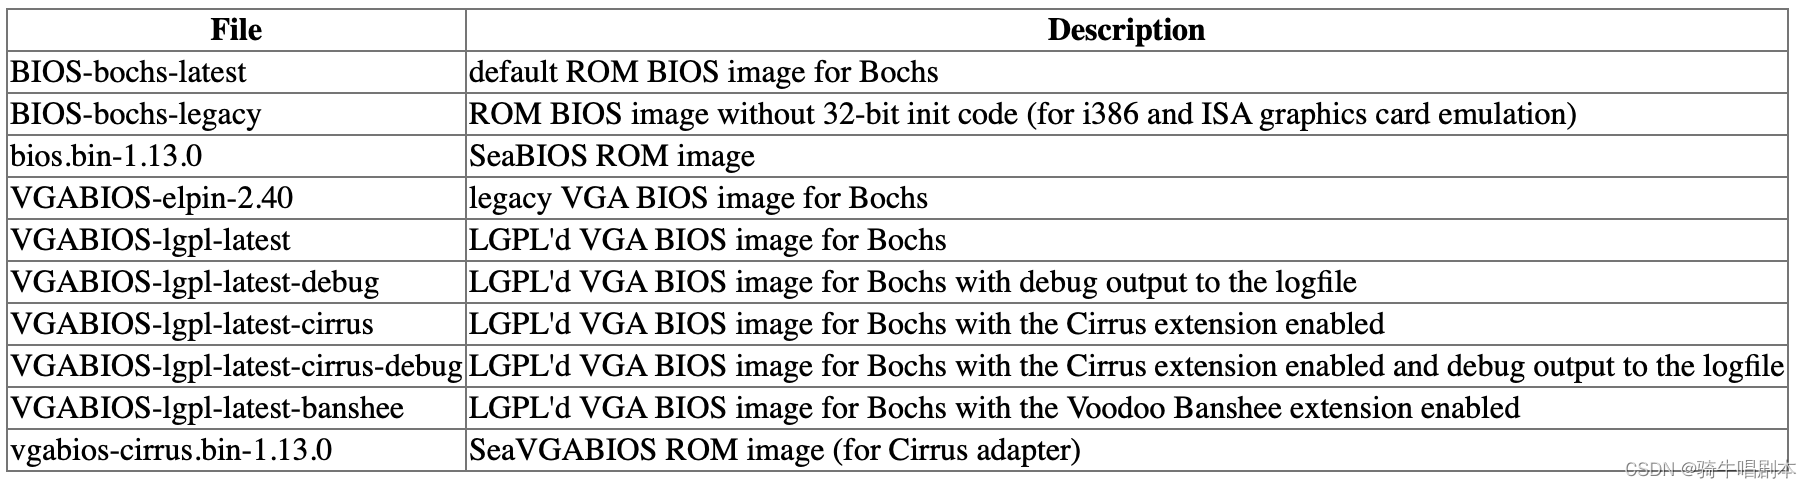
Bochs must be set up to use system and VGA BIOS like this:
Bochs必须设置为使用系统和VGA BIOS,如下所示:
romimage: file=BIOS-bochs-latest, address=0xfffe0000

vgaromimage: file=VGABIOS-lgpl-latest
We recommend to use the ROM images distributed with Bochs or one of the latest SeaBIOS images. BIOS images designed for real hardware mostly do not work properly. Please see the Section 4.3.8 for more information.
\qquad 我们建议使用随Bochs一起分发的ROM映像或最新的SeaBIOS映像之一。为实际硬件设计的BIOS映像大多无法正常工作。更多信息请参见第4.3.8节。
Bochs supports optional ROM images to be loaded into the ISA ROM space, typically between C8000 and EFFFF (see Section 4.3.10). The PCI versions of the Bochs network adapter emulations support loading a boot ROM into the PCI ROM space (see Section 4.3.34).
\qquad Bochs支持将可选ROM映像加载到ISA ROM空间,通常在C8000和EFFF之间(见第4.3.10节)。Bochs网络适配器仿真的PCI版本支持将引导ROM加载到PCI ROM空间(见第4.3.34节)。
4.3. The configuration file bochsrc (配置文件bochsrc)
Bochs uses a configuration file called bochsrc to know where to look for disk images, how the Bochs emulation layer should work, etc. When you first start up Bochs, it looks around for its configuration file (see Section 5.2), and parses it. Here are a few lines from a sample file:
\qquad Bochs使用一个名为bochsrc的配置文件来了解在哪里查找磁盘映像、Bochs仿真层应该如何工作等。当您第一次启动Bochs时,它会四处查找其配置文件(请参阅第5.2节),并对其进行解析。以下是示例文件中的几行:
ata0-master: type=disk, path="30M.sample", cylinders=615, heads=6, spt=17
boot: disk
The format is very strict, so be sure to put the right number of spaces and use lowercase letters. As you can see, most lines have a keyword telling what is being configured, followed by a colon, followed by a few property=value pairs, separated by commas. For very simple options, sometimes just a single value is needed. The source and binary distributions come with a sample bochsrc, so you can just copy the sample file and edit the settings you need to change.
\qquad 格式非常严格,所以一定要放正确数量的空格并使用小写字母。正如您所看到的,大多数行都有一个关键字,告诉您要配置什么,后面跟着一个冒号,后面跟着几个用逗号分隔的property=value对。对于非常简单的选项,有时只需要一个值。源发行版和二进制发行版附带了一个样例bochsrc,因此您只需复制样例文件并编辑需要更改的设置即可。
The syntax used for bochsrc can also be used as command line arguments for Bochs. If you have any spaces in your command line arguments, they should be enclosed in single quotes, for example:
\qquad 用于bochsrc的语法也可以用作Bochs的命令行参数。如果命令行参数中有空格,则应将它们用单引号括起来,例如:
bochs 'boot:floppy' 'floppya: 1_44=a.img, status=inserted'
For other arguments, see section Command line arguments.
有关其他参数,请参见命令行参数一节。
You can use environment variables with the dollar sign prefix in the bochsrc file, for example:
可以在bochsrc文件中使用带有美元符号前缀的环境变量,例如:
floppya: 1_44="$IMAGES/bootdisk.img", status=inserted
boot: floppy
There are two environment variables with a built-in default value which is set at compile or installation time. $BXSHARE points to the “share” directory which is typically /usr/local/share/bochs on UNIX machines. See the $(sharedir) variable in the Makefile for the exact value. $BXSHARE is used in the config files of the Bochs disk images to locate the directory where the BIOS images and keymaps can be found. If $BXSHARE is not defined, Bochs will supply the default value. Also, $LTDL_LIBRARY_PATH points to a list of directories to search in for Bochs plugins. The paths are separated by colons (on Windows: semicolons). A compile-time default is provided if this variable is not defined by the user. On Win32 and MacOSX, the default for the share directory is determined by a platform-specific specific algorithm. On Win32, we use the registry to see what directory Bochs and its support files were installed in. On MacOSX, the share directory is the directory where the application is located.
\qquad 有两个环境变量具有内置默认值,该值在编译或安装时设置 B X S H A R E 指向“ s h a r e ”目录,该目录在 U N I X 计算机上通常为 / u s r / l o c a l / s h a r e / b o c h s 。有关确切值,请参阅 M a k e f i l e 中的 BXSHARE指向“share”目录,该目录在UNIX计算机上通常为/usr/local/share/bochs。有关确切值,请参阅Makefile中的 BXSHARE指向“share”目录,该目录在UNIX计算机上通常为/usr/local/share/bochs。有关确切值,请参阅Makefile中的(sharedir)变量。 B X S H A R E 在 B o c h s 磁盘映像的配置文件中用于定位可以找到 B I O S 映像和密钥映射的目录。如果未定义 BXSHARE在Bochs磁盘映像的配置文件中用于定位可以找到BIOS映像和密钥映射的目录。如果未定义 BXSHARE在Bochs磁盘映像的配置文件中用于定位可以找到BIOS映像和密钥映射的目录。如果未定义BXSHARE,Bochs将提供默认值。此外,$LTDL_IBRARY_PATH指向要在其中搜索Bochs插件的目录列表。路径用冒号分隔(在Windows中:分号)。如果用户未定义此变量,则提供编译时默认值。在Win32和MacOSX上,共享目录的默认值由特定于平台的算法确定。在Win32上,我们使用注册表来查看Bochs及其支持文件安装在哪个目录中。在MacOSX上,共享目录是应用程序所在的目录。
You can use the #include statement in the bochsrc to read the configuration from other files. Now it is possible to put platform or installation defaults in a global config file (e.g. location of rom images). Put this on top of your config file if the global configuration is stored in /etc:
您可以使用bochsrc中的#include语句从其他文件中读取配置。现在可以将平台或安装默认值放在全局配置文件中(例如rom映像的位置)。如果全局配置存储在/etc/中,请将其放在配置文件的顶部:
#include /etc/bochsrc
Bochs now treats an unknown option as optional device plugin if it exists. It loads this plugin and then it tries to call the parser function for this configuration line which is located in the plugin. This mechanism is implemented for the Bochs network, sound and USB host controller devices. Externally developed device plugins (AKA “user plugins”) now can also be loaded this way.
\qquad
Bochs现在将未知选项视为可选设备插件(如果存在)。它加载这个插件,然后尝试调用位于插件中的配置行的解析器函数。该机制是为Bochs网络、声音和USB主机控制器设备实现的。外部开发的设备插件(又名“user plugins”)现在也可以通过这种方式加载。
\qquad
下面的部分列出了所有支持的bochsrc选项。
4.3.1. plugin_ctrl
示例:
plugin_ctrl: unmapped=0, e1000=1 # unload 'unmapped' and load 'e1000'
Controls the presence of optional device plugins. These plugins are loaded directly with this option and some of them install a config option that is only available when the plugin device is loaded. The value “1” means to load the plugin and “0” will unload it (if loaded before).
\qquad
控制可选设备插件的存在。这些插件是用这个选项直接加载的,其中一些插件安装了一个只有在加载插件设备时才可用的配置选项。值“1”表示加载插件,“0”将卸载它(如果以前加载过)。
\qquad
这些插件将默认加载(如果存在):“biosdev”、“extfpuirq”、“gameport”、“iodebug”、“parallel”、“serial”、“speaker”和“unmapped”。
\qquad
这些插件也受支持,但通常直接加载它们的bochsrc选项:“e1000”、“es1370”、“ne2k”、“pcidev”、“pc ipnic”、”sb16“、”usb_ehci“、”us b_ohci“、“usb_uhci”、“usc_xhci”和“voodoo”。
\qquad
外部开发的设备插件(又名“user plugins”)现在也可以通过这种方式加载。
4.3.2. config_interface
The configuration interface is a series of menus or dialog boxes that allows you to edit all the settings that control Bochs’ behavior. Depending on the platform there are up to 3 choices of configuration interface: a text mode version called “textconfig” and two graphical versions called “win32config” and “wx”. The text mode version uses stdin/stdout or gui console (if available / runtime config) and is always compiled in, unless Bochs is compiled for wx only. The choice “win32config” is only available on win32/win64 and it is the default on these platforms. The choice “wx” is only available when Bochs is compiled with wxWidgets support, see Section 3.4.13. If you do not write a config_interface line, Bochs will choose a default for you.
\qquad 配置界面是一系列菜单或对话框,允许您编辑控制Bochs行为的所有设置。根据平台的不同,最多有3种配置界面可供选择:一种称为“textconfig”的文本模式版本和两种名为“win32config”和“wx”的图形版本。文本模式版本使用stdin/stdout或gui控制台(如果可用/运行时配置),并且始终在中编译,除非Bochs仅针对wx编译。“win32config”选项仅在win32/win64上可用,并且在这些平台上是默认选项。只有在使用wxWidgets支持编译Bochs时,选项“wx”才可用,请参阅第3.4.13节。如果您没有编写config_interface行,Bochs将为您选择一个默认值。
注意:wxWidgets同时提供了一个配置界面和一个显示库。因此,如果您使用“wx”配置界面,您还必须使用“wx”显示库,请参阅display_library选项。
示例:
config_interface: textconfig
config_interface: win32config
config_interface: wx
4.3.3. display_library
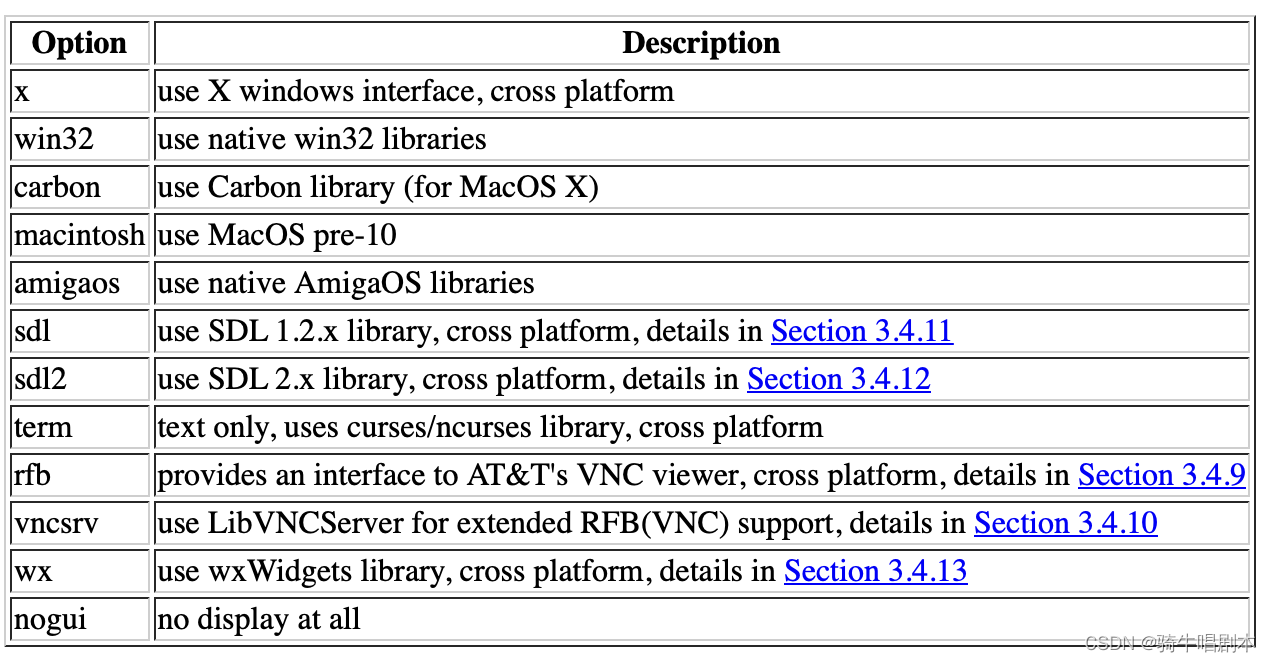
The display library is the code that displays the Bochs VGA screen. Bochs has a selection of about 10 different display library implementations for different platforms. If you run configure with multiple --with-* options, the display_library option lets you choose which one you want to run with. If you do not use a display_library line, Bochs will choose a default for you.
\qquad 显示库是显示Bochs VGA屏幕的代码。Bochs为不同的平台选择了大约10种不同的显示库实现。如果使用多个–with-*选项运行configure,display_library选项可以让您选择要使用的选项。如果您不使用display_library行,Bochs将为您选择一个默认值。
注意:wxWidgets同时提供了一个配置界面和一个显示库。因此,如果使用“wx”显示库,还必须使用“wx”配置接口,请参阅config_interface选项。
示例:
display_library: x
display_library: sdl2, options=fullscreen
display_library: options=cmdmode
一些显示库现在支持特定的选项来控制它们的行为。多个显示库支持这些选项:
“cmdmode” - 按F7后调用一个头栏按钮处理程序(sdl,sdl2,win32,x)
“fullscreen” - 在全屏模式下启动(sdl,sdl2)
“gui_debug” - 使用GTK调试器gui(sdl,x)/W32调试器gui(sdl,sdl2,Win32)
“hideIPS” - 禁用状态栏中的IPS输出(rfb、sdl、sdl2、term、vncsrv、win32、wx、x)
“nokeyrepeat” - 关闭主机键盘repeat(sdl,sdl2,win32,x)
“no_gui_console” - 使用系统控制台而不是内置的gui控制台(rfb、sdl、sdl2、vncsrv、x)
“timeout” - 等待客户端(rfb、vncsrv)的时间(以秒为单位)
有关当前支持的其他选项,请参阅下面的示例。

Setting up options without specifying display library is also supported.
也支持在不指定显示库的情况下设置选项。
表4-2。显示库值
4.3.4. cpu
示例:
cpu: count=2, ips=10000000
这定义了Bochs内部cpu的参数:
model
Selects CPU configuration to emulate from pre-defined list of all supported configurations. When this option is used and the value is different from ‘bx_generic’, the parameters of the CPUID option have no effect anymore. See the Section 5.4 for supported values.
\qquad 从所有支持的配置的预定义列表中选择要模拟的CPU配置。当使用此选项并且该值与“bx_generic”不同时,CPUID选项的参数不再有效。有关支持的值,请参见第5.4节。
count
Set the number of processors:cores per processor:threads per core when Bochs is compiled for SMP emulation. Bochs currently supports up to 14 threads (legacy APIC) or 254 threads (xAPIC or higher) running simultaniosly. If Bochs is compiled without SMP support, it won’t accept values different from 1. For more information on SMP see Section 9.9.
\qquad 设置为SMP仿真编译Bochs时的处理器数:每个处理器的核数:每个核的线程数。Bochs目前最多支持14个线程(传统APIC)或254个线程(xAPIC或更高版本)同时运行。如果在没有SMP支持的情况下编译Bochs,它将不会接受与1不同的值。有关SMP的更多信息,请参阅第9.9节。
quantum
Maximum amount of instructions allowed to execute by processor before returning control to another cpu. This option exists only in Bochs binary compiled with SMP support.
\qquad 在将控制权返回给另一个cpu之前,处理器允许执行的最大指令量。此选项仅存在于使用SMP支持编译的Bochs二进制文件中。
reset_on_triple_fault
Reset the CPU when triple fault occur (highly recommended) rather than PANIC. Remember that if you are trying to continue after triple fault the simulation will be completely bogus !
\qquad 发生三重故障时(强烈建议)重置CPU,而不是PANIC。记住,如果你试图在三次故障后继续,模拟将完全是假的!
cpuid_limit_winnt
Determine whether to limit maximum CPUID function to 2. This mode is required to workaround WinNT installation and boot issues.
\qquad 确定是否将最大CPUID函数限制为2。此模式是解决WinNT安装和启动问题所必需的。
mwait_is_nop
When this option is enabled MWAIT will not put the CPU into a sleep state. This option exists only if Bochs compiled with --enable-monitor-mwait.
\qquad 启用此选项时,MWAIT不会使CPU进入睡眠状态。只有使用–enable monitor mwait编译Bochs时,此选项才存在。
msrs
Define path to user CPU Model Specific Registers (MSRs) specification. See example in msrs.def.
\qquad 定义用户CPU型号特定寄存器(MSR)规范的路径。请参阅msrs.def中的示例。
ignore_bad_msrs
Ignore MSR references that Bochs does not understand; print a warning message instead of generating #GP exception. This option is enabled by default but will not be available if configurable MSRs are enabled.
\qquad 忽略Bochs不理解的MSR引用;打印一条警告消息,而不是生成#GP异常。默认情况下,此选项处于启用状态,但如果启用了可配置的MSR,则此选项将不可用。
ips
Emulated Instructions Per Second. This is the number of IPS that Bochs is capable of running on your machine. You can recompile Bochs with --enable-show-ips option enabled, to find your workstation’s capability. Measured IPS value will then be logged into your log file or in the status bar (if supported by the gui).
\qquad 每秒模拟指令数。这是Bochs能够在您的机器上运行的IPS数量。您可以在启用–enable-show-ips选项的情况下重新编译Bochs,以查找工作站的功能。测量的IPS值将记录到日志文件或状态栏中(如果gui支持)。
IPS is used to calibrate many time-dependent events within the Bochs simulation. For example, changing IPS affects the frequency of VGA updates, the duration of time before a key starts to autorepeat, and the measurement of BogoMips and other benchmarks. The table below lists some typical IPS settings for different machines[1].
\qquad IPS用于校准Bochs模拟中的许多与时间相关的事件。例如,更改IPS会影响VGA更新的频率、密钥开始自动重录之前的持续时间,以及BogoMips和其他基准的测量。下表列出了不同机器的一些典型IPS设置[1]。
表4-3。IPS设置示例

4.3.5. cpuid
示例:
cpuid: level=6, mmx=1, sep=1, sse=sse4_2, apic=xapic, aes=1, movbe=1, xsave=1
This defines features and functionality supported by Bochs emulated CPU. These settings are only valid and configurable if the cpu model is set to the default value ‘bx_generic’.
\qquad 这定义了Bochs仿真CPU支持的特性和功能。只有当cpu型号设置为默认值“bx_generic”时,这些设置才有效且可配置。
level
Set emulated CPU level information returned by CPUID. Default value is determined by configure option --enable-cpu-level. Currently supported values are 5 (for Pentium and similar processors) and 6 (for P6 and later processors).
\qquad 设置CPUID返回的模拟CPU级别信息。默认值由配置选项–enable cpu level决定。当前支持的值为5(适用于奔腾及类似处理器)和6(适用于P6及更高版本的处理器)。
family
Set family information returned by CPUID. Default family value determined by configure option --enable-cpu-level.
\qquad 设置CPUID返回的族信息。由配置选项确定的默认系列值–启用cpu级别。
model
Set model information returned by CPUID. Default model value is 3.
\qquad
设置CPUID返回的型号信息。默认模型值为3。
stepping
Set stepping information returned by CPUID. Default stepping value is 3.
\qquad
设置CPUID返回的步进信息。默认步进值为3。
vendor_string
Set the CPUID vendor string returned by CPUID(0x0). This should be a twelve-character ASCII string.
\qquad
设置CPUID(0x0)返回的CPUID供应商字符串。这应该是一个十二个字符的ASCII字符串。
brand_string
Set the CPUID brand string returned by CPUID(0x80000002 … 0x80000004]). This should be at most a forty-eight-character ASCII string.
\qquad
设置CPUID返回的CPUID品牌字符串(0x80000002…0x80000004])。这最多应该是一个四十八个字符的ASCII字符串。
mmx
Select MMX instruction set support. This option exists only if Bochs compiled with BX_CPU_LEVEL >= 5.
\qquad 选择MMX指令集支持。仅当使用BX_CPU_LEVEL>=5编译的Bochs时,此选项才存在。
apic
Select APIC configuration (LEGACY/XAPIC/XAPIC_EXT/X2APIC). This option exists only if Bochs compiled with BX_CPU_LEVEL >= 5.
\qquad 选择APIC配置(LEGACY/XAPIC/XAPIC_EXT/X2APIC)。仅当使用BX_CPU_LEVEL>=5编译的Bochs时,此选项才存在。
sep
Select SYSENTER/SYSEXIT instruction set support. This option exists only if Bochs compiled with BX_CPU_LEVEL >= 6.
\qquad 选择SYSENTR/SYSEXIT指令集支持。仅当使用BX_CPU_LEVEL>=6编译的Bochs时,此选项才存在。
simd
Select SIMD instructions support. Any of NONE/SSE/SSE2/SSE3/SSSE3/SSE4_1/SSE4_2/AVX/AVX2/AVX512 could be selected. This option exists only if Bochs compiled with BX_CPU_LEVEL >= 6. The AVX choises exists only if Bochs compiled with --enable-avx option.
\qquad 选择SIMD指令支持。可以选择NONE/SSE/SSE2/SSE3/SSSE3/SSE4_1/SSE4_2/AVX/AVX2/AVX512中的任何一个。仅当使用BX_CPU_LEVEL>=6编译的Bochs时,此选项才存在。只有使用–enable AVX选项编译Bochs时,AVX选项才存在。
sse4a
Select AMD SSE4A instructions support. This option exists only if Bochs compiled with BX_CPU_LEVEL >= 6.
选择AMD SSE4A指令支持。仅当使用BX_CPU_LEVEL>=6编译的Bochs时,此选项才存在。
misaligned_sse
Select AMD Misaligned SSE mode support. This option exists only if Bochs compiled with BX_CPU_LEVEL >= 6.
\qquad
选择AMD错位SSE模式支持。仅当使用BX_CPU_LEVEL>=6编译的Bochs时,此选项才存在。
aes
Select AES instruction set support. This option exists only if Bochs compiled with BX_CPU_LEVEL >= 6.
\qquad 选择AES指令集支持。仅当使用BX_CPU_LEVEL>=6编译的Bochs时,此选项才存在。
sha
Select SHA instruction set support. This option exists only if Bochs compiled with BX_CPU_LEVEL >= 6.
\qquad 选择SHA指令集支持。仅当使用BX_CPU_LEVEL>=6编译的Bochs时,此选项才存在。
movbe
Select MOVBE Intel® Atom instruction support. This option exists only if Bochs compiled with BX_CPU_LEVEL >= 6.
\qquad 选择MOVBE Intel(R)Atom指令支持。仅当使用BX_CPU_LEVEL>=6编译的Bochs时,此选项才存在。
adx
Select ADCX/ADOX instructions support. This option exists only if Bochs compiled with BX_CPU_LEVEL >= 6.
\qquad 选择ADCX/ADOX指令支持。仅当使用BX_CPU_LEVEL>=6编译的Bochs时,此选项才存在。
xsave
Select XSAVE extensions support. This option exists only if Bochs compiled with BX_CPU_LEVEL >= 6.
\qquad 选择XSAVE扩展支持。仅当使用BX_CPU_LEVEL>=6编译的Bochs时,此选项才存在。
xsaveopt
Select XSAVEOPT instruction support. This option exists only if Bochs compiled with BX_CPU_LEVEL >= 6.
\qquad
选择XSAVEOPT指令支持。仅当使用BX_CPU_LEVEL>=6编译的Bochs时,此选项才存在。
avx_f16c
Select AVX float16 convert instructions support. This option exists only if Bochs compiled with --enable-avx option.
\qquad
选择AVX float16转换指令支持。只有使用–enable avx选项编译Bochs时,此选项才存在。
avx_fma
Select AVX fused multiply add (FMA) instructions support. This option exists only if Bochs compiled with --enable-avx option.
\qquad
选择支持AVX融合乘加(FMA)指令。只有使用–enable avx选项编译Bochs时,此选项才存在。
bmi
Select BMI1/BMI2 instructions support. This option exists only if Bochs compiled with --enable-avx option.
\qquad
选择BMI1/BMI2指令支持。只有使用–enable avx选项编译Bochs时,此选项才存在。
fma4
Select AMD four operand FMA instructions support. This option exists only if Bochs compiled with --enable-avx option.
\qquad
选择AMD四操作数FMA指令支持。只有使用–enable avx选项编译Bochs时,此选项才存在。
xop
Select AMD XOP instructions support. This option exists only if Bochs compiled with --enable-avx option.
\qquad 选择AMD XOP指令支持。只有使用–enable avx选项编译Bochs时,此选项才存在。
tbm
Select AMD TBM instructions support. This option exists only if Bochs compiled with --enable-avx option.
\qquad 选择AMD TBM指令支持。只有使用–enable avx选项编译Bochs时,此选项才存在。
x86_64
Enable x86-64 and long mode support. This option exists only if Bochs compiled with x86-64 support.
\qquad
启用x86-64和长模式支持。只有在使用x86-64支持编译的Bochs时,此选项才存在。
1g_pages
Enable 1G page size support in long mode. This option exists only if Bochs compiled with x86-64 support.
\qquad
在长模式下启用1G页面大小支持。只有在使用x86-64支持编译的Bochs时,此选项才存在。
pcid
Enable Process-Context Identifiers (PCID) support in long mode. This option exists only if Bochs compiled with x86-64 support.
\qquad
在长模式下启用进程上下文标识符(PCID)支持。只有在使用x86-64支持编译的Bochs时,此选项才存在。
smep
Enable Supervisor Mode Execution Protection (SMEP) support. This option exists only if Bochs compiled with BX_CPU_LEVEL >= 6.
\qquad
启用监督模式执行保护(SMEP)支持。仅当使用BX_CPU_LEVEL>=6编译的Bochs时,此选项才存在。
smap
Enable Supervisor Mode Access Prevention (SMAP) support. This option exists only if Bochs compiled with BX_CPU_LEVEL >= 6.
\qquad
启用监控模式访问保护(SMAP)支持。仅当使用BX_CPU_LEVEL>=6编译的Bochs时,此选项才存在。
mwait
Select MONITOR/MWAIT instructions support. This option exists only if Bochs compiled with --enable-monitor-mwait.
\qquad
选择MONITOR/MWAIT指令支持。只有使用–enable monitor mwait编译Bochs时,此选项才存在。
vmx
Select VMX extensions emulation support. This option exists only if Bochs compiled with --enable-vmx option.
\qquad
选择VMX扩展仿真支持。只有使用–enable-vmx选项编译Bochs时,此选项才存在。
svm
Select AMD SVM (Secure Virtual Machine) extensions emulation support. This option exists only if Bochs compiled with --enable-svm option.
\qquad
选择AMD SVM(安全虚拟机)扩展仿真支持。只有使用–enable-svm选项编译Bochs时,此选项才存在。
4.3.6. memory
示例:
memory: guest=512, host=256
设置要模拟的物理内存量。
guest
Set amount of guest physical memory to emulate. The default is 32MB, the maximum amount limited only by physical address space limitations.
\qquad
设置要模拟的来宾物理内存量。默认值为32MB,这是仅受物理地址空间限制的最大容量。
host
Set amount of host memory you want to allocate for guest RAM emulation. It is possible to allocate less memory than you want to emulate in guest system. This will fake guest to see the non-existing memory. Once guest system touches new memory block it will be dynamically taken from the memory pool. You will be warned (by FATAL PANIC) in case guest already used all allocated host memory and wants more.
\qquad
设置要为来宾RAM模拟分配的主机内存量。分配的内存可能比您希望在来宾系统中模拟的内存少。这将伪造来宾以查看不存在的内存。一旦来宾系统接触到新的内存块,它将被动态地从内存池中取出。如果客人已经使用了所有分配的主机内存并想要更多内存,您将被警告(由致命恐慌)。
注意:由于主机操作系统的限制,Bochs无法在大多数32位系统上分配超过1024MB的空间。为了克服这个问题,使用–enable large ramfile选项配置和构建Bochs。
4.3.7. megs
示例:
megs: 32

megs: 128
This option sets the ‘guest’ and ‘host’ memory parameters to the same value. In all other cases the ‘memory’ option should be used instead.
\qquad
此选项将“guest”和“host”内存参数设置为相同的值。在所有其他情况下,应使用“内存”选项。
4.3.8. romimage
示例:
romimage: file=bios/BIOS-bochs-latest, options=fastboot

romimage: file=$BXSHARE/BIOS-bochs-legacy

romimage: file=mybios.bin, address=0xfff80000
The ROM BIOS controls what the PC does when it first powers on. Normally, you can use a precompiled BIOS in the source or binary distribution called BIOS-bochs-latest. The default ROM BIOS is usually loaded starting at address 0xfffe0000, and it is exactly 128k long. The legacy version of the Bochs BIOS is usually loaded starting at address 0xffff0000, and it is exactly 64k long. You can use the environment variable $BXSHARE to specify the location of the BIOS. The usage of external large BIOS images (up to 512k) at memory top is now supported, but we still recommend to use the BIOS distributed with Bochs. The start address is optional, since it can be calculated from image size. The Bochs BIOS currently supports only the option “fastboot” to skip the boot menu delay.
\qquad ROM BIOS控制电脑首次通电时的操作。通常,您可以在源或二进制发行版中使用预编译的BIOS,称为BIOS bochs latest。默认的ROM BIOS通常从地址0xfffe0000开始加载,长度正好为128k。传统版本的Bochs BIOS通常从地址0xffff0000开始加载,长度正好为64k。您可以使用环境变量$BXSHARE来指定BIOS的位置。现在支持在内存顶部使用外部大型BIOS映像(最高512k),但我们仍然建议使用与Bochs一起分发的BIOS。起始地址是可选的,因为它可以根据图像大小计算。Bochs BIOS目前仅支持“快速启动”选项以跳过启动菜单延迟。
4.3.9. vgaromimage
示例:
vgaromimage: file=bios/VGABIOS-elpin-2.40
vgaromimage: file=$BXSHARE/VGABIOS-lgpl-latest
vgaromimage: file=$BXSHARE/VGABIOS-lgpl-latest-cirrus
This tells Bochs what VGA ROM BIOS to load (at 0xC0000).
这将告诉Bochs要加载的VGA ROM BIOS地址在(0xC0000)。
A VGA BIOS from Elpin Systems, Inc. as well as a free LGPL’d VGA BIOS are provided in the source and binary distributions.
源代码和二进制版本中提供了Elpin Systems,Inc.的VGA BIOS以及免费的LGPL VGA BIOS。
注意:请使用vga选项进行检查,以决定要使用的vga BIOS。
4.3.10. optromimage1, optromimage2, optromimage3 or optromimage4
示例:
optromimage1: file=optionalrom.bin, address=0xd0000
This enables Bochs to load up to 4 optional ROM images.
\qquad
这使Bochs能够加载多达4个可选的ROM映像。
Be sure to use a read-only area, typically between C8000 and EFFFF. These optional ROM images should not overwrite the rombios (located at F0000-FFFFF) and the videobios (located at C0000-C7FFF).
\qquad 请确保使用只读区域,通常在C8000和EFFF之间。这些可选ROM图像不应覆盖血栓(位于F0000-FFFFF)和视频生物(位于C0000-C7FFF)。
Those ROM images will be initialized by the BIOS if they contain the right signature (0x55AA).
\qquad
如果这些ROM映像包含正确的签名(0x55AA),则BIOS将对其进行初始化。
It can also be a convenient way to upload some arbitrary code/data in the simulation, that can be retrieved by the boot loader
\qquad
它还可以是一种方便的方式来上传模拟中的一些任意代码/数据,这些代码/数据可以由引导加载程序检索
4.3.11. vga
示例:
vga: extension=cirrus, update_freq=10, realtime=1, ddc=file:monitor.bin
vga: extension=vbe
这定义了与VGA显示器相关的参数
The ‘extension’ option can be used to specify the VGA display extension. With the value ‘none’ you can use standard VGA with no extension. Other supported values are ‘vbe’ for Bochs VBE (needs VGABIOS-lgpl-latest as VGA BIOS, see vgaromimage option), ‘cirrus’ for Cirrus SVGA support (needs VGABIOS-lgpl-latest-cirrus as VGA BIOS) and ‘voodoo’ for Voodoo Graphics support (needs VGABIOS-lgpl-latest-banshee as VGA BIOS / see Section 9.20 for more information).
\qquad “extension”选项可用于指定VGA显示扩展。如果值为“none”,则可以使用无扩展的标准VGA。其他支持的值包括Bochs vbe的“vbe”(需要VGABIOS-lgpl-lastest 作为VGA BIOS,请参阅vgaromimage选项)、cirrus SVGA支持的“cirrus”(需要VGABIOS-lgpl-latest-cirrus作为VGA BIOS)和voodoo Graphics支持的“voodoo”(需要最新版本VGABIOS-lgpl-banshee 作为VGA BIOS/请参阅第9.20节了解更多信息)。
\qquad VGA更新频率指定每秒显示更新的次数。此参数可以在运行时更改。默认值为5。
The ‘realtime’ option specifies the operation mode of the VGA update timer. If set to 1, the VGA timer is based on realtime, otherwise it is based on the ips setting. If the host is slow (low ips, update_freq) and the guest uses HLT appropriately, setting this to 0 and “clock: sync=none” may improve the responsiveness of the guest GUI when the guest is otherwise idle. The default value is 1.
\qquad “realtime”选项指定VGA更新计时器的操作模式。如果设置为1,则VGA计时器基于实时,否则基于ips设置。如果主机速度慢(低 ips,update_freq),并且客户机适当地使用HLT,则将其设置为0并且“clock:sync=none”可以在客户机空闲时提高客户机GUI的响应能力。默认值为1。
The parameter ‘ddc’ defines the behaviour of the DDC emulation that returns the monitor EDID data. By default the ‘builtin’ values for ‘Bochs Screen’ are used. Other choices are ‘disabled’ (no DDC emulation) and ‘file’ (read monitor EDID from file / path name separated with a colon).
\qquad 参数“ddc”定义返回监视器EDID数据的DDC仿真的行为。默认情况下,将使用“Bochs Screen”的“builtin”值。其他选项包括“disabled”(无DDC模拟)和“file”(从用冒号分隔的 文件/路径 名中读取监视器EDID)。
4.3.12. voodoo
示例:
voodoo: enabled=1, model=voodoo1
This defines the Voodoo Graphics emulation (experimental). Currently supported models are ‘voodoo1’, ‘voodoo2’, ‘banshee’ and ‘voodoo3’. The Voodoo2 support is not yet complete, but almost usable. The Banshee / Voodoo3 support is under construction, but basically usable. The 2D/3D cards require the vga extension option to be set to ‘voodoo’. If the i440BX PCI chipset is selected, they can be assigned to AGP (slot #5). The gui screen update timing for all models is controlled by the related ‘vga’ options. See Section 9.20 for more information.
\qquad 这定义了Voodoo图形仿真(实验)。目前支持的型号有“voodoo1”、“voodoo2”、“banshee”和“voodoo3”。Voodoo2支持尚未完成,但几乎可以使用。Banshee/Vodoo3支架正在建造中,但基本可用。2D/3D卡需要将vga扩展选项设置为“voodoo”。如果选择了i440BX PCI芯片组,则可以将其分配给AGP(插槽#5)。所有型号的gui屏幕更新时间由相关的“vga”选项控制。详见第9.20节。
4.3.13. keyboard 键盘
示例:
keyboard: type=mf, serial_delay=200, paste_delay=100000
keyboard: keymap=gui/keymaps/x11-pc-de.map
keyboard: user_shortcut=ctrl-alt-del
这定义了与模拟键盘相关的参数。
type
Type of keyboard return by a “identify keyboard” command to the keyboard controller. It must be one of “xt”, “at” or “mf”. Defaults to “mf”. It should be ok for almost everybody. A known exception is french macs, that do have a “at”-like keyboard.
\qquad 通过“identify keyboard ”命令返回键盘控制器的键盘类型。它必须是“xt”、“at” 或 “mf”中的一个。默认为“mf”。几乎每个人都应该可以。一个已知的例外是法式 macs ,它确实有一个类似于“at”的键盘。
serial_delay
Approximate time in microseconds that it takes one character to be transferred from the keyboard to controller over the serial path.
\qquad
一个字符通过串行路径从键盘传输到控制器所用的近似时间(以微秒为单位)。
paste_delay
Approximate time in microseconds between attempts to paste characters to the keyboard controller. This leaves time for the guest os to deal with the flow of characters. The ideal setting depends on how your operating system processes characters. The default of 100000 usec (.1 seconds) was chosen because it works consistently in Windows.
\qquad
尝试将字符粘贴到键盘控制器之间的近似时间(以微秒为单位)。这给客串操作系统留下了处理角色流动的时间。理想的设置取决于操作系统处理字符的方式。之所以选择默认值100000 usec(.1秒),是因为它在Windows中工作一致。
\qquad
如果操作系统在粘贴过程中丢失字符,请增加粘贴延迟,直到停止丢失字符为止。
keymap
这使得物理本地化键盘能够重新映射为虚拟化的us键盘,正如PC体系结构所期望的那样。
Keyboard mapping is available for the display libraries x, sdl (Linux port) and wx (GTK port). For SDL you have to use keymaps designed for SDL, the wxWidgets GUI uses the keymaps for X11.
键盘映射可用于显示库x、sdl(Linux端口)和wx(GTK端口)。对于SDL,您必须使用为SDL设计的关键映射,wxWidgets GUI使用X11的关键映射。
user_shortcut
This defines the keyboard shortcut to be sent when you press the “user” button in the headerbar. The shortcut string is a combination of maximum 3 key names (listed below) separated with a ‘-’ character.
\qquad 这定义了按下头栏中的“用户”按钮时要发送的键盘快捷方式。快捷方式字符串是最多3个键名(如下所列)的组合,用“-”字符分隔。
Valid key names有效密钥名称:
“alt”, “bksl”, “bksp”, “ctrl”, “del”, “down”, “end”, “enter”, “esc”, “f1”, … “f12”, “home”, “ins”, “left”, “menu”, “minus”, “pgdwn”, “pgup”, “plus”, “power”, “print”, “right”, “scrlck”, “shift”, “space”, “tab”, “up” and “win”.
4.3.14. mouse 鼠标
示例:
mouse: enabled=1
mouse: type=imps2, enabled=1
mouse: type=serial, enabled=1
mouse: enabled=0, toggle=ctrl+f10
This defines parameters for the emulated mouse type, the initial status of the mouse capture and the runtime method to toggle it.
\qquad
这定义了模拟鼠标类型的参数、鼠标捕获的初始状态以及切换鼠标捕获的运行时方法。
type
With the mouse type option you can select the type of mouse to emulate. The default value is ‘ps2’. The other choices are ‘imps2’ (wheel mouse on PS/2), ‘serial’, ‘serial_wheel’, ‘serial_msys’ (one com port requires setting ‘mode=mouse’, see com option) ‘inport’ and ‘bus’ (if present). To connect a mouse to a USB port, see the usb_uhci, ‘usb_ohci’, ‘usb_ehci’ or ‘usb_xhci’ options (requires PCI and USB support).
\qquad
使用鼠标类型选项,可以选择要模拟的鼠标类型。默认值为“ps2”。其他选项是“imps2”(PS/2上的滚轮鼠标)、“serial”、“serial_wheel”、“serial_msys”(一个com端口需要设置“mode=mouse”,请参阅com选项)、“inport”和“bus”(如果存在)。要将鼠标连接到USB端口,请参阅usb_uhci, “usb_ohci”、“USB_ehci” 或 “usb_xhci”选项(需要PCI和USB支持)。
enabled
The Bochs gui creates mouse “events” unless the ‘enabled’ option is set to 0. The hardware emulation itself is not disabled by this. Unless you have a particular reason for enabling the mouse by default, it is recommended that you leave it off. You can also toggle the mouse usage at runtime (see headerbar and the ‘toggle’ option below).
\qquad
Bochs gui会创建鼠标“events”,除非 “enabled” 选项设置为0。硬件仿真本身并没有因此而被禁用。除非您有特殊原因默认启用鼠标,否则建议您将其关闭。您还可以在运行时切换鼠标的使用情况(请参阅下面的头栏和“toggle”选项)。
toggle拨动
The default method to toggle the mouse capture at runtime is to press the CTRL key and the middle mouse button (‘ctrl+mbutton’). This option allows to change the method to ‘ctrl+f10’ (like DOSBox) or ‘ctrl+alt’ (like QEMU) or ‘f12’.
\qquad 在运行时切换鼠标捕获的默认方法是按下CTRL键和鼠标中键(“ctrl + mbutton”)。此选项允许将方法更改为“ctrl+f10”(如DOSBox)或“ctrl+alt”(如QEMU)或“f12”。
4.3.15. pci
这定义了设置Bochs PCI仿真的参数:
示例:
pci: enabled=1, chipset=i440fx # default if compiled with PCI support
pci: enabled=1, chipset=i440fx, slot1=pcivga, slot2=ne2k, advopts=noacpi
pci: enabled=1, chipset=i440bx, slot5=voodoo, slot1=e1000
enabled
如果使用PCI支持编译Bochs,则默认情况下会启用它。
chipset芯片组
目前支持i430FX、i440FX和i440BX(有限)芯片组,默认为i440FX。
slotX
It is possible to specify the devices connected to PCI slots. Up to 5 slots are available. For combined PCI/ISA devices assigning to slot is mandatory if the PCI model should be emulated (cirrus, ne2k and pcivga). Setting up slot for PCI-only devices is also supported, but they are auto-assigned if not specified (e1000, es1370, pcidev, pcipnic, usb_ehci, usb_ohci, usb_xhci, voodoo). All device models except the network devices ne2k and e1000 can be used only once in the slot configuration. In case of the i440BX chipset, the slot #5 is the AGP slot. Currently only the ‘voodoo’ device can be assigned to AGP.
\qquad 可以指定连接到PCI插槽的设备。最多可提供5个插槽。对于组合PCI/ISA设备,如果应该模拟PCI模型(cirrus、ne2k和pcivga),则必须分配插槽。也支持为仅PCI设备设置插槽,但如果未指定,则会自动分配插槽(e1000、es1370、pcidev、pcipnic、usb_ehci、usb_ohci、usb_xhci、voodoo)。除了网络设备ne2k和e1000之外的所有设备型号在插槽配置中只能使用一次。在i440BX芯片组的情况下,插槽#5是AGP插槽。目前只有“voodoo”设备可以分配给AGP。
advopts
With the advanced PCI options it is possible to control the behaviour of the PCI chipset. These options can be specified as comma-separated values. By default the “Bochs i440FX” chipset enables the ACPI and HPET devices, but original i440FX doesn’t support them. The options ‘noacpi’ and ‘nohpet’ make it possible to disable them. The option ‘noagp’ disables the incomplete AGP subsystem of the i440BX chipset.
\qquad 通过高级PCI选项,可以控制PCI芯片组的行为。这些选项可以指定为逗号分隔的值。默认情况下,“Bochs i440FX”芯片组支持ACPI和HPET设备,但原始的i440FX不支持它们。选项“noacpi”和“nohpet”可以禁用它们。选项“noagp”禁用i440BX芯片组的不完整AGP子系统。
###4.3.16. clock 时钟
这定义了Bochs内部时钟的参数:
sync
This defines the method how to synchronize the Bochs internal time with realtime. With the value ‘none’ the Bochs time relies on the IPS value and no host time synchronization is used. The ‘slowdown’ method sacrifices performance to preserve reproducibility while allowing host time correlation. The ‘realtime’ method sacrifices reproducibility to preserve performance and host-time correlation. It is possible to enable both synchronization methods.
\qquad 这定义了如何将Bochs内部时间与实时时间同步的方法。值为“none”时,Bochs时间依赖于IPS值,并且不使用主机时间同步。“slowdown”方法牺牲性能以保持再现性,同时允许主机时间相关性。“realtime”方法牺牲了再现性以保持性能和主机时间相关性。可以同时启用这两种同步方法。
rtc_sync
If this option is enabled together with the realtime synchronization, the RTC runs at realtime speed. This feature is disabled by default.
如果此选项与实时同步一起启用,则RTC以实时速度运行。此功能在默认情况下处于禁用状态。
time0
Specifies the start (boot) time of the virtual machine. Use a time value as returned by the time(2) system call or a string as returned by the ctime(3) system call. If no time0 value is set or if time0 equal to 1 (special case) or if time0 equal ‘local’, the simulation will be started at the current local host time. If time0 equal to 2 (special case) or if time0 equal ‘utc’, the simulation will be started at the current utc time.
\qquad 指定虚拟机的启动(引导)时间。使用time(2)系统调用返回的时间值或ctime(3)系统调用所返回的字符串。如果未设置time0值,或者如果time0等于1(特殊情况),或者time0等于“local”,则模拟将在当前本地主机时间启动。如果time0等于2(特殊情况)或 time0等于“utc”,则模拟将在当前utc时间开始。
**Syntax : **
clock: sync=[none|slowdown|realtime|both], time0=[timeValue|local|utc]
示例:
clock: sync=none, time0=local # Now (localtime)
clock: sync=slowdown, time0=315529200 # Tue Jan 1 00:00:00 1980
clock: sync=none, time0=“Mon Jan 1 00:00:00 1990” # 631148400
clock: sync=realtime, time0=938581955 # Wed Sep 29 07:12:35 1999
clock: sync=realtime, time0=“Sat Jan 1 00:00:00 2000” # 946681200
clock: sync=none, time0=1 # Now (localtime)
clock: sync=none, time0=utc # Now (utc/gmt)
Default value are sync=none, rtc_sync=0, time0=local
4.3.17. cmosimage
示例:
cmosimage: file=cmos.img, rtc_init=time0
This defines a binary image file with size 128 bytes that can be loaded into the CMOS RAM at startup. The rtc_init parameter controls whether initialize the RTC with values stored in the image. By default the time0 argument given to the clock option is used. With ‘rtc_init=image’ the image is the source for the initial time.
\qquad 这定义了一个大小为128字节的二进制映像文件,该文件可以在启动时加载到CMOS RAM中。rtc_init参数控制是否使用映像中存储的值初始化RTC。默认情况下,将使用给定给clock选项的time0参数。对于“rtc_init=image”,映像是初始时间的源。
4.3.18. private_colormap
示例:
private_colormap: enabled=1
Requests that the GUI creates and uses its own non-shared colormap. This colormap will be used when in the Bochs window. If not enabled, a shared colormap scheme may be used. Once again, enabled=1 turns on this feature and 0 turns it off.
\qquad 请求GUI创建并使用其自己的非共享颜色映射。在Bochs窗口中将使用此颜色映射。如果未启用,则可以使用共享颜色映射方案。再次,enabled=1将打开此功能,0将关闭此功能。
4.3.19. floppya/floppyb
示例:
2.88M 3.5" media:
floppya: 2_88=a:, status=inserted
1.44M 3.5" media (write protected):
floppya: 1_44=floppya.img, status=inserted, write_protected=1
1.2M 5.25" media:
floppyb: 1_2=/dev/fd0, status=inserted
720K 3.5" media:
floppya: 720k=/usr/local/bochs/images/win95.img, status=inserted
auto-detect floppy media type: 自动检测软盘介质类型:
floppya: image=floppy.img, status=inserted
use directory as VFAT media:使用目录作为VFAT介质:
floppya: 1_44=vvfat:path, status=inserted
1.44M 3.5" floppy drive, no media: 1.44M 3.5“软盘驱动器,无介质:
floppya: type=1_44
Floppya is the first drive, and floppyb is the second drive. If you’re booting from a floppy, floppya should point to a bootable disk. To read from a disk image, write the name of the image file. In many operating systems Bochs can read directly from a raw floppy drive. For raw disk access, use the device name (Unix systems) or the drive letter and a colon (Windows systems).
\qquad Floppya是第一个驱动器,floppyb是第二个驱动器。如果您从软盘启动,floppya应该指向可启动磁盘。要读取磁盘映像,请写入映像文件的名称。在许多操作系统中,Bochs可以直接从原始软盘驱动器中读取。对于原始磁盘访问,请使用设备名称(Unix系统)或驱动器号和冒号(Windows系统)。
Following floppy media types are supported: 2_88, 1_44, 1_2, 720k, 360k, 320k, 180k, 160k, as well as “image” to let Bochs auto-detect the type of floppy media (does only work with images, not with raw floppy drives). In that case the size must match one of the supported types.
\qquad 支持以下软盘介质类型:2_88、1_44、1_2、720k、360k、320k、180k、160k,以及“映像”,以便Bochs自动检测软盘介质的类型(仅适用于映像,不适用于原始软盘驱动器)。在这种情况下,大小必须与支持的类型之一匹配。
You can set the initial status of the media to ejected or inserted. Usually you will want to use inserted.
\qquad
您可以将介质的初始状态设置为已弹出或已插入。通常您会想要使用inserted。
The parameter ‘type’ can be used to enable the floppy drive without media and status specified. Usually the drive type is set up based on the media type.
\qquad 参数“type”可用于在不指定介质和状态的情况下启用软盘驱动器。通常,驱动器类型是根据介质类型设置的。
The optional parameter ‘write_protected’ can be used to control the media write protect switch. By default it is turned off.
\qquad
可选参数“write_protected”可用于控制介质写保护开关。默认情况下,它处于关闭状态。
4.3.20. ata0, ata1, ata2, ata3
示例:
ata0: enabled=1, ioaddr1=0x1f0, ioaddr2=0x3f0, irq=14
ata1: enabled=1, ioaddr1=0x170, ioaddr2=0x370, irq=15
ata2: enabled=1, ioaddr1=0x1e8, ioaddr2=0x3e0, irq=11
ata3: enabled=1, ioaddr1=0x168, ioaddr2=0x360, irq=9
These options enables up to 4 ata channels. For each channel the two base io addresses and the irq must be specified. ata0 and ata1 are enabled by default, with the values shown above.
\qquad 这些选项最多可启用4个ata通道。对于每个通道,必须指定两个基本io地址和irq。默认情况下启用ata0和ata1,其值如上所示。
4.3.21. ata0-master, ata0-slave, ata1-, ata2-, ata3-*
示例:
ata0-master: type=disk, path=10M.img, mode=flat, cylinders=306, heads=4, spt=17, translation=none
ata1-master: type=disk, path=2GB.cow, mode=vmware3, cylinders=5242, heads=16, spt=50, translation=echs
ata1-slave: type=disk, path=3GB.img, mode=sparse, cylinders=6541, heads=16, spt=63, translation=auto
ata2-master: type=disk, path=7GB.img, mode=undoable, cylinders=14563, heads=16, spt=63, translation=lba
ata2-slave: type=cdrom, path=iso.sample, status=inserted
This defines the type and characteristics of all attached ata devices:
这定义了所有连接的ata设备的类型和特性:
表4-4。ata设备配置选项
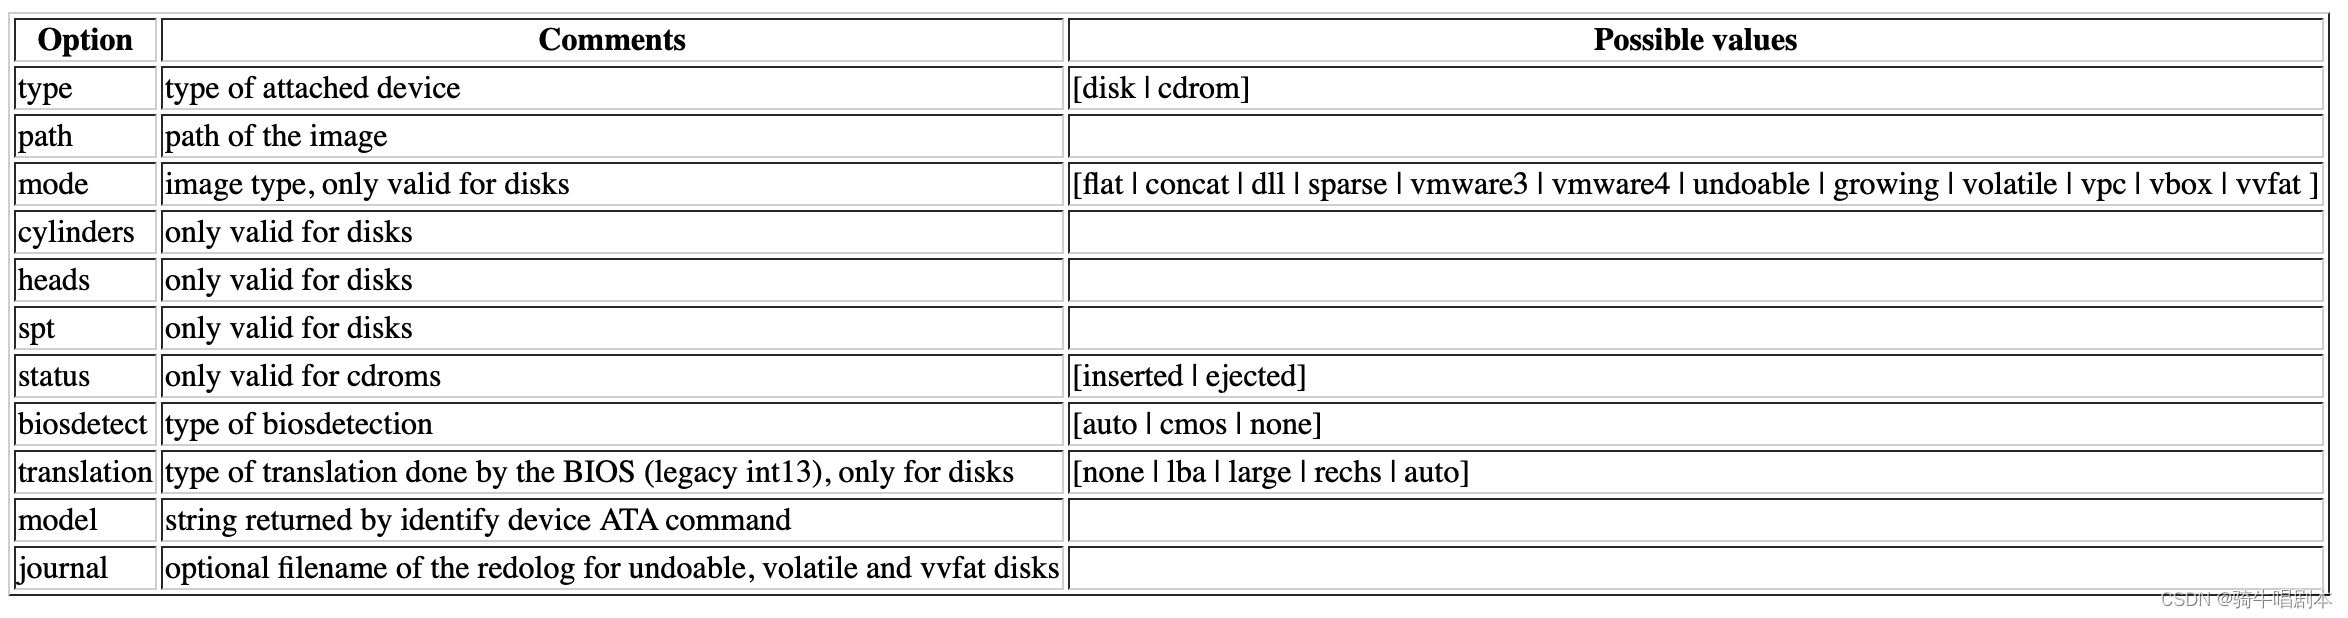
You have to tell the type of the attached device. For Bochs 2.0 or later, it can be disk or cdrom.
\qquad
您必须告知所连接设备的类型。对于Bochs 2.0或更高版本,它可以是磁盘或光盘。
You have to point the “path” at a hard disk image file, cdrom iso file, or physical cdrom device. To create a hard disk image, try running bximage (see Section 9.2). It will help you choose the size and then suggest a line that works with it.
\qquad 您必须将“path”指向硬盘映像文件、cdrom iso文件或物理cdrom设备。要创建硬盘映像,请尝试运行bximage(请参阅9.2节)。它将帮助您选择大小,然后建议以行方式工作。
In Unix it is possible to use a raw device as a Bochs hard disk, but we don’t recommend it for safety reasons. In Windows, there is no easy way.
\qquad
在Unix中,可以使用原始设备作为Bochs硬盘,但出于安全原因,我们不建议使用。在Windows中,没有简单的方法。
Disk geometry autodetection works with images created by bximage if CHS is set to 0/0/0 (cylinders are calculated using heads=16 and spt=63). For other hard disk images and modes the cylinders, heads, and spt are mandatory. In all cases the disk size reported from the image must be exactly CHS*512. Flat hard disk images from other projects might store additional information at the end of the file that makes this check fail. Only in this case it is safe to select “continue” when Bochs panics.
\qquad 如果CHS设置为0/0/0(使用heads=16和spt=63计算圆柱体),则磁盘几何结构自动检测可用于bximage创建的映像。对于其他硬盘映像和模式,柱面、磁头和spt是强制性的。在所有情况下,从映像报告的磁盘大小必须恰好为CHS*512。来自其他项目的平面硬盘映像可能会在导致此检查失败的文件末尾存储其他信息。只有在这种情况下,当Bochs恐慌时选择“continue”是安全的。
The disk translation scheme (implemented in legacy int13 BIOS functions, and used by older operating systems like MS-DOS), can be defined as:
\qquad
磁盘转换方案(在遗留的int13 BIOS功能中实现,并由MS-DOS等较旧的操作系统使用)可以定义为:
none : no translation, for disks up to 528MB (1032192 sectors) 无转换,适用于最大528MB的磁盘(1032192个扇区)
large : a standard bitshift algorithm, for disks up to 4.2GB (8257536 sectors) 标准位移算法,适用于高达4.2GB的磁盘(8257536个扇区)
rechs : a revised bitshift algorithm, using a 15 heads fake physical geometry, for disks up to 7.9GB (15482880 sectors). (don’t use this unless you understand what you’re doing) 一种改进的位移算法,使用15个磁头的伪物理几何结构,适用于高达7.9GB(15482880个扇区)的磁盘。(除非你明白自己在做什么,否则不要使用这个)
lba : a standard lba-assisted algorithm, for disks up to 8.4GB (16450560 sectors)一种标准的lba辅助算法,适用于高达8.4GB的磁盘(16450560个扇区)
auto : autoselection of best translation scheme. (it should be changed if system does not boot)自动选择最佳翻译方案。(如果系统未启动,则应进行更改)
Please see Section 9.16.2 for a discussion on translation scheme.
\qquad
关于翻译方案的讨论,请参见第9.16.2节。
The mode option defines how the disk image is handled. Disks can be defined as:
\qquad
模式选项定义如何处理磁盘映像。磁盘可以定义为:
flat : one file flat layout 单文件平面布局
concat : multiple files layout 多文件布局
dll : developer’s specific, through a DLL 特定于开发人员,通过dll
sparse : stackable, commitable, rollbackable 可堆叠、可通信、可回滚
vmware3 : vmware version 3 disk support vmware版本3磁盘支持
vmware4 : vmware version 4 disk support (aka VMDK) vmware版本4磁盘支持(又名VMDK)
undoable : read-only base file with commitable redolog 只读的基本文件,带有可执行的重做日志
growing : growing file 增长文件
volatile : read-only base file with volatile redolog 带有volatile重做日志的只读基础文件
vpc: fixed / dynamic size VirtualPC image 固定/动态大小的VirtualPC映像
vbox: fixed / dynamic size Oracle™ VM VirtualBox image (VDI version 1.1) 固定/动态大小的Oracle(tm)VM VirtualBox映像(VDI版本1.1)
vvfat: local directory appears as VFAT disk (with volatile redolog / optional commit) 本地目录显示为VFAT磁盘(带有volatile redolog/可选提交)
Please see Section 9.21 for a discussion on disk modes.
有关磁盘模式的讨论,请参见第9.21节。
默认值为:
mode=flat, biosdetect=auto, translation=auto, model=“Generic 1234”
The biosdetect option has currently no effect on the BIOS.
\qquad
BIOS检测选项当前对BIOS没有影响。
Note: Make sure the proper ata option is enabled when using a device on that ata channel.
注意:在该ata通道上使用设备时,请确保启用了正确的ata选项。
4.3.22. boot
示例:
boot: floppy
boot: cdrom, disk
boot: network, disk
boot: cdrom, floppy, disk
This defines the boot sequence. You can specify up to 3 boot drives, which can be ‘floppy’, ‘disk’, ‘cdrom’ or ‘network’ (boot ROM). Legacy ‘a’ and ‘c’ are also supported.
\qquad
这定义了引导顺序。您最多可以指定3个启动驱动器,可以是“软盘”、“磁盘”、“光盘”或“网络”(启动ROM)。还支持旧版“a”和“c”。
4.3.23. floppy_bootsig_check
示例:
floppy_bootsig_check: disabled=1
This disables the 0xaa55 signature check on boot floppies The check is enabled by default.
\qquad
这将禁用启动软盘上的0xaa55签名检查默认情况下会启用该检查。
4.3.24. log
示例:
log: bochsout.txt
log: -
log: /dev/tty (Unix only)
log: /dev/null (Unix only)
log: nul (win32 only)
Give the path of the log file you’d like Bochs debug and misc. verbiage to be to be written to. If you don’t use this option or set the filename to ‘-’ the output is written to the console. If you really don’t want it, make it “/dev/null” (Unix) or “nul” (win32). :^(
\qquad
给出您希望Bochs调试和错误的日志文件的路径。要写入的措辞。如果不使用此选项或将文件名设置为“-”,则输出将写入控制台。如果你真的不想要它,那就把它做成“/dev/null”(Unix)或“nul”(win32)。:^(
4.3.25. logprefix
示例:
logprefix: %t-%e-@%i-%d
logprefix: %i%e%d
This handles the format of the string prepended to each log line. You may use those special tokens :
\qquad
这将处理每个日志行前面的字符串的格式。您可以使用这些特殊代币:
%t : 11 decimal digits timer tick 11位十进制数字计时器刻度
%i : 8 hexadecimal digits of current cpu eip (ignored in SMP configuration) 8个当前cpu eip的十六进制数字(在SMP配置中忽略)
%e : 1 character event type ('i’nfo, 'd’ebug, 'p’anic, ‘e’rror) 1个字符的事件类型(’'info,'ebug,'p’nic,‘error’)
%d : 5 characters string of the device, between brackets 设备的5个字符串,括号之间
Default is %t%e%d 默认值为%t%e%d
###4.3.26. debug/info/error/panic
示例:
debug: action=ignore, pci=report
info: action=report
error: action=report
panic: action=ask
During simulation, Bochs encounters certain events that the user might want to know about. These events are divided into four levels of importance: debug, info, error, and panic. Debug messages are usually only useful when writing Bochs code or when trying to locate a problem. There may be thousands of debug messages per second, so be careful before turning them on. Info messages tell about interesting events that don’t happen that frequently. Bochs produces an “error” message when it finds a condition that really shouldn’t happen, but doesn’t endanger the simulation. An example of an error might be if the emulated software produces an illegal disk command. Panic messages mean that Bochs cannot simulate correctly and should probably shut down. A panic can be a configuration problem (like a misspelled bochsrc line) or an emulation problem (like an unsupported video mode).
\qquad 在模拟过程中,Bochs会遇到用户可能想要了解的某些事件。这些事件分为四个重要级别:调试、信息、错误和恐慌。调试消息通常只有在编写Bochs代码或试图查找问题时才有用。每秒可能有数千条调试消息,所以在打开它们之前要小心。信息消息会告诉你一些不太频繁发生的有趣事件。当Bochs发现一个确实不应该发生但不会危及模拟的情况时,它会产生一条“错误”消息。一个错误的例子可能是模拟软件产生了非法的磁盘命令。恐慌信息意味着Bochs无法正确模拟,可能应该关闭。恐慌可能是配置问题(如拼写错误的bochsrc线)或模拟问题(如不支持的视频模式)。
The debug, info, error, and panic lines in the bochsrc control what Bochs will do when it encounters each type of event. The allowed actions are: fatal (terminate bochs), ask (ask the user what to do), warn (show dialog with message and continue), report (print information to the console or log file), or ignore (do nothing). The recommended settings are listed in the sample above.
\qquad bochsrc中的debug、info、error和panic行控制Bochs在遇到每种类型的事件时将执行的操作。允许的操作有:致命(终止bochs)、询问(询问用户该做什么)、警告(显示带有消息的对话框并继续)、报告(将信息打印到控制台或日志文件)或忽略(什么都不做)。上面的示例中列出了建议的设置。
It is also possible to specify the ‘action’ to do for each Bochs facility separately (e.g. crash on panics from everything except the cdrom, and only report those). See the log function module table for valid module names.
\qquad 也可以单独指定要为每个Bochs设施执行的“操作”(例如,在除cdrom之外的所有设备上发生死机,并仅报告这些情况)。有关有效的模块名称,请参阅日志函数模块表。
Tip: The safest action for panics is “fatal” or “ask”. If you are getting lots of panics and get tired of telling it to continue each time, you can try action=report instead. If you allow Bochs to continue after a panic, don’t be surprised if you get strange behavior or crashes after a panic occurs. Please report panic messages to the bochs-developers mailing list unless it is just a configuration problem like “could not find hard drive image.”
提示:
\qquad
对于恐慌来说,最安全的行动是“致命”或“询问”。如果你有很多恐慌,并且厌倦了每次都告诉它继续下去,你可以尝试行动=报告。如果你允许Bochs在恐慌后继续,如果你在恐慌发生后出现奇怪的行为或崩溃,不要感到惊讶。请向bochs开发人员邮件列表报告恐慌消息,除非这只是一个配置问题,如“找不到硬盘驱动器映像”
4.3.27. debugger_log
示例:
debugger_log: debugger.out
debugger_log: /dev/null (Unix only)
debugger_log: -
Give the path of the log file you’d like Bochs to log debugger output. If you really don’t want it, make it ‘/dev/null’, or ‘-’.
\qquad 给出您希望Bochs记录调试器输出的日志文件的路径。如果您真的不想要它,请将其设置为“/dev/null”或“-”。
4.3.28. com[1-4]
示例:
com1: enabled=1, mode=null
com1: enabled=1, mode=mouse
com1: enabled=1, mode=term, dev=/dev/ttyp9
com2: enabled=1, mode=file, dev=serial.out
com3: enabled=1, mode=raw, dev=com1
com3: enabled=1, mode=socket-client, dev=localhost:8888
com3: enabled=1, mode=socket-server, dev=localhost:8888
com4: enabled=1, mode=pipe-client, dev=\.\pipe\mypipe
com4: enabled=1, mode=pipe-server, dev=\.\pipe\mypipe
This defines a serial port (UART type 16550A).
这定义了一个串行端口(UART类型16550A)。
When using the mode ‘term’, you can specify a device to use as com1. This can be a real serial line, or a pty. To use a pty (under X/Unix), create two windows (xterms, usually). One of them will run Bochs, and the other will act as com1. Find out the tty of the com1 window using the tty' command, and use that as the dev’ parameter. Then do `sleep 1000000’ in the com1 window to keep the shell from messing with things, and run Bochs in the other window. Serial I/O to com1 (port 0x3f8) will all go to the other window.
\qquad 当使用模式“term”时,您可以指定一个设备作为com1使用。这可以是一条真正的串行线,也可以是一个pty。要使用pty(在X/Unix下),请创建两个窗口(通常为xterms)。其中一人将管理Bochs,另一人将担任com1。使用“tty”命令找出com1窗口的tty,并将其用作“dev”参数。然后在com1窗口中执行“睡眠1000000”,以防止shell扰乱事务,并在另一个窗口中运行Bochs。到com1(端口0x3f8)的串行I/O将全部转到另一个窗口。
When using socket* and pipe* (win32 only) modes Bochs becomes either socket/named pipe client or server. In client mode it connects to an already running server (if connection fails Bochs treats com port as not connected). In server mode it opens socket/named pipe and waits until a client application connects to it before starting simulation. This mode is useful for remote debugging (e.g. with gdb’s “target remote host:port” command or windbg’s command line option -k com:pipe,port=\.\pipe\pipename). Socket modes use simple TCP communication, pipe modes use duplex byte mode pipes.
\qquad 当使用socket和pipe(仅限win32)模式时,Bochs将成为socket/命名管道客户端或服务器。在客户端模式下,它连接到已经运行的服务器(如果连接失败,Bochs将com端口视为未连接)。在服务器模式下,它打开套接字/命名管道,并等待客户端应用程序连接到它,然后再开始模拟。此模式适用于远程调试(例如,使用gdb的“target remote host:port”命令或windbg的命令行选项-k com:pipe,port=\.\pipe\pipename)。套接字模式使用简单的TCP通信,管道模式使用双工字节模式管道。
Other serial modes are ‘null’ (no input/output), ‘file’ (output to a file specified as the ‘dev’ parameter and changeable at runtime), ‘raw’ (use the real serial port - partly implemented on win32), ‘mouse’ (standard serial mouse - requires mouse option setting ‘type=serial’, ‘type=serial_wheel’ or ‘type=serial_msys’).
\qquad 其他串行模式有“null”(无输入/输出)、“file”(输出到指定为“dev”参数并在运行时可更改的文件)、“raw”(使用实际串行端口-部分在win32上实现)、“mouse”(标准串行鼠标-需要鼠标选项设置“type=serial”、“type=serial_wheel”或“type=串行_msys”)。
4.3.29. parport[1-2]
示例:
parport1: enabled=1, file=“parport.out”
parport2: enabled=1, file=“/dev/lp0”
parport1: enabled=0
This defines a parallel (printer) port. When turned on and an output file is defined, the emulated printer port sends characters printed by the guest OS into the output file. On some platforms, a device filename can be used to send the data to the real parallel port (e.g. “/dev/lp0” on Linux, “lpt1” on win32 platforms). The output file can be changed at runtime.
\qquad 这定义了一个并行(打印机)端口。当打开并定义了输出文件时,模拟打印机端口会将来宾操作系统打印的字符发送到输出文件中。在某些平台上,可以使用设备文件名将数据发送到真正的并行端口(例如,Linux上的“/dev/lp0”,win32平台上的“lpt1”)。输出文件可以在运行时更改。
4.3.30. sound
Example for one driver (uses platform-default):
sound: driver=default, waveout=/dev/dsp
Example for different drivers:
sound: waveoutdrv=sdl, waveindrv=alsa, midioutdrv=dummy
This defines the lowlevel sound driver(s) for the wave (PCM) input / output and the MIDI output feature and (if necessary) the devices to be used. It can have several of the following properties. All properties are in the format sound: property=value.
\qquad 这定义了波形(PCM)输入/输出的低电平声音驱动器和MIDI输出功能,以及(如有必要)要使用的设备。它可以具有以下几个属性。所有属性的格式均为sound:property=value。
waveoutdrv: This defines the driver to be used for the waveout feature. Possible values are ‘file’ (all wave data sent to file), ‘dummy’ (no output) and the platform-dependant drivers ‘alsa’, ‘oss’, ‘osx’, ‘sdl’ and ‘win’. 这定义了用于波形输出功能的驱动程序。可能的值为“file”(所有波形数据都发送到文件)、“dummy”(无输出)以及依赖于平台的驱动程序“alsa”、“oss”、“osx”、“sdl”和“win”。
waveout: This defines the device to be used for wave output (if necessary) or the output file for the ‘file’ driver. 定义用于波形输出的设备(如有必要)或“文件”驱动程序的输出文件。
waveindrv: This defines the driver to be used for the wavein feature. Possible values are ‘dummy’ (recording silence) and platform-dependent drivers ‘alsa’, ‘oss’, ‘sdl’ and ‘win’. 这定义了要用于wavein功能的驱动程序。可能的值为“dummy”(录制静音)和平台相关驱动程序“alsa”、“oss”、“sdl”和“win”。
wavein: This defines the device to be used for wave input (if necessary). 定义用于波输入的设备(如有必要)。
midioutdrv: This defines the driver to be used for the MIDI output feature. Possible values are ‘file’ (all MIDI data sent to file), ‘dummy’ (no output) and platform-dependent drivers ‘alsa’, ‘oss’, ‘osx’ and ‘win’. 它定义了用于MIDI输出功能的驱动程序。可能的值为“file”(所有MIDI数据都发送到文件)、“dummy”(无输出)和平台相关驱动程序“alsa”、“oss”、“osx”和“win”。
midiout: This defines the device to be used for MIDI output (if necessary). 定义用于MIDI输出的设备(如有必要)。
driver: This defines the driver to be used for all sound features with one property. Possible values are ‘default’ (platform default) and all other choices described above. Overriding one or more settings with the specific driver parameter is possible. 这定义了用于具有一个属性的所有声音功能的驱动程序。可能的值为“默认值”(平台默认值)和上述所有其他选项。可以使用特定的驱动程序参数替代一个或多个设置。
详见第5.6节。
4.3.31. speaker
示例:
speaker: enabled=1, mode=sound
This defines the PC speaker output mode. In the ‘sound’ mode the beep is generated by the square wave generator which is a part of the lowlevel sound support. In this mode the ‘volume’ parameter can be used to set the output volume (0 - 15). The ‘system’ mode is only available on Linux and Windows. On Linux /dev/console is used for output and on Windows the Beep() function. The ‘gui’ mode forwards the beep to the related gui methods (currently only used by the Carbon gui).
\qquad 这定义了电脑扬声器的输出模式。在“声音”模式下,嘟嘟声由方波发生器产生,方波发生器是低电平声音支持的一部分。在此模式下,“volume”参数可用于设置输出音量(0-15)。“系统”模式仅在Linux和Windows上可用。在Linux/dev/console上用于输出,在Windows上使用Beep()函数。“gui”模式将提示音转发到相关的gui方法(目前仅由Carbon gui使用)。
4.3.32. sb16
示例:
sb16: midimode=2, midifile=output.mid, wavemode=3, wavefile=output.wav
loglevel=2, log=sb16.log, dmatimer=600000
Note: The example is wrapped onto several lines for formatting reasons, but it should all be on one line in the actual bochsrc file.
注意:
\qquad
出于格式化的原因,该示例被封装在几行上,但在实际的bochsrc文件中,应该都在一行上。
This defines the Sound Blaster 16 emulation, see the developer documentation for more information. It can have several of the following properties. All properties are in the usual “property=value” format.
这定义了Sound Blaster 16仿真,有关详细信息,请参阅开发人员文档。它可以具有以下几个属性。所有属性都采用通常的“property=value”格式。
- enabled: This optional property controls the presence of the SB16 emulation. The emulation is turned on unless this property is used and set to 0. 此可选属性控制SB16仿真的存在。除非使用此属性并将其设置为0,否则将启用模拟。
- midimode: This parameter specifies what to do with the MIDI output. 这个参数指定如何处理MIDI输出。
-
- 0 = no output
-
- 1 = output to device specified with the sound option (system dependent)
-
- 2 = MIDI or raw data output to file (depends on file name extension)
-
- 3 = dual output (mode 1 and 2 at the same time)
- midifile: This is the file where the midi output is stored (midimode 2 or 3) . 这是存储midi输出的文件(midimode2或3)。
- wavemode: This parameter specifies what to do with the PCM output. (波形模式):此参数指定如何处理PCM输出。
-
- 0 = no output
-
- 1 = output to device specified with the sound option (system dependent) 输出到具有声音选项的指定设备(取决于系统)
-
- 2 = VOC, WAV or raw data output to file (depends on file name extension) VOC、WAV或原始数据输出到文件(取决于文件扩展名)
-
- 3 = dual output (mode 1 and 2 at the same time) 双输出(同时为模式1和模式2)
- wavefile: This is the file where the wave output is stored (wavemode 2 or 3). 这是存储波形输出的文件(波形模式2或3)。
- log: The file to write the sb16 emulator messages to. 将sb16仿真程序消息写入其中的文件。
- loglevel: 日志级别:
-
- 0 = No log. 无日志。
-
- 1 = Resource changes, midi program and bank changes. 资源变更、midi程序和银行变更。
-
- 2 = Severe errors. 严重错误。
-
- 3 = All errors. 所有错误。
-
- 4 = All errors plus all port accesses. 所有错误加上所有端口访问。
-
- 5 = All errors and port accesses plus a lot of extra information. 所有错误和端口访问加上大量额外信息。
It is possible to change the loglevel at runtime. 可以在运行时更改日志级别。
- dmatimer: Microseconds per second for a DMA cycle. Make it smaller to fix non-continuous sound. 750000 is usually a good value. This needs a reasonably correct setting for the ips parameter of the cpu option. It is possible to adjust the dmatimer value at runtime. DMA周期的每秒微秒。使其变小以修复不连续的声音。75万通常是一个不错的价值。这需要对cpu选项的ips参数进行合理正确的设置。可以在运行时调整dmatimer值。
4.3.33. es1370
示例:
es1370: enabled=1, wavemode=1 # use ‘sound’ parameters
es1370: enabled=1, wavemode=2, wavefile=output.voc # send output to file
This defines the ES1370 sound emulation (recording and playback - except DAC1+DAC2 output at the same time). The parameter ‘enabled’ controls the presence of the device. The wave and MIDI output can be sent to device, file or both using the parameters ‘wavemode’, ‘wavefile’, ‘midimode’ and ‘midifile’. See the description of these parameters at the SB16 directive.
\qquad 这定义了ES1370声音模拟(录制和播放-除了同时输出DAC1+DAC2)。参数“enabled”控制设备的存在。波形和MIDI输出可以使用参数“wavemode”、“wavefile”、“midimode”和“midifile”发送到设备、文件或两者。请参阅SB16指令中对这些参数的描述。
4.3.34. ne2k
The ne2k line configures an emulated NE2000-compatible Ethernet adapter, which allows the guest machine to communicate on the network. To disable the NE2000 just comment out the ne2k line.
\qquad
ne2k线路配置了一个模拟的NE2000兼容以太网适配器,允许客户机在网络上进行通信。要禁用NE2000,只需注释掉ne2k行。
示例:
ne2k: ioaddr=0x300, irq=9, mac=b0:c4:20:00:00:00, ethmod=fbsd, ethdev=xl0
ne2k: ioaddr=0x300, irq=9, mac=b0:c4:20:00:00:00, ethmod=fbsd, ethdev=en0 #macosx
ne2k: ioaddr=0x300, irq=9, mac=b0:c4:20:00:00:00, ethmod=linux, ethdev=eth0
ne2k: ioaddr=0x300, irq=9, mac=b0:c4:20:00:00:01, ethmod=win32, ethdev=MYCARD
ne2k: ioaddr=0x300, irq=9, mac=b0:c4:20:00:00:01, ethmod=vde, ethdev=“/tmp/vde.ctl”
ne2k: ioaddr=0x300, irq=9, mac=b0:c4:20:00:00:01, ethmod=vnet, ethdev=“c:/temp”
ne2k: ioaddr=0x300, irq=9, mac=fe:fd:00:00:00:01, ethmod=tap, ethdev=tap0
ne2k: ioaddr=0x300, irq=9, mac=fe:fd:00:00:00:01, ethmod=tuntap, ethdev=/dev/net/tun0, script=./tunconfig
ne2k: mac=b0:c4:20:00:00:01, ethmod=socket, ethdev=40000 # use localhost
ne2k: card=0, mac=b0:c4:20:00:00:01, ethmod=socket, ethdev=mymachine:40000
ne2k: mac=b0:c4:20:00:00:01, ethmod=slirp, script=slirp.conf, bootrom=ne2k_pci.rom
CARD: This is the zero-based card number to configure with this ne2k config line. Up to 4 devices are supported now (0…3). If not specified, the following parameters apply to card #0. 这是用这个ne2k配置行配置的从零开始的卡号。现在最多支持4个设备(0…3)。如果未指定,以下参数将应用于卡#0。
TYPE: This is the card type to emulate (“isa” or “pci”). If not specified, 这是要模拟的卡类型(“isa”或“pci”)。如果没有指定,
card #0 defaults to “pci” if assigned to a pci slot. For the additional cards the type parameter should be set up.
如果分配给pci插槽,则卡#0默认为“pci”。对于附加卡,应设置类型参数。
IOADDR, IRQ: You probably won’t need to change ioaddr and irq, unless there are IRQ conflicts. These parameters are ignored if the NE2000 is assigned to a PCI slot. 除非存在IRQ冲突,否则您可能不需要更改IOADDR和IRQ。如果将NE2000分配给PCI插槽,则会忽略这些参数。
MAC: The MAC address MUST NOT match the address of any machine on the net. Also, the first byte must be an even number (bit 0 set means a multicast address), and you cannot use ff:ff:ff:ff:ff:ff because that’s the broadcast address. For the ethertap module, you must use fe:fd:00:00:00:01. There may be other restrictions too. To be safe, just use the b0:c4… address. MAC地址不得与网络上任何机器的地址匹配。此外,第一个字节必须是偶数(设置的位0表示多播地址),并且不能使用ff:ff:ff:ff,因为这是广播地址。对于etherstap模块,必须使用fe:fd:00:00:00:01。可能还有其他限制。为了安全起见,只需使用b0:c4…地址。
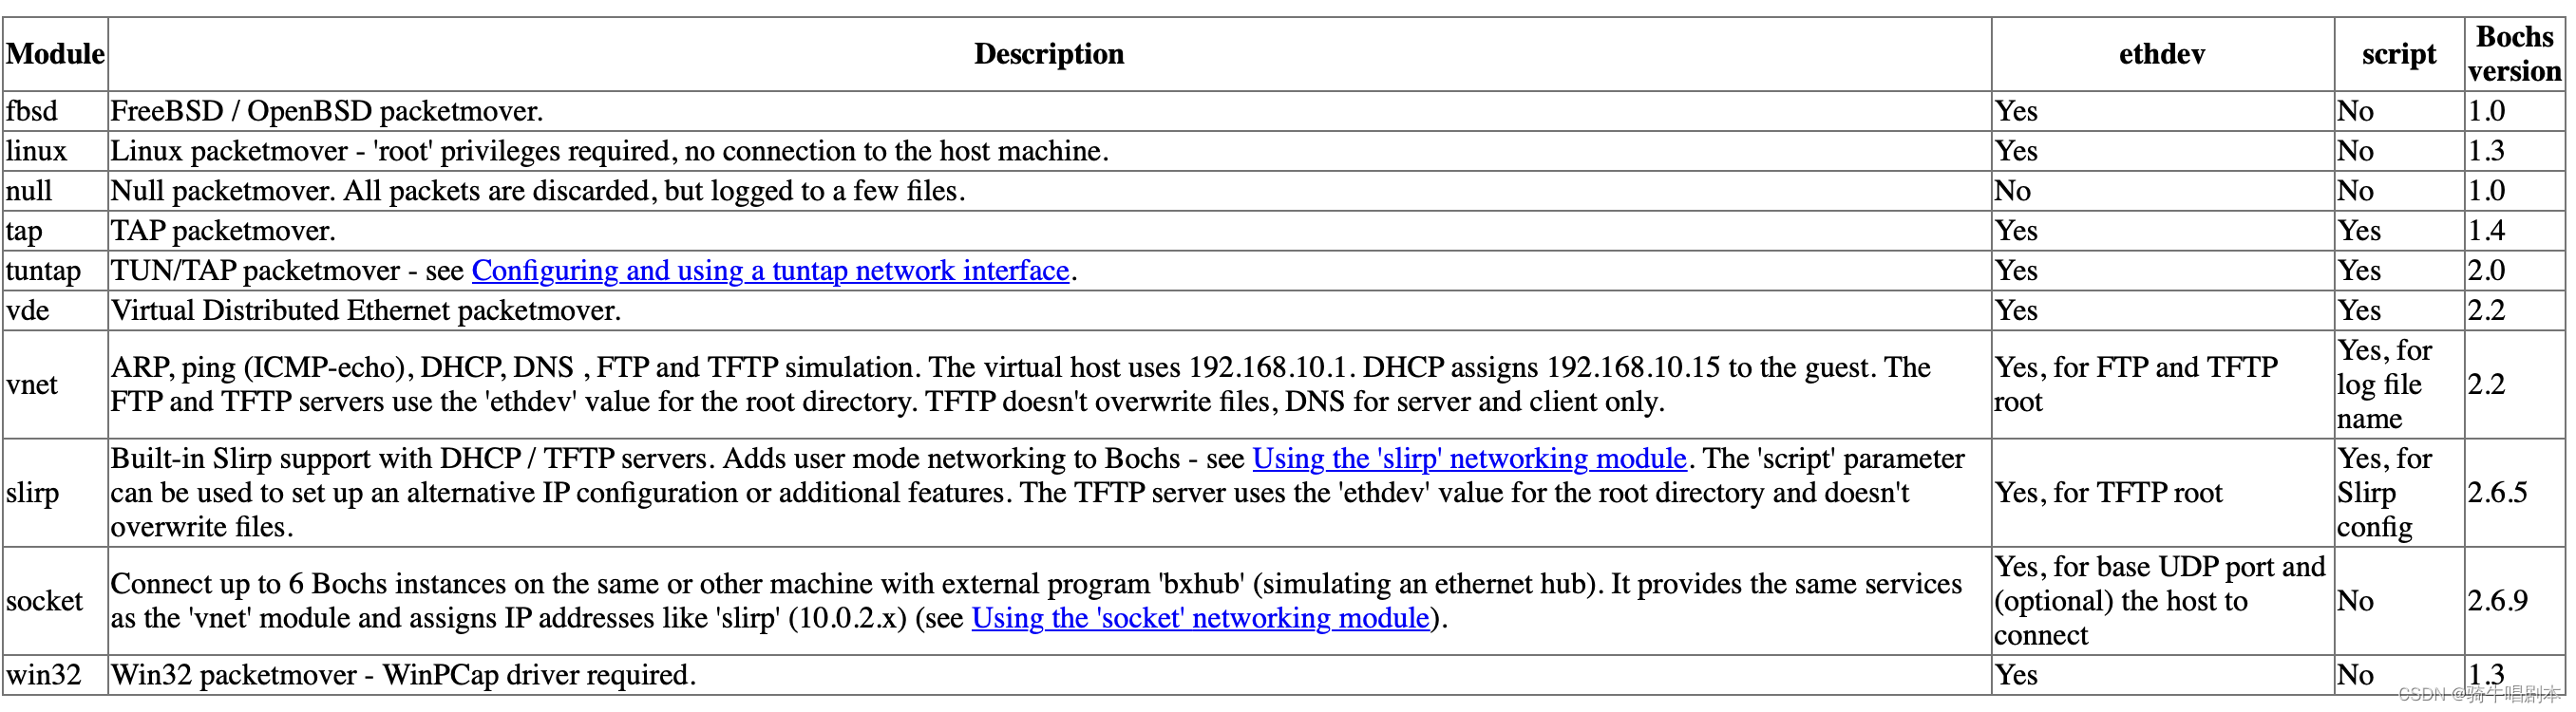
ETHMOD: The ethmod value defines which low level OS specific module to be used to access physical ethernet interface. You can also specify a network simulator or a module with no input/output (“null”). See the table below for currently supported values. ETHMOD值定义用于访问物理以太网接口的低级别操作系统特定模块。您还可以指定一个网络模拟器或一个没有输入/输出(“null”)的模块。有关当前支持的值,请参阅下表。
ETHDEV: The ethdev value is the name of the network interface on your host platform. On UNIX machines, you can get the name by running ifconfig. On Windows machines, you must run niclist to get the name of the ethdev. Niclist source code is in misc/niclist.c and it is included in Windows binary releases. ETHDEV值是主机平台上网络接口的名称。在UNIX计算机上,您可以通过运行ifconfig来获取名称。在Windows计算机上,必须运行niclist才能获得ethdev的名称。Niclist源代码在misc/Niclist.c中,它包含在Windows二进制版本中。
SCRIPT: The script value is optional, and is the name of a script that is executed after bochs initialize the network interface. You can use this script to configure this network interface, or enable masquerading. This is mainly useful for the tun/tap devices that only exist during Bochs execution. The network interface name is supplied to the script as first parameter. The ‘slirp’ module uses this parameter to specify a config file for setting up an alternative IP configuration or additional features. The ‘vnet’ module also uses this parameter to specify a config file similar to slirp, but with only a few settings. 脚本值是可选的,是在bochs初始化网络接口后执行的脚本的名称。您可以使用此脚本配置此网络接口,或启用伪装。这主要适用于仅在Bochs执行期间存在的tun/tap设备。网络接口名称作为第一个参数提供给脚本。“slirp”模块使用此参数指定用于设置备用IP配置或附加功能的配置文件。“vnet”模块还使用此参数来指定一个类似于slirp的配置文件,但只有一些设置。
BOOTROM: The bootrom value is optional, and is the name of the ROM image to load. Note that this feature is only implemented for the PCI version of the NE2000. The following table shows the available ethernet modules with description, whether the “ethdev” and “script” parameters are used or not and the Bochs version where this module was added. BOOTROM值是可选的,是要加载的ROM映像的名称。请注意,此功能仅适用于NE2000的PCI版本。下表显示了可用的以太网模块及其说明,无论是否使用“ethdev”和“script”参数,以及添加该模块的Bochs版本。
表4-5。以太网模块
4.3.35. pcipnic
示例:
pcipnic: enabled=1, mac=b0:c4:20:00:00:00, ethmod=vnet
To support the Bochs/Etherboot pseudo-NIC, Bochs must be compiled with the --enable-pnic configure option. It accepts the same syntax (for mac, ethmod, ethdev, script, bootrom) and supports the same networking modules as the NE2000 adapter.
\qquad 要支持Bochs/Etherboot伪NIC,必须使用–enable pnic configure选项编译Bochs。它接受相同的语法(用于mac、ethmod、ethdev、script、bootrom),并支持与NE2000适配器相同的网络模块。
4.3.36. e1000
示例:
e1000: enabled=1, mac=52:54:00:12:34:56, ethmod=slirp, script=slirp.conf
To support the Intel® 82540EM Gigabit Ethernet adapter, Bochs must be compiled with the --enable-e1000 configure option. It accepts the same syntax (for mac, ethmod, ethdev, script, bootrom) and supports the same networking modules as the NE2000 adapter.
\qquad 要支持Intel(R)82540EM千兆以太网适配器,必须使用–enable-e1000配置选项编译Bochs。它接受相同的语法(用于mac、ethmod、ethdev、script、bootrom),并支持与NE2000适配器相同的网络模块。
4.3.37. usb_uhci
示例:
usb_uhci: port1=mouse, port2=disk, options2=“path:usbstick.img”
usb_uhci: port1=hub, options1=“ports:6, pcap:outfile.pcap”
usb_uhci: port2=disk, options2=“path:undoable:usbdisk.img, journal:u.redolog”
usb_uhci: port2=disk, options2="“path:usbdisk2.img, sect_size:1024”
usb_uhci: port2=disk, options2=“path:vvfat:vvfat, debug, speed:full”
usb_uhci: port2=cdrom, options2=“path:image.iso”
usb_uhci: port1=printer, options1=“file:printdata.bin”
usb_uhci: port2=floppy, options2=“path:vvfat:diskette, model:teac”
This option controls the presence of the USB root hub which is a part of the i440FX PCI chipset.
\qquad 此选项控制作为i440FX PCI芯片组一部分的USB根集线器的存在。
With the portX option you can connect devices to the hub (currently supported: ‘mouse’, ‘tablet’, ‘keypad’, ‘keyboard’, ‘disk’, ‘cdrom’, 'floppy, '‘hub’ and ‘printer’).
\qquad 使用portX选项,您可以将设备连接到集线器(当前支持:“鼠标”、“平板电脑”、“键盘”、“按键”、“磁盘”、“光盘”、“软盘”、“集线器”和“打印机”)。
If you connect the mouse or tablet to one of the ports, Bochs forwards the mouse movement data to the USB device instead of the selected mouse type. When connecting the keypad to one of the ports, Bochs forwards the input of the numeric keypad to the USB device instead of the PS/2 keyboard. If the keyboard is selected, all key events are sent to the USB device.
\qquad 如果将鼠标或平板电脑连接到其中一个端口,Bochs会将鼠标移动数据转发到USB设备,而不是所选的鼠标类型。将键盘连接到其中一个端口时,Bochs将数字键盘的输入转发到USB设备,而不是PS/2键盘。如果选择了键盘,则所有按键事件都会发送到USB设备。
To connect a disk image as a USB hardisk you can use the ‘disk’ device. Use the ‘path’ option in the optionsX parameter to specify the path to the image separated with a colon. To use other disk image modes similar to ATA disks the syntax ‘path:mode:filename’ must be used (see below).
\qquad 要将磁盘映像连接为USB硬盘,您可以使用“磁盘”设备。使用optionsX参数中的“path”选项可以指定用冒号分隔的图像的路径。要使用与ATA磁盘类似的其他磁盘映像模式,必须使用语法“path:mode:filename”(请参阅下文)。
To emulate a USB cdrom you can use the ‘cdrom’ device and the path to an ISO image or raw device name can be set with the ‘path’ option in the optionsX parameter also separated with a colon. An option to insert/eject media is available in the runtime configuration.
\qquad 要模拟USB cdrom,您可以使用“cdrom”设备,ISO映像或原始设备名称的路径可以使用optionsX参数中的“path”选项设置,该参数也用冒号分隔。运行时配置中提供了插入/弹出介质的选项。
To emulate a USB floppy you can use the ‘floppy’ device and the path to a floppy image can be set with the ‘path’ option in the optionsX parameter separated with a colon. To use the VVFAT image mode similar to the legacy floppy the syntax ‘path:vvfat:directory’ must be used (see below). An option to insert/eject media is available in the runtime configuration.
\qquad 要模拟USB软盘,您可以使用“软盘”设备,软盘映像的路径可以用optionsX参数中的“路径”选项设置,用冒号分隔。要使用类似于传统软盘的VVFAT映像模式,必须使用语法“path:vffat:directory”(见下文)。运行时配置中提供了插入/弹出介质的选项。
The device name ‘hub’ connects an external hub with max. 8 ports (default: 4) to the root hub. To specify the number of ports you have to use the ‘ports’ option in the optionsX parameter with the value separated with a colon. Connecting devices to the external hub ports is only available in the runtime configuration.
\qquad 设备名称“hub”将最多有8个端口(默认值:4)的外部集线器连接到根集线器。要指定端口数,必须使用optionsX参数中的“ports”选项,该选项的值用冒号分隔。将设备连接到外部集线器端口仅在运行时配置中可用。
The device ‘printer’ emulates the HP Deskjet 920C printer. The PCL data is sent to a file specified in the ‘file’ option with the optionsX parameter. The current code appends the PCL code to the file if the file already existed. The output file can be changed at runtime.
\qquad 设备“打印机”模仿HP Deskjet 920C打印机。PCL数据被发送到具有optionsX参数的“file”选项中指定的文件。如果文件已经存在,则当前代码会将PCL代码附加到该文件。输出文件可以在运行时更改。
The optionsX parameter can also be used to assign specific options to the device connected to the corresponding USB port. The option ‘speed’ can be used to set the speed reported by device (‘low’, ‘full’, ‘high’ or ‘super’). The available speed choices depend on both HC and device. The option ‘debug’ turns on debug output for the device at connection time. The option ‘pcap’ turns on packet logging in PCAP format. For the USB ‘disk’ device the optionsX parameter can be used to specify an alternative redolog file (journal) of some image modes. For ‘vvfat’ mode USB disks the optionsX parameter can be used to specify the disk size (range 128M … 128G). If the size is not specified, it defaults to 504M. For the USB ‘floppy’ device the optionsX parameter can be used to specify an alternative device ID to be reported. Currently only the model “teac” is supported (can fix hw detection in some guest OS). The USB floppy also accepts the parameter “write_protected” with valid values 0 and 1 to select the access mode (default is 0).
\qquad optionsX参数也可用于为连接到相应USB端口的设备分配特定选项。选项“speed”可用于设置设备报告的速度(“low”、“full”、“high”或“super”)。可用的速度选择取决于HC和设备。选项“debug”在连接时打开设备的调试输出。选项“pcap”以pcap格式打开数据包日志记录。对于USB“磁盘”设备,optionsX参数可用于指定某些图像模式的替代重做日志文件(日志)。对于“vfat”模式的USB磁盘,optionsX参数可用于指定磁盘大小(范围为128M…128G)。如果未指定大小,则默认为504M。对于USB“软盘”设备,optionsX参数可用于指定要报告的备用设备ID。目前只支持“teac”模型(可以修复某些客户操作系统中的硬件检测)。USB软盘还接受有效值为0和1的参数“write_protected”以选择访问模式(默认值为0)。
注意:必须启用PCI支持才能使用USB UHCI。
4.3.38. usb_ohci
示例:
usb_ohci: enabled=1, port1=printer:printdata.bin
This option controls the presence of the USB OHCI host controller with a 2-port hub. The portX parameter accepts the same device types with the same syntax as the UHCI controller (see the usb_uhci option). The optionsX parameter is also available on OHCI.
\qquad 此选项控制带2端口集线器的USB OHCI主机控制器的存在。portX参数接受与UHCI控制器具有相同语法的相同设备类型(请参阅usb_UHCI选项)。optionsX参数也可用于OHCI。
4.3.39. usb_ehci
示例:
usb_ehci: enabled=1, port1=tablet, options1=“speed:high”
This option controls the presence of the USB EHCI host controller with a 6-port hub. The portX parameter accepts the same device types with the same syntax as the UHCI controller (see the usb_uhci option). The optionsX parameter is also available on EHCI.
\qquad 此选项控制带6端口集线器的USB EHCI主机控制器的存在。portX参数接受与UHCI控制器具有相同语法的相同设备类型(请参阅usb_UHCI选项)。optionsX参数也可用于EHCI。
4.3.40. usb_xhci
示例:
usb_xhci: enabled=1, port1=“disk:usbdisk.img”
This option controls the presence of the USB xHCI host controller with a 4-port hub. The portX parameter accepts the same device types with the same syntax as the UHCI controller (see the usb_uhci option). The optionsX parameter is also available on xHCI. NOTE: port 1 and 2 are USB3 and only support super-speed devices, but port 3 and 4 are USB2 and support speed settings low, full and high.
\qquad 此选项控制带4端口集线器的USB xHCI主机控制器的存在。portX参数接受与UHCI控制器具有相同语法的相同设备类型(请参阅usb_UHCI选项)。optionsX参数也可用于xHCI。注:端口1和2是USB3,仅支持超高速设备,但端口3和4是USB2,支持低速、全速和高速设置。
4.3.41. pcidev
示例:
pcidev: vendor=0xbabe, device=0x2bad
Enables the mapping of a host PCI hardware device within the virtual PCI subsystem of the Bochs x86 emulator. The arguments vendor and device should contain the PCI vendor ID respectively the PCI device ID of the host PCI device you want to map within Bochs.
\qquad 启用Bochs x86仿真器的虚拟PCI子系统内主机PCI硬件设备的映射。自变量vendor和device应分别包含PCI vendor ID,即要在Bochs中映射的主机PCI设备的PCI设备ID。
Note: The PCI device mapping is still in a very early stage of development and thus it is very experimental. This feature requires Linux as a host operating system.
注:PCI设备映射仍处于开发的早期阶段,因此它是非常实验性的。此功能要求将Linux作为主机操作系统。
Besides the pcidev config line you will need to load a pcidev kernel module within your Linux host OS. This kernel module is located in the bochs/host/linux/pcidev/ directory.
\qquad 除了pcidev配置行之外,您还需要在Linux主机操作系统中加载一个pcidev内核模块。这个内核模块位于bochs/host/linux/pcidev/目录中。
4.3.42. gdbstub
示例:
gdbstub: enabled=1, port=1234, text_base=0, data_base=0, bss_base=0
默认值:
gdbstub: enabled=0
This enables the GDB stub. See Section 9.14.
这将启用GDB存根。参见第9.14节。
###4.3.43. magic_break
示例:
magic_break: enabled=1
This enables the “magic breakpoint” feature when using the debugger. The useless cpu instruction XCHG BX, BX causes Bochs to enter the debugger mode. This might be useful for software development.
\qquad 这在使用调试器时启用了“神奇断点”功能。无用的cpu指令XCHG BX,BX导致Bochs进入调试器模式。这可能对软件开发有用。
4.3.44. debug_symbols
示例:
debug_symbols: file=mysymbols.sym
debug_symbols: file=mysymbols.sym, offset=0x1000
This loads symbols from the specified file for use in Bochs’ internal debugger. Symbols are loaded into global context. This is equivalent to issuing ldsym debugger command at start up.
\qquad 这将从指定的文件加载符号,以便在Bochs的内部调试器中使用。符号被加载到全局上下文中。这相当于在启动时发出ldsym调试器命令。
4.3.45. port_e9_hack
示例:
port_e9_hack: enabled=1
The 0xE9 port doesn’t exists in normal ISA architecture. However, we define a convention here, to display on the console of the system running Bochs anything that is written to it. The idea is to provide debug output very early when writing BIOS or OS code for example, without having to bother with setting up a serial port or etc. Reading from port 0xE9 will will return 0xe9 to let you know if the feature is available. Leave this 0 unless you have a reason to use it.
\qquad 0xE9端口在正常ISA体系结构中不存在。然而,我们在这里定义了一个约定,在运行Bochs的系统的控制台上显示写入它的任何内容。例如,这个想法是在编写BIOS或操作系统代码时尽早提供调试输出,而无需设置串行端口等。从端口0xE9读取将返回0xE9,让您知道该功能是否可用。保留此0,除非您有理由使用它。
注意事项
[1]
IPS measurements depend on OS and compiler configuration in addition to host processor clock speed.
IPS测量取决于操作系统和编译器配置以及主机处理器时钟速度。
4.4. How to write your own keymap table 如何编写自己的密钥映射表
Christophe Bothamy wrote the keymapping code for Bochs, and provided this documentation for how to create new keymaps. Keymapping was first implemented for X windows only, so there are many references to X-specific values in this section. In Bochs 2.0 keymapping is also available for SDL (Linux port) and wxWidgets (wxGTK port).
\qquad Christophe Bothamy为Bochs编写了密钥映射代码,并提供了有关如何创建新密钥映射的文档。键映射最初仅针对X窗口实现,因此在本节中有许多对X特定值的引用。在Bochs 2.0中,SDL(Linux端口)和wxWidgets(wxGTK端口)也可以使用密钥映射。
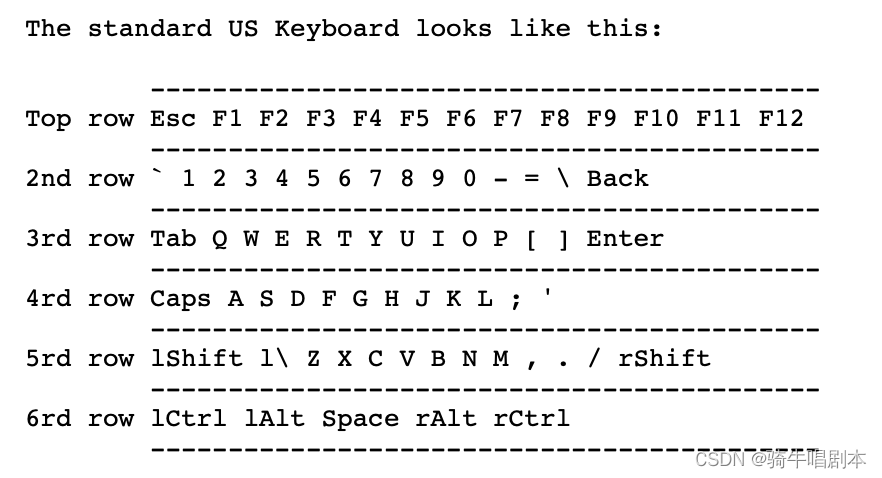
Each key of the US keyboard maps to a Bochs constant named BX_KEY_symbol. You can find the current list of BX_KEY_symbol in the BX_KEY table, below. Please note that there is only one BX_KEY_symbol for each physical key.
\qquad US键盘的每个键都映射到一个名为BX_key_symbol的Bochs常量。您可以在下面的BX_KEY表中找到BX_KEY_symbol的当前列表。请注意,每个物理密钥只有一个BX_KEY_symbol。
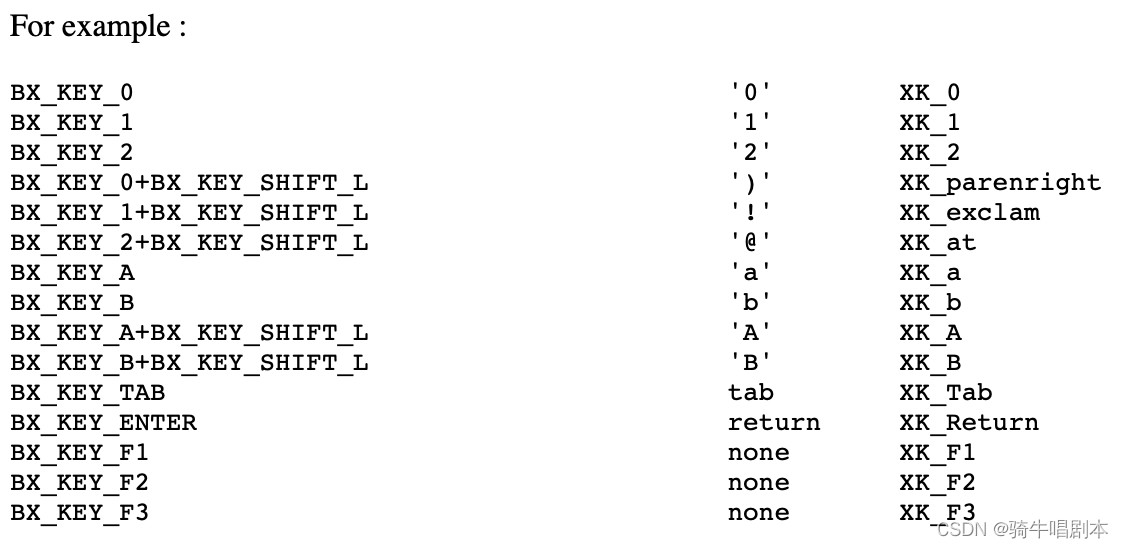
Now, for each key of the US keyboard, look at which symbols you can type on your real keyboard. Each symbol maps to a X-windows XK_symbol constant. In X11/keysymdef.h, you will find the list of all possible XK_symbol on your system. Alternatively, you can use a small utility called “xev” that prints out the symbol names of a pressed key. Note that the symbol name given by xev does not contain the XK_ prefix. Don’t forget to add a line for every symbol you can type on each key. For the key BX_KEY_A, you can type both lowercase ‘a’ and uppercase ‘A’, so you would need two different entries.
\qquad 现在,对于美国键盘的每个键,看看你可以在真正的键盘上键入哪些符号。每个符号映射到一个X窗口XK_符号常量。在X11/keysymdef.h中,您将找到系统上所有可能的XK_symbol的列表。或者,您可以使用一个名为“xev”的小型实用程序,打印出按键的符号名称。请注意,xev给出的符号名称不包含XK_前缀。不要忘记为每个键上可以键入的每个符号添加一行。对于密钥BX_key_A,可以同时键入小写的“A”和大写的“A”,因此需要两个不同的条目。
You can then create your own map file. Keymap files are found in the “gui/keymaps” directory in the source code, or in the “keymaps” directory in binary releases. Look at the existing keymap file as an example, and create a file containing one line for each symbol. The first column tells what key or combination of keys can be used to produce a given symbol. The second column is the ASCII equivalent for that symbol, or a special keyword (none, space, return, tab, backslash, or apostrophe). The third column is the X windows keysym for that symbol.
\qquad 然后,您可以创建自己的地图文件。密钥映射文件可以在源代码中的“gui/密钥映射”目录中找到,或者在二进制版本中的“密钥映射”文件夹中找到。以现有的关键点映射文件为例,为每个符号创建一个包含一行的文件。第一列告诉可以使用什么键或键的组合来生成给定的符号。第二列是该符号的ASCII等效项,或者是一个特殊关键字(none、space、return、tab、反斜杠或撇号)。第三列是该符号的X窗口键ym。
Now that there are several keymap files in the Bochs distribution, it is easiest to copy an existing keymap and follow the examples you see. When it works, be sure to send it to the mailing list or post it on Source Forge so that we can include it in the next release. You may need to look up some of your country specific X11 symbols in X11/keysymdef.h.
\qquad 现在Bochs发行版中有几个关键点映射文件,复制现有的关键点映射并遵循您看到的示例是最简单的。当它工作时,一定要把它发送到邮件列表或发布在Source Forge上,这样我们就可以把它包含在下一个版本中。您可能需要在X11/keysymdef.h中查找一些特定于国家/地区的X11符号。
表4-6。BX_KEY常量
| X_KEY constant | Keyboard Symbol |
|---|---|
| BX_KEY_CTRL_L | left Ctrl |
| BX_KEY_SHIFT_L | left Shift |
| BX_KEY_F1 | F1 |
| BX_KEY_F2 | F2 |
| BX_KEY_F3 | F3 |
| BX_KEY_F4 | F4 |
| BX_KEY_F5 | F5 |
| BX_KEY_F6 | F6 |
| BX_KEY_F7 | F7 |
| BX_KEY_F8 | F8 |
| BX_KEY_F9 | F9 |
| BX_KEY_F10 | F10 |
| BX_KEY_F11 | F11 |
| BX_KEY_F12 | F12 |
| BX_KEY_CTRL_R | right Ctrl |
| BX_KEY_SHIFT_R | right Shift |
| BX_KEY_CAPS_LOCK | CapsLock |
| BX_KEY_NUM_LOCK | NumLock |
| BX_KEY_ALT_L | left Alt |
| BX_KEY_ALT_R | right Alt |
| BX_KEY_A | A |
| BX_KEY_B | B |
| BX_KEY_C | C |
| BX_KEY_D | D |
| BX_KEY_E | E |
| BX_KEY_F | F |
| BX_KEY_G | G |
| BX_KEY_H | H |
| BX_KEY_I | I |
| BX_KEY_J | J |
| BX_KEY_K | K |
| BX_KEY_L | L |
| BX_KEY_M | M |
| BX_KEY_N | N |
| BX_KEY_O | O |
| BX_KEY_P | P |
| BX_KEY_Q | Q |
| BX_KEY_R | R |
| BX_KEY_S | S |
| BX_KEY_T | T |
| BX_KEY_U | U |
| BX_KEY_V | V |
| BX_KEY_W | W |
| BX_KEY_X | X |
| BX_KEY_Y | Y |
| BX_KEY_Z | Z |
| BX_KEY_0 | 0 |
| BX_KEY_1 | 1 |
| BX_KEY_2 | 2 |
| BX_KEY_3 | 3 |
| BX_KEY_4 | 4 |
| BX_KEY_5 | 5 |
| BX_KEY_6 | 6 |
| BX_KEY_7 | 7 |
| BX_KEY_8 | 8 |
| BX_KEY_9 | 9 |
| BX_KEY_ESC | Esc |
| BX_KEY_SPACE | SpaceBar |
| BX_KEY_SINGLE_QUOTE | ’ |
| BX_KEY_COMMA | , |
| BX_KEY_PERIOD | . |
| BX_KEY_SLASH | / |
| BX_KEY_SEMICOLON | ; |
| BX_KEY_EQUALS | = |
| BX_KEY_LEFT_BRACKET | [ |
| BX_KEY_BACKSLASH | | |
| BX_KEY_RIGHT_BRACKET | ] |
| BX_KEY_MINUS | - |
| BX_KEY_GRAVE | ` |
| BX_KEY_BACKSPACE | BackSpace |
| BX_KEY_ENTER | Enter |
| BX_KEY_TAB | Tab |
| BX_KEY_LEFT_BACKSLASH | left | |
| BX_KEY_PRINT | PrintScreen |
| BX_KEY_SCRL_LOCK | ScrollLock |
| BX_KEY_PAUSE | Pause |
| BX_KEY_INSERT | Ins |
| BX_KEY_DELETE | Del |
| BX_KEY_HOME | Home |
| BX_KEY_END | End |
| BX_KEY_PAGE_UP | PageUo |
| BX_KEY_PAGE_DOWN | PageDown |
| BX_KEY_KP_ADD Numeric | Keypad + |
| BX_KEY_KP_SUBTRACT | Numeric Keypad - |
| BX_KEY_KP_END | Numeric Keypad 1 |
| BX_KEY_KP_DOWN | Numeric Keypad 2 |
| BX_KEY_KP_PAGE_DOWN | Numeric Keypad 3 |
| BX_KEY_KP_LEFT | Numeric Keypad 4 |
| BX_KEY_KP_5 | Numeric Keypad 5 |
| BX_KEY_KP_RIGHT | Numeric Keypad 6 |
| BX_KEY_KP_HOME | Numeric Keypad 7 |
| BX_KEY_KP_UP | Numeric Keypad 8 |
| BX_KEY_KP_PAGE_UP | Numeric Keypad 9 |
| BX_KEY_KP_INSERT | Numeric Keypad 0 |
| BX_KEY_KP_DELETE | Numeric Keypad . |
| BX_KEY_KP_ENTER | Numeric Keypad Enter |
| BX_KEY_KP_MULTIPLY | Numeric Keypad * |
| BX_KEY_KP_DIVIDE | Numeric Keypad / |
| BX_KEY_UP | UpArrow |
| BX_KEY_DOWN | DownArrow |
| BX_KEY_LEFT | LeftArrow |
| BX_KEY_RIGHT | RightArrow |
| BX_KEY_WIN_L | Left Windows |
| BX_KEY_WIN_R | Right Windows |
| BX_KEY_MENU | Menu |
| BX_KEY_ALT_SYSREQ | Alt-Sysreq |
| BX_KEY_CTRL_BREAK | Ctrl-Break |
| BX_KEY_INT_BACK | Internet - back |
| BX_KEY_INT_FORWARD | Internet - forward |
| BX_KEY_INT_STOP | Internet - stop |
| BX_KEY_INT_MAIL | Internet - mail |
| BX_KEY_INT_SEARCH | Internet - search |
| BX_KEY_INT_FAV | Internet - favorites |
| BX_KEY_INT_HOME | Internet - home |
| BX_KEY_POWER_MYCOMP | Powerkeys - my computer |
| BX_KEY_POWER_CALC | Powerkeys - calculator |
| BX_KEY_POWER_SLEEP | Powerkeys - sleep |
| BX_KEY_POWER_POWER | Powerkeys - power |
| BX_KEY_POWER_WAKE | Powerkeys - wake |


 1918
1918


 被折叠的 条评论
为什么被折叠?
被折叠的 条评论
为什么被折叠?
 到【灌水乐园】发言


