


目录标题
一级目录
二级目录
三级目录
⭐小程序canvas生成海报
由于 wx.createCanvasContext() 接口不再维护,因此,我们将记录新旧接口生成海报的两种方法。
先上效果图
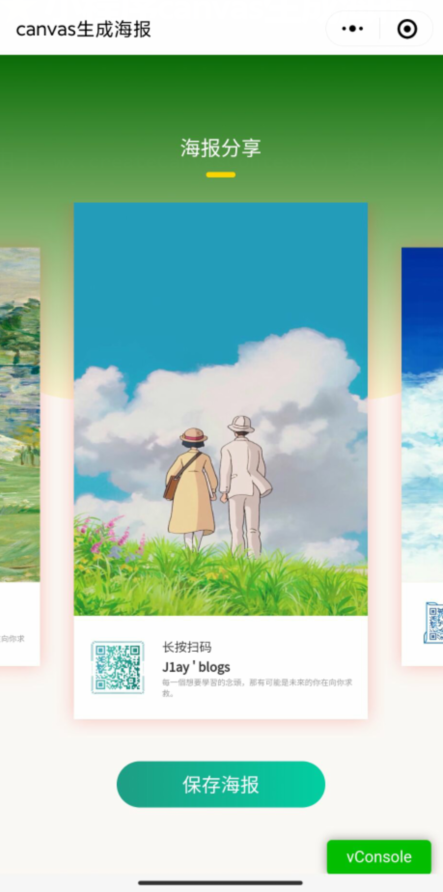
目前展现的是图片等元素组成、以轮播图形式展示的页面。为提高性能,采用按下保存海报按钮,再执行canvas生成海报,保存到本地相册这样一个操作。话不多说,来干!
⭐旧接口 wx.createCanvasContext
① 写一个canvas对象
<canvas class="hide" canvas-id="share" style="width:480px;height:854px;"></canvas>
注意,这里只需给他加上 canvas-id 等下即可获取到该对象。 hide类主要是将 此画布隐掉,让他不要出现在我们的页面中。由于canvas的特殊性,我们采用最最最简单的办法,将它定位到屏幕之外即可。
.hide{
  position:fixed;
  left:9000px;
}
② 图片临时地址准备
接下来,我们就可以着手准备在画布上画上我们的海报。
首先、海报上有图片。注意,网络图片地址是不能直接被画上去的,要先转为临时地址。
当然若是本地图片,直接采用该地址即可,无需进行临时地址获取。
ImgUrlToTmp方法
利用微信的 getImageInfo 接口,实现临时地址获取。
 // 获取海报图片和二维码临时地址
  ImgUrlToTmp(){
    var  that = this;
    wx.showLoading({
      title: '拼命生成中...',
    });
    wx.getImageInfo({
      src: that.data.img_url,
      success(res) {
        console.log("模板图片临时路径:" + res.path);
        that.setData({
          hbpath: res.path
        },()=>{
          console.log(that.data.code_url)
          wx.getImageInfo({
            src: that.data.code_url,
            success(res) {
              console.log("二维码临时路径:" + res.path);
              that.setData({
                codepath: res.path
              },()=>{
                that.createNewImg()
              })
            },
            fail(e){
              console.log(e)
            }
          })
        })
      },
      fail(e){
        console.log(e)
      }
    })
  },
③ canvas画布
等我们将图片地址准备好后,接下来,就正式进入我们的绘画阶段,上述可见调用了 createNewImg 方法
sharePage
 //将canvas转换为图片保存到本地,然后将图片路径传给image图片的src
  createNewImg: function () {
    var that = this;
    // 画画布
    var context = wx.createCanvasContext("share");
    var width = that.data.widths
    var height = that.data.heights
    context.clearRect(0, 0, width , height);
    context.setFillStyle("#fff")
    context.fillRect(0, 0, width, height)
    context.save();
    // 画海报
    var path = that.data.hbpath;
    // console.log(path)
    context.drawImage(path, 0, 0, width, height * 0.8);
    // 画二维码
    var codepath = that.data.codepath;
    context.drawImage(codepath, 15, height * 0.83 , 100 , 100);
    // 画话
    var t1 = "长按扫码";
    var title = "J1ay ' blogs";
    var tishi = "每一個想要學習的念頭,那有可能是未來的你在向你求救。";
    context.setFillStyle('#333');
    context.setFontSize(13)
    context.fillText(t1, 130, height * 0.872);
    context.font = 'normal bold 13px sans-serif';
    context.fillText(title, 130, height * 0.9);
    context.setFillStyle('#999');
    context.font = 'normal 10px sans-serif';
    context.fillText(tishi, 130, height * 0.93);
    context.draw()
    setTimeout(() => {
      that.toSave(); // 需要延迟一下,等待画布绘画完毕,否则将是空白
    }, 500);

  },
canvasToTempFilePath转换
// 打包海报
  toSave() {
    let that = this
    wx.canvasToTempFilePath({
      x : 0,
      y: 0,
      canvasId: 'share',
      width: that.data.widths,
      height: that.data.heights ,
      destWidth: that.data.widths * wx.getSystemInfoSync().pixelRatio,
      destHeight: that.data.heights * wx.getSystemInfoSync().pixelRatio,
      success: function (res) {
        let canvasToTempFilePath = res.tempFilePath // 返回的图片地址保存到一个全局变量里
        that.saveShareImg(canvasToTempFilePath)
      },
        fail: function (error) {
          console.log(error)
        }
    })
  },
④ 保存到本地相册
 // 保存到系统相册
   saveShareImg: function (canvasToTempFilePath) {
      wx.getSetting({
        success(res) {
          wx.hideLoading({
            success: (res) => {},
            fail: (res)=>{
              console.log(res)
            }
          })
          // 无权限
          if (!res.authSetting['scope.writePhotosAlbum']) {
              wx.authorize({
                  scope: 'scope.writePhotosAlbum',
                  success() {
                    wx.saveImageToPhotosAlbum({
                      filePath: canvasToTempFilePath,
                      success() {
                          wx.showToast({
                            title: '保存成功',
                            icon: 'success',
                            duration: 2000
                          })
                      },
                      fail() {
                        wx.showToast({
                          title: '保存失败',
                          icon: 'none'
                        })
                      }
                    })
                  },
                  fail (){
                    wx.showModal({
                      title: '提示',
                      content: '请设置允许访问相册,否则将无法使用该功能',
                      showCancel: false,
                      success (res) {
                        if (res.confirm) {
                          console.log('用户点击确定')
                          wx.openSetting({
                            success (res) {
                              // console.log(res.authSetting)
                              wx.saveImageToPhotosAlbum({
                                filePath: canvasToTempFilePath,
                                success() {
                                    wx.showToast({
                                      title: '保存成功',
                                      icon: 'success',
                                      duration: 2000
                                    })
                                },
                                fail() {
                                  wx.showToast({
                                    title: '保存失败',
                                    icon: 'error'
                                  })
                                }
                              })
                            },
                            fail(err){
                              console.log(err)
                            }
                          })

                        } else if (res.cancel) {
                          console.log('用户点击取消')
                        }
                      }
                    })
                  }
                })
              }
              else{
                wx.saveImageToPhotosAlbum({
                  filePath: canvasToTempFilePath,
                  success() {
                      wx.showToast({
                        title: '保存成功',
                        icon: 'success',
                        duration: 2000
                      })
                  },
                  fail() {
                    wx.showToast({
                      title: '保存失败',
                      icon: 'error'
                    })
                  }
                })
              }
            },
            fail() {}
        });

  },
⭐新接口 createSelectorQuery
① 挂载一个canvas 对象
其实是类似的。 首先也是 挂载一个canvas 对象,注意,这里需要 指定 type 属性以及id
<canvas type="2d" class="hide" id="share" style="width:480px;height:854px;"></canvas>
下一步也是同旧接口,就不重复阐述了。
画布方法改变
重点来了!!如何利用新的接口实现画布绘画。尤其是画图片这部分,踩坑太多。最终顶着血的教训成功了。。
代码如下:
 //将canvas转换为图片保存到本地,然后将图片路径传给image图片的src
  createNewImg: function () {
    var that = this;
    // 画画布
    wx.createSelectorQuery()
      .select('#share')
      .fields({
        node: true,
        size: true, })
      .exec(function (res) {
        console.log(res)
        const canvas = res[0].node
        const context = canvas.getContext('2d')
        const width = res[0].width
        const height = res[0].height
        context.restore();
        const dpr = wx.getSystemInfoSync().pixelRatio
        canvas.width = width * dpr
        canvas.height = height * dpr
        context.scale(dpr, dpr)
        context.clearRect(0, 0, width , height);
        context.fillStyle = 'white'
        context.fillRect(0, 0, width, height)
        context.save();

        // 画海报   为什么要这样呢?为了防止该图片还未加载出来就画了图导致画的一片空白!
        // 网上也有很有人采用 onload方法,但是在调试多次失败后,放弃,如下方案可行
        var path = that.data.hbpath;
        const hbPromise = new Promise((resolve, reject) => {
          const hb = canvas.createImage()
          hb.onload = () => {
            resolve(hb)
          }
          hb.onerror = () => {
            reject(new Error(`fail to fetch image form: ${path}`))
          }
          hb.src = path
        })
        hbPromise.then(img => {
          context.drawImage(img, 0, 0, width, height * 0.8)
        })

        // 画二维码
        var codepath = that.data.codepath;
        const codePromise = new Promise((resolve, reject) => {
          const code = canvas.createImage()
          code.onload = () => {
            resolve(code)
          }
          code.onerror = () => {
            reject(new Error(`fail to fetch image form: ${codepath}`))
          }
          code.src = codepath
        })
        codePromise.then(img => {
          context.drawImage(img, 15, height * 0.83 , 100 , 100)
        })

        // 画话
        var t1 = "长按扫码";
        var title = "J1ay ' blogs";
        var tishi = "每一個想要學習的念頭,那有可能是未來的你在向你求救。";
        context.fillStyle = '#333';
        context.fillText(t1, 130, height * 0.872);
        context.font = 'normal bold 13px sans-serif';
        context.fillText(title, 130, height * 0.9);
        context.fillStyle = '#999';
        context.font = 'normal 10px sans-serif';
        context.fillText(tishi, 130, height * 0.93);
        context.stroke();
        context.save();

        setTimeout(() => {
          that.toSave(canvas);
        }, 1000);
      });
  },
画布保存转为地址
基本一致,就是多加了个 canvas 属性, 也就是将 canvas 对象传进去即可
下方利用像素点转化,可以提升海报的高清度
 // 打包海报
  toSave(canvas) {
    console.log(canvas)
    let that = this
    wx.canvasToTempFilePath({
      x : 0,
      y: 0,
      canvasId: 'share',
      canvas: canvas,
      width: that.data.widths,
      height: that.data.heights ,
      destWidth: that.data.widths * wx.getSystemInfoSync().pixelRatio,
      destHeight: that.data.heights * wx.getSystemInfoSync().pixelRatio,
      success: function (res) {
        let canvasToTempFilePath = res.tempFilePath // 返回的图片地址保存到一个全局变量里
        // console.log(res)
        that.saveShareImg(canvasToTempFilePath)
      },
        fail: function (error) {
          console.log(error)
        }
    })
  },
保存到相册方案也不多说啦。
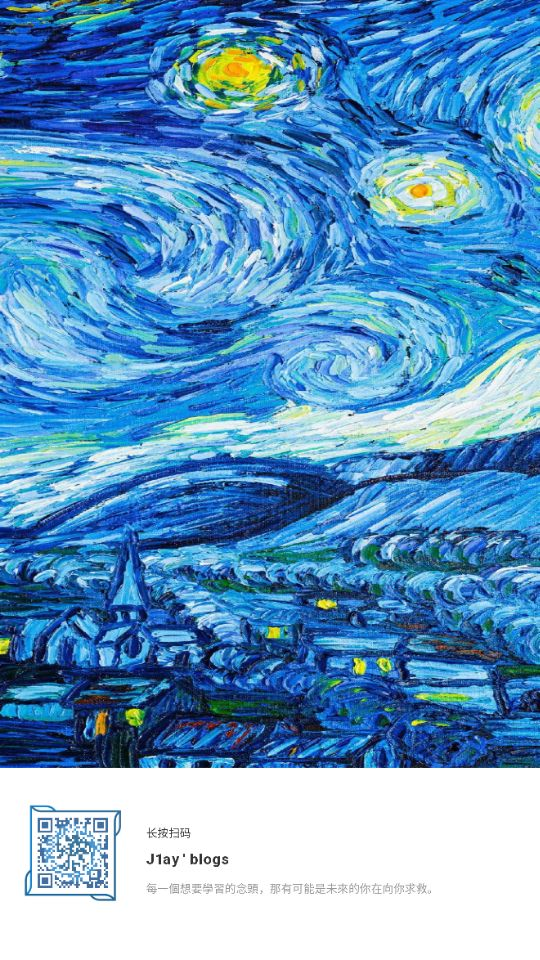
来看一下保存海报的效果图
轮播图实现
接下来来看一下轮播图实现, 微信开发者工具中直接有个组件 swiper
这里 利用
currentIndex == index判断当前选中项,从而改变选中的样式再加个滑动的动画即可
 <view class="main">
      <swiper class="gundong" circular bindchange="changeHB" previous-margin="100rpx" next-margin="100rpx" >
        <block wx:for="{{ shareImgs }}" wx:for-item="item" wx:key="index" >
          <swiper-item class="gundongItem" >
            <view class="Item {{currentIndex == index ? '' : 'smItem'}}">
              <!-- 海报分享 -->
              <view class="shareImg">
                <image style="width:100%;height:100%" src="{{item.img_url}}" />
              </view>
              <!-- 二维码 -->
              <view class="code">
                  <view class="img">
                    <image style="width: 100rpx;height:100rpx;" class="{{currentIndex == index ? '' : 'smCode'}}" src="{{item.code_url}}" />
                  </view>
                  <view class="code_txt">
                    <text>长按扫码</text>
                    <text style="font-weight:bold">J1ay ' blogs</text>
                    <text style="font-size: 14rpx;color: #999999;line-height: 20rpx;">每一個想要學習的念頭,那有可能是未來的你在向你求救。</text>
                  </view>
              </view>
            </view>
          </swiper-item>
        </block>
      </swiper>
    </view>
具体代码如下:
图片素材来源网络,侵权删


 703
703


 被折叠的 条评论
为什么被折叠?
被折叠的 条评论
为什么被折叠?
 到【灌水乐园】发言


