


 本文介绍了SMBMS项目的搭建过程,包括数据库配置、Maven项目构建、登录功能实现、登录流程优化(注销功能)、密码修改功能以及Ajax验证。详细讲解了各层(pojo、dao、service、filter、servlet等)的代码编写,提供了一个完整的JavaWeb应用实例。
SMBMS

数据库


项目如何搭建
考虑使用不使用Maven? Maven→依赖 ,不使用Maven→手动导入相应jar包
步骤
-
新建一个Maven项目
通过模板创建Maven项目


删除不必要的pom.xml配置

web.xml 改为最新4.0
<?xml version="1.0" encoding="UTF-8"?>
<web-app xmlns="http://xmlns.jcp.org/xml/ns/javaee"
         xmlns:xsi="http://www.w3.org/2001/XMLSchema-instance"
         xsi:schemaLocation="http://xmlns.jcp.org/xml/ns/javaee http://xmlns.jcp.org/xml/ns/javaee/web-app_4_0.xsd"
         version="4.0">

</web-app>

补全java结构

- 配置tomcat


-
测试项目是否能够跑起来
启动tomcat
-
导入项目中会使用的jar包;
-
servlet
<dependency> <groupId>javax.servlet</groupId> <artifactId>servlet-api</artifactId> <version>2.5</version> </dependency> -
jsp
<dependency> <groupId>javax.servlet.jsp</groupId> <artifactId>javax.servlet.jsp-api</artifactId> <version>2.3.3</version> </dependency> -
连接数据库
<dependency> <groupId>mysql</groupId> <artifactId>mysql-connector-java</artifactId> <version>5.1.47</version> </dependency> -
JSTL
<dependency> <groupId>javax.servlet.jsp.jstl</groupId> <artifactId>jstl-api</artifactId> <version>1.2</version> </dependency> -
standard标签
<dependency> <groupId>taglibs</groupId> <artifactId>standard</artifactId> <version>1.1.2</version> </dependency> -
junit
<dependency>
    <groupId>junit</groupId>
    <artifactId>junit</artifactId>
    <version>4.12</version>
</dependency>
-
-
创建项目包结构

-
编写实体类
编写实体类才能跟数据库一一对应,把这个关系和过程叫做ORM映射:表和类映射

-
编写基础公共类
-
db.properties
driver=com.mysql.jdbc.Driver url=jdbc:mysql://localhost:3306/smbms?useUnicode=true&characterEncoding=utf-8 username=root password=111111 -
连接数据库
-
操作数据库的公共类: BaseDao
package com.study.dao;

import java.io.IOException;
import java.io.InputStream;
import java.sql.*;
import java.util.Properties;

//操作数据库的公共类
public class BaseDao {

    private static String driver;
    private static String url;
    private static String username;
    private static String password;

    //静态代码块:启动就会加载(类加载的时候就初始化了)
    static{

        //第一步:获取当前类
        // 通过类家宅器读取对应的资源
        InputStream is = BaseDao.class.getClassLoader().getResourceAsStream( "db.properties" );
        //第二步:获得properties类
        Properties properties = new Properties();
        try {

            //第三步:用流加载Properties文件的内容
            properties.load( is );
        } catch (IOException e) {

            e.printStackTrace();
        }
        //第四步:等到连接数据库的信息
        driver = properties.getProperty( "driver" );
        url = properties.getProperty( "url" );
        username = properties.getProperty( "username" );
        password = properties.getProperty( "password" );
    }
    //第五步:连接数据库
    //获取数据库的连接
    public static Connection getConnection() {

        Connection connection = null;
        try {

            Class.forName(driver);
            connection = DriverManager.getConnection( url, username, password );
        } catch (Exception e) {

            e.printStackTrace();
        }
        return connection;
    }

    //第六步:编写查询公共方法
    //编写查询公共类
    public static ResultSet excute(Connection connection, PreparedStatement prepareStatement, ResultSet resultSet, String sql,Object[] params) throws SQLException {

        //1.获取的连接,预编译一个prepareStatement
        prepareStatement = connection.prepareStatement(sql);
        for (int i = 0; i < params.length; i++) {

            //setObject,占位符从1开始,但是我们的数据从0开始
            prepareStatement.setObject( i+1,params[i] );
        }
        //预编译的SQL,直接执行就可以了,不用传参
        resultSet = prepareStatement.executeQuery();
        return resultSet;
    }

    //第七步:编写增删改公共方法
    //编写增删改公共方法
    public static int excute(Connection connection, PreparedStatement prepareStatement, String sql,Object[] params ) throws SQLException {

        //1.获取的连接,预编译一个prepareStatement
        prepareStatement = connection.prepareStatement(sql);
        for (int i = 0; i < params.length; i++) {

            //setObject,占位符从1开始,但是我们的数据从0开始
            prepareStatement.setObject( i+1,params[i] );
        }
        //预编译的SQL,直接执行就可以了,不用传参
        int updateRows = prepareStatement.executeUpdate();

        return updateRows;
    }

    //第八步:关闭连接
    public static boolean closeResources(Connection connection,PreparedStatement prepareStatement, ResultSet resultSet ){

        boolean flag = true;
        if (resultSet != null){

            try {

                resultSet.close();
                //GC 回收
                resultSet = null;
            } catch (SQLException throwables) {

                throwables.printStackTrace();
                flag = false;
            }
        }

        if (prepareStatement != null){

            try {

                prepareStatement.close();
                //GC 回收
                prepareStatement = null;
            } catch (SQLException throwables) {

                throwables.printStackTrace();
                flag = false;
            }
        }

        if (connection != null){

            try {

                connection.close();
                //GC 回收
                connection = null;
            } catch (SQLException throwables) {

                throwables.printStackTrace();
                flag = false;
            }
        }
        return flag;
    }

}
-
-
编码过滤器 CharacterEncodingFilter
-
CharacterEncodingFilter
package com.study.filter; import javax.servlet.*; import java.io.IOException; public class CharacterEncodingFilter implements Filter { public void init(FilterConfig filterConfig) throws ServletException { } public void doFilter(ServletRequest servletRequest, ServletResponse servletResponse, FilterChain filterChain) throws IOException, ServletException { //设置编码语言 servletRequest.setCharacterEncoding( "utf-8" ); servletResponse.setCharacterEncoding( "utf-8" ); //让过滤器继续往下放行 filterChain.doFilter( servletRequest,servletResponse ); } public void destroy() { } } -
在web.xml里面注册Filter配置
<!--字符编码过滤器-->
<filter>
    <filter-name>CharacterEncodingFilter</filter-name>
    <filter-class>com.study.filter.CharacterEncodingFilter</filter-class>
</filter>
<filter-mapping>
    <filter-name>CharacterEncodingFilter</filter-name>
    <url-pattern>/*</url-pattern>
</filter-mapping>
-
-
-
导入静态资源
- calendar
- css
- images
- js

登录功能实现

-
编写前端页面
-
login.jsp
-
为了一启动tomcat就来到login.jsp页面,需要设置欢迎页面
<!--设置欢迎欢迎页面--> <welcome-file-list> <welcome-file>login.jsp</welcome-file> </welcome-file-list> -
在dao里面建立user的包
-

-
由于面向接口编程,创建一个UserDao接口类
-
userDao
public interface UserDao { //得到登录的用户 public User getLoginUser(Connection connection, String userCode) throws SQLException; } -
编写UseDao实现类: userDaoImpl
public class UserDaoImpl implements UserDao{

    //得到登录的用户
    public User getLoginUser(Connection connection, String userCode) throws SQLException {


        PreparedStatement pstm = null;
        ResultSet rs = null;
        User user = null;

        if (connection != null){

            String sql = "select * from smbms_user where userCode = ?";
            Object[] params = {
       userCode};

            rs = BaseDao.excute( connection, pstm, rs , sql, params);
            if (rs.next()){

                user = new User();
                user.setId(rs.getInt("id"));
                user.setUserCode(rs.getString("userCode"));
                user.setUserName(rs.getString("userName"));
                user.setUserPassword(rs.getString("userPassword"));
                user.setGender(rs.getInt("gender"));
                user.setBirthday(rs.getDate("birthday"));
                user.setPhone(rs.getString("phone"));
                user.setAddress(rs.getString("address"));
                user.setUserRole(rs.getInt("userRole"));
                user.setCreatedBy(rs.getInt("createdBy"));
                user.setCreationDate(rs.getTimestamp("creationDate"));
                user.setModifyBy(rs.getInt("modifyBy"));
                user.setModifyDate(rs.getTimestamp("modifyDate"));
            }
            BaseDao.closeResources( null,pstm,rs );
        }
        return user;
    }
}
-
-
业务层接口 UserService

public interface UserService {

    //用户登录
    public User login(String userCode, String userPassword);
}
-
业务层实现类 UserServiceImpl
public class UserServiceImpl implements UserService{ //第一步:业务层到会调用Dao层,所以我们要引入Dao层 //补充:以后这一步要交给容器来做 private UserDao userDao; public UserServiceImpl(){ userDao = new UserDaoImpl(); } public User login(String userCode, String userPassword) { Connection connection = null; User user = null; connection = BaseDao.getConnection(); try { user = userDao.getLoginUser( connection, userCode ); } catch (SQLException throwables) { throwables.printStackTrace(); }finally { BaseDao.closeResources( connection,null,null ); } return user; } }-
测试类:测试业务是否正常运行
@Test
public void test(){

    UserServiceImpl userService = new UserServiceImpl();
    User admin = userService.login( "admin", "111111" );
    System.out.println(admin.getUserPassword());

}
-
-
编写Servlet
- LoginServlet
public class LoginServlet extends HttpServlet { @Override protected void doGet(HttpServletRequest req, HttpServletResponse resp) throws ServletException, IOException { System.out.println("into --》LoginServlet"); //获取用户名和密码 //前端传递数据,通过name来传,不能瞎写 String userCode = req.getParameter( "userCode" ); String userPassword = req.getParameter( "userPassword" ); //和数据库中的密码进行对比,调用业务层 UserService userService = new UserServiceImpl(); User user = userService.login( userCode, userPassword );//这里已经把登录的人给查出来了 if(user != null){ //查有此人,可以登录 //将用户的信息放到session中, 这个session里面存user的信息 req.getSession().setAttribute( Constans.USER_SESSION, user); //尽量把这个放在常量里面(在util包里创建一个放常量的类:Constans) //跳转到主页 resp.sendRedirect( "jsp/frame.jsp" ); }else{ //查无此人 //转发会登录页面,顺带提示它,用户名或者密码错误 req.setAttribute( "error", "用户名或者密码不正确"); req.getRequestDispatcher( "login.jsp" ).forward( req,resp ); } } @Override protected void doPost(HttpServletRequest req, HttpServletResponse resp) throws ServletException, IOException { doGet( req, resp ); } }- util里面的常量类

     ~~~java
     public class Constans {
         public final static String USER_SESSION = "userSession";
     }

     ~~~

  3. 注册Servlet

     ~~~xml
     <servlet>
         <servlet-name>LoginServlet</servlet-name>
         <servlet-class>com.study.servlet.LoginServlet</servlet-class>
     </servlet>
     <servlet-mapping>
         <servlet-name>LoginServlet</servlet-name>
         <url-pattern>/login.do</url-pattern>
     </servlet-mapping>
     ~~~
登录流程优化
1. 注销功能
注销功能
思路:移除Session,返回登录页面
LogoutServlet.java
//退出功能
public class LogoutServlet extends HttpServlet {

    @Override
    protected void doGet(HttpServletRequest req, HttpServletResponse resp) throws ServletException, IOException {

        //移除session
        req.getSession().removeAttribute( Constans.USER_SESSION );
        resp.sendRedirect(  req.getContextPath()+"/login.jsp" );//返回登录页面
    }

    @Override
    protected void doPost(HttpServletRequest req, HttpServletResponse resp) throws ServletException, IOException {

        doGet( req, resp );
    }
}
注册xml
<servlet>
    <servlet-name>LogoutServlet</servlet-name>
    <servlet-class>com.study.servlet.LogoutServlet</servlet-class>
</servlet>
<servlet-mapping>
    <servlet-name>LogoutServlet</servlet-name>
    <url-pattern>/jsp/logout.do</url-pattern>
</servlet-mapping>
2.登录拦截优化
编写一个登录过滤器,并注册
public class SysFilter implements Filter {

    public void init(FilterConfig filterConfig) throws ServletException {


    }

    public void doFilter(ServletRequest servletRequest, ServletResponse servletResponse, FilterChain filterChain) throws IOException, ServletException {

        //要转为Httpservlet对象,才能获得Session
        HttpServletRequest request = (HttpServletRequest) servletRequest;
        HttpServletResponse response = (HttpServletResponse) servletResponse;

        //过滤器,从Session中获得用户
        User user = (User) request.getSession().getAttribute( Constans.USER_SESSION );

        if (user == null){
   //已经被移除或者注销了,或者未登录
            response.sendRedirect( "error.jsp" );
        }else{

            filterChain.doFilter( servletRequest,servletResponse );
        }

    }

    public void destroy() {


    }
}
注册
<!--用户登录过滤器-->
<filter>
    <filter-name>SysFilter</filter-name>
    <filter-class>com.study.filter.SysFilter</filter-class>
</filter>
<filter-mapping>
    <filter-name>SysFilter</filter-name>
    <url-pattern>/jsp/*</url-pattern>
</filter-mapping>
测试,登录,注销,权限,都要保证OK!
密码修改
-
导入前端素材:pwdmodify.js
<li><a href="${pageContext.request.contextPath }/jsp/pwdmodify.jsp">密码修改</a></li> -
写项目,建议从底层向上写

-
UserDao接口
//修改当前用户密码 public int updatePwd(Connection connection,int id, String userPassword ) throws SQLException; -
UserDao接口 实现类
//修改当前用户密码 public int updatePwd(Connection connection, int id, String userPassword) throws SQLException { PreparedStatement pstm = null; int excute = 0; if (connection != null){ String sql = "update smbms_user set userPassword = ? where id = ?"; Object[] params = { userPassword, id}; excute = BaseDao.excute( connection, pstm, sql, params ); BaseDao.closeResources( null,pstm,null ); } return excute; } -
UserService接口
//根据用户id修改密码 public boolean updatePwd(int id, String pwd ); -
UserService接口实现类
//根据用户id修改密码 public boolean updatePwd(int id, String pwd) { Connection connection = null; boolean flag = false; int i = 0; connection = BaseDao.getConnection(); try { if (userDao.updatePwd( connection, id, pwd ) > 0) { flag = true; } } catch (SQLException throwables) { throwables.printStackTrace(); }finally { BaseDao.closeResources( connection,null,null ); } return flag; } -
UserServlet
//实现Servlet复用 public class UserServlet extends HttpServlet { @Override protected void doGet(HttpServletRequest req, HttpServletResponse resp) throws ServletException, IOException { //从Session里面拿用户id Object attribute = req.getSession().getAttribute( Constans.USER_SESSION ); String pwd = req.getParameter( "newpassword" ); boolean flag = false; if (attribute != null && !StringUtils.isNullOrEmpty(pwd)){ User user = (User) attribute; int id = user.getId(); UserService service = new UserServiceImpl(); flag = service.updatePwd( id, pwd ); if (flag){ //给前端设置返回信息 req.setAttribute( "message", "修改密码成功,请退出,使用新密码的登录"); //密码修改成功,移除当前session req.getSession().removeAttribute( Constans.USER_SESSION ); }else{ req.setAttribute( "message", "修改修改失败"); } }else{ req.setAttribute( "message", "新密码设置有问题"); } req.getRequestDispatcher( "pwdmodify.jsp" ).forward( req,resp); } @Override protected void doPost(HttpServletRequest req, HttpServletResponse resp) throws ServletException, IOException { doGet( req, resp ); } } -
注册xml
<servlet> <servlet-name>UserServlet</servlet-name> <servlet-class>com.study.servlet.UserServlet</servlet-class> </servlet> <servlet-mapping> <servlet-name>UserServlet</servlet-name> <url-pattern>/jsp/user.do</url-pattern> </servlet-mapping> -
jsp页面
<%@ page language="java" contentType="text/html; charset=UTF-8" pageEncoding="UTF-8" %> <%@include file="/jsp/common/head.jsp" %> <div class="right"> <div class="location"> <strong>你现在所在的位置是:</strong> <span>密码修改页面</span> </div> <%--我们提交的表单到:/jsp/user.do 这个请求里面--%> <div class="providerAdd"> <form id="userForm" name="userForm" method="post" action="${pageContext.request.contextPath }/jsp/user.do"> <input type="hidden" name="method" value="savepwd"> <!--div的class 为error是验证错误,ok是验证成功--> <div class="info">${message}</div> <div class=""> <label for="oldPassword">旧密码:</label> <input type="password" name="oldpassword" id="oldpassword" value=""> <font color="red"></font> </div> <div> <label for="newPassword">新密码:</label> <input type="password" name="newpassword" id="newpassword" value=""> <font color="red"></font> </div> <div> <label for="rnewpassword">确认新密码:</label> <input type="password" name="rnewpassword" id="rnewpassword" value=""> <font color="red"></font> </div> <div class="providerAddBtn"> <!--<a href="#">保存</a>--> <input type="button" name="save" id="save" value="保存" class="input-button"> </div> </form> </div> </div> </section> <%@include file="/jsp/common/foot.jsp" %> <script type="text/javascript" src="${pageContext.request.contextPath }/js/pwdmodify.js"></script> -
js页面
var oldpassword = null;
var newpassword = null;
var rnewpassword = null;
var saveBtn = null;

$(function () {

    oldpassword = $("#oldpassword");
    newpassword = $("#newpassword");
    rnewpassword = $("#rnewpassword");
    saveBtn = $("#save");

    oldpassword.next().html("*");
    newpassword.next().html("*");
    rnewpassword.next().html("*");

    oldpassword.on("blur", function () {

        $.ajax({

            type: "GET",
            url: path + "/jsp/user.do",
            data: {
     method: "pwdmodify", oldpassword: oldpassword.val()}, //ajax传递的参数
            // path+ /jsp/user.do.?method=pwdmodify&oldpassword = oldpassword.val();
            dataType: "json",
            success: function (data) {

                if (data.result == "true") {
     //旧密码正确
                    validateTip(oldpassword.next(), {
     "color": "green"}, imgYes, true);
                } else if (data.result == "false") {
     //旧密码输入不正确
                    validateTip(oldpassword.next(), {
     "color": "red"}, imgNo + " 原密码输入不正确", false);
                } else if (data.result == "sessionerror") {
     //当前用户session过期,请重新登录
                    validateTip(oldpassword.next(), {
     "color": "red"}, imgNo + " 当前用户session过期,请重新登录", false);
                } else if (data.result == "error") {
     //旧密码输入为空
                    validateTip(oldpassword.next(), {
     "color": "red"}, imgNo + " 请输入旧密码", false);
                }
            },
            error: function (data) {

                //请求出错
                validateTip(oldpassword.next(), {
     "color": "red"}, imgNo + " 请求错误", false);
            }
        });


    }).on("focus", function () {

        validateTip(oldpassword.next(), {
     "color": "#666666"}, "* 请输入原密码", false);
    });

    newpassword.on("focus", function () {

        validateTip(newpassword.next(), {
     "color": "#666666"}, "* 密码长度必须是大于6小于20", false);
    }).on("blur", function () {

        if (newpassword.val() != null && newpassword.val().length > 6
            && newpassword.val().length < 20) {

            validateTip(newpassword.next(), {
     "color": "green"}, imgYes, true);
        } else {

            validateTip(newpassword.next(), {
     "color": "red"}, imgNo + " 密码输入不符合规范,请重新输入", false);
        }
    });


    rnewpassword.on("focus", function () {

        validateTip(rnewpassword.next(), {
     "color": "#666666"}, "* 请输入与上面一致的密码", false);
    }).on("blur", function () {

        if (rnewpassword.val() != null && rnewpassword.val().length > 6
            && rnewpassword.val().length < 20 && newpassword.val() == rnewpassword.val()) {

            validateTip(rnewpassword.next(), {
     "color": "green"}, imgYes, true);
        } else {

            validateTip(rnewpassword.next(), {
     "color": "red"}, imgNo + " 两次密码输入不一致,请重新输入", false);
        }
    });


    saveBtn.on("click", function () {

        oldpassword.blur();
        newpassword.blur();
        rnewpassword.blur();

        if (oldpassword.attr("validateStatus") == "true"
            && newpassword.attr("validateStatus") == "true"
            && rnewpassword.attr("validateStatus") == "true") {

            if (confirm("确定要修改密码?")) {

                $("#userForm").submit();
            }
        }
    });
});
Ajax验证就密码实现
-
阿里巴巴的fastjson
<!-- https://mvnrepository.com/artifact/com.alibaba/fastjson --> <dependency> <groupId>com.alibaba</groupId> <artifactId>fastjson</artifactId> <version>1.2.68</version> </dependency> -
Ajax实现就密码验证
//实现Servlet复用 public class UserServlet extends HttpServlet { @Override protected void doGet(HttpServletRequest req, HttpServletResponse resp) throws ServletException, IOException { String method = req.getParameter( "method" ); if(method.equals( "savepwd" ) && method != null){ this.updatePwd( req,resp ); }else if (method.equals( "pwdmodify" ) && method != null){ this.pwdmodify( req,resp ); } } @Override protected void doPost(HttpServletRequest req, HttpServletResponse resp) throws ServletException, IOException { doGet( req, resp ); } //修改密码 public void updatePwd(HttpServletRequest req, HttpServletResponse resp) { //从Session里面拿用户id Object attribute = req.getSession().getAttribute( Constans.USER_SESSION ); String pwd = req.getParameter( "newpassword" ); boolean flag = false; if (attribute != null && !StringUtils.isNullOrEmpty(pwd)){ User user = (User) attribute; int id = user.getId(); UserService service = new UserServiceImpl();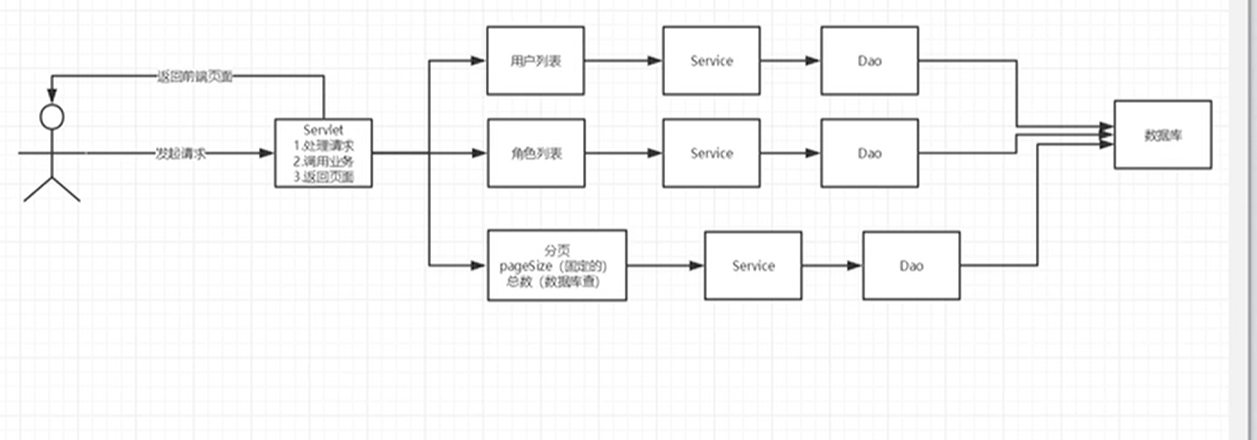 flag = service.updatePwd( id, pwd ); if (flag){ //给前端设置返回信息 req.setAttribute( "message", "修改密码成功,请退出,使用新密码的登录"); //密码修改成功,移除当前session req.getSession().removeAttribute( Constans.USER_SESSION ); }else{ req.setAttribute( "message", "修改修改失败"); } }else{ req.setAttribute( "message", "新密码设置有问题"); } try { req.getRequestDispatcher( "pwdmodify.jsp" ).forward( req,resp); } catch (ServletException e) { e.printStackTrace(); } catch (IOException e) { e.printStackTrace(); } } //验证就密码 public void pwdmodify(HttpServletRequest req, HttpServletResponse resp){ //从Session里面拿用户id Object attribute = req.getSession().getAttribute( Constans.USER_SESSION ); String oldpassword = req.getParameter( "oldpassword" ); //万能的Map Map<String, String> resultMap = new HashMap<String, String>(); if (attribute == null){ //Session 失效了,session过期了 resultMap.put( "result", "sessionerror" ); }else if (StringUtils.isNullOrEmpty( oldpassword )){ resultMap.put( "result", "error" ); }else { User user = (User) attribute; String userPassword = user.getUserPassword(); if (oldpassword.equals( userPassword )){ resultMap.put( "result", "true" ); }else { resultMap.put( "result", "false" ); } } resp.setContentType( "application/json" ); try { PrintWriter writer = resp.getWriter(); //JSONArray 阿里巴巴的JSON工具类,转换格式 /* * resultMap = [ "result": "true","result": "sessionerror" ] * */ writer.write( JSONArray.toJSONString( resultMap ) ); writer.flush(); writer.close(); } catch (IOException e) { e.printStackTrace(); } } }
SMBMS用户管理底层实现
- 思路

代码
pojo
bill
Bill.java
package com.study.pojo;

import java.math.BigDecimal;
import java.util.Date;

public class Bill {

    private Integer id; // 账单ID
    private String billCode;    // 账单编码
    private String productName; // 商品名
    private String productDesc; // 商品描述
    private String productUnit; // 商品单价
    private BigDecimal productCount; // 商品数量
    private BigDecimal totalPrice; // 总金额
    private Integer isPayment; // 是否支付
    private Integer createdBy;  // 创建者ID
    private Date creationDate;// 创建时间
    private Integer modifyBy;   // 修改者ID
    private Date modifyDate;    // 修改时间
    private Integer providerId; // 供应商ID

    private String providerName;    //供应商名称

    public Integer getId() {

        return id;
    }

    public String getBillCode() {

        return billCode;
    }

    public String getProductName() {

        return productName;
    }

    public String getProductDesc() {

        return productDesc;
    }

    public String getProductUnit() {

        return productUnit;
    }

    public BigDecimal getProductCount() {

        return productCount;
    }

    public BigDecimal getTotalPrice() {

        return totalPrice;
    }

    public Integer getIsPayment() {

        return isPayment;
    }

    public Integer getCreatedBy() {

        return createdBy;
    }

    public Date getCreationDate() {

        return creationDate;
    }

    public Integer getModifyBy() {

        return modifyBy;
    }

    public Date getModifyDate() {

        return modifyDate;
    }

    public Integer getProviderId() {

        return providerId;
    }

    public String getProviderName() {

        return providerName;
    }

    public void setId(Integer id) {

        this.id = id;
    }

    public void setBillCode(String billCode) {

        this.billCode = billCode;
    }
 最低0.47元/天 解锁文章


 841
841

 被折叠的 条评论
为什么被折叠?
被折叠的 条评论
为什么被折叠?
 到【灌水乐园】发言


