


文章目录
lamp
1.lamp简介
- lamp,其实就是由Linux+Apache+Mysql/MariaDB+Php/Perl/Python的一组动态网站或者服务器的开源软件,除Linux外其它各部件本身都是各自独立的程序,但是因为经常被放在一起使用,拥有了越来越高的兼容度,共同组成了一个强大的Web应用程序平台。
- LAMP指的是Linux(操作系统)、Apache(HTTP服务器)、MySQL(也指MariaDB,数据库软件)和PHP(有时也是指Perl或Python)的第一个字母,一般用来建立web应用平台。
2.web服务器的工作流程
web服务器的资源分为两种,静态资源和动态资源
- 静态资源就是指静态内容,客户端从服务器获得的资源的表现形式与原文件相同。可以简单的理解为就是直接存储于文件系统中的资源
- 动态资源则通常是程序文件,需要在服务器执行之后,将执行的结果返回给客户端
那么下面我们用一张图片来了解服务器如何处理客户端请求的。
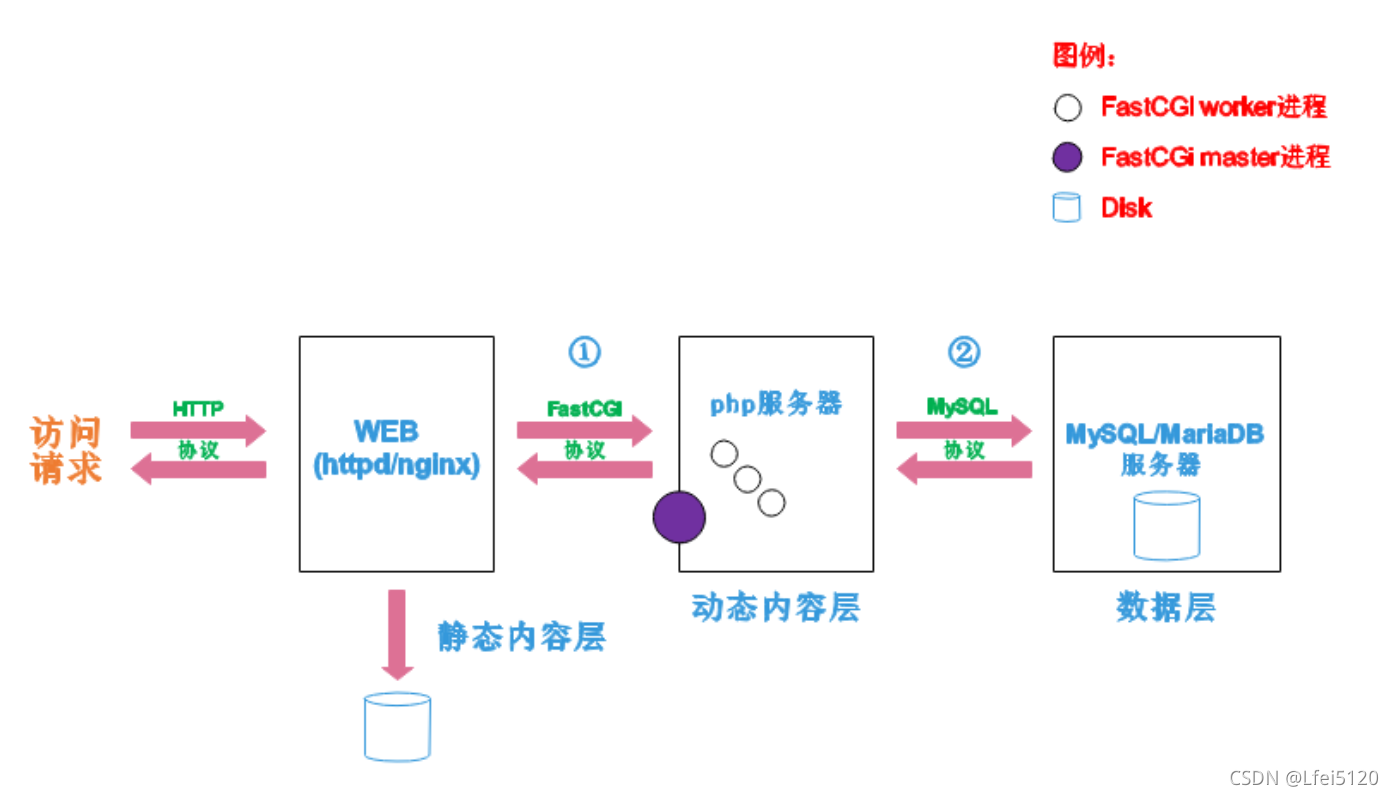
阶段①显示的是httpd服务器(即apache)和php服务器通过FastCGI协议进行通信,且php作为独立的服务进程运行
阶段②显示的是php程序和mysql数据库间通过mysql协议进行通信。php与mysql本没有什么联系,但是由Php语言写成的程序可以与mysql进行数据交互。同理perl和python写的程序也可以与mysql数据库进行交互
通过上面的图说明一下web的工作流程
- 客户端通过http协议请求web服务器资源
- web服务器收到请求后判断客户端请求的资源是静态资源或是动态资源
- 若是静态资源则直接从本地文件系统取之返回给客户端。
- 否则若为动态资源则通过FastCGI协议与php服务器联系,通过CGI程序的master进程调度worker进程来执行程序以获得客户端请求的动态资源,并将执行的结果通过FastCGI协议返回给httpd服务器,httpd服务器收到php的执行结果后将其封装为http响应报文响应给客户端。在执行程序获取动态资源时若需要获得数据库中的资源时,由Php服务器通过mysql协议与MySQL/MariaDB服务器交互,取之而后返回给httpd,httpd将从php服务器收到的执行结果封装成http响应报文响应给客户端。
3.cgi与fastcgi
上图阶段①中提到了FastCGI,下面我们来了解下CGI与FastCGI。
CGI(Common Gateway Interface,通用网关接口),CGI是外部应用程序(CGI程序)与WEB服务器之间的接口标准,是在CGI程序和Web服务器之间传递信息的过程。CGI规范允许Web服务器执行外部程序,并将它们的输出发送给Web浏览器,CGI将web的一组简单的静态超媒体文档变成一个完整的新的交互式媒体。
FastCGI(Fast Common Gateway Interface)是CGI的改良版,CGI是通过启用一个解释器进程来处理每个请求,耗时且耗资源,而FastCGI则是通过master-worker形式来处理每个请求,即启动一个master主进程,然后根据配置启动几个worker进程,当请求进来时,master会从worker进程中选择一个去处理请求,这样就避免了重复的生成和杀死进程带来的频繁cpu上下文切换而导致耗时
4.httpd与php结合的方式
httpd与php结合的方式有以下三种:
- modules:php将以httpd的扩展模块形式存在,需要加载动态资源时,httpd可以直接通过php模块来加工资源并返回给客户端
- httpd prefork:libphp5.so(多进程模型的php)
- httpd event or worker:libphp5-zts.so(线程模型的php)
- CGI:httpd需要加载动态资源时,通过CGI与php解释器联系,获得php执行的结果,此时httpd负责与php连接的建立和断开等
- FastCGI:利用php-fpm机制,启动为服务进程,php自行运行为一个服务,https通过socket与php通信
5.lamp平台构建
环境
| 系统 | ip | 需要安装的服务 |
|---|---|---|
| centos | 192.168.100.147 | httpd,php |
| redhat | mysql |
lamp平台的搭建一定要注意安装的先后顺序:
httpd --> mysql --> php
5.1 安装httpd
下载httpd的三个包
httpd
[root@localhost src]# wget https://dlcdn.apache.org/httpd/httpd-2.4.49.tar.gz
--2021-09-23 02:29:25--  https://dlcdn.apache.org/httpd/httpd-2.4.49.tar.gz
略。。。。。。
apr
[root@localhost src]# wget https://dlcdn.apache.org/apr/apr-1.7.0.tar.gz
--2021-09-23 02:30:53--  https://dlcdn.apache.org/apr/apr-1.7.0.tar.gz
略。。。。。。
apr-util
[root@localhost src]# wget https://dlcdn.apache.org/apr/apr-util-1.6.1.tar.gz
--2021-09-23 02:31:48--  https://dlcdn.apache.org/apr/apr-util-
略。。。。。。
5.2解压
[root@localhost src]# tar xf apr-1.7.0.tar.gz
[root@localhost src]# tar xf apr-util-1.6.1.tar.gz
[root@localhost src]# tar xf httpd-2.4.49.tar.gz
[root@localhost src]# ls
apr-1.7.0              debug
apr-1.7.0.tar.gz       httpd-2.4.49
apr-util-1.6.1         httpd-2.4.49.tar.gz
apr-util-1.6.1.tar.gz  kernels
[root@localhost src]#
下载开发工具包
[root@localhost src]# yum groups mark install 'Development Tools' -y
创建用户和组
[root@localhost src]# groupadd -r apache
[root@localhost src]# useradd -r -M -s /sbin/nologin -g apache apache
[root@localhost src]#
安装依赖包
[root@localhost src]#  yum -y install openssl-devel pcre-devel expat-devel libtool gcc gcc-c++ make
上次元数据过期检查:0:34:26 前,执行于 2021年09月23日 星期四 02时08分15秒。
依赖关系解决。
略。。。。。。
编译安装apr
[root@localhost src]# cd apr-1.7.0
[root@localhost apr-1.7.0]# vim configure
 cfgfile=${ofile}T
    trap "$RM \"$cfgfile\"; exit 1" 1 2 15
#   $RM "$cfgfile"    //进入这个配置文件搜索cfgfile,然后删除或者注释掉
[root@localhost apr-1.7.0]# ./configure --prefix=/usr/local/apr
略。。。。。。
[root@localhost apr-1.7.0]# make && make install
略。。。。。。
编译安装apr-util
[root@localhost apr-util-1.6.1]# ./configure --prefix=/usr/local/apr-util --with-apr=/usr/local/apr
略。。。。。。
[root@localhost apr-util-1.6.1]# make && make install
略。。。。。。
编译安装httpd
./configure --prefix=/usr/local/apache \
--enable-so \
--enable-ssl \
--enable-cgi \
--enable-rewrite \
--with-zlib \
--with-pcre \
--with-apr=/usr/local/apr \
--with-apr-util=/usr/local/apr-util/ \
--enable-modules=most \
--enable-mpms-shared=all \
--with-mpm=prefork
略。。。。。。
[root@localhost httpd-2.4.49]# make && make install
略。。。。。。
安装完成后进行配置
[root@localhost src]# echo 'export PATH=/usr/local/apache/bin:$PATH' > /etc/profile.d/httpd.sh
[root@localhost src]# source /etc/profile.d/httpd.sh
[root@localhost src]# ln -s /usr/local/apache/include/ /usr/include/httpd
[root@localhost src]# echo 'MANPATH /usr/local/apache/man' >> /etc/man.config
[root@localhost src]#
[root@localhost ~]# vim /usr/local/apache/conf/httpd.conf
ServerName www.example.com:80    //在这里把前面的注释取消掉
写一个开机自启动的service文件
[root@localhost ~]# cat /usr/lib/systemd/system/sshd.service > /usr/lib/systemd/system/httpd.serice
[root@localhost ~]# vim /usr/lib/systemd/system/httpd.serice
[root@localhost ~]# cat /usr/lib/systemd/system/httpd.serice
[Unit]
Description=Httpd server daemon
After=network.target

[Service]
Type=forking
ExecStart=/usr/local/apache/bin/apachectl start
Execstop=/usr/local/apache/bin/apachectl stop
ExecReload=/bin/kill -HUP $MAINPID

[Install]
WantedBy=multi-user.target
[root@localhost ~]#
重新加载并关闭防火墙
[root@localhost ~]# systemctl daemon-reload
[root@localhost ~]# systemctl enable --now httpd
Created symlink /etc/systemd/system/multi-user.target.wants/httpd.service → /usr/lib/systemd/system/httpd.service.
[root@localhost ~]# systemctl disable --now firewalld
[root@localhost ~]# setenforce 0
[root@localhost ~]#
[root@localhost ~]# ss -antl
State    Recv-Q   Send-Q     Local Address:Port           Peer Address:Port        Process
LISTEN   0        128              0.0.0.0:22                  0.0.0.0:*
LISTEN   0        128                    *:80                        *:*
LISTEN   0        128                 [::]:22                     [::]:*
[root@localhost ~]#
6.安装mysql
安装依赖包
[root@localhost ~]# yum -y install ncurses-devel openssl-devel openssl cmake mariadb-devel ncurses-compat-libs
略。。。。。。
创建用户
[root@localhost ~]# useradd -r -M -s /sbin/nologin mysql
[root@localhost ~]#
下载mysql软件包并解压
[root@localhost ~]# cd /usr/src/
[root@localhost src]# wget https://downloads.mysql.com/archives/get/file/mysql-5.7.34-linux-glibc2.12-x86_64.tar.gz
[root@localhost src]# tar xf mysql-5.7.34-linux-glibc2.12-x86_64.tar.gz -C /usr/local
重命名
[root@localhost src]# cd /usr/local
[root@localhost local]# mv mysql-5.7.34-linux-glibc2.12-x86_64/ mysql
[root@localhost local]#
修改MySQL的属主属组
[root@localhost local]# chown -R mysql.mysql mysql
[root@localhost local]# ll
总用量 0
drwxr-xr-x. 14 root  root  164 9月  23 03:02 apache
drwxr-xr-x.  6 root  root   58 9月  23 02:54 apr
drwxr-xr-x.  5 root  root   43 9月  23 02:57 apr-util
drwxr-xr-x.  2 root  root    6 5月  18 2020 bin
drwxr-xr-x.  2 root  root    6 5月  18 2020 etc
drwxr-xr-x.  2 root  root    6 5月  18 2020 games
drwxr-xr-x.  2 root  root    6 5月  18 2020 include
drwxr-xr-x.  2 root  root    6 5月  18 2020 lib
drwxr-xr-x.  3 root  root   17 7月  13 02:31 lib64
drwxr-xr-x.  2 root  root    6 5月  18 2020 libexec
drwxr-xr-x.  9 mysql mysql 129 9月  23 03:31 mysql
drwxr-xr-x.  2 root  root    6 5月  18 2020 sbin
drwxr-xr-x.  5 root  root   49 7月  13 02:31 share
drwxr-xr-x.  2 root  root    6 5月  18 2020 src
[root@localhost local]#
添加变量环境并配置
[root@localhost local]# echo 'export PATH=/usr/local/mysql/bin:$PATH' > /etc/profile.d/mysql.sh
[root@localhost local]# source /etc/profile.d/mysql.sh
[root@localhost local]#
[root@localhost ~]# ln -s /usr/local/mysql/include/ /usr/include/mysql/
[root@localhost ~]#
[root@localhost ~]# vim /etc/man_db.conf
MANDATORY_MANPATH                       /usr/man
MANDATORY_MANPATH                       /usr/share/man
MANDATORY_MANPATH                       /usr/local/share/man
MANDATORY_MANPATH                       /usr/local/apache/man
MANDATORY_MANPATH                       /usr/local/mysql/man   //在这里加上mysql
[root@localhost ~]# vim /etc/ld.so.conf.d/mysql.conf
[root@localhost ~]# cat /etc/ld.so.conf.d/mysql.conf
/usr/local/mysql/lib
[root@localhost ~]# ldconfig
[root@localhost ~]#
创建数据目录
[root@localhost ~]# mkdir /opt/data
[root@localhost ~]# chown -R mysql.mysql /opt/data
[root@localhost ~]#
初始化
[root@localhost ~]#  /usr/local/mysql/bin/mysqld --initialize --user=mysql --datadir=/opt/data/
略。。。。。。
生成配置文件
[root@localhost ~]# cat > /etc/my.cnf <<EOF
> [mysqld]
> basedir = /usr/local/mysql
> datadir = /opt/data
> socket = /tmp/mysql.sock
> port = 3306
> pid-file = /opt/data/mysql.pid
> user = mysql
> skip-name-resolve
> EOF
[root@localhost ~]#
配置开机自启动的service文件
[root@localhost ~]# cp -a /usr/local/mysql/support-files/mysql.server /etc/init.d/mysqld
[root@lnmp ~]# sed -ri 's#^(basedir=).*#\1/usr/local/mysql#g' /etc/init.d/mysqld
[root@lnmp ~]# sed -ri 's#^(datadir=).*#\1/opt/data#g' /etc/init.d/mysqld
[root@lnmp ~]#
重新加载
[root@lnmp ~]# service mysqld start
Starting MySQL.Logging to '/opt/data/lnmp.err'.
 SUCCESS!
[root@lnmp ~]# ss -antl
State   Recv-Q  Send-Q   Local Address:Port        Peer Address:Port      Process
LISTEN  0       128            0.0.0.0:22               0.0.0.0:*
LISTEN  0       128            0.0.0.0:80               0.0.0.0:*
LISTEN  0       128               [::]:22                  [::]:*
LISTEN  0       80                   *:3306                   *:*
[root@lnmp ~]#
我们进去修改密码
[root@localhost ~]# mysql -u root -p
Enter password:      //这里的登录密码我们要使用上面初始化的密码
Welcome to the MySQL monitor.  Commands end with ; or \g.
Your MySQL connection id is 4
Server version: 5.7.34

Copyright (c) 2000, 2021, Oracle and/or its affiliates.

Oracle is a registered trademark of Oracle Corporation and/or its
affiliates. Other names may be trademarks of their respective
owners.

Type 'help;' or '\h' for help. Type '\c' to clear the current input statement.

mysql>


mysql> set password = password("shenlongfei");   //给它设置一个新密码
Query OK, 0 rows affected, 1 warning (0.00 sec)

mysql>


[root@localhost ~]# mysql -u root -pshenlongfei    //在这里用我们设置的密码登录即可
mysql: [Warning] Using a password on the command line interface can be insecure.
Welcome to the MySQL monitor.  Commands end with ; or \g.
Your MySQL connection id is 5
Server version: 5.7.34 MySQL Community Server (GPL)

Copyright (c) 2000, 2021, Oracle and/or its affiliates.

Oracle is a registered trademark of Oracle Corporation and/or its
affiliates. Other names may be trademarks of their respective
owners.

Type 'help;' or '\h' for help. Type '\c' to clear the current input statement.

mysql>
7.安装phph
下载epel源
[root@localhost ~]# yum -y install epel-release
上次元数据过期检查:1:29:23 前,执行于 2021年09月23日 星期四 05时10分47秒。
略。。。。。。
在这里上传我们最新的8.0.10的php包
可以在php.net官网下载
[root@localhost ~]# ls
anaconda-ks.cfg  php-8.0.10.tar
[root@localhost ~]#
解压
[root@localhost ~]# tar xf php-8.0.10.tar
[root@localhost ~]# ls
anaconda-ks.cfg  php-8.0.10  php-8.0.10.tar
[root@localhost ~]#
安装依赖包
[root@localhost php-8.0.10]#yum -y install libxml2 libxml2-devel openssl openssl-devel bzip2 bzip2-devel libcurl libcurl-devel libicu-devel libjpeg libjpeg-devel libpng libpng-devel openldap-devel  pcre-devel freetype freetype-devel gmp gmp-devel libmcrypt libmcrypt-devel readline readline-devel libxslt libxslt-devel mhash mhash-devel

[root@localhost php-8.0.10]# wget http://mirror.centos.org/centos/8-stream/PowerTools/x86_64/os/Packages/oniguruma-devel-6.8.2-2.el8.x86_64.rpm

[root@localhost php-8.0.10]#yum -y installlibzip-devel.x86_64

[root@localhost php-8.0.10]#yum -y install libsqlite3x-devel.x86_64
编译安装
[root@localhost php-8.0.10]# ./configure --prefix=/usr/local/php8  \
--with-config-file-path=/etc \
--enable-fpm \
--disable-debug \
--disable-rpath \
--enable-shared \
--enable-soap \
--with-openssl \
--enable-bcmath \
--with-iconv \
--with-bz2 \
--enable-calendar \
--with-curl \
--enable-exif  \
--enable-ftp \
--enable-gd \
--with-jpeg \
--with-zlib-dir \
--with-freetype \
--with-gettext \
--enable-mbstring \
--enable-pdo \
--with-mysqli=mysqlnd \
--with-pdo-mysql=mysqlnd \
--with-readline \
--enable-shmop \
--enable-simplexml \
--enable-sockets \
--with-zip \
--enable-mysqlnd-compression-support \
--with-pear \
--enable-pcntl \
--enable-posix
略。。。。。。
make && make install
设置环境变量
[root@localhost php-8.0.10]# echo 'export PATH=/usr/local/php8/bin:$PATH' > /etc/profile.d/php.sh[root@localhost php-8.0.10]# source /etc/profile.d/php.sh
[root@localhost php-8.0.10]#
配置php-fpm文件
[root@localhost php-8.0.10]# cp php.ini-production /etc/php.ini
[root@localhost php-8.0.10]# cp sapi/fpm/init.d.php-fpm /etc/init.d/php-fpm
[root@localhost php-8.0.10]# chmod +x /etc/rc.d/init.d/php-fpm
[root@localhost php-8.0.10]# cp /usr/local/php8/etc/php-fpm.conf.default /usr/local/php8/etc/php-fpm.conf
[root@localhost php-8.0.10]# cp /usr/local/php8/etc/php-fpm.d/www.conf.default /usr/local/php8/etc/php-fpm.d/www.conf
[root@localhost php-8.0.10]#
启动php-fpm
[root@localhost php-8.0.10]# service php-fpm start
Starting php-fpm  done
[root@localhost php-8.0.10]#
//默认情况下,fpm监听在127.0.0.1的9000端口,也可以使用如下命令验证其是否已经监听在相应的套接字
[root@localhost php-8.0.10]# ss -antl
State    Recv-Q   Send-Q     Local Address:Port           Peer Address:Port        Process
LISTEN   0        128            127.0.0.1:9000                0.0.0.0:*
LISTEN   0        128              0.0.0.0:22                  0.0.0.0:*
LISTEN   0        80                     *:3306                      *:*
LISTEN   0        128                    *:80                        *:*
LISTEN   0        128                 [::]:22                     [::]:*
[root@localhost php-8.0.10]#
8.配置apache
8.1启用代理模块
在apache httpd 2.4以后已经专门有一个模块针对FastCGI的实现,此模块为mod_proxy_fcgi.so,它其实是作为mod_proxy.so模块的扩展,因此,这两个模块都要加载,编辑httpd.conf文件,取消以下两行内容的注释:
进入到我们的httpd.conf中去搜索proxy,然后把下面两行注释取消掉即可
[root@localhost php-8.0.10]# vim /usr/local/apache/conf/httpd.conf
LoadModule proxy_module modules/mod_proxy.so
LoadModule proxy_fcgi_module modules/mod_proxy_fcgi.so
8.2.配置虚拟主机
创建虚拟主机目录并生成php测试页面
[root@localhost ~]# mkdir /usr/local/apache/htdocs/shenlongfei
[root@localhost ~]# cat > /usr/local/apache/htdocs/shenlongfei/index.php <<EOF
<?php
   phpinfo();
?>
EOF

[root@localhost ~]#
[root@localhost ~]# chown -R apache.apache /usr/local/apache/htdocs/
[root@localhost ~]#
在配置文件最后面加上下面内容
[root@localhost apache]# vim conf/httpd.conf
<VirtualHost *:80>
    DocumentRoot "/usr/local/apache/htdocs/shenlongfei"
    ServerName www.shenlongfei.com
    ProxyRequests Off
    ProxyPassMatch ^/(.*\.php)$ fcgi://127.0.0.1:9000/usr/local/apache/htdocs/shenlongfei/$1
    <Directory "/usr/local/apache/htdocs/shenlongfei">
        Options none
        AllowOverride none
        Require all granted
    </Directory>
//加完上面内容之后搜索AddType,添加一下内容
    AddType application/x-compress .Z
    AddType application/x-gzip .gz .tgz
    AddType application/x-httpd-php .php    //把这行和下面一行写进去
    AddType application/x-httpd-php-source .php
 //然后再搜索index.html
<IfModule dir_module>
    DirectoryIndex index.php  index.html    //把index.php加到中间
</IfModule>
我们修改配置文件之后一定要记得重启,否则无效
[root@localhost bin]# systemctl restart httpd
[root@localhost bin]#
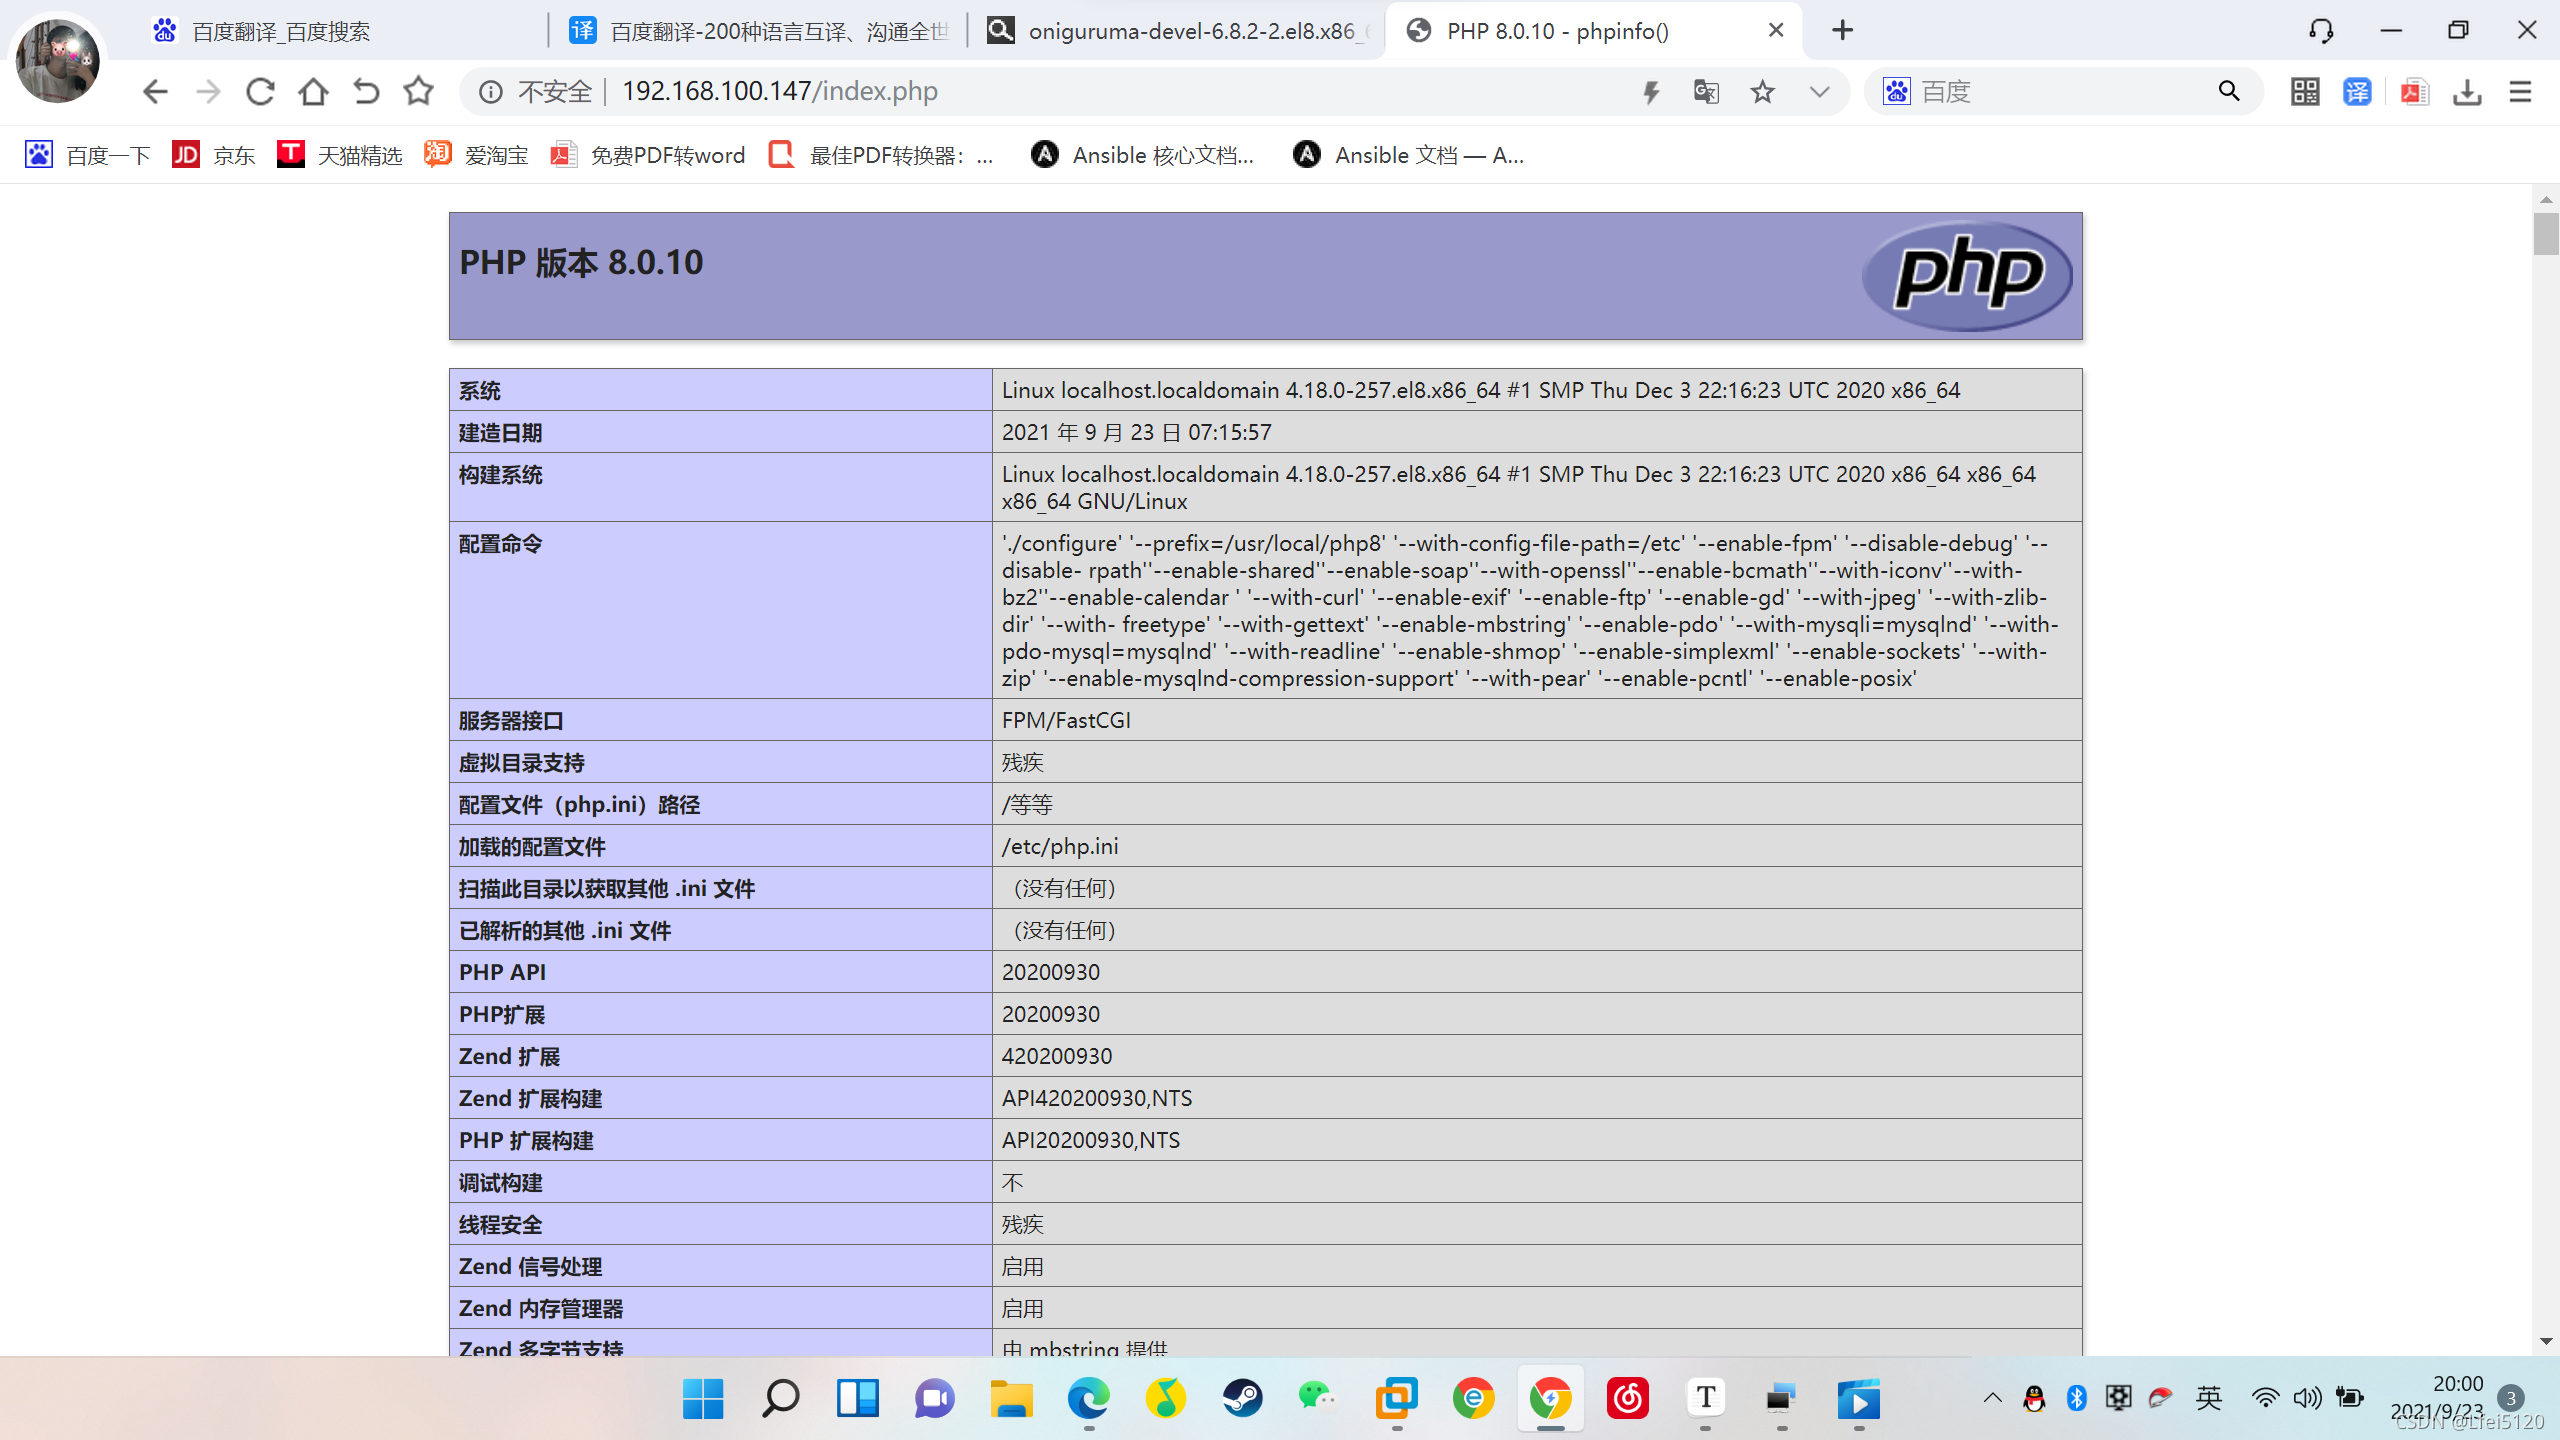
9.验证:
在浏览器上使用域名访问,若看到以下界面则表示lamp架构搭建成功,否则请检查你的操作


 6492
6492


 被折叠的 条评论
为什么被折叠?
被折叠的 条评论
为什么被折叠?
 到【灌水乐园】发言


