


spring总结
spring_jar包
core container
- spring-core,spring-bean 提供框架的基础部分,包括 IoC 和依赖注入特性。
spring-context, 在spring-core,spring-beans基础上构建。它提供一种框架式的访问对象的方法。它也支持类似 Java EE 特性,例如:EJB,JMX 和基本 remoting。ApplicationContext 接口是它的聚焦点。springcontext-support, 集成第三方库到 Spring application context。spring-expression,提供一种强有力的表达语言在运行时来查询和操纵一个对象图。
aop
spring-aop,提供了对面向切面编程的丰富支持。spring-aspects,提供了对 AspectJ 的集成。spring-instrument,提供了对类 instrumentation 的支持和类加载器。spring-instrument-tomcat,包含了 Spring 对 Tomcat 的 instrumentation 代理。
messaging
spring-messaging,包含 spring 的消息处理功能,如 Message,MessageChannel,MessageHandler。
data Access
spring-jdbc,提供了一个 JDBC 抽象层。spring-tx,支持编程和声明式事务管理类。spring-orm,提供了流行的对象关系型映射 API 集,如 JPA,JDO,Hibernate。spring-oxm,提供了一个抽象层以支持对象/XML 映射的实现,如 JAXB,Castor,XMLBeans,JiBX 和 XStream.spring-jms,包含了生产和消费消息的功能。
web
spring-web,提供了基本的面向 web 的功能,如多文件上传、使用 Servlet 监听器的 Ioc 容器的初始化。一个面向 web 的应用层上下文。spring-webmvc,包括 MVC 和 REST web 服务实现。spring-webmvc-portlet,提供在 Protlet 环境的 MVC 实现和spring-webmvc功能的镜像
TEST
spring-test,以 Junit 和 TestNG 来支持 spring 组件的单元测试和集成测试。
术语
- 非侵入式设计:从框架角度可以这样理解,无需继承框架提供的类,这种设计就可以看作是非侵入式设计,如果继承了这些框架类,就是侵入设计,如果以后想更换框架之前写过的代码几乎无法重用,如果非侵入式设计则之前写过的代码仍然可以继续使用。
- POJO:POJO(Plain Old Java Objects)
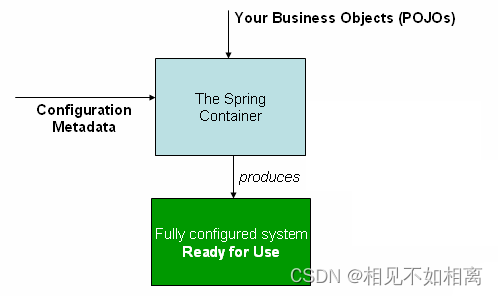
ioc简介
IoC,是 Inversion of Control 的缩写,即控制反转。
- 上层模块不应该依赖于下层模块,它们共同依赖于一个抽象
- 抽象不能依赖于具体实现,具体实现依赖于抽象
- 注:又称为依赖倒置原则。这是设计模式六大原则之一。
核心接口
在 Spring 中,有两种 IoC 容器:BeanFactory 和 ApplicationContext。
BeanFactory:BeanFactory 提供了 Spring 容器的配置框架和基本功能。ApplicationContext:BeanFactory 的子接口。它还扩展了其他一些接口,以支持更丰富的功能,如:国际化、访问资源、事件机制、更方便的支持 AOP、在 web 应用中指定应用层上下文等。
工作步骤
ioc容器工作步骤
- 配置元数据:需要配置一些元数据来告诉 Spring,你希望容器如何工作,具体来说,就是如何去初始化、配置、管理 JavaBean 对象。
- 实例化容器:由 IoC 容器解析配置的元数据。IoC 容器的 Bean Reader 读取并解析配置文件,根据定义生成 BeanDefinition 配置元数据对象,IoC 容器根据
BeanDefinition进行实例化、配置及组装 Bean。 - 使用容器:由客户端实例化容器,获取需要的 Bean。
配置元数据
-
基于 xml 配置:Spring 的传统配置方式。在
<beans>标签中配置元数据内容。缺点是当 JavaBean 过多时,产生的配置文件足以让你眼花缭乱。 -
基于注解配置:Spring2.5 引入。可以大大简化你的配置。
-
基于 Java 配置:可以使用 Java 类来定义 JavaBean 。
为了使用这个新特性,需要用到
@Configuration、@Bean、@Import和@DependsOn注解。
依赖注入类型
| 依赖注入类型 | 配置元数据举例 |
|---|---|
| Setter 方法 | <proeprty name="user" ref="userBean"/> |
| 构造器 | <constructor-arg name="user" ref="userBean" /> |
| 字段 | @Autowired User user; |
| 方法 | @Autowired public void user(User user) { ... } |
| 接口回调 | class MyBean implements BeanFactoryAware { ... } |
Aware系列接口回调
| 內建接口 | 说明 |
|---|---|
BeanFactoryAware | 获取 IoC 容器- BeanFactory |
ApplicationContextAware | 获取 Spring 应用上下文- ApplicationContext 对象 |
EnvironmentAware | 获取 Environment 对象 |
ResourceLoaderAware | 获取资源加载器对象- ResourceLoader |
BeanClassLoaderAware | 获取加载当前 Bean Class 的 ClassLoader |
BeanNameAware | 获取当前 Bean 的名称 |
MessageSourceAware | 获取 MessageSource 对象,用于 Spring 国际化 |
ApplicationEventPublisherAware | 获取 ApplicationEventPublishAware 对象,用于 Spring 事件 |
EmbeddedValueResolverAware | 获取 StringValueResolver 对象,用于占位符处理 |
实践
singleton的Bean如何注入prototype的Bean
该类维护了一个data属性在每次调用say()方法时都会向data添加数据可以认为SayService 是有状态,如果 SayService 是单例的话必然会 OOM。
@Slf4j
public abstract class SayService {

   List<String> data = new ArrayList<>();

   public void say() {
      data.add(IntStream.rangeClosed(1, 1000000)
         .mapToObj(__ -> "a")
         .collect(Collectors.joining("")) + UUID.randomUUID().toString());
      log.info("I'm {} size:{}", this, data.size());
   }

}
其子类如果添加进IOC容器必然要修改器作用域
@Scope(value = ConfigurableBeanFactory.SCOPE_PROTOTYPE)
然而@RestController 注解 =@Controller 注解 +@ResponseBody 注解,又因为 @Controller 标记了 @Component 元注解,所以 @RestController 注解其实也是一个 Spring Bean。所以controller注入的Service也是一次性创建的即使service本身标记了prototype的范围也没用
修复方式:让 Service 以代理方式注入。这样虽然 Controller 本身是单例的,但每次都能从代理获取 Service。这样一来,prototype 范围的配置才能真正生效。
@Scope(value = ConfigurableBeanFactory.SCOPE_PROTOTYPE, proxyMode = ScopedProx)
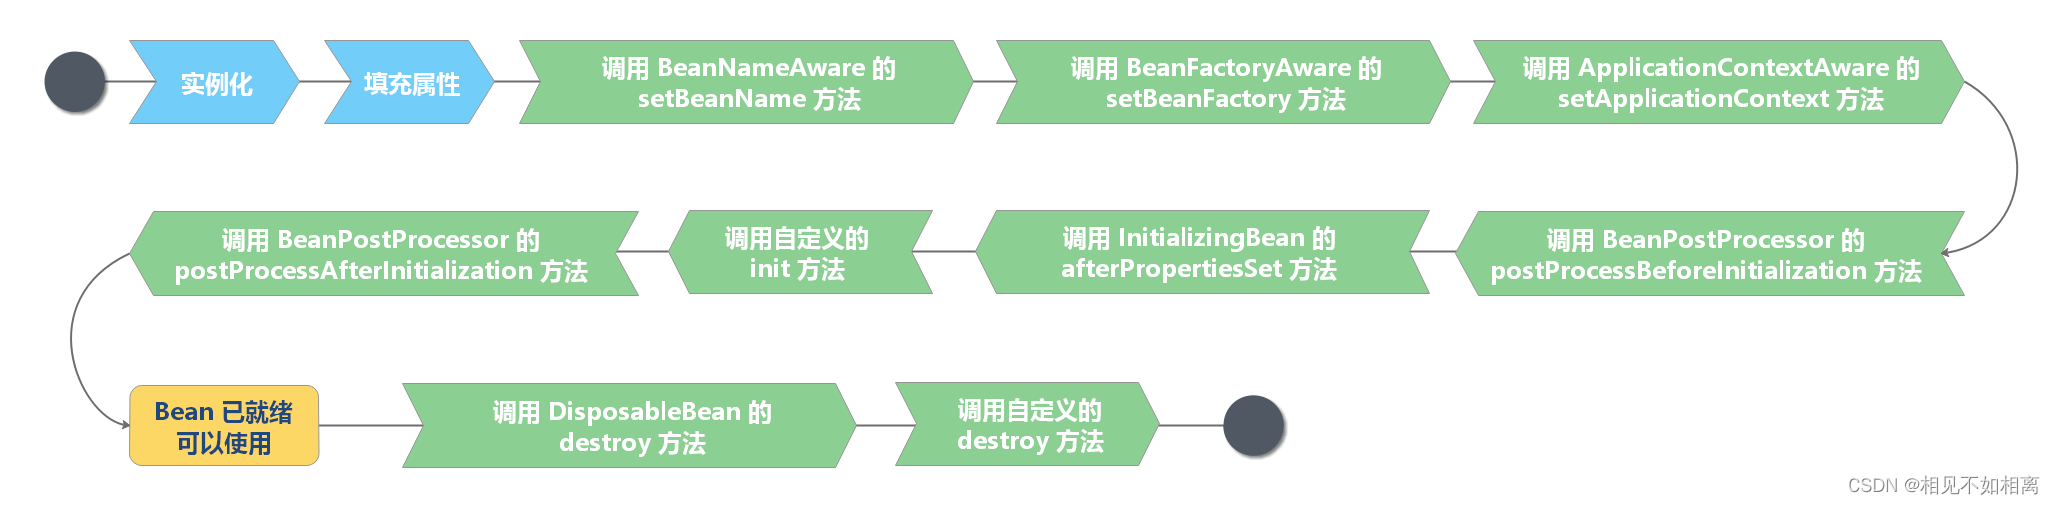
bean生命周期
AOP
在OOP中以类作为基本单元,而AOP中的基本单元是Aspect(切面),简单理解为标记了@Aspect 注解的类
AOP的工作重心在于如何将增强织入目标对象的连接点上【1.如何通过pointcut和advice定位到特定的joinpoint上 2.如何在advice中编写切面代码】
理解:
- join point --> 爪哇的小县城里的百姓: 因为根据定义, join point 是所有可能被织入 advice 的候选的点, 在 Spring AOP 中, 则可以认为所有方法执行点都是 join point. 而在我们上面的例子中, 命案发生在小县城中, 按理说在此县城中的所有人都有可能是嫌疑人.
- point cut --> 男性, 身高约七尺五寸: 我们知道, 所有的方法(joint point) 都可以织入 advice, 但是我们并不希望在所有方法上都织入 advice, 而 pointcut 的作用就是提供一组规则来匹配 joinpoint, 给满足规则的 joinpoint 添加 advice. 同理, 对于县令来说, 他再昏庸, 也知道不能把县城中的所有百姓都抓起来审问, 而是根据
凶手是个男性, 身高约七尺五寸, 把符合条件的人抓起来. 在这里凶手是个男性, 身高约七尺五寸就是一个修饰谓语, 它限定了凶手的范围, 满足此修饰规则的百姓都是嫌疑人, 都需要抓起来审问. - advice --> 抓过来审问, advice 是一个动作, 即一段 Java 代码, 这段 Java 代码是作用于 point cut 所限定的那些 join point 上的. 同理, 对比到我们的例子中,
抓过来审问这个动作就是对作用于那些满足男性, 身高约七尺五寸的爪哇的小县城里的百姓. - aspect: aspect 是 point cut 与 advice 的组合, 因此在这里我们就可以类比: “根据老王的线索, 凡是发现有身高七尺五寸的男性, 都要抓过来审问” 这一整个动作可以被认为是一个 aspect.
注意
仅仅使用@Aspect 注解, 并不能将一个 Java 对象转换为 Bean, 因此我们还需要使用类似 @Component 之类的注解.` `注意, 如果一个 类被@Aspect 标注, 则这个类就不能是其他 aspect 的 **advised object** 了, 因为使用 @Aspect 后, 这个类就会被排除在 auto-proxying 机制之外.
将advice内置在pointcut中
@Component
@Aspect
public class AdviseDefine {
    // 将 pointcut 和 advice 同时定义
    @Before("within(com.xys.service..*)")
    public void doAccessCheck(JoinPoint joinPoint) {
        System.out.println("*****doAccessCheck, Before advise, method: " + joinPoint.getSignature().toShortString() + " *****");
    }
}
环绕通知
around advice 可以在一个方法的之前和之后添加不同的操作, 并且甚至可以决定何时, 如何, 是否调用匹配到的方法.
@Component
@Aspect
public class AdviseDefine {
    // 定义 advise
    @Around("com.xys.aspect.PointcutDefine.dataAccessOperation()")
    public Object doAroundAccessCheck(ProceedingJoinPoint pjp) throws Throwable {
        StopWatch stopWatch = new StopWatch();
        stopWatch.start();
        // 开始
        Object retVal = pjp.proceed();
        stopWatch.stop();
        // 结束
        System.out.println("invoke method: " + pjp.getSignature().getName() + ", elapsed time: " + stopWatch.getTotalTimeMillis());
        return retVal;
    }
}
环绕通知有返回值,该返回值是执行环绕后增强了的同一个参数,交给后续的执行器,继续执行
spring资源管理
spring里所有的ApplicationContext都实现了ResourceLoader接口,所有applicationContext都可以通过gteResource()方法获取Resource实例
ResourceLoaderAware 是一个特殊的标记接口,用来标记提供 ResourceLoader 引用的对象。
public interface ResourceLoaderAware {
    void setResourceLoader(ResourceLoader resourceLoader);
}
当将一个 ResourceLoaderAware 接口的实现类部署到应用上下文时(此类会作为一个 spring 管理的 bean), 应用上下文会识别出此为一个 ResourceLoaderAware 对象,并将自身作为一个参数来调用 setResourceLoader() 函数,如此,该实现类便可使用 ResourceLoader 获取 Resource 实例来加载你所需要的资源。
资源依赖
如果 bean 本身将通过某种动态过程来确定和提供资源路径,那么 bean 可以使用 ResourceLoader 接口来加载资源。
<bean id="myBean" class="...">
<property name="template" value="some/resource/path/myTemplate.txt"/>
</bean>
spring的数据访问策略
支持dao(Data Access Object)技术的目的:
使得切换持久化技术方便,如 JDBC、JPA、ORM 等。这样数据访问层仅暴露 DAO 接口,而上层不需要关注具体的持久化技术,达到了解耦的目的。
spring的异常体系
- Spring JDBC 不同于 JDBC,提供了比较丰富的数据异常类型。
- Spring 的数据异常并没有与特定的持久化方式相关联,所以异常对于不同的持久化方式都是一致的。
- Spring 的数据异常都继承自 DataAccessException,这种异常是非检查型异常。即,不一定非要捕获 Spring 所抛出的数据访问异常。
数据访问模板
Spring 在数据访问过程中,采用了模板方法设计模式。 它将数据访问过程分为两块:模板(template)和回调(callback)。模板管理过程中固定的部分,而回调处理自定义的数据访问代码。
jdbc数据访问
依赖
<dependency>
  <groupId>org.springframework</groupId>
  <artifactId>spring-jdbc</artifactId>
</dependency>
数据源连接池配置
<bean id="dataSource" class="com.alibaba.druid.pool.DruidDataSource"
        init-method="init" destroy-method="close">
    <property name="driverClassName" value="${jdbc.driver}"/>
    <property name="url" value="${jdbc.url}"/>
    <property name="username" value="${jdbc.username}"/>
    <property name="password" value="${jdbc.password}"/>

    <!-- 配置初始化大小、最小、最大 -->
    <property name="initialSize" value="1"/>
    <property name="minIdle" value="1"/>
    <property name="maxActive" value="10"/>

    <!-- 配置获取连接等待超时的时间 -->
    <property name="maxWait" value="10000"/>

    <!-- 配置间隔多久才进行一次检测,检测需要关闭的空闲连接,单位是毫秒 -->
    <property name="timeBetweenEvictionRunsMillis" value="60000"/>

    <!-- 配置一个连接在池中最小生存的时间,单位是毫秒 -->
    <property name="minEvictableIdleTimeMillis" value="300000"/>

    <property name="testWhileIdle" value="true"/>

    <!-- 这里建议配置为TRUE,防止取到的连接不可用 -->
    <property name="testOnBorrow" value="true"/>
    <property name="testOnReturn" value="false"/>

    <!-- 打开PSCache,并且指定每个连接上PSCache的大小 -->
    <property name="poolPreparedStatements" value="true"/>
    <property name="maxPoolPreparedStatementPerConnectionSize"
              value="20"/>

    <!-- 这里配置提交方式,默认就是TRUE,可以不用配置 -->

    <property name="defaultAutoCommit" value="true"/>

    <!-- 验证连接有效与否的SQL,不同的数据配置不同 -->
    <property name="validationQuery" value="select 1 "/>
    <property name="filters" value="stat"/>
  </bean>
jdbc驱动的数据源
<bean id="dataSource" class="org.springframework.jdbc.datasource.DriverManagerDataSource">
  <property name="driverClassName" value="${jdbc.driver}"/>
  <property name="url" value="${jdbc.url}"/>
  <property name="username" value="${jdbc.username}"/>
  <property name="password" value="${jdbc.password}"/>
</bean>
驱动模板
JdbcTemplate:最基本的 Spring JDBC 模板,这个模板支持最简单的 JDBC 数据库访问功能以及简单的索引参数查询。
SimpleJdbcTemplate:改模板类利用 Java 5 的一些特性,如自动装箱、泛型以及可变参数列表来简化 JDBC 模板的使用。
NamedParameterJdbcTemplate:使用该模板类执行查询时,可以将查询值以命名参数的形式绑定到 SQL 中,而不是使用简单的索引参数。
注:Spring 实战推荐使用 SimpleJdbcTemplate。
使用步骤
- 创建 DTO 类。DTO 是 Data Transfer Object 的缩写,即数据传输对象。
- 创建实现 RowMapper 接口的类。它可以看成是数据表实际实体和 DTO 之间的映射关系。
- 声明数据库读写接口的 DAO 接口。定义 DAO 的好处在于对于数据层上层的业务,调用 DAO 时仅关注对外暴露的读写方法,而不考虑底层的具体持久化方式。这样,便于替换持久化方式。
- 创建一个 DAO 接口的实现类,使用 Spring 的 JDBC 模板去实现接口。
- 最后,只需要按照 Spring 的 JDBC 规范配置 xml。定义一个 DAO 接口的实现类的 JavaBean,并将数据源注入进去。
spring事务管理
事务特性
- 原子性(Atomic):一个事务是一个不可分割的工作单位,事务中包括的诸操作要么都做,要么都不做。
- 一致性(Consistent):事务必须是使数据库从一个一致性状态变到另一个一致性状态。一致性与原子性是密切相关的。
- 隔离性(Isolated):一个事务的执行不能被其他事务干扰。即一个事务内部的操作及使用的数据对并发的其他事务是隔离的,并发执行的各个事务之间不能互相干扰。
- 持久性(Durable):持久性也称永久性(permanence),指一个事务一旦提交,它对数据库中数据的改变就应该是永久性的。接下来的其他操作或故障不应该对其有任何影响。
spring对事务的支持
spring通过回调机制将实际的事务实现从事务性的代码中抽象出来,并提供了对编码式和声明式事务管理的支持
- 编码式事务允许用户在代码中精确定义事务的边界
- 声明式事务(基于 AOP)有助于用户将操作与事务规则进行解耦
核心API
PlatformTransactionManager
spring并不是直接管路事务,而是提供了多种事务管路器,它们将事务管理的职责委托给 JTA 或其他持久化机制所提供的平台相关的事务实现。
接口:org.springframework.transaction.PlatformTransactionManager
public interface PlatformTransactionManager {
TransactionStatus getTransaction(
        TransactionDefinition definition) throws TransactionException;

void commit(TransactionStatus status) throws TransactionException;

void rollback(TransactionStatus status) throws TransactionException;
}
jdbc事务
如果应用程序中直接使用 JDBC 来进行持久化,DataSourceTransactionManager 会为你处理事务边界。为了使用 DataSourceTransactionManager,你需要使用如下的 XML 将其装配到应用程序的上下文定义中:
<bean id="transactionManager" class="org.springframework.jdbc.datasource.DataSourceTransactionManager">
  <property name="dataSource" ref="dataSource" />
</bean>
DataSourceTransactionManager是通过调用java.sql.Connection 来管理事务,而后者是通过 DataSource 获取到的。通过调用连接的 commit() 方法来提交事务,同样,事务失败则通过调用 rollback() 方法进行回滚。
java持久化API事务(JPA)
spring中使用JpaTransactionManager来处理事务
<bean id="transactionManager" class="org.springframework.orm.jpa.JpaTransactionManager">
  <property name="sessionFactory" ref="sessionFactory" />
</bean>
TransactionDefinition
PlatformTransactionManager 通过 getTransaction(TransactionDefinition definition) 方法来得到事务
**事务属性的五个方面:**传播行为,隔离规则,回滚规则,事务超时,是否只读,而TransactionDefinition正好是用来定义事务属性的
传播行为
- PROPAGATION_REQUIRED 如果存在一个事务,则支持当前事务。如果没有事务则开启一个新的事务。spirng声明式事务使用AOP来支持根据事务属性在方法中调用之前开启的一个事务并在执行方法之后决定事务提交或是回滚事务
PROPAGATION_SUPPORTS如果存在一个事务,支持当前事务。如果没有事务,则非事务的执行。但是对于事务同步的事务管理器,PROPAGATION_SUPPORTS与不使用事务有少许不同。PROPAGATION_MANDATORY如果已经存在一个事务,支持当前事务。如果没有一个活动的事务,则抛出异常。PROPAGATION_REQUIRES_NEW总是开启一个新的事务。如果一个事务已经存在,则将这个存在的事务挂起。PROPAGATION_NOT_SUPPORTED总是非事务地执行,并挂起任何存在的事务。使用 PROPAGATION_NOT_SUPPORTED,也需要使用 JtaTransactionManager 作为事务管理器。- PROPAGATION_NEVER 总是非事务地执行,如果存在一个活动事务,则抛出异常。
- PROPAGATION_NESTED 如果一个活动的事务存在,则运行在一个嵌套的事务中. 如果没有活动事务, 则按 TransactionDefinition.PROPAGATION_REQUIRED 属性执行。这是一个嵌套事务,使用 JDBC 3.0 驱动时,仅仅支持 DataSourceTransactionManager 作为事务管理器。需要 JDBC 驱动的 java.sql.Savepoint 类。有一些 JTA 的事务管理器实现可能也提供了同样的功能。使用 PROPAGATION_NESTED,还需要把 PlatformTransactionManager 的 nestedTransactionAllowed 属性设为 true;而 nestedTransactionAllowed 属性值默认为 false。
事务隔离级别
多个事务并发运行经常会操作相同的数据来完成各自的任务,并发是必须的但会导致问题
- 脏读(Dirty reads)——脏读发生在一个事务读取了另一个事务改写但尚未提交的数据时。如果改写在稍后被回滚了,那么第一个事务获取的数据就是无效的。
- 不可重复读(Nonrepeatable read)——不可重复读发生在一个事务执行相同的查询两次或两次以上,但是每次都得到不同的数据时。这通常是因为另一个并发事务在两次查询期间进行了更新。
- 幻读(Phantom read)——幻读与不可重复读类似。它发生在一个事务(T1)读取了几行数据,接着另一个并发事务(T2)插入了一些数据时。在随后的查询中,第一个事务(T1)就会发现多了一些原本不存在的记录。
隔离级别
| 隔离级别 | 含义 |
|---|---|
| ISOLATION_DEFAULT | 使用后端数据库默认的隔离级别 |
| ISOLATION_READ_UNCOMMITTED | 最低的隔离级别,允许读取尚未提交的数据变更,可能会导致脏读、幻读或不可重复读 |
| ISOLATION_READ_COMMITTED | 允许读取并发事务已经提交的数据,可以阻止脏读,但是幻读或不可重复读仍有可能发生 |
| ISOLATION_REPEATABLE_READ | 对同一字段的多次读取结果都是一致的,除非数据是被本身事务自己所修改,可以阻止脏读和不可重复读,但幻读仍有可能发生 |
| ISOLATION_SERIALIZABLE | 最高的隔离级别,完全服从 ACID 的隔离级别,确保阻止脏读、不可重复读以及幻读,也是最慢的事务隔离级别,因为它通常是通过完全锁定事务相关的数据库表来实现的 |
编程式事务
编程式和声明式事务的区别
Spring 提供了对编程式事务和声明式事务的支持。编程式事务允许用户在代码中精确定义事务的边界,而声明式事务(基于 AOP)有助于用户将操作与事务规则进行解耦。 简单地说,编程式事务侵入到了业务代码里面,但是提供了更加详细的事务管理;而声明式事务由于基于 AOP,所以既能起到事务管理的作用,又可以不影响业务代码的具体实现。Spring 提供两种方式的编程式事务管理,分别是:使用 TransactionTemplate 和使用 PlatformTransactionManager。
使用 TransactionTemplate
    TransactionTemplate tt = new TransactionTemplate(); // 新建一个TransactionTemplate
    Object result = tt.execute(
        new TransactionCallback(){
            public Object doTransaction(TransactionStatus status){
                updateOperation();
                return resultOfUpdateOperation();
            }
    }); // 执行execute方法进行事务管理
使用 TransactionCallback()可以返回一个值。如果使用 TransactionCallbackWithoutResult 则没有返回值。
使用 PlatformTransactionManager
    DataSourceTransactionManager dataSourceTransactionManager = new DataSourceTransactionManager(); //定义一个某个框架平台的TransactionManager,如JDBC、Hibernate
    dataSourceTransactionManager.setDataSource(this.getJdbcTemplate().getDataSource()); // 设置数据源
    DefaultTransactionDefinition transDef = new DefaultTransactionDefinition(); // 定义事务属性
    transDef.setPropagationBehavior(DefaultTransactionDefinition.PROPAGATION_REQUIRED); // 设置传播行为属性
    TransactionStatus status = dataSourceTransactionManager.getTransaction(transDef); // 获得事务状态
    try {
        // 数据库操作
        dataSourceTransactionManager.commit(status);// 提交
    } catch (Exception e) {
        dataSourceTransactionManager.rollback(status);// 回滚
    }
声明式事务
1.每个bean都有一个代理
<?xml version="1.0" encoding="UTF-8"?>
<beans xmlns="http://www.springframework.org/schema/beans"
    xmlns:xsi="http://www.w3.org/2001/XMLSchema-instance"
    xmlns:context="http://www.springframework.org/schema/context"
    xmlns:aop="http://www.springframework.org/schema/aop"
    xsi:schemaLocation="http://www.springframework.org/schema/beans
           http://www.springframework.org/schema/beans/spring-beans-2.5.xsd
           http://www.springframework.org/schema/context
           http://www.springframework.org/schema/context/spring-context-2.5.xsd
           http://www.springframework.org/schema/aop http://www.springframework.org/schema/aop/spring-aop-2.5.xsd">

    <bean id="sessionFactory"
            class="org.springframework.orm.hibernate3.LocalSessionFactoryBean">
        <property name="configLocation" value="classpath:hibernate.cfg.xml" />
        <property name="configurationClass" value="org.hibernate.cfg.AnnotationConfiguration" />
    </bean>

    <!-- 定义事务管理器(声明式的事务) -->
    <bean id="transactionManager"
        class="org.springframework.orm.hibernate3.HibernateTransactionManager">
        <property name="sessionFactory" ref="sessionFactory" />
    </bean>

    <!-- 配置DAO -->
    <bean id="userDaoTarget" class="com.bluesky.spring.dao.UserDaoImpl">
        <property name="sessionFactory" ref="sessionFactory" />
    </bean>

    <bean id="userDao"
        class="org.springframework.transaction.interceptor.TransactionProxyFactoryBean">
           <!-- 配置事务管理器 -->
           <property name="transactionManager" ref="transactionManager" />
        <property name="target" ref="userDaoTarget" />
         <property name="proxyInterfaces" value="com.bluesky.spring.dao.GeneratorDao" />
        <!-- 配置事务属性 -->
        <property name="transactionAttributes">
            <props>
                <prop key="*">PROPAGATION_REQUIRED</prop>
            </props>
        </property>
    </bean>
</beans>
2.所有 Bean 共享一个代理基类
<?xml version="1.0" encoding="UTF-8"?>
<beans xmlns="http://www.springframework.org/schema/beans"
    xmlns:xsi="http://www.w3.org/2001/XMLSchema-instance"
    xmlns:context="http://www.springframework.org/schema/context"
    xmlns:aop="http://www.springframework.org/schema/aop"
    xsi:schemaLocation="http://www.springframework.org/schema/beans
           http://www.springframework.org/schema/beans/spring-beans-2.5.xsd
           http://www.springframework.org/schema/context
           http://www.springframework.org/schema/context/spring-context-2.5.xsd
           http://www.springframework.org/schema/aop http://www.springframework.org/schema/aop/spring-aop-2.5.xsd">

    <bean id="sessionFactory"
            class="org.springframework.orm.hibernate3.LocalSessionFactoryBean">
        <property name="configLocation" value="classpath:hibernate.cfg.xml" />
        <property name="configurationClass" value="org.hibernate.cfg.AnnotationConfiguration" />
    </bean>

    <!-- 定义事务管理器(声明式的事务) -->
    <bean id="transactionManager"
        class="org.springframework.orm.hibernate3.HibernateTransactionManager">
        <property name="sessionFactory" ref="sessionFactory" />
    </bean>

    <bean id="transactionBase"
            class="org.springframework.transaction.interceptor.TransactionProxyFactoryBean"
            lazy-init="true" abstract="true">
        <!-- 配置事务管理器 -->
        <property name="transactionManager" ref="transactionManager" />
        <!-- 配置事务属性 -->
        <property name="transactionAttributes">
            <props>
                <prop key="*">PROPAGATION_REQUIRED</prop>
            </props>
        </property>
    </bean>

    <!-- 配置DAO -->
    <bean id="userDaoTarget" class="com.bluesky.spring.dao.UserDaoImpl">
        <property name="sessionFactory" ref="sessionFactory" />
    </bean>

    <bean id="userDao" parent="transactionBase" >
        <property name="target" ref="userDaoTarget" />
    </bean>
</beans>
3.使用拦截器
<?xml version="1.0" encoding="UTF-8"?>
<beans xmlns="http://www.springframework.org/schema/beans"
    xmlns:xsi="http://www.w3.org/2001/XMLSchema-instance"
    xmlns:context="http://www.springframework.org/schema/context"
    xmlns:aop="http://www.springframework.org/schema/aop"
    xsi:schemaLocation="http://www.springframework.org/schema/beans
           http://www.springframework.org/schema/beans/spring-beans-2.5.xsd
           http://www.springframework.org/schema/context
           http://www.springframework.org/schema/context/spring-context-2.5.xsd
           http://www.springframework.org/schema/aop http://www.springframework.org/schema/aop/spring-aop-2.5.xsd">

    <bean id="sessionFactory"
            class="org.springframework.orm.hibernate3.LocalSessionFactoryBean">
        <property name="configLocation" value="classpath:hibernate.cfg.xml" />
        <property name="configurationClass" value="org.hibernate.cfg.AnnotationConfiguration" />
    </bean>

    <!-- 定义事务管理器(声明式的事务) -->
    <bean id="transactionManager"
        class="org.springframework.orm.hibernate3.HibernateTransactionManager">
        <property name="sessionFactory" ref="sessionFactory" />
    </bean>

    <bean id="transactionInterceptor"
        class="org.springframework.transaction.interceptor.TransactionInterceptor">
        <property name="transactionManager" ref="transactionManager" />
        <!-- 配置事务属性 -->
        <property name="transactionAttributes">
            <props>
                <prop key="*">PROPAGATION_REQUIRED</prop>
            </props>
        </property>
    </bean>

    <bean class="org.springframework.aop.framework.autoproxy.BeanNameAutoProxyCreator">
        <property name="beanNames">
            <list>
                <value>*Dao</value>
            </list>
        </property>
        <property name="interceptorNames">
            <list>
                <value>transactionInterceptor</value>
            </list>
        </property>
    </bean>

    <!-- 配置DAO -->
    <bean id="userDao" class="com.bluesky.spring.dao.UserDaoImpl">
        <property name="sessionFactory" ref="sessionFactory" />
    </bean>
</beans>
4.使用 tx 标签配置的拦截器
<?xml version="1.0" encoding="UTF-8"?>
<beans xmlns="http://www.springframework.org/schema/beans"
    xmlns:xsi="http://www.w3.org/2001/XMLSchema-instance"
    xmlns:context="http://www.springframework.org/schema/context"
    xmlns:aop="http://www.springframework.org/schema/aop"
    xmlns:tx="http://www.springframework.org/schema/tx"
    xsi:schemaLocation="http://www.springframework.org/schema/beans
           http://www.springframework.org/schema/beans/spring-beans-2.5.xsd
           http://www.springframework.org/schema/context
           http://www.springframework.org/schema/context/spring-context-2.5.xsd
           http://www.springframework.org/schema/aop http://www.springframework.org/schema/aop/spring-aop-2.5.xsd
           http://www.springframework.org/schema/tx http://www.springframework.org/schema/tx/spring-tx-2.5.xsd">

    <context:annotation-config />
    <context:component-scan base-package="com.bluesky" />

    <bean id="sessionFactory"
            class="org.springframework.orm.hibernate3.LocalSessionFactoryBean">
        <property name="configLocation" value="classpath:hibernate.cfg.xml" />
        <property name="configurationClass" value="org.hibernate.cfg.AnnotationConfiguration" />
    </bean>

    <!-- 定义事务管理器(声明式的事务) -->
    <bean id="transactionManager"
        class="org.springframework.orm.hibernate3.HibernateTransactionManager">
        <property name="sessionFactory" ref="sessionFactory" />
    </bean>

    <tx:advice id="txAdvice" transaction-manager="transactionManager">
        <tx:attributes>
            <tx:method name="*" propagation="REQUIRED" />
        </tx:attributes>
    </tx:advice>

    <aop:config>
        <aop:pointcut id="interceptorPointCuts"
            expression="execution(* com.bluesky.spring.dao.*.*(..))" />
        <aop:advisor advice-ref="txAdvice"
            pointcut-ref="interceptorPointCuts" />
    </aop:config>
</beans>
5.全注解
<?xml version="1.0" encoding="UTF-8"?>
<beans xmlns="http://www.springframework.org/schema/beans"
    xmlns:xsi="http://www.w3.org/2001/XMLSchema-instance"
    xmlns:context="http://www.springframework.org/schema/context"
    xmlns:aop="http://www.springframework.org/schema/aop"
    xmlns:tx="http://www.springframework.org/schema/tx"
    xsi:schemaLocation="http://www.springframework.org/schema/beans
           http://www.springframework.org/schema/beans/spring-beans-2.5.xsd
           http://www.springframework.org/schema/context
           http://www.springframework.org/schema/context/spring-context-2.5.xsd
           http://www.springframework.org/schema/aop http://www.springframework.org/schema/aop/spring-aop-2.5.xsd
           http://www.springframework.org/schema/tx http://www.springframework.org/schema/tx/spring-tx-2.5.xsd">

    <context:annotation-config />
    <context:component-scan base-package="com.bluesky" />

    <tx:annotation-driven transaction-manager="transactionManager"/>

    <bean id="sessionFactory"
            class="org.springframework.orm.hibernate3.LocalSessionFactoryBean">
        <property name="configLocation" value="classpath:hibernate.cfg.xml" />
        <property name="configurationClass" value="org.hibernate.cfg.AnnotationConfiguration" />
    </bean>

    <!-- 定义事务管理器(声明式的事务) -->
    <bean id="transactionManager"
        class="org.springframework.orm.hibernate3.HibernateTransactionManager">
        <property name="sessionFactory" ref="sessionFactory" />
    </bean>

</beans>
实现类:
package com.bluesky.spring.dao;

import java.util.List;

import org.hibernate.SessionFactory;
import org.springframework.beans.factory.annotation.Autowired;
import org.springframework.orm.hibernate3.support.HibernateDaoSupport;
import org.springframework.stereotype.Component;

import com.bluesky.spring.domain.User;

@Transactional
@Component("userDao")
public class UserDaoImpl extends HibernateDaoSupport implements UserDao {

    public List<User> listUsers() {
        return this.getSession().createQuery("from User").list();
    }
}
springmvc
springmvc工作流程图
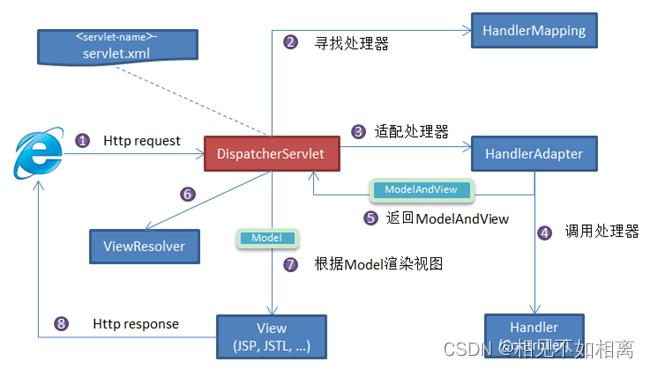
- 向服务器发送 HTTP 请求,请求被前端控制器
DispatcherServlet捕获。 DispatcherServlet根据 -servlet.xml 中的配置对请求的 URL 进行解析,得到请求资源标识符(URI)。然后根据该 URI,调用HandlerMapping获得该 Handler 配置的所有相关的对象(包括 Handler 对象以及 Handler 对象对应的拦截器),最后以HandlerExecutionChain对象的形式返回。DispatcherServlet根据获得的Handler,选择一个合适的HandlerAdapter。(附注:如果成功获得HandlerAdapter后,此时将开始执行拦截器的 preHandler(…)方法)。- 提取
Request中的模型数据,填充Handler入参,开始执行Handler(Controller)。 在填充Handler的入参过程中,根据你的配置,Spring 将帮你做一些额外的工作:- HttpMessageConveter: 将请求消息(如 Json、xml 等数据)转换成一个对象,将对象转换为指定的响应信息。
- 数据转换:对请求消息进行数据转换。如
String转换成Integer、Double等。 - 数据根式化:对请求消息进行数据格式化。 如将字符串转换成格式化数字或格式化日期等。
- 数据验证: 验证数据的有效性(长度、格式等),验证结果存储到
BindingResult或Error中。
- Handler(Controller)执行完成后,向
DispatcherServlet返回一个ModelAndView对象; - 根据返回的
ModelAndView,选择一个适合的ViewResolver(必须是已经注册到 Spring 容器中的ViewResolver)返回给DispatcherServlet。 ViewResolver结合Model和View,来渲染视图。- 视图负责将渲染结果返回给客户端。
缓存中间件
Spring 的缓存 API 以注解方式提供。
<cache:annotation-driven cache-manager="cacheManager"/>
使能缓存
@Configuration
@EnableCaching
public class AppConfig {
}
缓存注解
@Cacheable
表明所修饰的方法是可以缓存的:当第一次调用这个方法时,它的结果会被缓存下来,在缓存的有效时间内,以后访问这个方法都直接返回缓存结果,不再执行方法中的代码段。 这个注解可以用condition属性来设置条件,如果不满足条件,就不使用缓存能力,直接执行方法。 可以使用key属性来指定 key 的生成规则。
@CachePut
与@Cacheable不同,@CachePut不仅会缓存方法的结果,还会执行方法的代码段。 它支持的属性和用法都与@Cacheable一致。
@CacheEvict
与@Cacheable功能相反,@CacheEvict表明所修饰的方法是用来删除失效或无用的缓存数据。
实例:
@Service
public class UserService {
    // @Cacheable可以设置多个缓存,形式如:@Cacheable({"books", "isbns"})
    @Cacheable(value={"users"}, key="#user.id")
    public User findUser(User user) {
        return findUserInDB(user.getId());
    }

    @Cacheable(value = "users", condition = "#user.getId() <= 2")
    public User findUserInLimit(User user) {
        return findUserInDB(user.getId());
    }

    @CachePut(value = "users", key = "#user.getId()")
    public void updateUser(User user) {
        updateUserInDB(user);
    }

    @CacheEvict(value = "users")
    public void removeUser(User user) {
        removeUserInDB(user.getId());
    }

    @CacheEvict(value = "users", allEntries = true)
    public void clear() {
        removeAllInDB();
    }
}
@Caching
如果需要使用同一个缓存注解(@Cacheable、@CacheEvict或@CachePut)多次修饰一个方法,就需要用到@Caching。
@Caching(evict = { @CacheEvict("primary"), @CacheEvict(cacheNames="secondary", key="#p0") })
public Book importBooks(String deposit, Date date)
@CacheConfig
与前面的缓存注解不同,这是一个类级别的注解。 如果类的所有操作都是缓存操作,你可以使用@CacheConfig来指定类,省去一些配置。
@CacheConfig("books")
public class BookRepositoryImpl implements BookRepository {
	@Cacheable
	public Book findBook(ISBN isbn) {...}
}
缓存存储
使用 ConcurrentHashMap 作为缓存
<?xml version="1.0" encoding="UTF-8"?>
<beans xmlns="http://www.springframework.org/schema/beans"
       xmlns:xsi="http://www.w3.org/2001/XMLSchema-instance"
       xmlns:context="http://www.springframework.org/schema/context"
       xmlns:cache="http://www.springframework.org/schema/cache" xmlns:p="http://www.springframework.org/schema/p"
       xsi:schemaLocation="http://www.springframework.org/schema/beans http://www.springframework.org/schema/beans/spring-beans.xsd
         http://www.springframework.org/schema/context https://www.springframework.org/schema/context/spring-context.xsd
         http://www.springframework.org/schema/cache http://www.springframework.org/schema/cache/spring-cache.xsd">

  <description>使用 ConcurrentHashMap 作为 Spring 缓存</description>

  <!--配置参考:https://docs.spring.io/spring/docs/current/spring-framework-reference/integration.html#cache-store-configuration-->

  <context:component-scan base-package="io.github.dunwu.spring.cache"/>

  <bean id="simpleCacheManager" class="org.springframework.cache.support.SimpleCacheManager">
    <property name="caches">
      <set>
        <bean class="org.springframework.cache.concurrent.ConcurrentMapCacheFactoryBean" p:name="default"/>
        <bean class="org.springframework.cache.concurrent.ConcurrentMapCacheFactoryBean" p:name="users"/>
      </set>
    </property>
  </bean>

  <cache:annotation-driven cache-manager="simpleCacheManager"/>
</beans>
使用 Ehcache 作为缓存
<?xml version="1.0" encoding="UTF-8"?>
<beans xmlns="http://www.springframework.org/schema/beans"
       xmlns:xsi="http://www.w3.org/2001/XMLSchema-instance"
       xmlns:context="http://www.springframework.org/schema/context"
       xmlns:cache="http://www.springframework.org/schema/cache"
       xsi:schemaLocation="http://www.springframework.org/schema/beans http://www.springframework.org/schema/beans/spring-beans.xsd
         http://www.springframework.org/schema/context https://www.springframework.org/schema/context/spring-context.xsd
         http://www.springframework.org/schema/cache http://www.springframework.org/schema/cache/spring-cache.xsd">

  <description>使用 EhCache 作为 Spring 缓存</description>

  <!--配置参考:https://docs.spring.io/spring/docs/current/spring-framework-reference/integration.html#cache-store-configuration-->

  <context:component-scan base-package="io.github.dunwu.spring.cache"/>

  <bean id="ehcache" class="org.springframework.cache.ehcache.EhCacheManagerFactoryBean">
    <property name="configLocation" value="classpath:ehcache/ehcache.xml"/>
  </bean>

  <bean id="ehcacheCacheManager" class="org.springframework.cache.ehcache.EhCacheCacheManager">
    <property name="cacheManager" ref="ehcache"/>
  </bean>

  <cache:annotation-driven cache-manager="ehcacheCacheManager"/>
</beans>
使用 Caffeine 作为缓存
<?xml version="1.0" encoding="UTF-8"?>
<beans xmlns="http://www.springframework.org/schema/beans"
       xmlns:xsi="http://www.w3.org/2001/XMLSchema-instance"
       xmlns:context="http://www.springframework.org/schema/context"
       xmlns:cache="http://www.springframework.org/schema/cache"
       xsi:schemaLocation="http://www.springframework.org/schema/beans http://www.springframework.org/schema/beans/spring-beans.xsd
         http://www.springframework.org/schema/context https://www.springframework.org/schema/context/spring-context.xsd
         http://www.springframework.org/schema/cache http://www.springframework.org/schema/cache/spring-cache.xsd">

  <description>使用 Caffeine 作为 Spring 缓存</description>

  <!--配置参考:https://docs.spring.io/spring/docs/current/spring-framework-reference/integration.html#cache-store-configuration-->

  <context:component-scan base-package="io.github.dunwu.spring.cache"/>

  <bean id="caffeineCacheManager" class="org.springframework.cache.caffeine.CaffeineCacheManager"/>

  <cache:annotation-driven cache-manager="caffeineCacheManager"/>
</beans>
任务调度
**概述:**如果想在Spring中使用任务调度功能,除了集成调度框架Quartz这种方式,也可以使用Spring自己的调度任务框架。 使用Spring的调度框架,优点是:支持注解@Scheduler,可以省去大量的配置。
TaskScheduler接口
重要参数:
- 一个是要调度的方法,即一个实现了Runnable接口的线程类的run()方法;
- 另一个就是触发条件。
TaskScheduler接口的实现类 它有三个实现类:DefaultManagedTaskScheduler、ThreadPoolTaskScheduler、TimerManagerTaskScheduler。 DefaultManagedTaskScheduler:基于JNDI的调度器。 TimerManagerTaskScheduler:托管commonj.timers.TimerManager实例的调度器。 ThreadPoolTaskScheduler:提供线程池管理的调度器,它也实现了TaskExecutor接口,从而使的单一的实例可以尽可能快地异步执行。
Trigger接口
Trigger接口的实现类 CronTrigger:实现了cron规则的触发器类(和Quartz的cron规则相同)。 PeriodicTrigger:实现了一个周期性规则的触发器类(例如:定义触发起始时间、间隔时间等)。


 933
933

 被折叠的 条评论
为什么被折叠?
被折叠的 条评论
为什么被折叠?
 到【灌水乐园】发言


