


目录
1.什么是mybatis
-
MyBatis是一款优秀的持久层框架,用于简化JDBC的开发。
-
MyBatis本是Apache的一个开源项目iBatis,2010年这个项目由apache迁移到了google code,并且改名为MyBatis。2013年11月迁移到Github.
-
官网:MyBatis中文网
-
持久层:指的就是持久化操作的层,通常指数据访问层(dao),是用来操作数据库的.
简单来说MyBatis是更简单完成程序和数据库交互的框架,也就是更简单的操作和读取数据库工具
接下来,我们就通过一个入门程序,让大家感受一下通过Mybatis如何来操作数据库
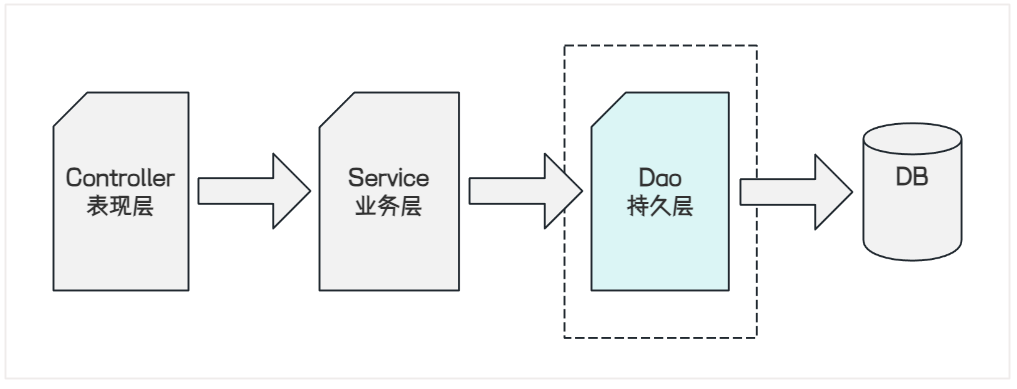
2.mybatis中的分层
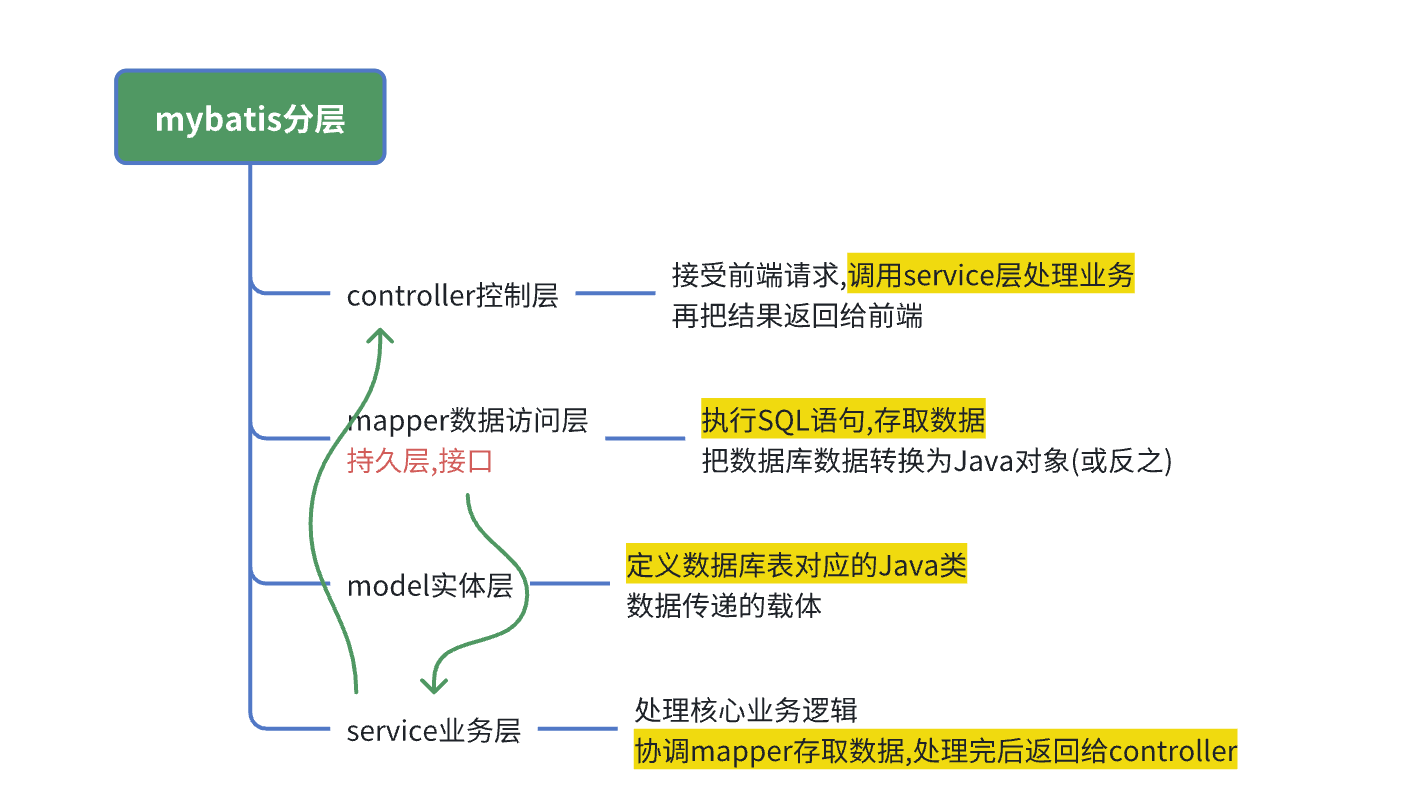
2.1 controller(控制层)
作用:
接收前端(网页 / APP)的请求(比如 "查询用户" "新增用户")。
调用 service 层处理业务,再把结果返回给前端。
类比:公司的 “客服部”,直接对接客户(前端),然后协调其他部门(service)干活。
@RestController
@RequestMapping("/user")
public class UserController {
//调用service层处理业务
@Autowired
private UserService userService;
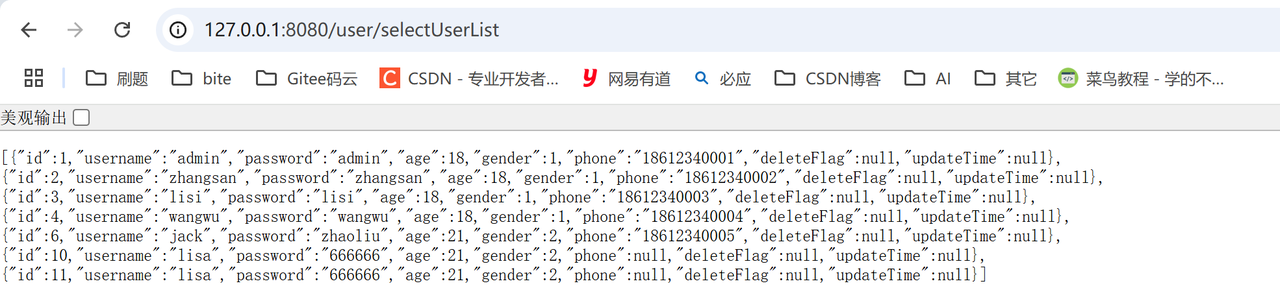
@RequestMapping("/selectUserList")
public List<UserInfo> selectUserList(){
return userService.selectUserList();
}
}
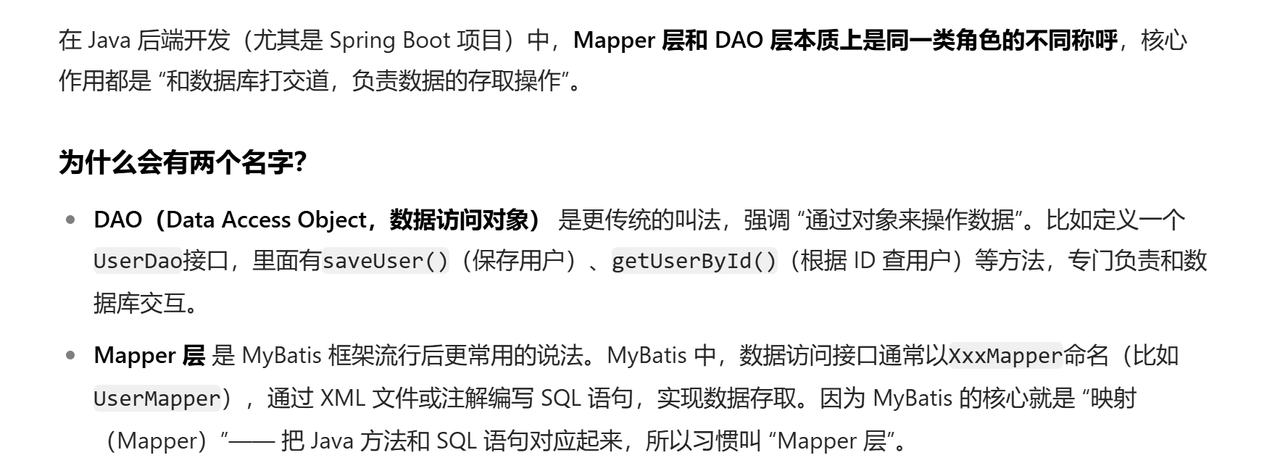
2.2 mapper(数据访问层,也叫 DAO 层)
作用:
直接和数据库打交道,执行 SQL 语句(比如 select * from user)。
把数据库的数据转换成 Java 对象(或反之)。
类比:公司的 “仓库管理员”,专门负责和数据库(仓库)交互,存取数据。
@Mapper
public interface UserInfoMapper {
//查询所有的用户信息
@Select("select * from user_info")
List<UserInfo> selectAll();
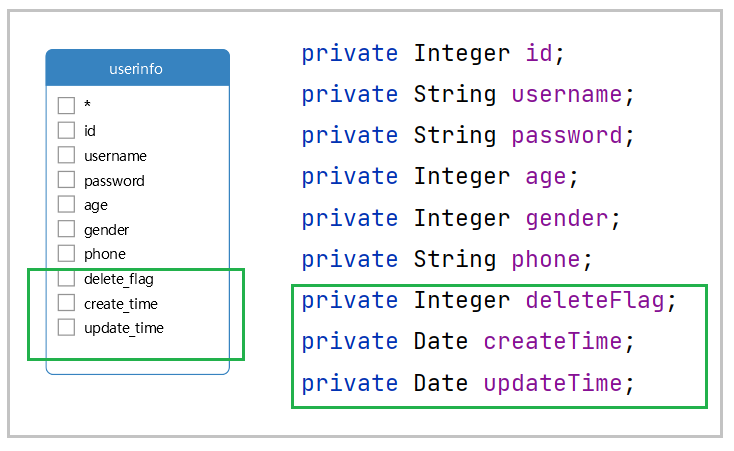
}2.3 model(模型层,也叫实体层)
作用:
定义和数据库表对应的 Java 类(比如 UserInfo 对应 user 表,属性对应字段)。
作为数据传递的 “载体”(比如从 mapper 拿数据,传给 service、controller)。
类比:公司的 “快递盒”,里面装着数据(用户信息),在各部门之间传递。
@Data
public class UserInfo {
    private Integer id;
    private String username;
    private String password;
    private Integer age;
    private Integer gender;
    private String phone;
    private Integer deleteFlag;
    private Date updateTime;
}
2.4 service(业务逻辑层)
作用:
处理核心业务逻辑(比如 "注册用户时要校验密码强度" "下单时要扣减库存")。
协调 mapper 层存取数据,处理完后返回给 controller。
类比:公司的 “业务部”,处理具体业务规则,调用 “仓库”(mapper)拿数据,处理后给 “客服”(controller)。
@Service
public class UserService {
    @Autowired
    private UserInfoMapper userInfoMapper;

    public List<UserInfo> selectUserList() {
        return userInfoMapper.selectAll();
    }
}
分层的目的是 “各司其职、解耦代码”,让每个层只做自己擅长的事:
-
controller管 “对接前端”, -
service管 “业务逻辑”, -
mapper管 “操作数据库”, -
model管 “数据载体”。
3.mybatis入门
3.1 创建工程
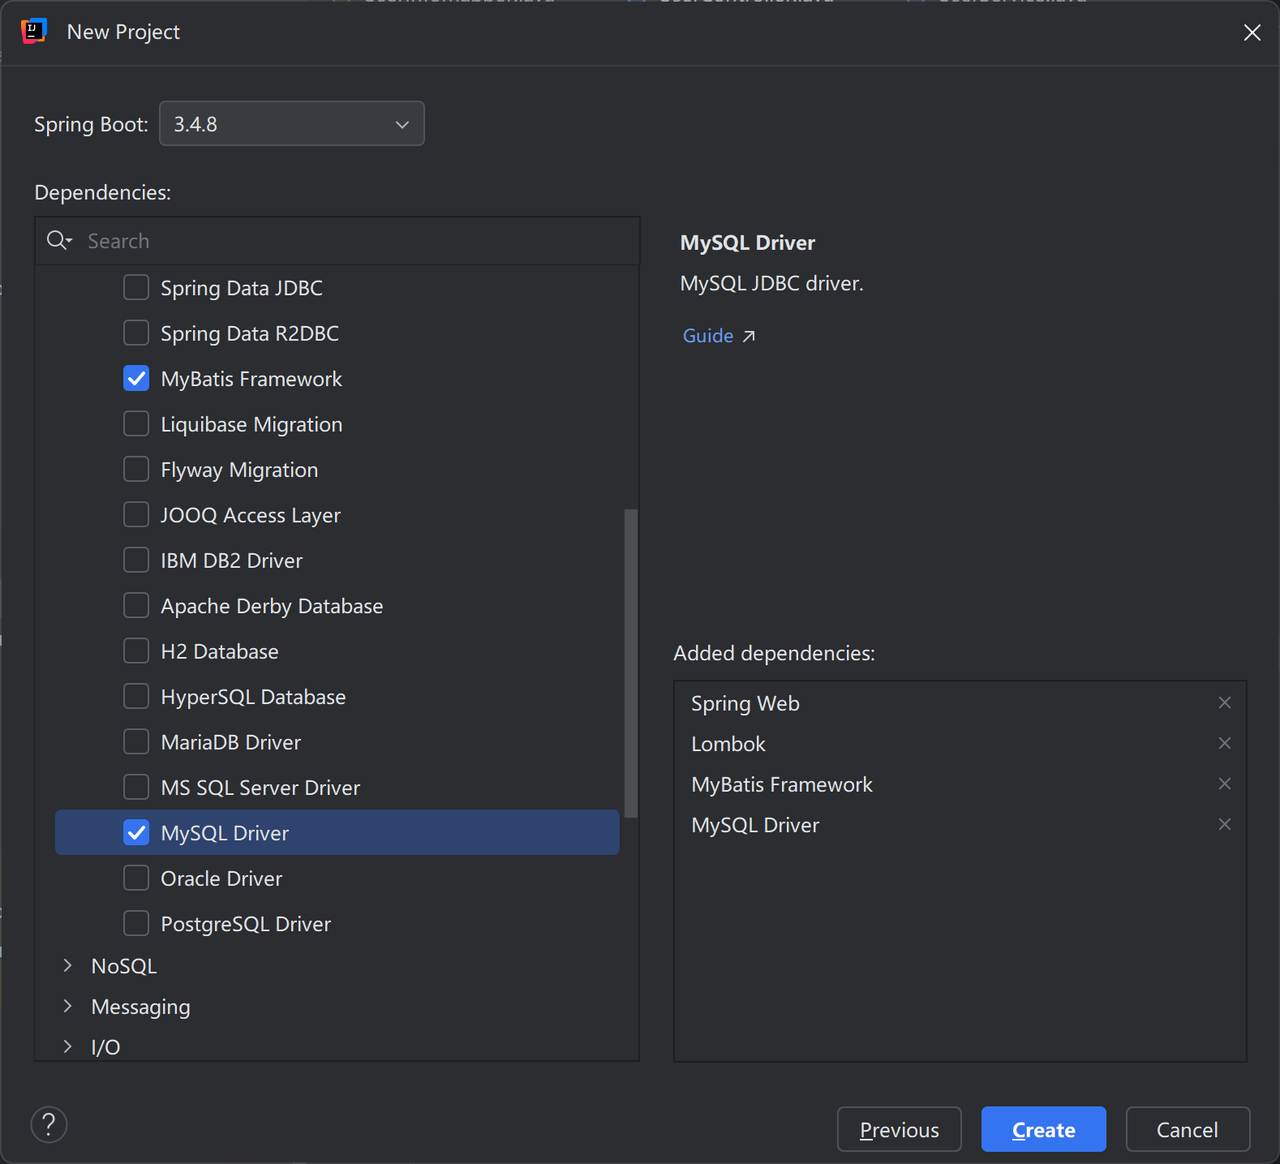
Mybatis是一个持久层框架,具体的数据存储和数据操作还是在MySQL中操作的,所以需要添加
MySQL驱动
3.2 数据准备
Mybatis中要连接数据库,需要数据库相关参数配置
-
数据库连接字符串(指定数据库的连接地址和参数,是连接数据库的核心路径)
-
登录名
-
密码
-
MySQL驱动类
com.mysql.cj.jdbc.Driver是 MySQL 官方提供的 JDBC 驱动类,负责实现 Java 程序与 MySQL 数据库之间的通信协议,是 Java 操作 MySQL 的 “桥梁” ,用于告诉程序 “使用哪个类来建立与 MySQL 数据库的连接” -
MySQL 8.x 及以上:必须使用
com.mysql.cj.jdbc.Driver(这是新版驱动,“cj” 代表 “Connector/J”,是 MySQL 官方 JDBC 驱动的名称)。 -
MySQL 5.x 及以下:传统驱动类是
com.mysql.jdbc.Driver,但新版的com.mysql.cj.jdbc.Driver也能兼容 5.x 版本(推荐统一使用新版,更安全)。
spring:
  datasource:
    url: jdbc:mysql://127.0.0.1:3306/mybatis_test?characterEncoding=utf8&useSSL=false
    username: root
    password: jqka
    driver-class-name: com.mysql.cj.jdbc.Driver
3.3 持久层代码
在项目中,创建持久层接口UserInfoMapper
package com.example.mybatis.demo.mapper;

import com.example.mybatis.demo.model.UserInfo;
import org.apache.ibatis.annotations.Mapper;
import org.apache.ibatis.annotations.Select;

import java.util.List;

@Mapper
public interface UserInfoMapper {
    //查询所有的用户信息
    @Select("select * from user_info")
    List<UserInfo> selectAll();
}
Mybatis的持久层接口规范一般都叫XxxMapper
@Mapper注解:表示是MyBatis中的Mapper接口
程序运行时,框架会自动生成接口的实现类对象(代理对象),并给交Spring的IOC容器管理
@Select注解:代表的就是select查询,也就是注解对应方法的具体实现内容.
3.4 单元测试
在创建出来的SpringBoot工程中,在src下的test目录下,已经自动帮我们创建好了测试类,我们可以直接使用这个测试类来进行测试.
package com.example.mybatis.demo;
import com.example.mybatis.demo.mapper.UserInfoMapper;
import org.junit.jupiter.api.Test;
import org.springframework.beans.factory.annotation.Autowired;
import org.springframework.boot.test.context.SpringBootTest;
@SpringBootTest
class MybatisDemoApplicationTests {
@Autowired
private UserInfoMapper userInfoMapper;
@Test
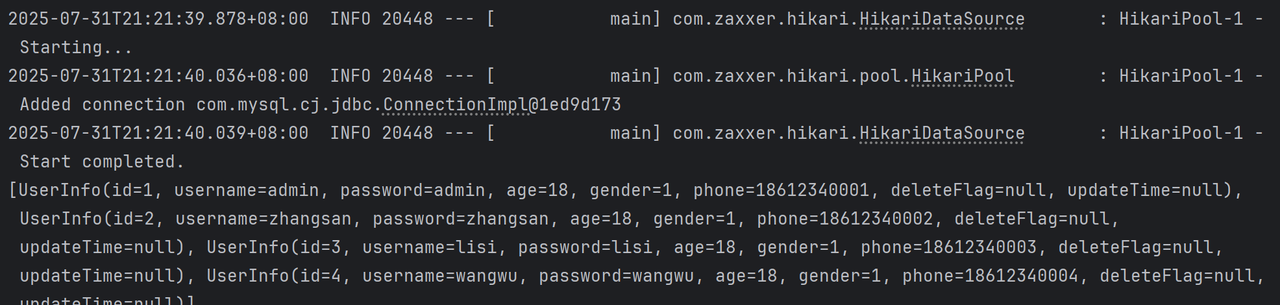
void contextLoads() {
System.out.println(userInfoMapper.selectAll());
}
}测试类上添加了注解@SpringBootTest,该测试类在运行时,就会自动加载Spring的运行环境。
我们通过@Autowired这个注解,注入我们要测试的类,就可以开始进行测试了
使用IDEA自动生成的测试类
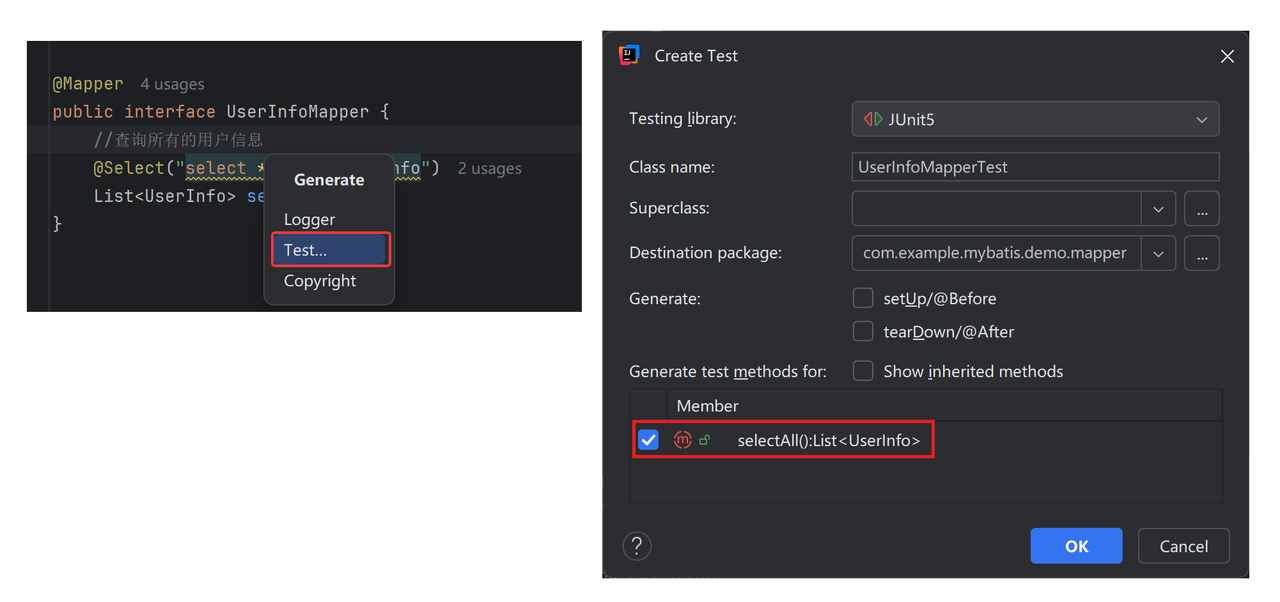
import com.example.mybatis.demo.model.UserInfo;
import org.junit.jupiter.api.Test;
import org.springframework.beans.factory.annotation.Autowired;
import org.springframework.boot.test.context.SpringBootTest;
import java.util.List;
@SpringBootTest
class UserInfoMapperTest {
@Autowired
private UserInfoMapper userInfoMapper;
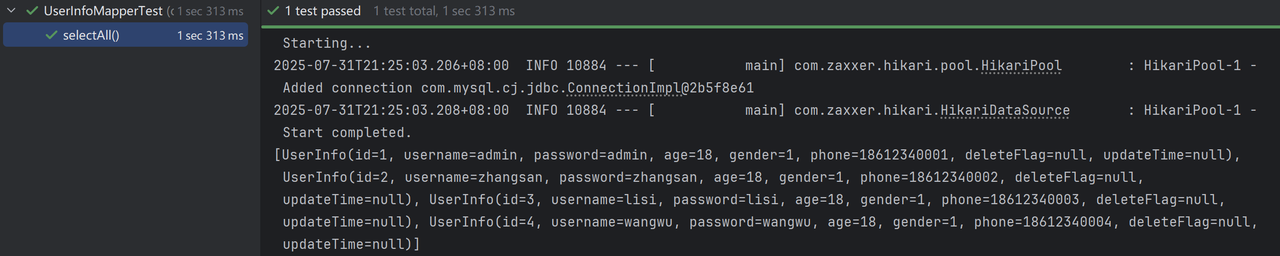
@Test
void selectAll() {
List<UserInfo> list = userInfoMapper.selectAll();
System.out.println(list);
}
}
4. MyBatis的基础操作
4.1 打印日志
mybatis:
  configuration: # 配置打印 MyBatis日志
    log-impl: org.apache.ibatis.logging.stdout.StdOutImpl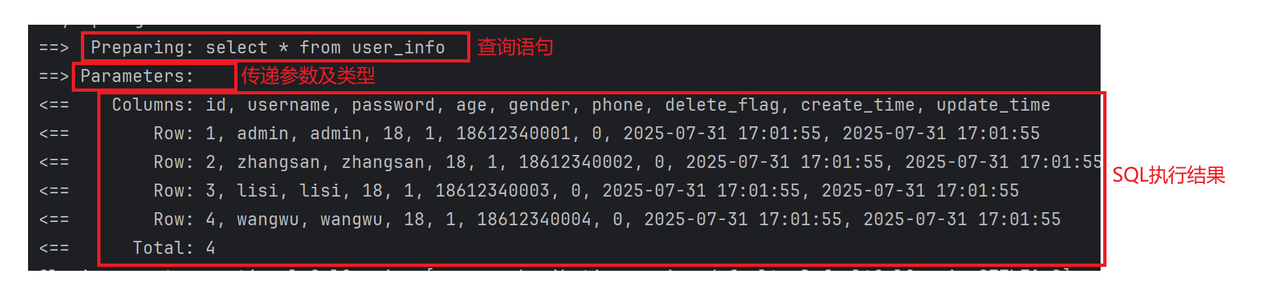
4.2 参数传递
@Select("select username, `password`, age, gender, phone from user_info where id = 4 ")
//@Select("select * from user_info where id=4")
UserInfo selectUserById();
//生成测试类
@Test
void selectUserById() {
UserInfo userInfo = userInfoMapper.selectUserById();
System.out.println(userInfo);
}
但是这样的话,只能查找id=4的数据,所以SQL语句中的id值不能写成固定数值,需要变为动态的数值
解决方案:在selectUserById方法中添加一个参数(id),将方法中的参数,传给SQL语句
使用#{}_的方式获取方法中的参数
@Select("select * from user_info where id=#{id}")
UserInfo selectUserById(Integer id);
@Test
void selectUserById() {
UserInfo userInfo = userInfoMapper.selectUserById(3);
System.out.println(userInfo);
}
也可以通过@Param设置参数的别名,如果使用@Param设置别名,#{..}里面的属性名必须和@Param设置的一样
@Select("select * from user_info where id=#{userid}")
UserInfo selectUserById(@Param("userid") Integer id);
//非唯一主键查询,返回结果建议用List
//1.写法一
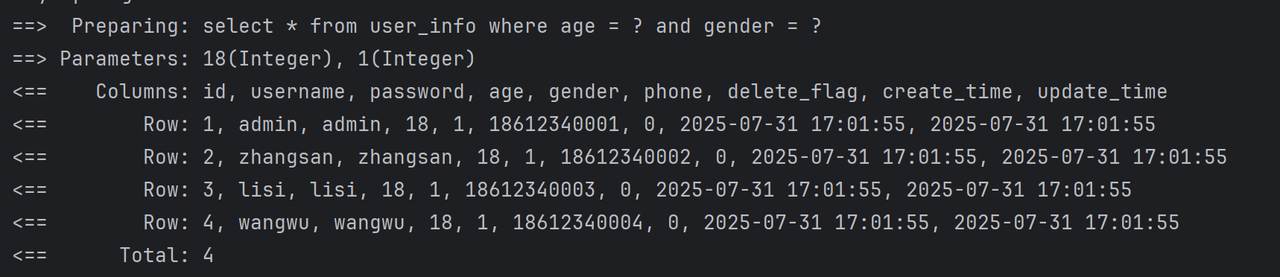
@Select("select * from user_info where age = #{age} and gender = #{gender}")
//2.写法二(不推荐)
@Select("select * from user_info where age = #{param2} and gender = #{param1}")
//3.参数重命名
@Select("select * from user_info where age = #{age} and gender = #{gender}")
List<UserInfo> selectByAgeAndGender(@Param("age") Integer age, @Param("gender") Integer gender);@Test
void selectByAgeAndGender() {
List<UserInfo> userInfos = userInfoMapper.selectByAgeAndGender(18,1);
System.out.println(userInfos);
}
4.3 增(Insert)
insert into user_info (username, `password`, age, gender, phone) values ("zhaoliu","zhaoliu",19,1,"18700001234")把SQL中的常量替换为动态的参数
Mapper接口
@Insert("insert into user_info (username, `password`, age, gender, phone) " +
        "values (#{username},#{password},#{age},#{gender},#{phone})")
Integer insert(UserInfo userInfo);
返回值 Integer:表示该插入操作影响的数据库记录行数,正常插入一条数据成功的话,返回 1;如果插入失败(比如字段约束冲突等),可能返回 0 或者抛出异常
@Test
void insert() {
UserInfo userInfo = new UserInfo();
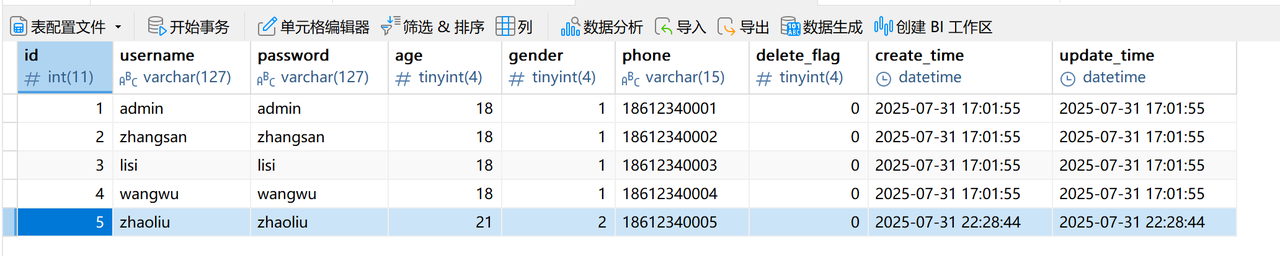
userInfo.setUsername("zhaoliu");
userInfo.setPassword("zhaoliu");
userInfo.setGender(2);
userInfo.setAge(21);
userInfo.setPhone("18612340005");
userInfoMapper.insert(userInfo);
}
如果设置了 @Param 属性,#{...}需要使用参数.属性来获取
对象参数 +
@Param:必须用#{参数名.属性名}(如#{userParam.username})。简单类型 +
@Param:直接用#{参数名}(如#{userId})。
对象参数 + @Param:
@Insert("insert into user_info (username, `password`, age, gender, phone) " +
        "values (#{userInfo.username}, #{userInfo.password}, #{userInfo.age}, #{userInfo.gender}, #{userInfo.phone})")

Integer insert(@Param("userInfo") UserInfo userInfo);
@Test
void insert() {
UserInfo userInfo = new UserInfo();
userInfo.setUsername("zhaoliu");
userInfo.setPassword("zhaoliu");
userInfo.setGender(2);
userInfo.setAge(21);
userInfo.setPhone("18612340005");
Integer count = userInfoMapper.insert(userInfo);
System.out.println(count);
}简单类型 + @Param:
// Mapper 接口
@Select("select * from user where id = #{userId}")
User selectById(@Param("userId") Integer id);
MyBatis 的参数包装机制
有
@Param:无论参数类型是对象还是简单类型,都会被包装成Map(key 是@Param定义的名称,value 是参数值)。无
@Param:
单个参数:直接以参数本身作为值(对象参数可直接用
#{属性名})。多个参数:自动包装成
Map,key 为param1、param2等,需按顺序引用。
当用
@Param("userParam")给对象参数命名时,MyBatis 会将参数包装成一个Map,结构类似:{ "userParam": User对象 }此时#{userParam.username}表示:从Map中取出 key 为"userParam"的 User 对象,再获取其username属性。 如果直接写#{username},MyBatis 会去Map中找 key 为"username"的值(而非 User 对象的属性),导致参数解析失败。简单类型(
Integer、String等)用@Param("userId")命名后,MyBatis 会将参数包装成Map:{ "userId": 1001 },此时#{userId}直接从Map中取出 key 为"userId"的值(1001),无需额外的属性层级,因此直接写参数名即可。
返回主键
Insert语句默认返回的是受影响的行数
但有些情况下,数据插入之后,还需要有后续的关联操作,需要获取到新插入数据的id
比如订单系统
当我们下完订单之后,需要通知物流系统,库存系统,结算系统等,这时候就需要拿到订单ID
如果想要拿到自增id,需要在Mapper接口的方法上添加一个Options的注解
@Options(useGeneratedKeys = true,keyProperty = "id")
@Insert("insert into user_info (username, age, gender, phone) " +
        "values (#{userInfo.username}, #{userInfo.password}, #{userInfo.age}, #{userInfo.gender}, #{userInfo.phone})")
Integer insert1(@Param("userInfo") UserInfo userInfo);
useGeneratedKeys = true:开启 “自动获取数据库生成的主键” 功能(默认为false),插入一条用户数据时,id 字段由 MySQL 自动生成(比如 1001),useGeneratedKeys = true 在数据插入后,能及时获取到数据库自动生成的唯一标识(主键)
keyProperty:指定 “主键值要存到 Java 对象的哪个属性”
-
有
@Param→ 参数被包装,需用参数名.属性名 -
无
@Param→ 参数是对象本身,直接用属性名
@Test
void insertUserByParm() {
    UserInfo userInfo = new UserInfo();
    userInfo.setUsername("lisa");
    userInfo.setPassword("666666");
    userInfo.setGender(2);
    userInfo.setAge(21);
    Integer count = userInfoMapper.insertUserByParm(userInfo);
    System.out.println("添加数据条数:" +count +", 数据ID:" + userInfo.getId());

}
4.4 删(Delete)
delete from user_info where id=6把SQL中的常量替换为动态的参数
Mapper接口
@Delete("delete from user_info where id = #{id}")
Integer delete(@Param("id") Integer id);
@Test
void delete() {
UserInfo userInfo = userInfoMapper.selectUserById(5);
System.out.println(userInfo);
}
4.5 改(Update)
update user_info set username="zhaoliu" where id=5把SQL中的常量替换为动态的参数 Mapper接口
@Update("update user_info set username = #{username} where id = #{id}")
//根据Id来更新
void update(Integer id,String username);
@Test
void update() {
userInfoMapper.update(6,"jack");
}

4.6 查(Select)
@Select("select username, `password`, age, gender, phone from user_info where id = 4 ")
UserInfo selectUserById();
从运行结果上可以看到,我们SQL语句中,查询了delete_flag,create_time,update_time,但是这几个属性却没有赋值.
MyBatis会根据方法的返回结果进行赋值.
方法用对象UserInfo接收返回结果,MySQL查询出来数据为一条,就会自动赋值给对象。
方法用List<UserInfo>接收返回结果,MySQL查询出来数据为一条或多条时,也会自动赋值给List.
但如果MySQL查询返回多条,但是方法使用UserInfo接收,MyBatis执行就会报错.
当自动映射查询结果时,MyBatis会获取结果中返回的列名并在Java类中查找相同名字的属性(忽略大小写)。
这意味着如果发现了ID列和id属性,MyBatis会将列ID的值赋给id属性
解决办法:
-
起别名
-
结果映射
-
开启驼峰命名
4.6.1 起别名
在SQL语句中,给列名起别名,保持别名和实体类属性名一样
@Select("select id,username,'password',age,gender,phone," +
        "delete_flag as deleteFlag, creat_time as creatTime, update_time as updateTime from user_info")
public List<UserInfo> queryAllUser();
@Test
void queryAllUser() {
List<UserInfo> userInfos = userInfoMapper.queryAllUser();
System.out.println(userInfos);
}4.6.2 结果映射
@Select("select id,username,'password',age,gender,phone," +
        "delete_flag as deleteFlag, create_time as createTime, update_time as updateTime from user_info")
@Results({
        @Result(column = "delete_flag", property = "deleteFlag"),
        @Result(column = "create_time", property = "createTime"),
        @Result(column = "update_time", property = "updateTime")
})
List<UserInfo> queryAllUser1();
如果其他SQL,也希望可以复用这个映射关系,可以给这个Results定义一个名称
List<UserInfo> queryAllUser1();
@Select("select id, username,'password', age, gender, phone, delete_flag, create_time, update_time " +
        "from user_info where id = #{userid}")
@ResultMap(value = "resultMap")
UserInfo queryUserById(@Param("userid") Integer id);
4.6.3 开启驼峰命名
通常数据库列使用蛇形命名法进行命名(下划线分割各个单词),而Java属性一般遵循驼峰命名法约定.
为了在这两种命名方式之间启用自动映射,需要将mapUnderscoreToCamelCase设置为true。
mybatis:
  configuration:
    map-underscore-to-camel-case: true #配置驼峰自动转换
驼峰命名规则:abc_xyz=>abcXyz
-
表中字段名:abc_xyz
-
类中属性名:abcXyz
4.7 SQL操作的返回值
在 MyBatis 中,不同类型的 SQL 操作(select/insert/update/delete)返回值的含义和处理方式不同
| SQL 类型 | 操作含义 | 典型返回值类型 | 返回值含义 |
| select | 查询数据 | 实体类(如 UserInfo) / List<实体类> (如 List<UserInfo>)/ 简单类型 | 查询到的数据 / 统计结果 |
| insert | 插入数据 | Integer | 插入成功的行数 |
| update | 更新数据 | Integer | 更新成功的行数 |
| delete | 删除数据 | Integer | 删除成功的行数 |
-
select用void当返回值:错误(查询有结果但无法映射),如之前提到的void selectUserByName(...)。 -
insert/update/delete用实体类当返回值:错误(这些操作无结果集,无法映射为实体)。
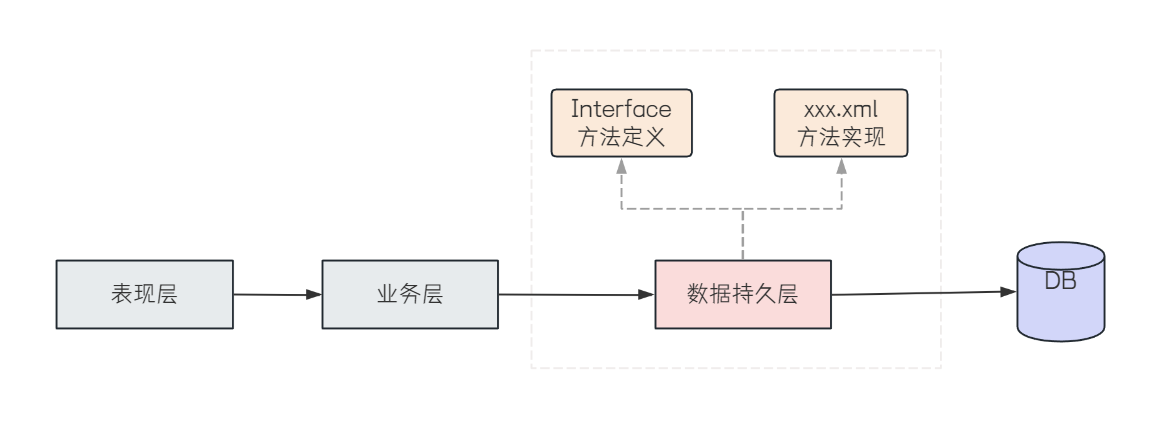
5.MyBatisXML配置文件
Mybatis的开发有两种方式:
-
注解
-
XML
上面学习了注解的方式,接下来我们学习XML的方式
使用Mybatis的注解方式,主要是来完成一些简单的增删改查功能.如果需要实现复杂的SQL功能,建
议使用XML来配置映射语句,也就是将SQL语句写在XML配置文件中.
MyBatis XML的方式需要以下两步:
-
配置数据库连接字符串和MyBatis
-
写持久层代码
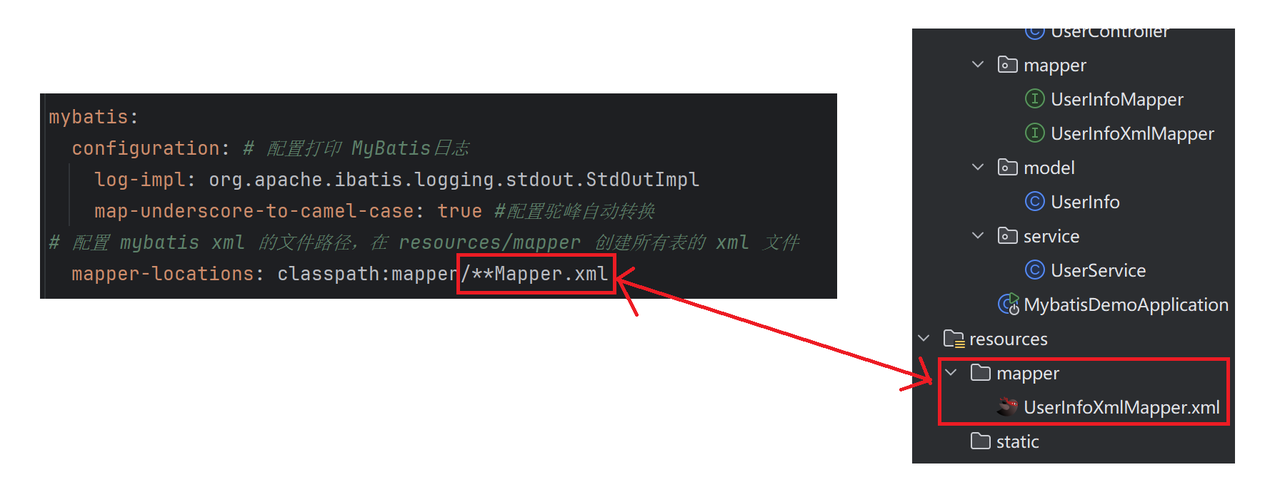
5.1 配置连接字符串和MyBatis
此步骤需要进行两项设置
-
数据库连接字符串设置
-
MyBatis的XML文件配置
# 数据库连接配置
spring:
 datasource:
 url: jdbc:mysql://127.0.0.1:3306/mybatis_test?characterEncoding=utf8&useSSL=false
 username: root
 password: root
 driver-class-name: com.mysql.cj.jdbc.Driver
# 配置 mybatis xml 的文件路径,在 resources/mapper 创建所有表的 xml 文件
mybatis:
 mapper-locations: classpath:mapper/**Mapper.xml
5.2 写持久层代码
持久层代码分两部分
-
方法定义Interface
-
方法实现:XXX.xml
5.2.1 添加mapper接口
数据持久层的接口定义:
@Mapper
public interface UserInfoXmlMapper {
    List<UserInfo> selectAllUsers();
}
5.2.2 添加UserInfoXMLMapper.xml
<?xml version="1.0" encoding="UTF-8"?>
<!DOCTYPE mapper PUBLIC "-//mybatis.org//DTD Mapper 3.0//EN"
        "http://mybatis.org/dtd/mybatis-3-mapper.dtd">
<mapper namespace="com.example.mybatis.demo.mapper.UserInfoXmlMapper">

</mapper>
创建UserInfoXMLMapper.xml,路径参考yml中的配置
查询所有用户的具体实现:
<?xml version="1.0" encoding="UTF-8"?>
<!DOCTYPE mapper PUBLIC "-//mybatis.org//DTD Mapper 3.0//EN"
        "http://mybatis.org/dtd/mybatis-3-mapper.dtd">
<mapper namespace="com.example.mybatis.demo.mapper.UserInfoXmlMapper">

    <select id="selectAllUsers" resultType="com.example.mybatis.demo.model.UserInfo">
        select username, `password`, age, gender, phone from user_info
    </select>
</mapper>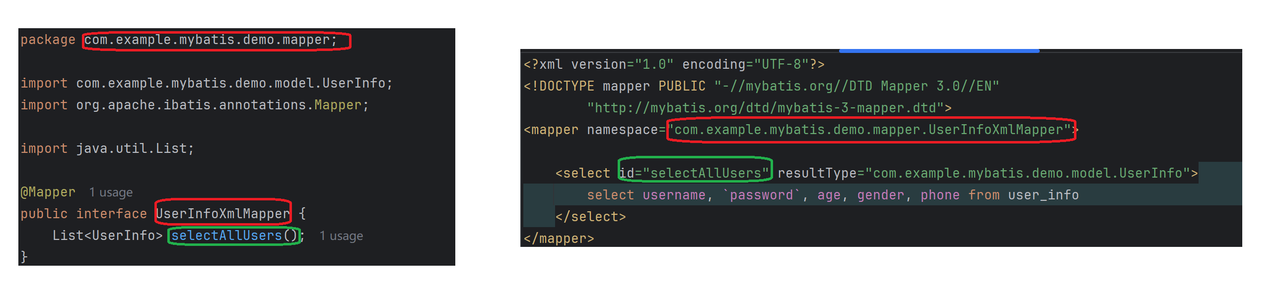
5.2.3 单元测试
@SpringBootTest
class UserInfoXmlMapperTest {
    @Autowired
    private UserInfoMapper userInfoMapper;
    @Test
    void selectAllUsers() {
        List<UserInfo> userInfos = userInfoMapper.selectAll();
        System.out.println(userInfos);
    }
}
5.3 增删改查
5.3.1 增(Insert)
UserInfoMapper接口:
Integer insertUserInfo(UserInfo userInfo);UserInfoMapper.xml实现:
<insert id="insertUserInfo">
    insert into user_info (username, `password`, age, gender, phone)
    values (#{userInfo.username}, #{userInfo.password}, #{userInfo.age}, #{userInfo.gender}, #{userInfo.phone})
</insert>
@Param设置参数名称:
Integer insertUserInfo2(@Param("userInfo") UserInfo userInfo);<insert id="insertUserInfo2">
insert into user_info (username, password, age, gender, phone)
values (#{userInfo.username}, #{userInfo.password}, #{userInfo.age}, #{userInfo.gender}, #{userInfo.phone})
</insert>返回自增id
接口定义不变,Mapper.xml实现设置useGeneratedKeys和keyProperty属性
<insert id="insertUserInfo3" useGeneratedKeys="true" keyProperty="id">
    insert into user_info (username, password, age, gender, phone)
    values (#{userInfo.username}, #{userInfo.password}, #{userInfo.age}, #{userInfo.gender}, #{userInfo.phone})
</insert>
5.3.2 删(Delete)
Integer deleteUserInfo(@Param("id") Integer id);<delete id="deleteUserInfo">
delete from user_info where id = #{id}
</delete>5.3.3 改(Update)
Integer updateUserInfo(Integer id,String username);<update id="updateUserInfo">
update user_info set username = #{username} where id = #{id}
</update>5.3.4 查(select)
<select id="selectAllUsers" resultType="com.example.mybatis.demo.model.UserInfo">
    select username, `password`, age, gender, phone, delete_flag,create_time, update_time from user_info
</select>
void selectAllUsers() {
List<UserInfo> userInfos = userInfoXmlMapper.selectAllUsers();
System.out.println(userInfos);
}解决办法和注解类似:
-
起别名
-
结果映射
-
开启驼峰命名

1,3同注解
结果映射:
<resultMap id="BaseMap" type="com.example.mybatis.demo.model.UserInfo">
    <id column="id" property="id"></id>
    <result column="delete_flag" property="deleteFlag"></result>
    <result column="create_time" property="createTime"></result>
    <result column="update_time" property="updateTime"></result>
</resultMap>

<select id="selectAllUsers" resultMap="BaseMap">
    select * from user_info
</select>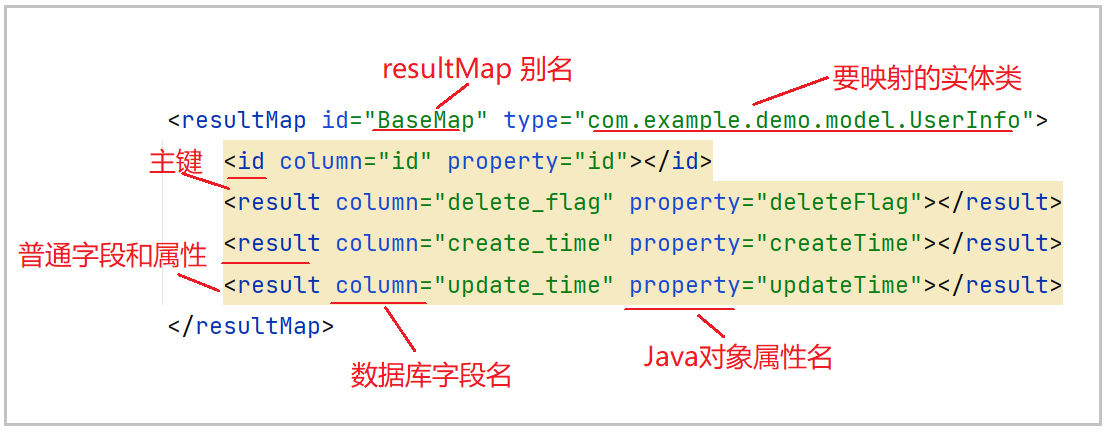
开发中使用注解还是XML的方式?
关于开发中使用哪种模式这个问题,没有明确答案,仁者见仁智者见智,并没有统一的标准,更多是取决于你的团队或者项目经理,项目负责人.
5.4 其他查询操作
5.5 #{}和${}
5.5.1 使用
-
Integer类型参数
@Select("select * from user_info where id=#{id}")
UserInfo selectUserById(Integer i);

@Select("select * from user_info where id=${id}")
UserInfo selectUserById(Integer i);
-
String类型参数
@Select("select * from user_info where username=#{name}")
UserInfo selectUserByName(String name);

@Select("select * from user_info where username='${name}'")
UserInfo selectUserByName(String name);
从上面两个例子可以看出:
#{}使用的是预编译SQL,通过?占位的方式,提前对SQL进行编译,然后把参数填充到SQL语句中.#{}会根据参数类型,自动拼接引号''
${}会直接进行字符替换,一起对SQL进行编译.如果参数为字符串,需要加上引号''
参数为数字类型时,也可以加上,查询结果不变,但是可能会导致索引失效,性能下降。
5.5.2 区别
#{}和${}的区别就是预编译SQL和即时SQL的区别
当客户发送一条SQL语句给服务器后,大致流程如下:
-
解析语法和语义,校验SQL语句是否正确
-
优化SQL语句,制定执行计划
-
执行并返回结果
一条 SQL如果走上述流程处理,我们称之为Immediate Statements(即时 SQL)
-
性能更高
绝大多数情况下,某一条SQL语句可能会被反复调用执行,或者每次执行的时候只有个别的值不同(比如select的where子句值不同,update的set子句值不同,insert的values值不同).如果每次都需要经过上面的语法解析,SQL优化、SQL编译等,则效率就明显不行了.
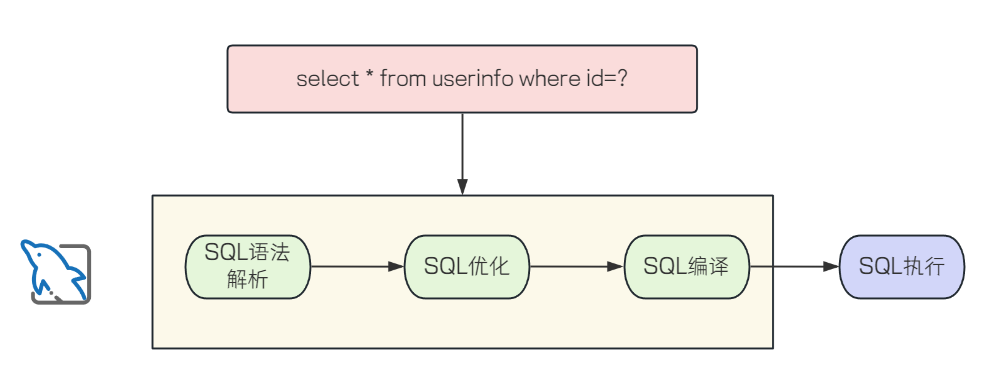
预编译SQL,编译一次之后会将编译后的SQL语句缓存起来,后面再次执行这条语句时,不会再次编译(只是输入的参数不同),省去了解析优化等过程,以此来提高效率
-
更安全(防止SQL注入)
-
SQL注入:是通过操作输入的数据来修改事先定义好的SQL语句,以达到执行代码对服务器进行攻击的
方法。
由于没有对用户输入进行充分检查,而SQL又是拼接而成,在用户输入参数时,在参数中添加一些
SQL关键字,达到改变SQL运行结果的目的,也可以完成恶意攻击。
sql注入代码:
or1='1@Select("select * from user_info where username='${name}'") List<UserInfo> selectUserByName(String name); @Test void selectUserByName() { userInfoMapper.selectUserByName("' or 1='1"); }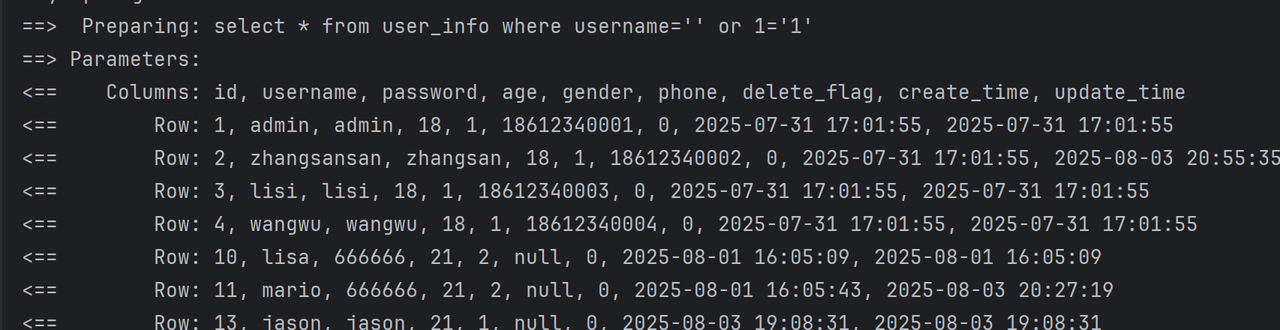
SQL注入是⼀种非常常见的数据库攻击手段,SQL注入漏洞也是网络世界中最普遍的漏洞之一. 如果发生在用户登录的场景中,密码输入为
' or 1='1,就可能完成登录(不是⼀定会发生的场景, 需要看登录代码如何写)
5.5.3 SQL注入问题
-
登录功能(最常见的注入场景)
危险代码(MyBatis 注解版)
// 登录验证:通过用户名和密码查询用户
@Select("select * from user_info where username = '${username}' and password = '${password}'")
UserInfo login(@Param("username") String username, @Param("password") String password);
攻击参数
攻击者输入:
-
username = "admin' --" -
password = "任意值"
生成的恶意 SQL
select * from user_info where username = 'admin' -- and password = '任意值'-
--是 SQL 注释符,后面的and password = ...被注释掉,导致条件简化为username = 'admin',直接登录成功。
后果
无需正确密码,直接登录管理员账号,窃取敏感信息。
-
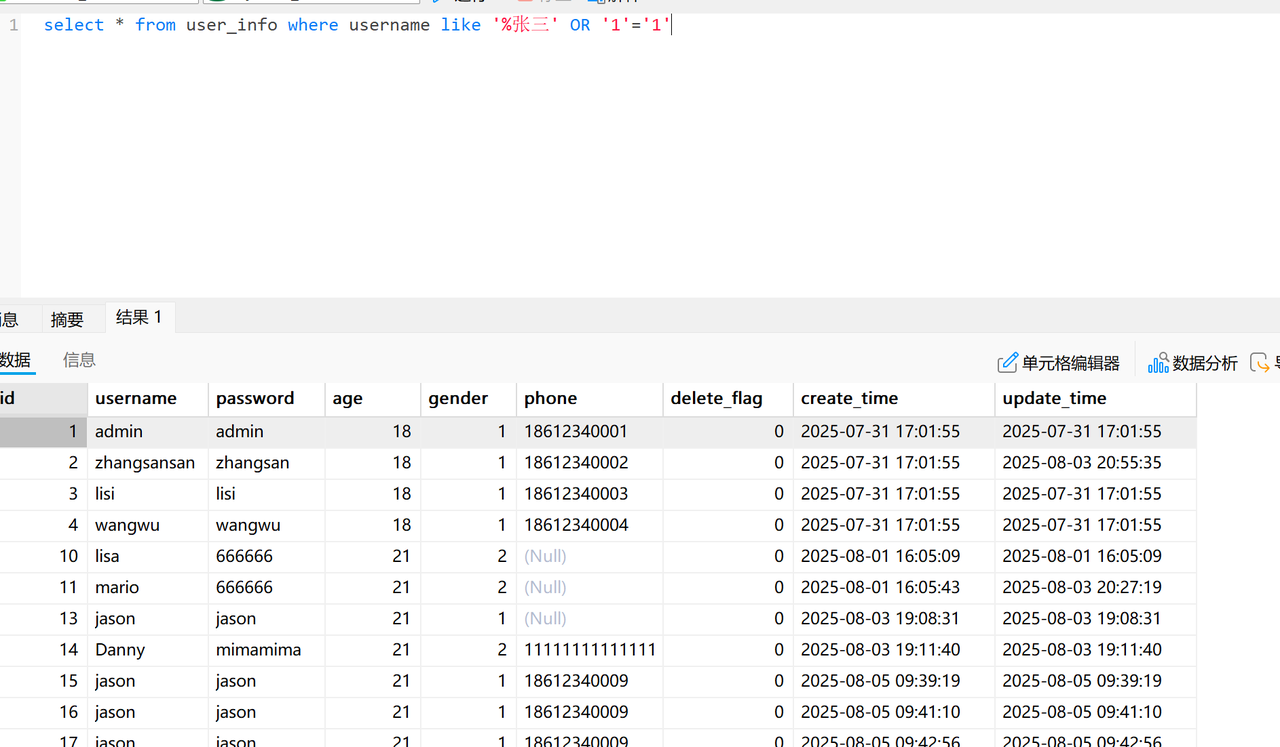
模糊查询(未使用参数化)
危险代码(MyBatis XML 版)
<!-- 根据关键字模糊查询用户 --><select id="searchUsers" resultType="UserInfo">
  select * from user_info
  where username like '%${keyword}%'
</select>
攻击参数
攻击者输入:keyword = '%张三' OR '1'='1'
生成的恶意 SQL
select * from user_info where username like '%张三' OR '1'='1'-
'1'='1'永远为真,条件整体成立,返回表中所有用户数据(包括密码等敏感信息)。
后果
数据库中的用户信息被批量泄露。
-
动态删除操作(直接拼接 ID)
危险代码(MyBatis 注解版)
// 根据 ID 删除用户
@Delete("delete from user_info where id = ${id}")
void deleteUser(@Param("id") String id);
攻击参数
攻击者输入:id = "1; drop table user_info"
生成的恶意 SQL
delete from user_info where id = 1; drop table user_info -
分号
;分隔两个 SQL 语句,先删除 ID=1 的用户,再执行drop table删除整个表。
后果
整个用户表被删除,数据永久丢失。
5.6 排序功能
从上面的例子中,可以得出结论:${}会有SQL注入的风险,所以我们尽量使用#{}完成查询
接下来我们看下${}的使用场景
@Select("select id, username, age, gender, phone, delete_flag, create_time, update_time " +
        "from user_info order by id ${sort} ")
List<UserInfo> queryAllUserBySort(String sort);
@Test
void queryAllUserBySort() {
//asc升序,desc降序
userInfoMapper.queryAllUserBySort("desc");
}当使用#{sort} 查询时,asc前后自动给加了引号,导致sql错误
#{} 会根据参数类型判断是否拼接引号
''如果参数类型为String,就会加上引号.
5.7 like查询
like使用#{}报错
把#{}改成${}可以正确查出来,但是${}存在SQL注入的问题,所以不能直接使用${}
解决办法:使用mysql的内置函数concat()来处理,实现代码如下:
select id, username, age, gender, phone, delete_flag, create_time, update_time
from user_info
where username like '%张三%'
@Select("select id, username, age, gender, phone, delete_flag, create_time, update_time " +
"from user_info where username like concat('%',#{key},'%')")
List<UserInfo> queryAllUserByLike(String key);-
concat函数:SQL 中的字符串拼接函数,作用是将三个参数拼接成一个字符串:-
第一个参数
'%':表示匹配关键字前的任意字符。 -
第二个参数
#{key}:MyBatis 的参数占位符,对应方法传入的key(要模糊查询的关键字)。 -
第三个参数
'%':表示匹配关键字后的任意字符。
-
6.数据库连接池
在上面Mybatis的讲解中,我们使用了数据库连接池技术,避免频繁的创建连接,销毁连接
下面我们来了解下数据库连接池
6.1 介绍
数据库连接池负责分配、管理和释放数据库连接,它允许应用程序重复使用一个现有的数据库连接
而不是再重新建立一个.
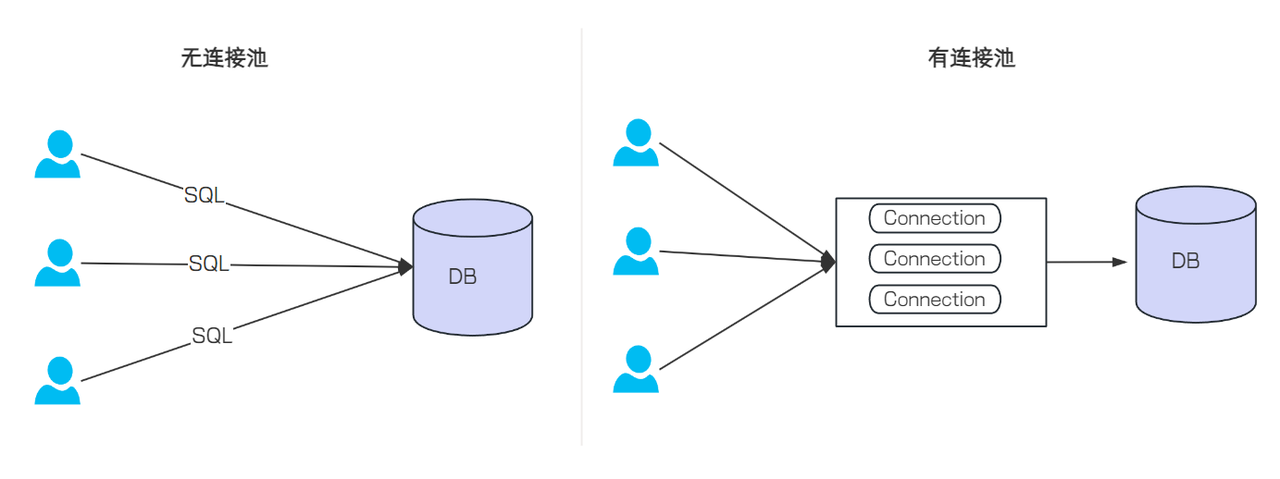
没有使用数据库连接池的情况:每次执行SQL语句,要先创建一个新的连接对象,然后执行SQL语句,SQL语句执行完,再关闭连接对象释放资源,这种重复的创建连接,销毁连接比较消耗资源
使用数据库连接池的情况:程序启动时,会在数据库连接池中创建一定数量的Connection对象,当客户请求数据库连接池,会从数据库连接池中获取Connection对象,然后执行SQL,SQL语句执行完,再把Connection归还给连接池.
优点:
-
减少了网络开销
-
资源重用
-
提升了系统的性能
6.2 使用
常见的数据库连接池:
-
C3PO
-
DBCP
-
Druid
-
Hikari
目前比较流行的是Hikari,Druid
-
Hikari:SpringBoot默认使用的数据库连接池

-
Druid
如果我们想把默认的数据库连接池切换为Druid数据库连接池,只需要引入相关依赖即可
<dependency>
 <groupId>com.alibaba</groupId>
 <artifactId>druid-spring-boot-3-starter</artifactId>
 <version>1.2.21</version>
</dependency>
7.MySQL开发企业规范
-
表名,字段名使用小写字母或数字,单词之间以下划线分割.尽量避免出现数字开头或者两个下划线
中间只出现数字,数据库字段名的修改代价很大,所以字段名称需要慎重考虑。
MySQL在Windows下不区分大小写,但在Linux下默认是区分大小写.因此,数据库名,表名,字
段名都不允许出现任何大写字母,避免节外生枝
正例:aliyun_admin,rdc_config,level3_name
反例:AliyunAdmin,rdcConfig, level_3_name
-
表必备三字段:id,create_time,update_time
id 必为主键,类型为bigint unsigned,单表时自增,步长为1
create_time,update_time 的类型均为 datetime类型,create_time表示创建时间,
update_time表示更新时间
有同等含义的字段即可,字段名不做强制要求
-
在表查询中,避免使用*作为查询的字段列表,标明需要哪些字段
增加查询分析器解析成本
增减字段容易与 resultMap配置不一致
无用字段增加网络消耗,尤其是text类型的字段


 1242
1242

 被折叠的 条评论
为什么被折叠?
被折叠的 条评论
为什么被折叠?
 到【灌水乐园】发言


