一、MyBatis介绍
1.1 什么是MyBatis
mybatis前身是apache的ibatis,是一个封装了jdbc的持久层框架,使开发者只需关注sql即可
1.2框架要解决的问题(jdbc的缺点)
问题:
1.手动创建和释放连接
2.sql语句在代码中硬编译
3.对结果的解析
二、MyBatis入门案例
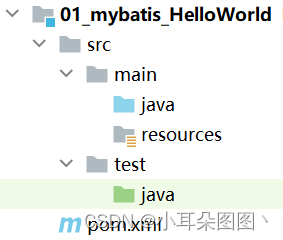
创建工程

2.1 pom.xml(添加依赖)
mybatis、mysql-connection-java、log4j、junit根据版本不同自行配置
<build>
   <!-- 如果不添加此节点src/main/java目录下的所有配置文件都会被漏掉。 -->
                <resources>
                    <resource>
                        <directory>src/main/java</directory>
                        <includes>
                            <include>**/*.xml</include>
                        </includes>
                    </resource>
<!-- 如果出现找不到mybatis-config.xml配置文件的情况进行配置 -->
                    <resource>
                        <directory>src/main/resources</directory>
                    </resource>
                </resources>
            </build>
2.2log4j.properties(配置文件)
# Global logging configuration
log4j.rootLogger=DEBUG, stdout
# Console output...
log4j.appender.stdout=org.apache.log4j.ConsoleAppender
log4j.appender.stdout.layout=org.apache.log4j.PatternLayout
log4j.appender.stdout.layout.ConversionPattern=%5p [%t] - %m%n
2.3 pojo(根据数据库创建的用户类)
public class User implements Serializable {
    private Integer id;
    private String username;
    private Date birthday;
    private String sex;
    private String address;

    public Integer getId() {
        return id;
    }

    public void setId(Integer id) {
        this.id = id;
    }

    public String getUsername() {
        return username;
    }

    public void setUsername(String username) {
        this.username = username;
    }

    public Date getBirthday() {
        return birthday;
    }

    public void setBirthday(Date birthday) {
        this.birthday = birthday;
    }

    public String getSex() {
        return sex;
    }

    public void setSex(String sex) {
        this.sex = sex;
    }

    public String getAddress() {
        return address;
    }

    public void setAddress(String address) {
        this.address = address;
    }

    @Override
    public String toString() {
        return "User{" +
                "id=" + id +
                ", username='" + username + '\'' +
                ", birthday=" + birthday +
                ", sex='" + sex + '\'' +
                ", address='" + address + '\'' +
                '}';
    }
}
2.4UserDao(UserMapper)接口
public interface UserDao {
    public List<User> findAll();
}
2.5 UserDao.xml (接口的配置文件)
<?xml version="1.0" encoding="UTF-8"?>
<!DOCTYPE mapper
        PUBLIC "-//mybatis.org//DTD Mapper 3.0//EN"
        "http://mybatis.org/dtd/mybatis-3-mapper.dtd">
<!--namespace:隔离sql,一般是接口名称的全类名-->
<mapper namespace="com.by.dao.UserDao">
    <!--
      id:和接口方法名保持一致
      resultType:和接口返回类型保持一致
     -->
    <select id="findAll" resultType="com.by.pojo.User">
        select * from user
    </select>
</mapper>
2.6 mybatis-config.xml(配置)
<?xml version="1.0" encoding="UTF-8"?>
<!DOCTYPE configuration PUBLIC "-//mybatis.org//DTD Config 3.0//EN" "http://mybatis.org/dtd/mybatis-3-config.dtd">
<configuration>
    <!-- 和spring整合后 environments配置将废除-->
    <environments default="dev">
        <!-- dev环境 -->
        <environment id="dev">
            <!-- 配置事务的类型:type="JDBC | MANAGED" 两种方式
                 JDBC:表示使用JDBC中原生的事务管理方式
                 MANAGED:被管理,例如Spring
			-->
            <transactionManager type="JDBC"></transactionManager>
            <!-- 配置连接数据库的信息:用的是数据源(连接池) -->
            <dataSource type="POOLED">
                 <!-- mysql5 -->
                <property name="driver" value="com.mysql.jdbc.Driver"/>
                <property name="url" value="jdbc:mysql://127.0.0.1:3306/mybatis?characterEncoding=UTF-8"/>
                <property name="username" value="root"/>
                <property name="password" value="1111"/>
            </dataSource>
        </environment>
    </environments>
    <!-- 告知 mybatis 映射配置的位置 -->
    <mappers>
        <mapper resource="com/by/dao/UserDao.xml"/>
    </mappers>
</configuration>
** 注意mysql18的driver和url
<!-- mysql8 -->
<property name="driver" value="com.mysql.cj.jdbc.Driver"/>
<property name="url" value="jdbc:mysql://localhost:3306/mybatis?useSSL=false&serverTimezone=Asia/Shanghai"/>
2.7测试
public class MyBatisTest {

    private InputStream inputStream;
    private SqlSession sqlSession;

    @Before
    public void createSqlSession() throws IOException {
        // 加载配置文件
        String resource = "mybatis-config.xml";
        inputStream = Resources.getResourceAsStream(resource);

        // 创建SqlSessionFactory
        SqlSessionFactory sqlSessionFactory =
            				new SqlSessionFactoryBuilder().build(inputStream);
        //获得数据库会话实例
        sqlSession = sqlSessionFactory.openSession();
    }

    @Test
    public void testFindAll(){
        UserDao userDao = sqlSession.getMapper(UserDao.class);
        List<User> userList = userDao.findAll();
        for(User user : userList) {
            System.out.println(user);
        }
    }

    @After
    public void closeSqlSession() throws IOException {
        sqlSession.close();
        inputStream.close();
    }
}
三、 MyBatis运行原理

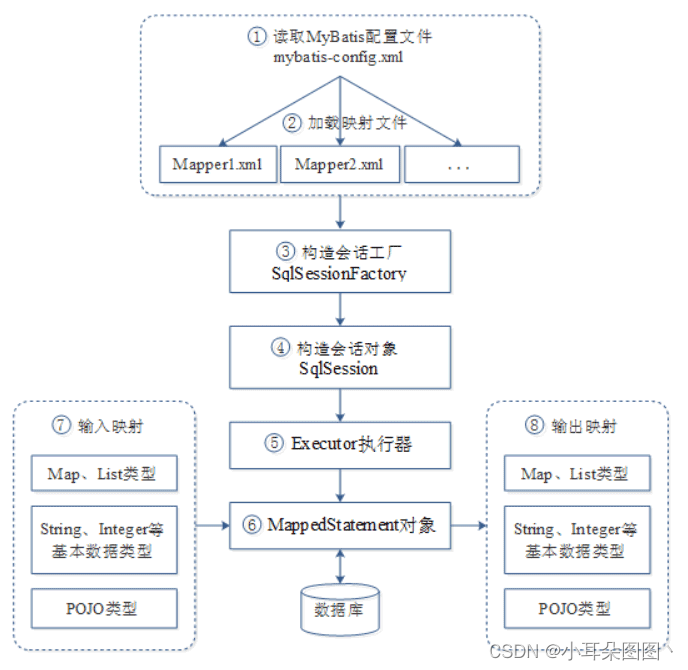
MyBatis框架在操作数据库时,大体经过了8个步骤:
1.读取 MyBatis 配置文件:mybatis-config.xml 为 MyBatis 的全局配置文件,配置了 MyBatis 的运行环境等信息,例如数据库连接信息。
2.加载映射文件:映射文件即 SQL 映射文件,该文件中配置了操作数据库的 SQL 语句,需要在 MyBatis 配置文件 mybatis-config.xml 中加载。mybatis-config.xml 文件可以加载多个映射文件,每个文件对应数据库中的一张表。
3.构造会话工厂:通过 MyBatis 的环境等配置信息构建会话工厂 SqlSessionFactory。
4.创建会话对象:由会话工厂创建 SqlSession 对象,该对象中包含了执行 SQL 语句的所有方法,是一个既可以发送sql执行并返回结果的,也可以获取mapper的接口
5.Executor 执行器:MyBatis 底层定义了一个 Executor 接口来操作数据库,它将根据 SqlSession 传递的参数动态地生成需要执行的 SQL 语句,同时负责查询缓存的维护。
6.MappedStatement 对象:在 Executor 接口的执行方法中有一个 MappedStatement 类型的参数,该参数是对映射信息的封装,用于存储要映射的 SQL 语句的 id、参数等信息。
7.输入参数映射:输入参数类型可以是 Map、List 等集合类型,也可以是基本数据类型和 POJO 类型。输入参数映射过程类似于 JDBC 对 preparedStatement 对象设置参数的过程。
8.输出结果映射:输出结果类型可以是 Map、 List 等集合类型,也可以是基本数据类型和 POJO 类型。输出结果映射过程类似于 JDBC 对结果集的解析过程。
mybatis-config.xml
mapper.xml mapper.xml mapper.xml…(会有多个sql语句就会有多个sql文件)
|
|
Resources
|
|---->InputStream
|
SqlSessionFactoryBuilder
|
|---->Configuration(conn, Map<namespace+“.”+id, MappedStatement(sql, resultType)>)
|
SqlSessionFactory
|
|---->Configuration(conn, Map<namespace+“.”+id, MappedStatement(sql, resultType)>)
|
SqlSession
|
|---->conn, Map<namespace+“.”+id, MappedStatement(sql, resultType)>
|
ProxyFactory
|
|---->MappedStatement(sql, resultType), conn
|
Executor
| |
| |
| |
输出映射
四、Mybatis传递多个参数(重点)
1.传递一个参数
User findUserById(Integer id);
WHERE id=#{**}
{ }内可随意命名
2.按序号传参(不推荐)
User findUserByIdAndName(Integer id, String username);
	① WHERE id=#{arg0} AND username=#{arg1}
    ② WHERE id=#{param1} AND username=#{param2}
3.注解传参(适用于少量参数)
User findUserByIdAndName2(@Param("id") Integer id, @Param("username") String username);
	 WHERE username=#{username} AND id=#{id} //注解的value值
4.对象传参(适用于多个参数)
User findUser(User userParam);
WHERE id=#{id} AND username=#{username} //对象的属性名
5.map传参(不推荐)
 User findUserByMap(Map<String, Object> map);
WHERE id=#{id} AND username=#{username} //map的key
五、#{}和${}的区别(重点)
#{ } :
1.单个简单参数类型:随便命名
2.底层:preparedStatement
3.数据类型转换:自动转换
4.sql注入:防止
${ }:
1.简单单个参数类型:value
2.底层:Statement
3.数据类型转换:不转换
4.sql注入:不防止
六、主键回填
方式一:
<selectKey order="AFTER" keyProperty="id" resultType="java.lang.Integer">
	    SELECT LAST_INSERT_ID()
	</selectKey>
方式二:
<insert id="" parameterType="" useGeneratedKeys="true" keyProperty="id">
七、Mybatis的ORM映射
1.字段起别名
SELECT role_name as roleName, role_desc as roleDesc From......
2.resultMap结果映射
<resultMap id="findAllResultMap" type="com.by.pojo.Role">
        <id column="id" property="id"></id>
        <result column="role_name" property="roleName"></result>
</resultMap>

<select id="findAll" resultMap="findAllResultMap">......
八、Mybatis的类别名
1.自定义别名
<typeAliases>
            <!--批量起别名-->
            <package name="com.by.pojo"/>
</typeAliases>
2.Mybatis默认支持的别名
统统小写、统统基本类型、集合统统写接口
九、批量加载mapper映射文件
<mappers>
    <!--批量加载映射文件-->
    <package name="com.by.mapper"/>
</mappers>
十、Mybatis的关联查询
1.一对一
<association property="对象的属性名" javaType="查询的结果集装到哪个对象里">
   <id column="id" property="id"/>
   <result column="username" property="username"/>
</association>
参考:
<?xml version="1.0" encoding="UTF-8"?>
<!DOCTYPE mapper
        PUBLIC "-//mybatis.org//DTD Mapper 3.0//EN"
        "http://mybatis.org/dtd/mybatis-3-mapper.dtd">
<mapper namespace="com.by.dao.AccountDao">
    <!-- 结果映射 -->
    <resultMap type="account" id="findAllResultMap">
        <id column="aid" property="id"/>
        <result column="uid" property="uid"/>
        <result column="money" property="money"/>
        <!-- 指定关系表中数据的封装规则 -->
        <association property="user" javaType="user">
            <id column="id" property="id"/>
            <result column="username" property="username"/>
            <result column="sex" property="sex"/>
            <result column="birthday" property="birthday"/>
            <result column="address" property="address"/>
        </association>
    </resultMap>
    <select id="findAll" resultMap="findAllResultMap">
        select u.*,a.id as aid,a.uid,a.money from account a,user u where a.uid =u.id
    </select>
</mapper>
2.一对多
<collection property="对象的属性名" ofType="集合的泛型">
    <id column="aid" property="id"></id>
    <result column="uid" property="uid"></result>
</collection>
参考:
<?xml version="1.0" encoding="UTF-8"?>
<!DOCTYPE mapper
        PUBLIC "-//mybatis.org//DTD Mapper 3.0//EN"
        "http://mybatis.org/dtd/mybatis-3-mapper.dtd">
<mapper namespace="com.by.dao.UserDao">
    <resultMap type="user" id="findAllResultMap">
        <id column="id" property="id"></id>
        <result column="username" property="username"/>
        <result column="address" property="address"/>
        <result column="sex" property="sex"/>
        <result column="birthday" property="birthday"/>
        <!-- collection 是用于建立一对多中集合属性的对应关系
        ofType 用于指定集合元素的数据类型
        -->
        <collection property="accounts" ofType="account">
            <id column="aid" property="id"/>
            <result column="uid" property="uid"/>
            <result column="money" property="money"/>
        </collection>
    </resultMap>
    <!-- 配置查询所有操作 -->
    <select id="findAll" resultMap="findAllResultMap">
      select u.*,a.id as aid ,a.uid,a.money
      from user u left join account a on u.id =a.uid
    </select>
</mapper>
3.多对多
<collection property="对象的属性名" ofType="集合的泛型">
    <id column="rid" property="id"></id>
    <result column="role_name" property="roleName"></result>
</collection>
注:多对多和一对多雷同
十一、mybatis的延迟加载
    <resultMap id="findAllResultMap" resultType="user">
        ......
        <collection property="对象的属性名"
                    ofType="集合的泛型"
                    select="select标签的id"
                    column="参数"
                    fetchType="lazy"

        ></resultMap>
    <select id="findAll" resultMap="findAllResultMap">
        ......
    </select>
十二、mybatis的动态sql
1.if标签
        <if test="username!=null and username!=''">
            AND username=#{username}
        </if>
2.where标签
        <!--where标签:把if包括起来,并且会去掉多余的'AND'或'OR'-->
        <where>
            <if test="">
            </if>
        </where>
3.set标签
        <!--set标签:去掉多余的“,”-->
        <set>
            <if test="">
            </if>
        </set>
4.trim标签
 <!--trim标签:添加前缀和后缀,去掉多余的前缀和后缀-->
       <trim prefix="(" suffix=")" suffixOverrides=",">
            <if test="">
            </if>
       </trim>
5.foreach标签
<!--
            collection="idList":取值array、list、map、@Param("value")
            item="id":集合中的每一个元素进行迭代时的别名
            open="in(":加前缀
            separator="," :分割符
            close=")":加后缀
        -->
        <foreach collection="idList" item="id" open="in(" separator="," close=")">
            #{id}
        </foreach>
6.sql标签
        <!--定义公共的sql片段-->
        <sql id="find_user_where">
            ......
        </sql>

        <!--引用sql片段-->
        <include refid="find_user_where"></include>
十三、mybatis的缓存
1、一级缓存
范围:sqlSession
配置:默认开启
走缓存:同一个sqlSession执行同一条sql
不走缓存:不同sqlSession 或 两次查询之间执行了增上改
2、二级缓存
范围:sqlSessionFactory
配置:
走缓存:同一个sqlSessionFactory走同一条sql
不走缓存:不同sqlSessionFactory 或 两次查询之间执行了增上改


 392
392

 被折叠的 条评论
为什么被折叠?


