


使用HttpURLConnection
在Android上发送HTTP请求的方式一般有两种,HttpURLConnection和HttpClient,现在先学习下
HttpURLConnection的用法。
首先需要获取到HttpURLConnection的实例,一般只需new 出一个URL对象,并传入目标网络的地址,然后
调用一下openConnection()方法即可,如下所示:
URL URL=new URL("http://www.baidu.com");
HttpURLConnection connection=( HttpURLConnection)url.openConnection();
得到了 HttpURLConnection的实例之后,我们可以设置一下HTTP请求所使用的方法。常用的方法主要有两个,
get和post。get表示希望从服务器那里获取数据,而post则表示提交数据给服务器。写法如下:
connection.setRequestMethod("GET");
接下来就可以进行一些自由的定制了,比如设置连接超时,读取超时的毫秒数,以及服务器希望得到的一些消息头等。这部分内容根据自己的实际情况进行编写,示例如下:
connection.setConnectionTimeout(8000);
connection.setReadTimeout(8000);
之后调用getInputStream()方法就可以获取到服务器返回的输入流了,剩下的任务就是对输入流进行读取,如下所示:
InputStream in=connection.getInputStream();
最后可以调用disconnect()方法将这个HTTP连接关闭掉,如下所示:
connection.disconnection();
下面通过一个具体的例子来熟悉下HttpURLConnection的用法。新建NetworkTest项目,首先修改activit_main.xml中的代码,如下所示:
<LinearLayout xmlns:android="http://schemas.android.com/apk/res/android"
    xmlns:tools="http://schemas.android.com/tools"
    android:layout_width="match_parent"
    android:layout_height="match_parent"
    android:orientation="vertical"
    >

    <Button
        android:id="@+id/send_request"
        android:layout_width="match_parent"
        android:layout_height="wrap_content"
        android:text="send request"
        />

  <ScrollView
        android:layout_width="match_parent"
        android:layout_height="match_parent"
        >
        <TextView
            android:id="@+id/response_text"
            android:layout_width="match_parent"
            android:layout_height="wrap_content"
            />
    </ScrollView>


</LinearLayout>
由于手机屏幕的空间一般都比较小,有些时候过多的内容一屏是显示不下的,借助ScrollView控件的话就可以允许我们以滚动的形式查看屏幕外的那部分内容。另外布局中还放置了一个Button和一个TextView,Button用来发送HTTP请求,TextView用于将服务器返回的数据显示出来。接着修改MainActivity中的代码如下所示:
package com.jack.networktest;
import java.io.BufferedReader;
import java.io.InputStream;
import java.io.InputStreamReader;
import java.net.HttpURLConnection;
import java.net.MalformedURLException;
import java.net.URL;

import android.annotation.SuppressLint;
import android.app.Activity;
import android.os.Bundle;
import android.os.Handler;
import android.os.Message;
import android.util.Log;
import android.view.Menu;
import android.view.View;
import android.view.View.OnClickListener;
import android.widget.Button;
import android.widget.TextView;
/*
 在Android上发送HTTP请求的方式一般有两种,HttpURLConnection和HttpClient,现在先学习下
 HttpURLConnection的用法。
 首先需要获取到HttpURLConnection的实例,一般只需new 出一个URL对象,并传入目标网络的地址,然后
 调用一下openConnection()方法即可,如下所示:
 URL URL=new URL("http://www.baidu.com");
 HttpURLConnection connection=( HttpURLConnection)url.openConnection();
 得到了 HttpURLConnection的实例之后,我们可以设置一下HTTP请求所使用的方法。常用的方法主要有两个,
 get和post。get表示希望从服务器那里获取数据,而post则表示提交数据给服务器。写法如下:
 connection.setRequestMethod("GET");
 接下来就可以进行一些自由的定制了,比如设置连接超时,读取超时的毫秒数,以及服务器希望得到的一些消息头等。
 这部分内容根据自己的实际情况进行编写,示例如下:
 connection.setConnectionTimeout(8000);
 connection.setReadTimeout(8000);
 之后调用getInputStream()方法就可以获取到服务器返回的输入流了,剩下的任务就是对输入流进行读取,如下所示:
 InputStream in=connection.getInputStream();
 最后可以调用disconnect()方法将这个HTTP连接关闭掉,如下所示:
 connection.disconnection();
 下面通过一个具体的例子来熟悉下HttpURLConnection的用法。新建NetworkTest项目,首先修改activit_main.xml中的代码,如下所示:
 */
public class MainActivity extends Activity implements OnClickListener{

	public static final int SHOW_RESPONSE=0;
	private Button sendRequest=null;
	private TextView responseText=null;

	private Handler handler=new Handler(){

		@Override
		public void handleMessage(Message msg) {
			// TODO Auto-generated method stub
			super.handleMessage(msg);

			switch(msg.what){
			case SHOW_RESPONSE:
				String response=(String) msg.obj;
				//在这里进行UI操作,将结果显示到界面上
				responseText.setText(response);
				break;
			default:
				break;
			}

		}

	};


	@Override
	protected void onCreate(Bundle savedInstanceState) {
		super.onCreate(savedInstanceState);
		setContentView(R.layout.activity_main);
		sendRequest=(Button) findViewById(R.id.send_request);
		responseText=(TextView) findViewById(R.id.response_text);
		sendRequest.setOnClickListener(this);

	}

	@Override
	public boolean onCreateOptionsMenu(Menu menu) {
		// Inflate the menu; this adds items to the action bar if it is present.
		getMenuInflater().inflate(R.menu.main, menu);
		return true;
	}

	@Override
	public void onClick(View v) {
		// TODO Auto-generated method stub
		Log.d("MainActivity", "onClick(View v)!");
		if(v.getId()==R.id.send_request){
			sendRequestWithHttpURLConnection();

		}

	}


	private void sendRequestWithHttpURLConnection(){
		//开启线程来发起网络请求
		new Thread(new Runnable(){

			@Override
			public void run() {
				// TODO Auto-generated method stub
				HttpURLConnection connection=null;

				try {
					URL url=new URL("http://www.baidu.com");
					connection =(HttpURLConnection) url.openConnection();
					connection.setRequestMethod("GET");
					connection.setConnectTimeout(8000);
					connection.setReadTimeout(8000);
					InputStream in=connection.getInputStream();
					//下面对获取到的输入流进行读取
					BufferedReader reader=new BufferedReader(new InputStreamReader(in));
					StringBuilder response=new StringBuilder();
					String line;
					while((line=reader.readLine())!=null){
						response.append(line);
					}
					Message message=new Message();
					message.what=SHOW_RESPONSE;
					//将服务器返回的结果存放到Message中
					message.obj=response.toString();
					handler.sendMessage(message);


				} catch (MalformedURLException e) {
					// TODO Auto-generated catch block
					e.printStackTrace();
				}catch(Exception e){
					e.printStackTrace();
				}finally{
					if(connection!=null){
						connection.disconnect();
					}
				}
			}

		}).start();


	}


}
在send request按钮的点击事件里调用了sendRequestWithHttpURLConnection()方法,,在这个方法中先是开启了一个子线程,然后在子线程里使用 HttpURLConnection发出一条HTTP请求,请求的目标地址就是百度的首页。接着利用BufferedReader对服务器返回的流进行读取,并将结果存放到了一个Message对象中。这里为什么要使用Message对象呢?当然是因为子线程中无法对ui进行操作了。我们希望可以将服务器返回的内容显示到界面上所以就创建了一个Message对象,并使用Handler将它发送出去。之后又在Handler的handMessage()方法中对这条Message进行处理,最终取出结果并设置到TextView上。
在开始运行之前,还需要声明一下网络权限。修改AndroidManifest.xml中的代码,如下所示:
<?xml version="1.0" encoding="utf-8"?>
<manifest xmlns:android="http://schemas.android.com/apk/res/android"
    package="com.jack.networktest"
    android:versionCode="1"
    android:versionName="1.0" >

    <uses-permission android:name="android.permission.INTERNET"/>


    <uses-sdk
        android:minSdkVersion="13"
        android:targetSdkVersion="17" />

    <application
        android:allowBackup="true"
        android:icon="@drawable/ic_launcher"
        android:label="@string/app_name"
        android:theme="@style/AppTheme" >
        <activity
            android:name="com.jack.networktest.MainActivity"
            android:label="@string/app_name" >
            <intent-filter>
                <action android:name="android.intent.action.MAIN" />

                <category android:name="android.intent.category.LAUNCHER" />
            </intent-filter>
        </activity>
    </application>

</manifest>
运行下程序,点击send request按钮,结果如下所示:
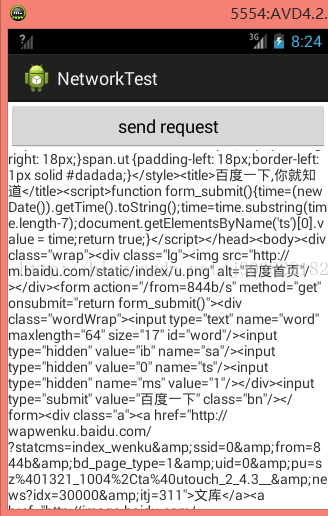
服务器返回给我们的就是这种HTML代码,只是通常情况下浏览器都会将这些代码解析成漂亮的网页后再展示出来。
如果想要提交数据给服务器,只需要将HTTP请求的方法改成POST,并在获取输入流之前把 要提交的数据写出来即可。注意每条数据都要以键值对的形式存在,数据与数据之间用&符号隔开,比如说我们想要向服务器提交用户名和密码,就可以这样写:
connection.setRequestMethod("POST");
DataOutputStream out=new DataOutputStream(connection.getOutputStream());
out.writeBytes("username=admin&password=123456");
以上就是HttpURLConnection的基本用法了,下面继续讲解另外一个方法。
使用HttpClient
<span style="font-size:18px;">    HttpClient是Apache提供的HTTP网络访问接口,从一开始的时候就被引入到android的api中。它可以
 完成和HttpURLConnection几乎一模一样的效果,但两者的之间的用法却有较大的差别,下面我们看看HttpClient的用法。
    首先我们要知道,HttpClient是一个接口,因此无法创建它的实例,通常情况下都会创建一个DefaultHttpClient的实例,如下所示:
HttpClient httpClient=new DefaultHttpClient();
接下来如果想要发起一条GET请求,就可以创建一个HttpGet对象,并传入目标的网络地址,然后调用HttpClient的execute()方法即可:
HttpGet httpGet=new HttpGet("http://www.baidu.com");
httpClient.execute(httpGet);
如果是发起一条POST请求会比GET稍复杂一点,我们需要创建一个HttpPost对象,并传入目标网络地址,如下所示:
HttpPost httpPost=new HttpPost("http://www.baidu.com");
  然后通过一个NameValuePair集合来存放待提交的参数,并将这个参数集合传入到一个UrlEncodedFormEntity中,然后
  调用HttpPost的setEntity()方法将构建好的UrlEncodedFormEntity传入,如下所示:
  List<NameValuePair> params=new ArrayList<NameValuePair>();
  params.add(new BasicNameValuePair("username","jack"));
  params.add(new BasicNameValuePair("password","123456"));
  UrlEncodedFormEntity entity=new UrlEncodedFormEntity(params,"utf-8");
  httpPost.setEntity(entity);
  接下来的操作就和HttpGet一样了,调用HttpClient的execute()方法,并将HttpPost对象传入即可:
  httpClient.execute(httpPost);
  执行execute()方法之后会返回一个HttpResponse对象,服务器所返回的所有信息就会包含在这里面。通常情况下我们都会先取出服务器返回的状态
  码,如果等于200就说明请求和响应都成功了,如下所示:
  if(httpResponse.getStatusCode()==200){

     //请求和响应都成功了
  }
  接下来在这个if判断的内部取出服务返回的具体内容,可以调用getEntity()方法获取到一个HttpEntity实例,然后再用
  EntityUtils.toString()这个静态方法将HttpEntity转化成字符串即可,如下所示:
  HttpEntity entity=httpResponse.getEntity();
  String response=EntityUtils.toString(entity);
  注意如果服务器返回的数据是带中文的,直接调用EntityUtils.toString()方法进行转换会有乱码的情况出现,这个时候
  只需要在转换的时候将字符集指定成utf-8就可以了,如下所示:
  String response=EntityUtils.toString(entity,"utf-8");</span>
HttpClient是Apache提供的HTTP网络访问接口,从一开始的时候就被引入到android的api中。它可以
完成和HttpURLConnection几乎一模一样的效果,但两者的之间的用法却有较大的差别,下面我们看看HttpClient的用法。
首先我们要知道,HttpClient是一个接口,因此无法创建它的实例,通常情况下都会创建一个DefaultHttpClient的实例,如下所示:
HttpClient httpClient=new DefaultHttpClient();
接下来如果想要发起一条GET请求,就可以创建一个HttpGet对象,并传入目标的网络地址,然后调用HttpClient的execute()方法即可:
HttpGet httpGet=new HttpGet("http://www.baidu.com");
httpClient.execute(httpGet);
如果是发起一条POST请求会比GET稍复杂一点,我们需要创建一个HttpPost对象,并传入目标网络地址,如下所示:
HttpPost httpPost=new HttpPost("http://www.baidu.com");
然后通过一个NameValuePair集合来存放待提交的参数,并将这个参数集合传入到一个UrlEncodedFormEntity中,然后
调用HttpPost的setEntity()方法将构建好的UrlEncodedFormEntity传入,如下所示:
List<NameValuePair> params=new ArrayList<NameValuePair>();
params.add(new BasicNameValuePair("username","jack"));
params.add(new BasicNameValuePair("password","123456"));
UrlEncodedFormEntity entity=new UrlEncodedFormEntity(params,"utf-8");
httpPost.setEntity(entity);
接下来的操作就和HttpGet一样了,调用HttpClient的execute()方法,并将HttpPost对象传入即可:
httpClient.execute(httpPost);
执行execute()方法之后会返回一个HttpResponse对象,服务器所返回的所有信息就会包含在这里面。通常情况下我们都会先取出服务器返回的状态
码,如果等于200就说明请求和响应都成功了,如下所示:
if(httpResponse.getStatusCode()==200){
//请求和响应都成功了
}
接下来在这个if判断的内部取出服务返回的具体内容,可以调用getEntity()方法获取到一个HttpEntity实例,然后再用
EntityUtils.toString()这个静态方法将HttpEntity转化成字符串即可,如下所示:
HttpEntity entity=httpResponse.getEntity();
String response=EntityUtils.toString(entity);
注意如果服务器返回的数据是带中文的,直接调用EntityUtils.toString()方法进行转换会有乱码的情况出现,这个时候
只需要在转换的时候将字符集指定成utf-8就可以了,如下所示:
String response=EntityUtils.toString(entity,"utf-8");
接下来把NetworkTest这个项目改用HttpClient的方式再来实现一遍。
布局部分完全不用改动,所以现在直接修改MainActivity中的代码,如下所示:
package com.jack.networktest;
import java.io.BufferedReader;
import java.io.IOException;
import java.io.InputStream;
import java.io.InputStreamReader;
import java.net.HttpURLConnection;
import java.net.MalformedURLException;
import java.net.URL;

import org.apache.http.HttpEntity;
import org.apache.http.HttpHost;
import org.apache.http.HttpRequest;
import org.apache.http.HttpResponse;
import org.apache.http.client.ClientProtocolException;
import org.apache.http.client.HttpClient;
import org.apache.http.client.ResponseHandler;
import org.apache.http.client.methods.HttpGet;
import org.apache.http.client.methods.HttpUriRequest;
import org.apache.http.conn.ClientConnectionManager;
import org.apache.http.impl.client.DefaultHttpClient;
import org.apache.http.params.HttpParams;
import org.apache.http.protocol.HttpContext;
import org.apache.http.util.EntityUtils;

import android.annotation.SuppressLint;
import android.app.Activity;
import android.os.Bundle;
import android.os.Handler;
import android.os.Message;
import android.util.Log;
import android.view.Menu;
import android.view.View;
import android.view.View.OnClickListener;
import android.widget.Button;
import android.widget.TextView;

public class MainActivity extends Activity implements OnClickListener{

	public static final int SHOW_RESPONSE=0;
	private Button sendRequest=null;
	private TextView responseText=null;

	private Handler handler=new Handler(){

		@Override
		public void handleMessage(Message msg) {
			// TODO Auto-generated method stub
			super.handleMessage(msg);
			switch(msg.what){
			case SHOW_RESPONSE:
				String response=(String) msg.obj;
				//在这里进行UI操作,将结果显示到界面上
				responseText.setText(response);
				break;
			default:
				break;
			}

		}

	};


	@Override
	protected void onCreate(Bundle savedInstanceState) {
		super.onCreate(savedInstanceState);
		setContentView(R.layout.activity_main);
		sendRequest=(Button) findViewById(R.id.send_request);
		responseText=(TextView) findViewById(R.id.response_text);
		sendRequest.setOnClickListener(this);

	}

	@Override
	public boolean onCreateOptionsMenu(Menu menu) {
		// Inflate the menu; this adds items to the action bar if it is present.
		getMenuInflater().inflate(R.menu.main, menu);
		return true;
	}

	@Override
	public void onClick(View v) {
		// TODO Auto-generated method stub
		Log.d("MainActivity", "onClick(View v)!");
		if(v.getId()==R.id.send_request){
			//sendRequestWithHttpURLConnection();
			sendRequestWithHttpClient();
		}

	}


	private void sendRequestWithHttpURLConnection(){
		//开启线程来发起网络请求
		new Thread(new Runnable(){

			@Override
			public void run() {
				// TODO Auto-generated method stub
				HttpURLConnection connection=null;

				try {
					URL url=new URL("http://www.baidu.com");
					connection =(HttpURLConnection) url.openConnection();
					connection.setRequestMethod("GET");
					connection.setConnectTimeout(8000);
					connection.setReadTimeout(8000);
					InputStream in=connection.getInputStream();
					//下面对获取到的输入流进行读取
					BufferedReader reader=new BufferedReader(new InputStreamReader(in));
					StringBuilder response=new StringBuilder();
					String line;
					while((line=reader.readLine())!=null){
						response.append(line);
					}
					Message message=new Message();
					message.what=SHOW_RESPONSE;
					//将服务器返回的结果存放到Message中
					message.obj=response.toString();
					handler.sendMessage(message);


				} catch (MalformedURLException e) {
					// TODO Auto-generated catch block
					e.printStackTrace();
				}catch(Exception e){
					e.printStackTrace();
				}finally{
					if(connection!=null){
						connection.disconnect();
					}
				}
			}

		}).start();


	}


	private void sendRequestWithHttpClient(){
		new Thread(new Runnable(){

			@Override
			public void run() {
				// TODO Auto-generated method stub
				try{
					HttpClient httpClient=new DefaultHttpClient() ;
					HttpGet httpGet=new HttpGet("http://www.baidu.com");
					HttpResponse httpResponse=httpClient.execute(httpGet);
					if(httpResponse.getStatusLine().getStatusCode()==200){
						//请求和响应都成功了
						HttpEntity entity=httpResponse.getEntity();
						String response=EntityUtils.toString(entity,"utf-8");
						Message message=new Message();
						message.what=SHOW_RESPONSE;
						//将服务器返回的结果存放到Message中
						message.obj=response.toString();
						handler.sendMessage(message);
					}
				}catch(Exception e){
					e.printStackTrace();
				}
			}

		}).start();

	}


}
上面的代码只是添加了一个sendRequestWithHttpClient()方法,并在send request按钮的点击事件里去调用这个方法。在这个方法中同样还是先开启一个子线程,然后在子线程里使用HttpClient发出一条HTTP请求,请求的目标地址还是百度的首页。然后将服务器返回的数据存放到Message对象中,并用Handler将Message发送出去。
现在重新运行程序,点击send request按钮,你会发现和上面的结果一样,由此证明,使用HttpClient来发送Http请求的功能也已经实现了。
经过上面的练习,应该把HttpURLConnection 和 HttpClient的基本用法掌握的差不多了。
http://blog.csdn.net/j903829182/article/details/42440155


 878
878


 被折叠的 条评论
为什么被折叠?
被折叠的 条评论
为什么被折叠?
 到【灌水乐园】发言


