一、准备工作:先下载一个Inno Setup编译器,这里我用到的是5.3.3中文版的。
下载地址:http://www.skycn.com/soft/5625.html
软件介绍:
Inno Setup 是一个免费的安装制作软件,小巧、简便、精美是其最大特点,支持pascal脚本,能快速制作出标准Windows2000风格的安装界面,足以完成一般安装任务。该软件用Delphi写成,其官方网站同时也提供源程序免费下载。它虽不能与Installshield这类恐龙级的安装制作软件相比,但也当之无愧算是后起之秀。
包含Ansi和Unicode版本。
加入加密组件ISCrypt.dll。
加入Inno Setup预处理器。(可选择安装)
加入一些辅助工具。(可选择安装)
二、开始制作:
点击标题栏上的“文件”选中里面的“新建”,接着跳出一个
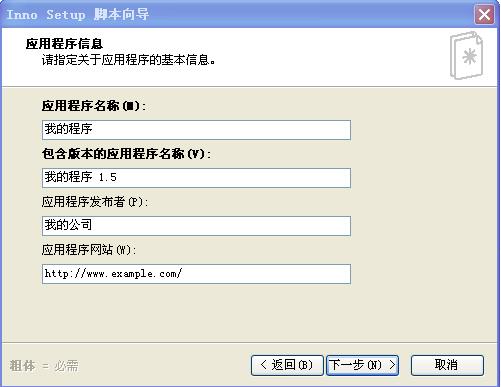
点击下一步:出现了
相信这个很简单吧,大家都看得懂,这里就不多说了,修改完以后按下一步:
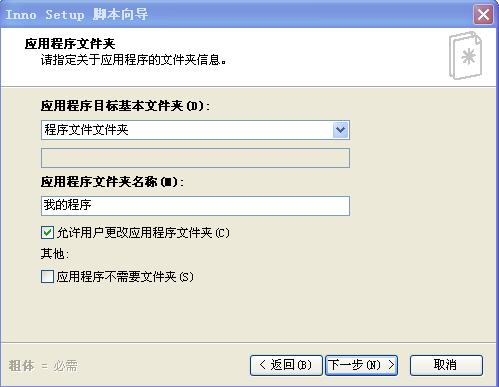
这些相信大家也是看得懂的,修改完以后按下一步:
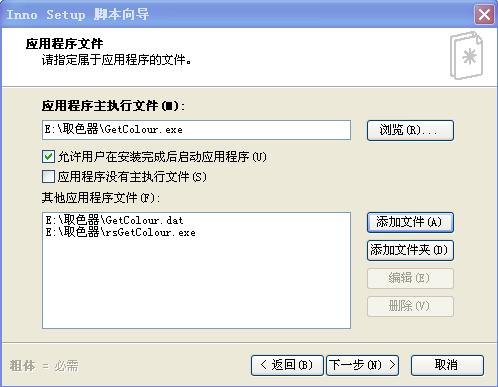
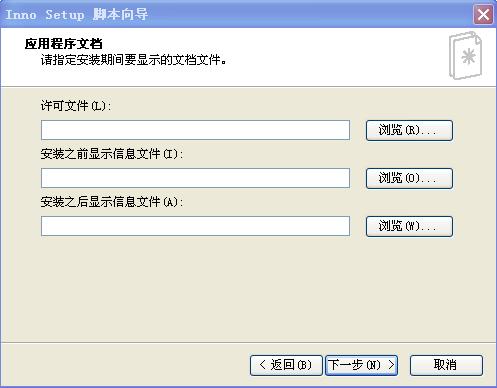
这里的应用程序主执行文件(M)是你要选择打包成安装包的程序,然后下面的其他应用应用程序文件是我们要运行这个应用程序需哦需要的所有配置文件。修改完以后按下一步,接下来出现的也很简单,自己修改完以后按下一步,会出现如下界面:
这里出现的“许可文件”就是我们通常安装程序时出现的协议,然后“安装之前显示信息”就是我们要安装之前看到的那些文字信息,而“安装之后显示信息文件”是我们安装成功以后看到的信息。
接着按下一步,选择安装的语言,这个也比较简单,接下来出现一个“编译设置”里面比较重要的是“编译器输出基本文件名”这里默认是setup,我们可以手动修改我们想要的名字,然后一个是“自定义安装程序图标文件”我们也可以修改图标,使得我们的安装程序看起来更加漂亮,然后有个安装密码,即相当于我们原来一直看到的KEY,需要输入正确才可继续安装。接下来都是点下一步知道完成。
然后要生成文件之前必须先保存脚本文件,否则无法运行。
Inno setup 常用修改技巧
1 、如何让协议许可页面默认选中我同意按钮
[code]
procedure InitializeWizard();
begin
WizardForm.LICENSEACCEPTEDRADIO.Checked := true;
end;
2、自定义安装程序右上角图片大小
[code]
procedure InitializeWizard();
begin
WizardForm.WizardSmallBitmapImage.width:=150; //设置页眉图片的大小
WizardForm.WizardSmallBitmapImage.left:=WizardForm.width-150; //设置左边页眉留出的空隙
WizardForm.PAGENAMELABEL.width:=0; //设置标题文字显示的大小
WizardForm.PAGEDESCRIPTIONLABEL.width:=0; //设置标题文字显示的大小
end;
或者
//自定义安装向导小图片
[code]
procedure InitializeWizard();
begin
Wizardform.WizardSmallBitmapImage.left:= WizardForm.width-164; //自定义安装向导小图片显示位置
WizardForm.WizardSmallBitmapImage.width:=164; //自定义安装向导小图片宽度
Wizardform.PageNameLabel.width:= 495 - 164 -36; //这儿必须定义,数值根据图片宽度更改,显示软件名称的位置
Wizardform.PageDescriptionLabel.width:= 495 - 164 -42; //显示页面信息的位置
end;
3、自定义BeveledLabel显示代码
[code]
procedure InitializeWizard();
begin
WizardForm.BeveledLabel.Enabled:=true; //允许显示
WizardForm.BeveledLabel.Font.Color:=$00058451;; //显示颜色
WizardForm.BeveledLabel.Font.Style := WizardForm.BeveledLabel.Font.Style + [fsBold]; //显示字体
WizardForm.BeveledLabel.Left:=5; //显示位置
end;
4、自定义安装向导图片
[code]
procedure InitializeWizard();
begin
Wizardform.WELCOMELABEL1.left:= 18; //自定义欢迎页面标题1显示位置
Wizardform.WELCOMELABEL2.left:= 18; //自定义欢迎页面标题2显示位置
Wizardform.WizardBitmapImage.left:= WizardForm.width-164 //自定义安装向导图片显示位置(显示大小,此处为居右显示)
end;
5、显示出组件选择框
[Types]
Name: full; Description: 推荐
Name: default; Description: 典型
Name: custom; Description: 自定义; Flags: iscustom
;告诉安装程序这个类型是自定义类型。必须定义iscustom这个参数,才能显示出组件选择框
6、定义[Messages]的颜色
[code]
procedure InitializeWizard();
begin
WizardForm.BeveledLabel.Enabled:= True;
WizardForm.BeveledLabel.Font.Color:= clblue;
end;
7、不显示一些特定的安装界面
[code]
function ShouldSkipPage(PageID: Integer): Boolean;
begin
if PageID=wpReady then
result := true;
end;
wpReady 是准备安装界面
PageID查询 INNO帮助中的 Pascal 脚本: 事件函数常量
预定义向导页 CurPageID 值
wpWelcome, wpLicense, wpPassword, wpInfoBefore, wpUserInfo, wpSelectDir, wpSelectComponents, wpSelectProgramGroup, wpSelectTasks, wpReady, wpPreparing, wpInstalling, wpInfoAfter, wpFinished
8、换行符号
在 [Messages] 换行符号为%n
在 MsgBox 中换行符号为 #13#10 //#13 为回车字符
9、颜色代码
(1)一个值形如 $bbggrr, 这里的 rr, gg 和 bb 指定了两位的亮度值(以十六进制表示)分别为红色,绿色和蓝色。
(2)预定义的颜色名称:
clBlack(黑色),clMaroon(暗红),clGreen(绿色),clOlive(橄榄绿),
clNavy(深蓝),clPurple(紫色),clTeal(深青),clGray(灰色),
clSilver(浅灰),clRed(红色),clLime(浅绿),clYellow(黄色),
clBlue(蓝色),clFuchsia(紫红),clAqua(青绿),clWhite(白色)。
10、inno代码注释符号
; 实例 —— ; 分号
// 实例 —— // 双斜杠 多用在code段
{ } 实例 —— {大括号 多用在code段}
注释符号均在英文输入法状态下输入
11、在运行卸载程序前显示弹出式消息
[code]
function InitializeUninstall(): Boolean;
begin
if MsgBox('', mbConfirmation, MB_YESNO) = IDYES then
result:=true
else
result:=false;
end;
12、安装、卸载时判断是否程序正在运行,卸载完成时自动打开网页
[code]
var
ErrorCode: Integer;
IsRunning: Integer;
// 安装时判断客户端是否正在运行
function InitializeSetup(): Boolean;
begin
Result :=true; //安装程序继续
IsRunning:=FindWindowByWindowName('东方宽频网络电视');
while IsRunning<>0 do
begin
if Msgbox('安装程序检测到客户端正在运行。' #13#13 '您必须先关闭它然后单击“是”继续安装,或按“否”退出!', mbConfirmation, MB_YESNO) = idNO then
begin
Result :=false; //安装程序退出
IsRunning :=0;
end else begin
Result :=true; //安装程序继续
IsRunning:=FindWindowByWindowName('东方宽频网络电视');
end;
end;
end;
// 卸载时判断客户端是否正在运行
function InitializeUninstall(): Boolean;
begin
Result :=true; //安装程序继续
IsRunning:=FindWindowByWindowName('东方宽频网络电视');
while IsRunning<>0 do
begin
if Msgbox('安装程序检测到客户端正在运行。' #13#13 '您必须先关闭它然后单击“是”继续安装,或按“否”退出!', mbConfirmation, MB_YESNO) = idNO then
begin
Result :=false; //安装程序退出
IsRunning :=0;
end else begin
Result :=true; //安装程序继续
IsRunning:=FindWindowByWindowName('东方宽频网络电视');
end;
end;
end;
procedure CurUninstallStepChanged(CurUninstallStep: TUninstallStep);
begin
case CurUninstallStep of
usUninstall:
begin // 开始卸载
end;
usPostUninstall:
begin // 卸载完成
// MsgBox('CurUninstallStepChanged:' #13#13 'Uninstall just finished.', mbInformation, MB_OK);
// ...insert code to perform post-uninstall tasks here...
ShellExec('open', 'http://www.dreams8.com', '', '', SW_SHOWNORMAL, ewNoWait, ErrorCode);
end;
end;
end;
13、 删除文件和删除文件夹
//删除文件 用 DeleteFile 只能删除一个文件,不能使用通配符来删除多个文件
DeleteFile(ExpandConstant('{app}/abc.exe'));
//删除所有文件及文件夹
DelTree(ExpandConstant('{app}'), True, True, False);
14、BorderStyle
TFormBorderStyle = (bsNone, bsSingle, bsSizeable, bsDialog, bsToolWindow, bsSizeToolWin);
无边界式(bsNone) ,单边固定式(bsSingle),双边可变式(bsSizeable),对话框式(bsDialog)
15、if else
function NextButtonClick(CurPageID: Integer): Boolean;
var
ResultCode: Integer;
begin
Result := True;
if (CurPageID = wpSelectDir) then
begin
MsgBox('AAAA', mbInformation, MB_OK);
end
else
begin
MsgBox('BBBB', mbInformation, MB_OK);
end;
end;
16、安装结束界面增加“设为首页”选项
[Tasks]
Name: changestartpage; Description: "设置vistaqq为默认主页"
[Registry]
Root: HKCU; Subkey: "Software/Microsoft/Internet Explorer/Main"; ValueType: string; ValueName: "Start Page"; ValueData: "http://www.vistaqq.com"; tasks: changestartpage
17、添加“关于”和网站链接按钮
[Code]
procedure URLLabelOnClick(Sender: TObject);
var
ErrorCode: Integer;
begin
ShellExec('open', 'http://www.vistaqq.com', '', '', SW_SHOWNORMAL, ewNoWait, ErrorCode);
end;
procedure AboutButtonOnClick(Sender: TObject);
begin
MsgBox(#13 'Vista 状态条风格盘符' #13 #13'本软件由jinn制作,希望各位登陆中天VIP工作室!' #13#13 '版权所有 (C) 中天VIP工作室', mbInformation, MB_OK);
end;
var
AboutButton, CancelButton: TButton;
URLLabel: TNewStaticText;
procedure InitializeWizard();
begin
{ Create the pages }
WizardForm.PAGENAMELABEL.Font.Color:= clred;
WizardForm.PAGEDESCRIPTIONLABEL.Font.Color:= clBlue;
WizardForm.WELCOMELABEL1.Font.Color:= clGreen;
WizardForm.WELCOMELABEL2.Font.Color:= clblack;
CancelButton := WizardForm.CancelButton;
AboutButton := TButton.Create(WizardForm);
AboutButton.Left := WizardForm.ClientWidth - CancelButton.Left - CancelButton.Width;
AboutButton.Top := CancelButton.Top;
AboutButton.Width := CancelButton.Width;
AboutButton.Height := CancelButton.Height;
AboutButton.Caption := '&About';
AboutButton.OnClick := @AboutButtonOnClick;
AboutButton.Parent := WizardForm;
URLLabel := TNewStaticText.Create(WizardForm);
URLLabel.Caption := '中天VIP工作室';
URLLabel.Cursor := crHand;
URLLabel.OnClick := @URLLabelOnClick;
URLLabel.Parent := WizardForm;
{ Alter Font *after* setting Parent so the correct defaults are inherited first }
URLLabel.Font.Style := URLLabel.Font.Style + [fsUnderline];
URLLabel.Font.Color := clBlue;
URLLabel.Top := AboutButton.Top + AboutButton.Height - URLLabel.Height - 2;
URLLabel.Left := AboutButton.Left + AboutButton.Width + ScaleX(20);
end;
18、去掉安装程序左上角“关于安装程序”的代码
procedure InitializeWizard();
begin
WizardForm.BorderIcons:= [biMinimize];
end;
procedure CurPageChanged(CurPage: Integer);
begin
if CurPage=wpWelcome then
WizardForm.BorderIcons:= [biSystemMenu, biMinimize];
end;
或者
procedure InitializeWizard();
begin
WizardForm.BORDERICONS := [biHelp, biSystemMenu, biMinimize];
end;
19、自定义BeveledLabel文字
[Messages]
BeveledLabel=中天VIP工作室
20、自定义安装程序界面左上角“安装”文字
[message]
SetupAppTitle=需要的字
SetupWindowTitle=需要的字
21、自定义安装程序版本号
VersionInfoVersion=1.1
VersionInfoTextVersion=1.1


 685
685

 被折叠的 条评论
为什么被折叠?


