


1、Cookie是什么,这里不再详述。只介绍如何使用。
——我们知道请求如果满足条件是会带着Cookie的,所以我们获取Cookie是用request。我们设置Cookie是用response。
    public void doGet(HttpServletRequest request, HttpServletResponse response)
            throws ServletException, IOException {
        // 设置字符
        response.setContentType("text/html;charset=UTF-8");
        // 获得字符输出流
        PrintWriter out = response.getWriter();
        // 获取Cookies
        Cookie[] cookies = request.getCookies();

        for(int i=0;cookies!=null&&i<cookies.length;i++){
            if("lastAccessTime".equals(cookies[i].getName())){
                // 输出,结果是:1473730890611到毫秒级别
                // out.print(cookies[i].getValue());

                // 输出,结果是:Tue Sep 13 09:42:31 CST 2016
                long d=Long.parseLong(cookies[i].getValue());
                // out.print(new Date(d));

                // 输出,结果是:2016-9-13 9:43:09
                out.print(new Date(d).toLocaleString());
            }
        }

        // 创建Cookie,不创建的话,上面那个一直就没有输出结果
        Cookie ck=new Cookie("lastAccessTime", System.currentTimeMillis()+"");
        response.addCookie(ck);
}——以上代码虽然创建了Cookie,但是这个Cookie只存活在缓存中,也就是说浏览器关闭的话,这个Cookie就销毁了。那是因为你没有设置Cookie的存活时间。是通过下面这个设置,单位是秒。这个测试过程是这样的,我先不写ck.setMaxAge(300);也就是说这个Cookie值存在缓存里,不会保存到本地磁盘上,然后我访问一下,查看Cookie里发现有个localhost的网站,里面有1个Cookie,就是我们设置的,但是此时我们关闭掉浏览器,然后重新再设置里查找Cookie,发现没有了,说明之前虽然我们在Cookie里看到,但是它只存在缓存中,浏览器关闭就被销毁了。
——然后,我们增加ck.setMaxAge(300);这一句,也就是设置5分钟。同样的步骤,我们先访问一下、看看是否有Cookie数据、然后关闭浏览器、重新打开浏览器在不访问的情况下直接查看Cookie,发现这个Cookie仍然在,说明浏览器关闭它不会被销毁,再看看那个时间,确实是5分钟。
Cookie ck=new Cookie("lastAccessTime",System.currentTimeMillis()+"");
ck.setMaxAge(300);
response.addCookie(ck);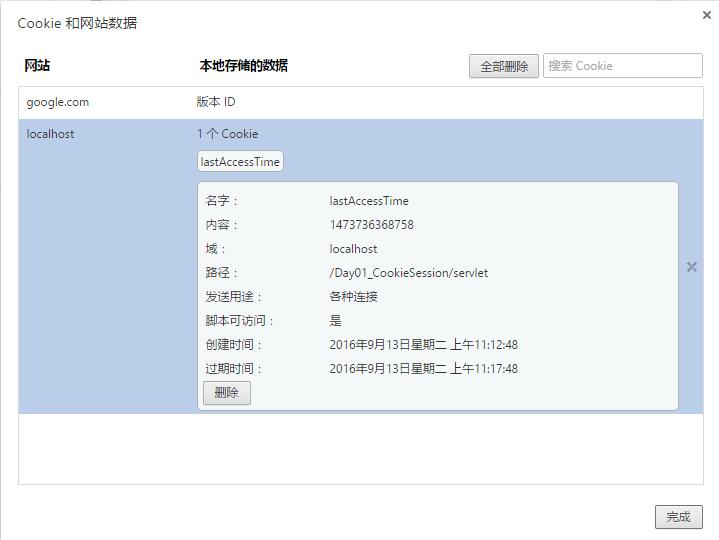
——这个设置时间也有不同的含义。负数表示只放在缓存里(默认采用这种方式缓存),0表示直接删除,正数表示存活多久。
——我们在Chrome浏览器下可以直观的看到每个网站有几个Cookie,这也是有限制的,一般一个域最多20个Cookie,整个浏览器貌似限制了300个,每个Cookie大小约在4K,但是每个浏览器是不同的,有的浏览器支持每个域可以存储50个Cookie。
——什么情况下请求才会带Cookie呢?这里就说到path了。从上图可以看出我们这个Cookie的路径(path)是:/Day01_CookieSession/servlet。那么如果其他的访问也是以这个Cookie的path开头的,就携带Cookie,如果不是以这个开头的就不携带。比如“localhost:8080/Day01_CookieSession/servlet/CookieDemo2”是以“/Day01_CookieSession/servlet”开头的,所以就携带这个Cookie,我们在CookieDemo2中就能通过request.getCookies得到里面的信息。
——那问题来了,如果我想整个应用下的访问都能携带呢?那就设置我们这个Cookie的path,把它设置的范围变大一些,比如下面这个都是把虚拟目录也就是应用根目录设置成Cookie的路径,那么以后访问“localhost:8080/Day01_CookieSession/aaa”时也能携带已有的Cookie了。
ck.setPath(request.getContextPath());
ck.setPath("/");
——删除Cookie,有很多种方法。需要特别注意的是路径一定要对,不然找不到那个Cookie就删不掉。我们在CookieDemo1里增加一个删除按钮,跳转到CookieDemo2里面处理。
out.print("<a href='"+request.getContextPath()+"/servlet/CookieDemo2'>删除<a/>");CookieDemo2里删除这个Cookie。
Cookie ck=new Cookie("lastAccessTime","");
ck.setPath("/");
ck.setMaxAge(0);
response.addCookie(ck);——需要注意的是,我们设置Cookie的路径path原则上是可以设置“http://www.baidu.com”的,然后我们访问百度的时候就会自动带着我们的Cookie,但一般浏览器都不行,因为浏览器中有个设置是“是否允许第三方Cookie”,一般是不允许的,但有的web浏览器有BUG除外。这也是为什么要有节制地使用Cookie,不仅仅是因为存储Cookie有数量限制,还因为处理Cookie的可选属性时会有一些问题。
- 可选属性就是path、生存时间等。
- cookie正常必须有的是name和value。其中name可以在不同的路径下重复使用,同一路径的话会覆盖掉。
2、记住用户名的例子。
——也就是判断一下,如果用户勾选了“记住用户名”,那么就把用户名放在Cookie里,下一次到登录界面的时候,用户名就自动填充在input表单中。同理,那个“记住用户名”是一个checkbox,如果上一次勾选了,下一次可以自动默认勾选上。
——在login中:
    public void doGet(HttpServletRequest request, HttpServletResponse response)
            throws ServletException, IOException {
        response.setContentType("text/html;charset=UTF-8");

        // 重点,判断Cookie里是否有,如果有就做处理
        String uname="";
        String checked="";
        Cookie[] cookies = request.getCookies();
        for(int i=0;cookies!=null&&i<cookies.length;i++){
            if("username".equals(cookies[i].getName())){
                uname=cookies[i].getValue();
                checked="checked='checked'";
            }
        }

        PrintWriter out = response.getWriter();
        out.write("<form method='post' action='"+request.getContextPath()+"/servlet/doLogin'>");
        out.write("用户名:<input name='username' type='text' value='"+uname+"' /><br/>");
        out.write("密码:<input name='password' type='text' /><br/>");
        out.write("<input name='remember' type='checkbox'"+checked+" />一天之内记住用户名<br/>");
        out.write("<input name='btn' type='submit' value='登录' />");
    }
——在doLogin中:
    public void doGet(HttpServletRequest request, HttpServletResponse response)
            throws ServletException, IOException {
        request.setCharacterEncoding("UTF-8");
        response.setContentType("text/html;charset=UTF-8");

        PrintWriter out = response.getWriter();
        String username=request.getParameter("username");
        String password=request.getParameter("password");
        String remember=request.getParameter("remember");

        Cookie ck=new Cookie("username",username);
        ck.setPath("/");
        if("andy".equals(username)&&"1234".equals(password)){
            if(remember!=null){
                ck.setMaxAge(24*60*60);
            }else{
                ck.setMaxAge(0);
            }
            out.write("登陆成功!");
        }else{
            ck.setMaxAge(0);
            out.write("登陆失败!");
            response.setHeader("refresh", "3;url="+request.getContextPath()+"/servlet/login");
        }
        response.addCookie(ck);
    }
3、再整一个浏览历史记录的例子。比如浏览的书籍。
——目录结构
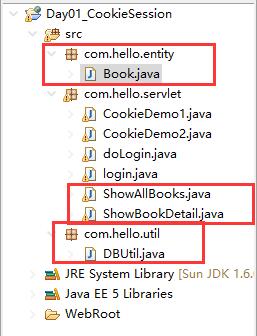
——Book类中就是几个属性和生成的方法。
——DBUtil类中就是初始化了一些数据。
package com.hello.util;

import java.util.HashMap;
import java.util.Map;

import com.hello.entity.Book;

public class DBUtil {
    private static Map<String,Book> books=new HashMap<String, Book>();

    static{
        books.put("1", new Book("1","Java书籍",20,"eric"));
        books.put("2", new Book("2","Python书籍",60,"tom"));
        books.put("3", new Book("3","PHP书籍",50,"andy"));
        books.put("4", new Book("4","C++书籍",40,"jerry"));
    }

    public static Map<String,Book> findAllBooks(){
        return books;
    }

    public static Book findBookById(String id){
        return books.get(id);
    }
}
——ShowAllBooks中,我们只需要获得在下面详细页面帮我们拼接完成的书id的字符串,然后拆分,根据不同的id找到对应的书即可:
public class ShowAllBooks extends HttpServlet {

    public void doGet(HttpServletRequest request, HttpServletResponse response)
            throws ServletException, IOException {

        response.setContentType("text/html;charset=UTF-8");

        PrintWriter out = response.getWriter();
        Map<String, Book> bs = DBUtil.findAllBooks();
        out.write("我们有下面这些书:<br/>");
        for (Map.Entry<String, Book> b : bs.entrySet()) {
            out.write("<a href='"+request.getContextPath()+"/servlet/ShowBookDetail?id="+b.getKey()+"'>"+b.getValue().getName()+"<a/><br/>");
        }
        out.write("<hr>");
        out.write("您的浏览历史:<br/>");

        // 取出Cookie里面的东西
        Cookie[] cookies = request.getCookies();
        for(int i=0;cookies!=null&&i<cookies.length;i++){
            if("historyBookId".equals(cookies[i].getName())){
                String targetId=cookies[i].getValue();
                String[] ids = targetId.split("-");
                for(int j=0;j<ids.length;j++){
                    Book b = DBUtil.findBookById(ids[j]);
                    out.print(b.getName()+"<br/>");
                }
            }
        }
    }
——ShowBookDetail中,我们存储多个id的办法是拼接成一个字符串,比如“1-3-2”等,所以我们在改变这个字符串之前,先把字符串转化成LinkedList,然后操作它增删,最后再把LinkedList转换成字符串:
public class ShowBookDetail extends HttpServlet {

    public void doGet(HttpServletRequest request, HttpServletResponse response)
            throws ServletException, IOException {
        response.setContentType("text/html;charset=UTF-8");

        PrintWriter out = response.getWriter();
        String id=request.getParameter("id");
        Book b = DBUtil.findBookById(id);
        // 字符输出流的print和write区别在于,print可以输出对象,而write只能输出String
        out.print(b);

        out.write("<hr>");
        out.write("您的浏览历史:<br/>");
        // 取出Cookie里面的东西
        Cookie[] cookies = request.getCookies();
        for(int i=0;cookies!=null&&i<cookies.length;i++){
            if("historyBookId".equals(cookies[i].getName())){
                String targetId=cookies[i].getValue();
                String[] ids = targetId.split("-");
                for(int j=0;j<ids.length;j++){
                    Book bk = DBUtil.findBookById(ids[j]);
                    out.print(bk.getName()+"<br/>");
                }
            }
        }

        //然后把这个装进Cookie里面
        Cookie ck=new Cookie("historyBookId", getHistoryId(id,request));
        ck.setPath("/");
        ck.setMaxAge(Integer.MAX_VALUE);
        response.addCookie(ck);
    }

    public String getHistoryId(String id,HttpServletRequest request){
        String targetId="";
        // 分析各种可能,生成最终的targetId
        Cookie[] cookies = request.getCookies();
        if(cookies==null){
            //说明什么Cookie都没有,那就返回崭新的id即可
            return id;
        }

        // 如果Cookie有值,那么久看看有没有historyBookId,有的话就取出来
        Cookie historyBook=null;
        for(int i=0;i<cookies.length;i++){
            if("historyBookId".equals(cookies[i].getName())){
                historyBook=cookies[i];
            }
        }

        // 判断historyBook是否存在,以下是不存在的情况
        if(historyBook==null){
            return id;
        }

        // 下面是存在的情况
        String originalId=historyBook.getValue();
        String[] ids = originalId.split("-");
        //LinkedList类型方便增删里面的id
        LinkedList<String> list=new LinkedList<String>(Arrays.asList(ids));
        if(list.size()>=3){
            // 一共存3个,如果>=3的话,那也就是删除最后一个
            if(list.contains(id)){
                list.remove(id);
            }else{
                list.removeLast();
            }
        }else{
            //还没满。那再判断是不是里面包含过这个页面的id,如果包含的话,删除掉,因为它要放在最前面了
            if(list.contains(id)){
                list.remove(id);
            }
        }
        // 不论如何,都会把最新的添加在第一个
        list.addFirst(id);

        // 再把这个list拼接成转换成String
        StringBuffer sb=new StringBuffer();
        for(int j=0;j<list.size();j++){
            if(j>0){
                sb.append("-");
            }
            sb.append(list.get(j));
        }
        return sb.toString();
    }
4、Session的实现原理,其实是借助了Cookie,也就是说我们设置一个Session的时候,它有一个SessionId,这个SessionId是存储在浏览器的Cookie中的,下一次用户再访问的时候,就带着这个SessionId去,服务器再判断这个SessionId是对应哪个Session,从而取得里面的值。
——它是基于用户浏览器的,也就是说我打开一个IE浏览器使用的Session,默认情况下,在另外打开的IE浏览器窗口里是使用不到的,是完全两个SessionId。
——购物车案例。利用之前的Book类和DBUtil。在SessionAllBooks:
public void doGet(HttpServletRequest request, HttpServletResponse response)
            throws ServletException, IOException {
        response.setContentType("text/html;charset=UTF-8");

        PrintWriter out = response.getWriter();
        out.write("点击下面图书,可以添加进购物车:");
        out.write("<br/>");

        Map<String, Book> books = DBUtil.findAllBooks();
        for(Map.Entry<String, Book> m:books.entrySet()){
            out.write("<a href='"+request.getContextPath()+"/servlet/SessionAddBook?id="+m.getKey()+"'>"+m.getValue().getName()+"<a/><br/>");
        }
        out.write("<hr>");
        out.write("<a href='"+request.getContextPath()+"/servlet/SessionCart'>查看购物车<a/>");
    }
——在SessionAddBook中:
public void doGet(HttpServletRequest request, HttpServletResponse response)
            throws ServletException, IOException {
        response.setContentType("text/html;charset=UTF-8");
        PrintWriter out = response.getWriter();
        out.write("已添加成功,2秒后跳转至首页!");

        String id=request.getParameter("id");

        HttpSession session = request.getSession();
        List<Book> list=(List<Book>)session.getAttribute("cart");
        if(list==null){
            list=new ArrayList<Book>();
        }
        list.add(DBUtil.findBookById(id));

        session.setAttribute("cart", list);

        response.setHeader("refresh", "2;url="+request.getContextPath()+"/servlet/SessionAllBooks");
    }
——在SessionCart中:
public void doGet(HttpServletRequest request, HttpServletResponse response)
            throws ServletException, IOException {
        response.setContentType("text/html;charset=UTF-8");

        PrintWriter out = response.getWriter();
        out.write("购物车的东西如下:");
        out.write("<hr>");
        HttpSession session = request.getSession();
        List<Book> list=(List<Book>) session.getAttribute("cart");
        if(list==null){
            out.write("您还没有添加任何东西啊!");
        }else{
            for(Book b:list){
                out.write(b.getName()+"<br/>");
            }
        }
}5、补充知识点:Session的失效用法。有一个叫invalidate的函数,一般在登出的时候,让储存用户信息的Session失效。或者通过setMaxInactiveInterval函数设置Session的生存时间(单位是秒),这个生存时间也可以通过web.xml来设置(单位是分钟):
    <session-config>
        <session-timeout>1</session-timeout>
    </session-config>
6、服务器在 1)内存溢出宕机;2)服务器重启的时候,会对内存中的Session进行钝化(或搁置),也就是把里面的所有对象进行序列化,然后存到磁盘里,这个地址就是如下:

——我们在关闭(不是直接断电)服务器的时候,会在以上路径产生以上文件,这个文件就是被序列化的Session。但是我们重启的时候发现Session里面并没有我们放进购物车的东西啊?为什么?
——问题就在错误提示信息里。其实我们每次关闭服务器的时候会发现有下面这样的错误提示:
警告: Cannot serialize session attribute cart for session 7C19614115F40623CB3BEFBEE1E2CF27
java.io.NotSerializableException: com.hello.entity.Book
——我们在开启服务器的时候,会出现下面这样的错误提示信息。
严重: Exception loading sessions from persistent storage
java.io.WriteAbortedException: writing aborted; java.io.NotSerializableException: com.hello.entity.Book
——这些提示信息,都指向一个类,就是Book,也就是说服务器想在关闭的时候帮我们序列化保存一下放进购物车里面的信息,但是这个里面放得是Book类,服务器没办法序列化,所以报错了。核心原因是我们的Book类没有实现序列化。我们只要添加一下实现接口即可。
import java.io.Serializable;

public class Book implements Serializable {
}
——这样的话,我们关闭开启服务器就不会有错误提示信息了,而且重启服务器之后,我们利用Session保存的购物车信息也能继续得到了。还有一个说明是,刚刚那个序列化错误并不影响其他的使用,只是在序列化的时候报个错,我们还注意到,关闭开启服务器的速度还慢了下来,就是因为要处理这个错误信息吧。
7、验证码可以结合Session来实现,即在生成验证码图片的时候,把验证码的code存在Session中,图片返回显示到前台。然后在验证的地方把存在Session里面的code拿出来和用户输入的进行比较即可,注意可以忽略大小写进行比较。
8、如果用户禁止了Cookie,怎么办?要么提示用户别禁止,要么自己重写全部的URL。重写**全部**URL,重写的方法是:
request.getSession();
String url="****";
String encodedURL=response.encodeURL(url);
// 然后在需要使用的地方使用即可,编码一下,就会自动带上我们所需的session了,但一定要先request.getSession()一下,不然也是没有session的
——这里面告诉我们一个重要的信息,就是每次请求都会带着Cookie,那这个Cookie是怎么上传过来的。答案就在url里面。正常情况下,我们在浏览器上看到的url是这样的:
http://localhost:8080/Day01_CookieSession/servlet/SessionAddBook?id=3但是实际上,携带着cookie的url是这样的:
http://localhost:8080/Day01_CookieSession/servlet/SessionAddBook;jsessionid=xxxxxxxxxxxxxxxxxxxxxxxxxxxxxxxx?id=3


 4876
4876

 被折叠的 条评论
为什么被折叠?
被折叠的 条评论
为什么被折叠?
 到【灌水乐园】发言


