


Hibernate之单表映射:
ORM 对象关系映射(java -> sql)
Hibernate是java领域的一款开源的orm框架技术,对JDBC进行了非常轻量级的封装。
Hibernate是java领域的一款开源的orm框架技术,对JDBC进行了非常轻量级的封装。
对于hibernate的使用,eclipse中需要进行升级配置相应比较麻烦,使用myeclipse之中已经支持了对hibernate的支持,所以这里使用myeclipse进行测试。
首先是在myeclipse中hibernate的具体操作:
1.新建一个java项目
2.window--》show View--》Other,展开Myeclipse Database选择DBBrowser打开数据库界面
3.新建数据库连接
Driver template:mysql
Driver name:自定义
URL:jdbc:mysql:///数据库名?useUnicode=true&characterEncoding=UTF-8
用户名,密码
Driver JARs:
Test Driver测试链接是否成功。
4.右键新建的项目,选择myeclipse--》project facets--》install hibernatefacet
之后选择hibernate的版本,尽量选择较高的版本。
创建一个核心配置文件xxx.cfg.xml(上面一项是保存的位置)
create sessionfactory class,自己选择一个包放入
DB Driver 选择之前创建好的
选择之后下面的信息会自动显示,然后下一步
选择一些jar包,完成
5.选择刚创建的DB driver,选择一个数据库的表格,然后右键hibernate reverseengineering,然后选择包,之后点击
完成,就会自动生成持久化类。
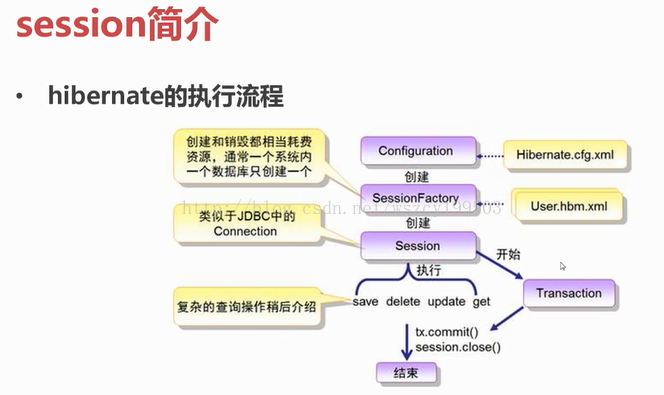
Session:
session可以看作是操作数据库的对象。
session与connection,是多对一关系,每个session都有一个与之对应的connection,一个connection不同时刻可以供多个session使用。
session与connection,是多对一关系,每个session都有一个与之对应的connection,一个connection不同时刻可以供多个session使用。
session的方法:
save(),update(),delete(),createQuery()
transaction简介
hibernate对数据的操作都是封装在事务中,并且默认是非自动提交的方式。所以用session保存对象时,如果不开启事务,并且手动提交,对象并不会真正保存在数据库中。
如果你想在hibernate像jdbc那样自动提交事务,必须调用session对象的doWork()方法,获得jdbc的connection后,设置其为自动提交事务模式。
hibernate对数据的操作都是封装在事务中,并且默认是非自动提交的方式。所以用session保存对象时,如果不开启事务,并且手动提交,对象并不会真正保存在数据库中。
如果你想在hibernate像jdbc那样自动提交事务,必须调用session对象的doWork()方法,获得jdbc的connection后,设置其为自动提交事务模式。
session详解:
如何获取session对象?
1,openSession
2,getCurrentSession
如果使用getCurrentsession需要在hibernate.cfg.xml文件中进行配置:
如果本地事务(jdbc事务)
《propertyname="hibernate.current_session_context_class"》thread《/property》
如果是全局事务(jta事务)
《propertyname="hibernate.current_session_context_class"》jta《/property》
opensession与getCurrentsession的区别:
getCurrentSession在提交事务或者回滚之后会自动关闭,而openSession需要你动手关闭,如果使用opensession而没有手动关闭,多次之后会导致连接池溢出。
opensession每次创建的都是新的session,getcurrentsession使用的都是现有的session对象。
getCurrentSession在提交事务或者回滚之后会自动关闭,而openSession需要你动手关闭,如果使用opensession而没有手动关闭,多次之后会导致连接池溢出。
opensession每次创建的都是新的session,getcurrentsession使用的都是现有的session对象。


public class SessionTest {
    private SessionFactory sessionfactory;
    private Session session;
    private Transaction transaction;

    @Before
    public void init() {
        //创建配置对象
        Configuration config = newConfiguration().configure();
        //创建服务注册对象
        ServiceRegistry serviceRegistry = newServiceRegistryBuilder().applySettings(config.getProperties()).buildServiceRegistry();
        //创建会话工厂对象
        sessionfactory = config.buildSessionFactory(serviceRegistry);
        session = sessionfactory.openSession();
        transaction = session.beginTransaction();
    }

    @After
    public void destory() {
        transaction.commit();
        session.close();
        sessionfactory.close();
    }

    @Test
    public void tstOpenSession() {
        Configuration config = newConfiguration().configure();//获得配置对象
        //获得服务注册对象
        ServiceRegistry ser = newServiceRegistryBuilder().applySettings(config.getProperties()).buildServiceRegistry();
        //获得sessionfactory对象
        SessionFactory sessionfactory = config.buildSessionFactory(ser);
        Session session = sessionfactory.openSession();
        Session session1 = sessionfactory.openSession();
        System.out.println(session == session1); //false

    }

    @Test
    public void testGetCurrentSession() {
        Configuration config = newConfiguration().configure();//获得配置对象
        //获得服务注册对象
        ServiceRegistry ser = newServiceRegistryBuilder().applySettings(config.getProperties()).buildServiceRegistry();
        //获得sessionfactory对象
        SessionFactory sessionfactory = config.buildSessionFactory(ser);
        Session session = sessionfactory.getCurrentSession();
        Session session1 = sessionfactory.getCurrentSession();
        System.out.println(session == session1); //true

    }

    @Test
    public voidtestSaveStudentsWithOpenSession() {
        Configuration config = newConfiguration().configure();//获得配置对象
        //获得服务注册对象
        ServiceRegistry ser = newServiceRegistryBuilder().applySettings(config.getProperties()).buildServiceRegistry();
        //获得sessionfactory对象
        SessionFactory sessionfactory = config.buildSessionFactory(ser);
        Session session1 = sessionfactory.openSession();
        //开启事务
        Transaction transaction = session1.beginTransaction();
        //生成一个学生对象
        StudentId s = newStudentId(125, "张三", "12456", 86, 87, 89);
        Student ss = new Student(s);
        session1.doWork(newWork() {
            @Override
            public voidexecute(Connection arg0) throws SQLException {
                System.out.println("connectionhassCode:" + arg0.hashCode());
            }
        });
        session1.save(ss);
        //session1.close();
        transaction.commit();
        Session session2 = sessionfactory.openSession();
        transaction = session2.beginTransaction();
        s = new StudentId(126, "张", "1246", 76, 77, 79);
        ss = new Student(s);
        session2.doWork(newWork() {
            @Override
            public voidexecute(Connection arg0) throws SQLException {
                System.out.println("connectionhassCode:" + arg0.hashCode());
            }
        });
        session2.save(ss);
        transaction.commit();
    }

    @Test
    public voidtestSaveStudentsWithGetCurrentSession() {
        Configuration config = newConfiguration().configure();//获得配置对象
        //获得服务注册对象
        ServiceRegistry ser = newServiceRegistryBuilder().applySettings(config.getProperties()).buildServiceRegistry();
        //获得sessionfactory对象
        SessionFactory sessionfactory = config.buildSessionFactory(ser);
        Session session1 = sessionfactory.getCurrentSession();
        //开启事务
        Transaction transaction = session1.beginTransaction();
        //生成一个学生对象
        StudentId s = newStudentId(125, "张三", "12456", 86, 87, 89);
        Student ss = new Student(s);
        session1.doWork(newWork() {
            @Override
            public voidexecute(Connection arg0) throws SQLException {
                System.out.println("connectionhassCode:" + arg0.hashCode());
            }
        });
        session1.save(ss);
        transaction.commit();
        Session session2 = sessionfactory.getCurrentSession();
        transaction = session2.beginTransaction();
        s = new StudentId(126, "张", "1246", 76, 77, 79);
        ss = new Student(s);
        session2.doWork(newWork() {
            @Override
            public voidexecute(Connection arg0) throws SQLException {
                System.out.println("connectionhassCode:" + arg0.hashCode());
            }
        });
        session2.save(ss);
        transaction.commit();
    }
}
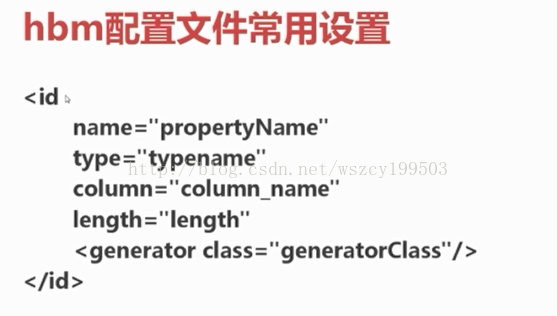
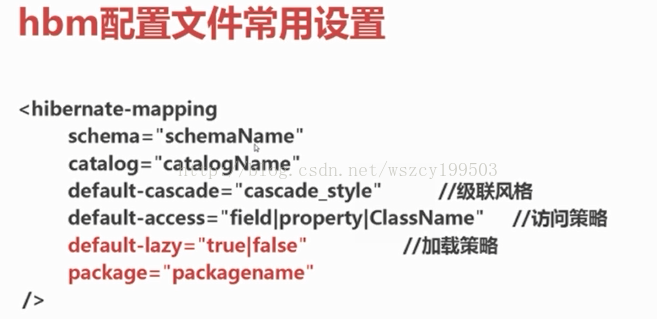
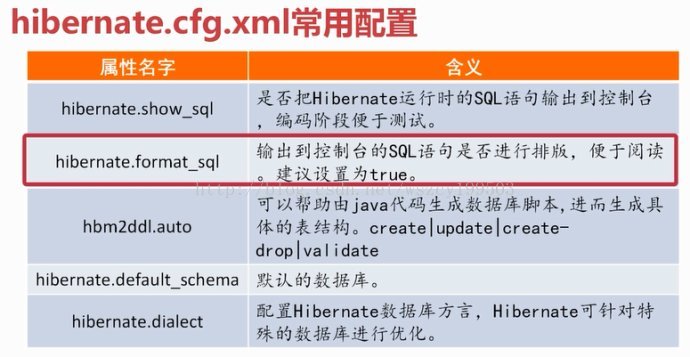
hbm配置文件常用设置:
generator class主键生成策略

单一主键:
assigned 有java应用程序负责生成(手动赋值)。
Student ss = new Student();
会出错,没有手动添加主键,需要手动保证主键不冲突。
native由底层数据库自动生成标示符,如果是mysql就是increment,如果是oracle就是sequence,等等。
assigned 有java应用程序负责生成(手动赋值)。
Student ss = new Student();
会出错,没有手动添加主键,需要手动保证主键不冲突。
native由底层数据库自动生成标示符,如果是mysql就是increment,如果是oracle就是sequence,等等。
<id name="id" type="java.lang.Integer">
   <column name="id" />
   <generator class="native" />
</id>
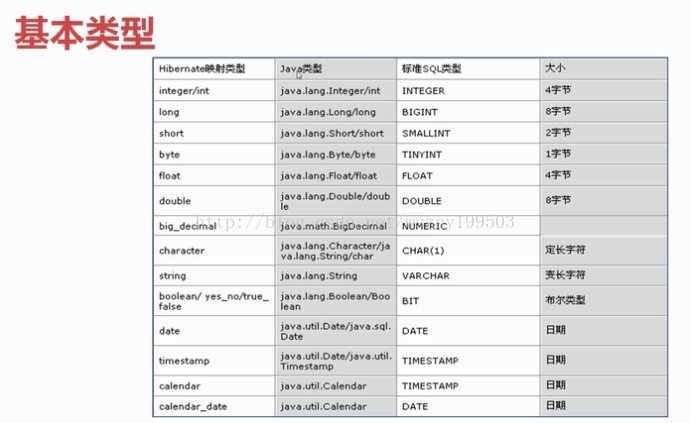
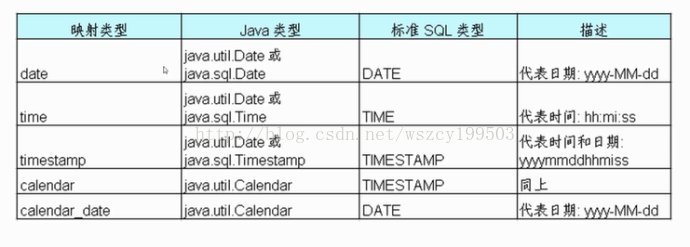
hibernate基本映射类型:
 hibernate对象类型:
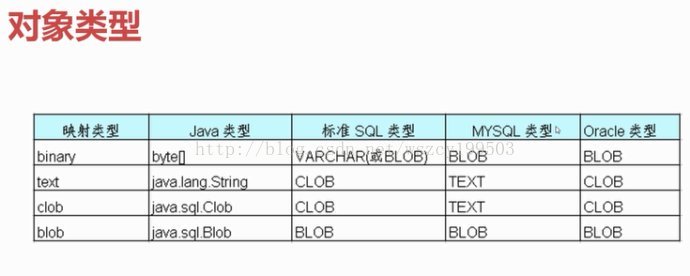
Mysql不支持标准sql的clob类型,在mysql中,用text,mediumtext及longtext类型来表示长度超过255的长文本数据。
hibernate组件属性:
实体类中的某些属性属于用户可以自定义的类的对象。
<component name="name"class="com.edu.Name">
        <property name="name"type="java.lang.String">
        <column name="NAME"></column>
        </property>
        <property name="nickname"type="java.lang.String">
        <column name="NICKNAME"></column>
        </property>
       </component>
单表CRUD操作实例:
@Test
 public void testGetStudents(){
  Student s =(Student)session.get(Student.class,1);
  System.out.println(s);
 }
 @Test
 public void testLoadStudents(){
  Student s =(Student)session.load(Student.class,1);
  System.out.println(s);
 }
 @Test
 public void testUpdateStudents(){
  Student s =(Student)session.get(Student.class,1);
  s.setMath(56);
  session.update(s);
 }
 @Test
 public void testDeleteStudents(){
  Student s =(Student)session.get(Student.class,1);
  session.delete(s);
 }
get,load,update,delete
get与load的区别:
在不考虑缓存情况下,get方法会在调用之后立即向数据库发送sql语句,返回持久化对象。
load方法会在调用后返回一个代理对象。
该代理对象只保存了实体对象的id,直到使用对象的非主键属性时才会发出sql语句。
查询数据库中不存在的数据时,get方法返回null;
load方法抛出异常org.hibernate.ObjectNotFoundException


 5613
5613


 被折叠的 条评论
为什么被折叠?
被折叠的 条评论
为什么被折叠?
 到【灌水乐园】发言


