


从零开发操作系统的目标是实现一个简化版本的基于x86架构处理器的操作系统,在实现的过程中,加载对操作系统原理的理解。以及熟悉开发软件功能的使用。
本次实验完成如下功能:
- 熟悉操作系统开发软件的使用,包括gcc,ld,qemu,dd等
- 完成基本操作系统的组织结构
- 熟悉实模式上电流程
操作系统开发软件
编译器:gcc
链接器:ld
仿真器:qemu
其他:objcopy,dd
上电流程介绍
计算机按下电源键后,软件(操作系统)的执行流程如下:
- 按下电源后, CPU的CS:IP指向内存地址为0xF000:0xFFF0, 即物理地址0xF000 << 4 + 0xFFF0 = 0xFFFF0的地方, CPU执行该地址处存储的指令。该指令的功能是跳转到BIOS的执行入口。
- CPU执行BIOS提供的基本功能。主要是进行硬件的初始化相关内容,同时从磁盘(软盘,硬盘,U盘等)读取第一个扇区的内容到内存起始地址0x7C00处,读取的大小是512字节。然后跳转到0x7C00处执行。
- 此时CPU处于实模式状态,也就是8086处理器执行的模式状态下,此处磁盘第一个扇区存储的是bootloader, 16bit模式的代码。本次实验在该booloader中只是简单实现了打印字符到屏幕上。
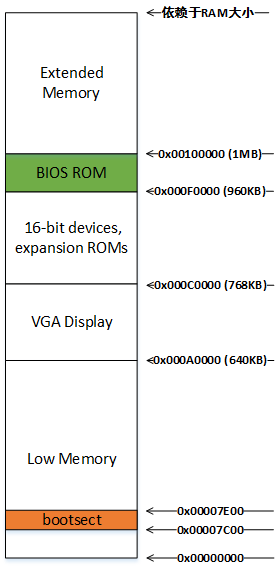
本实验代码执行完成后,内存布局如下图所示, RAM中的BIOS RAM和bootsect被使用。
因此,本次实验需要完成的功能就是在bootloader的代码中实现打印字符串的功能。
实模式下源码
使用 INT 10, 13 - Write String的BIOS 中断来实现字符串,

代码实现如下
#include <inc/boot.h>

.code16
.global start
start:
    xorw %ax, %ax
    movw %ax, %ds
    movw %ax, %es
    movw %ax, %fs
    movw %ax, %ss
    movw $BOOTSECT_ADDR, %sp

#####################################################
#   INT 10, 3 获取当前光标位置
#####################################################
    movb $3, %ah
    movb $0, %bh
    int $0x10

#####################################################
#   INT 10, 13 打印字符串
#       BP: 待打印字符串首地址
#       CX: 待打印字符串长度
#####################################################
    movw $boot_msg, %bp
    movw len, %cx

    movb $0x13, %ah
    movb $0x01, %al
    movb $0x00, %bh
    movb $0x02, %bl
    movb $0x0a, %dh     # row coordinate
    movb $0x18, %dl     # column coordinate

    int $0x10

1:
    jmp 1b

boot_msg:
    .asciz  "Boot Loading..."
len:
    .int    . - boot_msg

    .org    0x1fe, 0x90
    .word   0xaa55
boot.h文件中相关宏定义如下
#ifndef MYOS_BOOT_H
#define MYOS_BOOT_H

#define BOOTSECT_ADDR   0x7c00

#endif
编译
$ gcc -pipe -nostdinc -O1 -fno-builtin -I. -MD -fno-omit-frame-pointer -std=gnu99 -static -Wall -Wno-format -Wno-unused -Werror -gstabs -m32 -fno-tree-ch -fno-stack-protector -DJOS_KERNEL -gstabs -c -o boot.o boot.S链接
$ ld -m elf_i386 -N -e start -Ttext 0x7C00 -o boot.out boot.o生成原始二进制文件
$ objcopy -S -O binary -j .text boot.out boot写入软盘
 $ dd if=/dev/zero of=kernel.img~ count=10000 2>/dev/null

 $ dd if=boot of=kernel.img~ conv=notrunc 2>/dev/null

 $ mv kernel.img~ kernel.img
Makefile生成可执行文件
以上编译和链接等步骤,可以通过一个makefile文件搞定
CC	:= gcc -pipe
AS	:= as
AR	:= ar
LD	:= ld
DD  := dd
OBJCOPY	:= objcopy
OBJDUMP	:= objdump
NM	:= nm

CFLAGS := $(CFLAGS) $(DEFS) $(LABDEFS) -O1 -fno-builtin -I$(TOP) -MD
CFLAGS += -fno-omit-frame-pointer
CFLAGS += -std=gnu99
CFLAGS += -static
CFLAGS += -Wall -Wno-format -Wno-unused -Werror -gstabs -m32
# -fno-tree-ch prevented gcc from sometimes reordering read_ebp() before
# mon_backtrace()'s function prologue on gcc version: (Debian 4.7.2-5) 4.7.2
CFLAGS += -fno-tree-ch

# Add -fno-stack-protector if the option exists.
CFLAGS += $(shell $(CC) -fno-stack-protector -E -x c /dev/null >/dev/null 2>&1 && echo -fno-stack-protector)

# Common linker flags
LDFLAGS := -m elf_i386


# Make sure that 'all' is the first target
all: boot.img


boot.o: boot.s
	$(CC) -nostdinc $(CFLAGS) -c -o boot.o boot.S

boot: boot.o
	$(LD) $(LDFLAGS) -N -e start -Ttext 0x7C00 -o boot.out boot.o
	$(OBJDUMP) -S boot.out >boot.asm
	$(OBJCOPY) -S -O binary -j .text boot.out boot

boot.img: boot
	dd if=/dev/zero of=kernel.img~ count=10000 2>/dev/null
	dd if=boot of=kernel.img~ conv=notrunc 2>/dev/null
	mv kernel.img~ kernel.img

qemu:
	qemu-system-i386 -drive file=kernel.img

clean:
	rm -rf *.o *.img *.asm *.out boot
然后在当前源码目录下执行make命令即可
$ make执行启动软盘
$ qemu-system-i386 kernel.img
参考资料


 7129
7129


 被折叠的 条评论
为什么被折叠?
被折叠的 条评论
为什么被折叠?
 到【灌水乐园】发言


