


最近学习的时候,看见一份资料上教怎么写自定义控件,上面的示例用的是优酷早期版本的客户端,该客户端的菜单就是一个自定义的组件(现在的版本就不清楚有没有了,没下载过了),好吧,废话不多说,先上优酷的原型图。
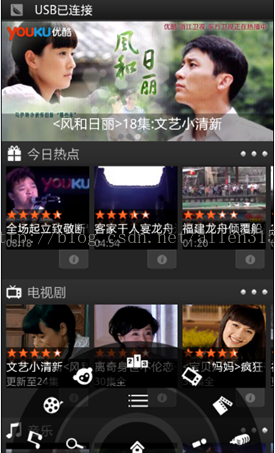
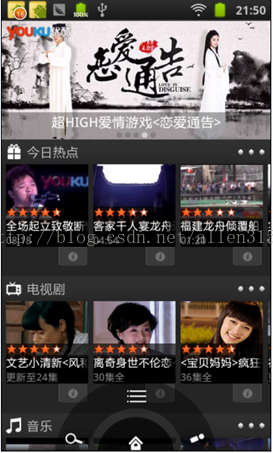
这个自定义组件感官上看是,里外三层设计,每一层上有布置不同的菜单按钮,每一层又设置了进入和退出的动画,来增强用户的体验效果。这种设计非常好,简洁美观,以下是我仿照优酷菜单自定义的一个组件,写的马马虎虎,仅作为参考。
1,首先,里外三层看似错乱,其实无外乎就是UI布局,并不高深。以下是布局文件:
- <RelativeLayout xmlns:android="http://schemas.android.com/apk/res/android"
- xmlns:tools="http://schemas.android.com/tools"
- android:layout_width="match_parent"
- android:layout_height="match_parent"
- tools:context=".MainActivity" >
- <RelativeLayout
- android:id="@+id/rl_level1"
- android:layout_width="100dip"
- android:layout_height="50dip"
- android:layout_alignParentBottom="true"
- android:layout_centerHorizontal="true"
- android:background="@drawable/level1" >
- <ImageButton
- android:id="@+id/ib_home"
- android:layout_width="wrap_content"
- android:layout_height="wrap_content"
- android:layout_centerInParent="true"
- android:background="@drawable/icon_home" />
- </RelativeLayout>
- <RelativeLayout
- android:id="@+id/rl_level2"
- android:layout_width="200dip"
- android:layout_height="100dip"
- android:layout_alignParentBottom="true"
- android:layout_centerHorizontal="true"
- android:background="@drawable/level2" >
- <ImageButton
- android:layout_width="wrap_content"
- android:layout_height="wrap_content"
- android:layout_alignParentBottom="true"
- android:layout_marginBottom="5dip"
- android:layout_marginLeft="10dip"
- android:background="@drawable/icon_search" />
- <ImageButton
- android:id="@+id/ib_menu"
- android:layout_width="wrap_content"
- android:layout_height="wrap_content"
- android:layout_centerHorizontal="true"
- android:layout_marginTop="10dip"
- android:background="@drawable/icon_menu" />
- <ImageButton
- android:layout_width="wrap_content"
- android:layout_height="wrap_content"
- android:layout_alignParentBottom="true"
- android:layout_alignParentRight="true"
- android:layout_marginBottom="5dip"
- android:layout_marginRight="10dip"
- android:background="@drawable/icon_myyouku" />
- </RelativeLayout>
- <RelativeLayout
- android:id="@+id/rl_level3"
- android:layout_width="320dip"
- android:layout_height="160dip"
- android:layout_alignParentBottom="true"
- android:layout_centerHorizontal="true"
- android:background="@drawable/level3" >
- <ImageButton
- android:id="@+id/ib_channel1"
- android:layout_width="wrap_content"
- android:layout_height="wrap_content"
- android:layout_alignParentBottom="true"
- android:layout_marginBottom="10dip"
- android:layout_marginLeft="15dip"
- android:background="@drawable/channel1" />
- <ImageButton
- android:id="@+id/ib_channel2"
- android:layout_width="wrap_content"
- android:layout_height="wrap_content"
- android:layout_above="@id/ib_channel1"
- android:layout_marginBottom="20dip"
- android:layout_marginLeft="40dip"
- android:background="@drawable/channel2" />
- <ImageButton
- android:layout_width="wrap_content"
- android:layout_height="wrap_content"
- android:layout_above="@id/ib_channel2"
- android:layout_marginBottom="15dip"
- android:layout_marginLeft="10dip"
- android:layout_toRightOf="@id/ib_channel2"
- android:background="@drawable/channel3" />
- <ImageButton
- android:layout_width="wrap_content"
- android:layout_height="wrap_content"
- android:layout_centerHorizontal="true"
- android:layout_marginTop="10dip"
- android:background="@drawable/channel4" />
- <ImageButton
- android:id="@+id/ib_channel7"
- android:layout_width="wrap_content"
- android:layout_height="wrap_content"
- android:layout_alignParentBottom="true"
- android:layout_alignParentRight="true"
- android:layout_marginBottom="10dip"
- android:layout_marginRight="15dip"
- android:background="@drawable/channel7" />
- <ImageButton
- android:id="@+id/ib_channel6"
- android:layout_width="wrap_content"
- android:layout_height="wrap_content"
- android:layout_above="@id/ib_channel7"
- android:layout_alignParentRight="true"
- android:layout_marginBottom="20dip"
- android:layout_marginRight="40dip"
- android:background="@drawable/channel6" />
- <ImageButton
- android:layout_width="wrap_content"
- android:layout_height="wrap_content"
- android:layout_above="@id/ib_channel6"
- android:layout_marginBottom="15dip"
- android:layout_marginRight="10dip"
- android:layout_toLeftOf="@id/ib_channel6"
- android:background="@drawable/channel5" />
- </RelativeLayout>
- </RelativeLayout>
布局后的UI效果见图:
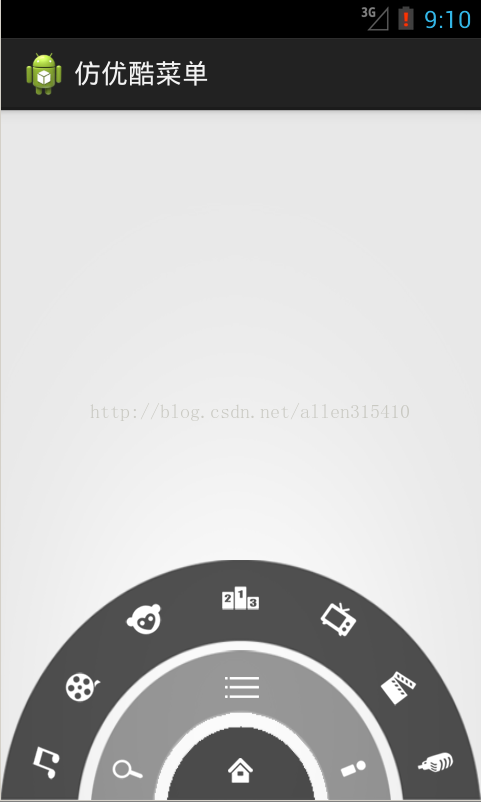
如上图所示的样子,布局完成了,接下来就是添加一些动态的效果了,效果描述是这样的:该菜单由内而外分别叫做“1级菜单”,“2级菜单”和“3级菜单”,1级菜单和2级菜单的中心位置的ImageButton用来控制整个菜单的动态效果。点击1级菜单时,若2级或者3级菜单处于显示状态,则隐藏2级和3级菜单,如果没有显示,则只显示出2级菜单。点击2级菜单的时候,只控制3级菜单的显示和隐藏。
这里所有的动态效果都是由自定义的旋转动画来实现,下面我们先完成这个自定义的旋转动画:
- package com.example.youkumenu;
- import android.view.animation.Animation;
- import android.view.animation.RotateAnimation;
- import android.widget.RelativeLayout;
- public class AnimationUtils {
- public static boolean isRunningAnimation = false; // 记录动画是否在执行
- /**
- * 旋转出去的动画
- *
- * @param layout
- * 执行动画的对象
- * @param startOffset
- * 延迟时间
- */
- public static void outRotateAnimation(RelativeLayout layout, long startOffset) {
- // 防止父控件中的子控件抢焦点能力强,而将子控件设置为不可用
- for (int i = 0; i < layout.getChildCount(); i++) {
- layout.getChildAt(i).setEnabled(false);
- }
- RotateAnimation ra = new RotateAnimation( //
- 0.0f, // 旋转开始的角度
- -180.0f, // 旋转结束的角度
- RotateAnimation.RELATIVE_TO_SELF, // 旋转坐标X轴的参照物
- 0.5f, // 相对于参照物X轴的百分比
- RotateAnimation.RELATIVE_TO_SELF, // 旋转坐标Y轴的参照物
- 1.0f // 相对于参照物Y轴的百分比
- );
- ra.setDuration(500);
- ra.setStartOffset(startOffset); // 动画延迟时间
- ra.setFillAfter(true);
- ra.setAnimationListener(new MyAnimationListener());
- layout.startAnimation(ra);
- }
- /**
- * 旋转进来的动画
- *
- * @param layout
- * 执行动画的对象
- */
- public static void inRotateAnimation(RelativeLayout layout) {
- // 进来的时候,将所有的子控件设置为可用
- for (int i = 0; i < layout.getChildCount(); i++) {
- layout.getChildAt(i).setEnabled(false);
- }
- RotateAnimation ra = new RotateAnimation( //
- -180.0f, // 旋转开始的角度
- 0.0f, // 旋转结束的角度
- RotateAnimation.RELATIVE_TO_SELF, // 旋转坐标X轴的参照物
- 0.5f, // 相对于参照物X轴的百分比
- RotateAnimation.RELATIVE_TO_SELF, // 旋转坐标Y轴的参照物
- 1.0f // 相对于参照物Y轴的百分比
- );
- ra.setDuration(500);
- ra.setFillAfter(true);
- layout.startAnimation(ra);
- }
- static class MyAnimationListener implements Animation.AnimationListener {
- /**
- * 动画开始的时候执行
- */
- @Override
- public void onAnimationStart(Animation animation) {
- // TODO Auto-generated method stub
- isRunningAnimation = true;
- }
- /**
- * 动画结束的时候执行
- */
- @Override
- public void onAnimationEnd(Animation animation) {
- // TODO Auto-generated method stub
- isRunningAnimation = false;
- }
- /**
- * 动画重复执行的时候
- */
- @Override
- public void onAnimationRepeat(Animation animation) {
- // TODO Auto-generated method stub
- }
- }
- }
- package com.example.youkumenu;
- import android.os.Bundle;
- import android.app.Activity;
- import android.view.KeyEvent;
- import android.view.View;
- import android.view.View.OnClickListener;
- import android.widget.RelativeLayout;
- public class MainActivity extends Activity implements OnClickListener {
- private RelativeLayout rlLevel1;
- private RelativeLayout rlLevel2;
- private RelativeLayout rlLevel3;
- /** 记录3级菜单是否展示 */
- private boolean isDisplayLevel3 = true;
- /** 记录2级菜单是否展示 */
- private boolean isDisplayLevel2 = true;
- /** 记录1级菜单是否展示 */
- private boolean isDisplayLevel1 = true;
- @Override
- protected void onCreate(Bundle savedInstanceState) {
- super.onCreate(savedInstanceState);
- setContentView(R.layout.activity_main);
- rlLevel1 = (RelativeLayout) findViewById(R.id.rl_level1);
- rlLevel2 = (RelativeLayout) findViewById(R.id.rl_level2);
- rlLevel3 = (RelativeLayout) findViewById(R.id.rl_level3);
- findViewById(R.id.ib_home).setOnClickListener(this);
- findViewById(R.id.ib_menu).setOnClickListener(this);
- }
- @Override
- public void onClick(View v) {
- switch (v.getId()) {
- case R.id.ib_home:
- if (AnimationUtils.isRunningAnimation) // 当前动画正在执行的时候,不执行动画
- return;
- if (isDisplayLevel2) {
- // 2级菜单正在展示
- long startOffset = 0; // 旋转延时时间
- if (isDisplayLevel3) {
- // 3级菜单也在展示,先旋转出去3级菜单,再旋转出去2级菜单
- AnimationUtils.outRotateAnimation(rlLevel3, startOffset);
- startOffset += 200;
- isDisplayLevel3 = !isDisplayLevel3;
- }
- AnimationUtils.outRotateAnimation(rlLevel2, startOffset);
- } else {
- // 2级菜单没有展示,需要旋转进来
- AnimationUtils.inRotateAnimation(rlLevel2);
- }
- isDisplayLevel2 = !isDisplayLevel2;
- break;
- case R.id.ib_menu:
- if (AnimationUtils.isRunningAnimation)
- return;
- if (isDisplayLevel3) {
- // 3级菜单正在展示,需要旋转出去
- AnimationUtils.outRotateAnimation(rlLevel3, 0);
- } else {
- // 3级菜单没有展示,需要旋转进来
- AnimationUtils.inRotateAnimation(rlLevel3);
- }
- isDisplayLevel3 = !isDisplayLevel3;
- break;
- default:
- break;
- }
- }
- /**
- * 菜单按钮的处理
- */
- @Override
- public boolean onKeyDown(int keyCode, KeyEvent event) {
- // TODO Auto-generated method stub
- if (keyCode == KeyEvent.KEYCODE_MENU) {
- if (AnimationUtils.isRunningAnimation)
- return super.onKeyDown(keyCode, event);
- if (isDisplayLevel1) {
- // 1级菜单旋转出去
- long startOffset = 0; // 记录延迟时间
- if (isDisplayLevel2) {
- // 2级菜单旋转出去
- if (isDisplayLevel3) {
- // 3级菜单先旋转出去
- AnimationUtils.outRotateAnimation(rlLevel3, startOffset);
- startOffset += 200;
- isDisplayLevel3 = !isDisplayLevel3;
- }
- AnimationUtils.outRotateAnimation(rlLevel2, startOffset);
- startOffset += 200; // 延迟200ms
- isDisplayLevel2 = !isDisplayLevel2;
- }
- AnimationUtils.outRotateAnimation(rlLevel1, startOffset);
- } else {
- // 1级菜单旋转进来
- AnimationUtils.inRotateAnimation(rlLevel1);
- }
- isDisplayLevel1 = !isDisplayLevel1;
- }
- return super.onKeyDown(keyCode, event);
- }
- }
以上是整个自定义组件的全部源代码,值得注意的是:
1,关于控件的焦点问题。
在布局中可以看到,我在这个相对布局RelativeLayout中使用的控件都是ImageButton,ImageButton有个显著地特点就是它抢焦点的能力特别强。所以为了各层次菜单在动画执行的过程中,用户点击了ImageButton按钮,就会发生事件响应。这种用户体验是极不可取的,那么该怎么解决这个问题。
诚然通过API查找发现,RelativeLayout继承于ViewGroup类

ViewGroup提供了遍历子元素的方法getChildAt(int index),所以,我们在Animation的动画旋转出去的方法中,遍历菜单上的所有子控件,并设置其为不可用;而在动画旋转进来的方法,遍历菜单上的所有子控件,并设置其可用,这样的矛盾就解决了。
2,关于快速点击菜单2次的问题,当快速点击菜单2次的时候,即第一次点击菜单,菜单还没有完全旋转出去或者旋转进来的时候,伴随着第二次点击菜单,这里执行相反的动画效果,即菜单还未完全出去或者进来的时候,中途被迫停止操作,取之而来的是相反的动作,即旋转进来或者旋转出去。那么,这个问题怎么解决?
通过动画的API,可以发现Android给我们提供的一个接口:
- public static interface AnimationListener {
- /**
- * <p>Notifies the start of the animation.</p>
- *
- * @param animation The started animation.
- */
- void onAnimationStart(Animation animation);
- /**
- * <p>Notifies the end of the animation. This callback is not invoked
- * for animations with repeat count set to INFINITE.</p>
- *
- * @param animation The animation which reached its end.
- */
- void onAnimationEnd(Animation animation);
- /**
- * <p>Notifies the repetition of the animation.</p>
- *
- * @param animation The animation which was repeated.
- */
- void onAnimationRepeat(Animation animation);
- }
在MainActivity里,只要调用这个控制菜单动画的方法前,判断一下动画的运行状态,再做操作,这样问题就可以解决了。
以上是个人爱好,源码已经上传,欢迎大家一起交流学习。


 1万+
1万+

 被折叠的 条评论
为什么被折叠?
被折叠的 条评论
为什么被折叠?
 到【灌水乐园】发言


