


PostgresMain()中重要的几个初始化
上次写完了Postmaster 里面的一些内存初始化结构,具体参考:
接下来就得写写Postgres进程里面的初始化内存结构了。如何调试PostgresMain()从 pg_usleep(PostAuthDelay * 1000000L);到 for()循环之间的代码请参考: Postmaster 命令 -W 参数使用中的启动参数说明。
我们知道,一个新的connection来到后,postmaster通过fork()一个postgre进程,PostgresMain()开始做一些初始化,然后进入for(;;)循环,处理后续的sql命令。那么从进入PostgresMain()函数开始到for(;;)循环之间关于该进程有哪些重要的初始化呢?因为我们想知道是否在内存中是否通过初始化给将要buffer的table,heaptuple预留出相应的内存空间。
通过分析,在PostgresMain()中我们发现有三个重要的初始化函数:
void BaseInit(void){
/*
* Attach to shared memory and semaphores, and initialize our
* input/output/debugging file descriptors.
*/
InitCommunication();
DebugFileOpen();
/* Do local initialization of file, storage and buffer managers */
InitFileAccess();
smgrinit();
InitBufferPoolAccess();
}
其中 InitCommunication()没做什么事。 DebugFileOpen()暂时我们先不管它。接下来就是 InitFileAccess():
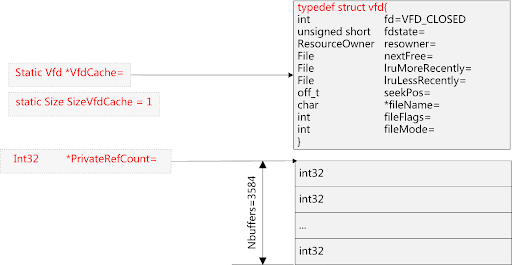
void InitFileAccess(void){
Assert(SizeVfdCache == 0); /* call me only once */
/* initialize cache header entry */
VfdCache = (Vfd *) malloc(sizeof(Vfd));
if (VfdCache == NULL)
ereport(FATAL,
(errcode(ERRCODE_OUT_OF_MEMORY),
errmsg("out of memory")));
MemSet((char *) &(VfdCache[0]), 0, sizeof(Vfd));
VfdCache->fd = VFD_CLOSED;
SizeVfdCache = 1;
/* register proc-exit hook to ensure temp files are dropped at exit */
on_proc_exit(AtProcExit_Files, 0);
}
我们发现其实也没做什么工作,主要是初始化了VfdCache和SizeVfdCache。
接下来是 smgrinit(),即初始化硬盘管理器,static const f_smgr smgrsw[],通过跟踪我们发现同样没做什么工作。
那么最后一项 InitBufferPoolAccess()做了哪些工作呢?通过该调用:
void InitBufferPoolAccess(void){
/*
* Allocate and zero local arrays of per-buffer info.
*/
PrivateRefCount = (int32 *) calloc(NBuffers, sizeof(int32));
if (!PrivateRefCount)
ereport(FATAL,
(errcode(ERRCODE_OUT_OF_MEMORY),
errmsg("out of memory")));
}
我们发现,只是初始化了NBuffers个PrivateRefCount 。
故,我们小结一下:BaseInit();简单初始化了几个变量:VfdCache ,SizeVfdCache ,PrivateRefCount 。
如下图:
2.接下来我们看看InitProcess()
void InitProcess(void){
volatile PROC_HDR *procglobal = ProcGlobal;
int i;
if (procglobal == NULL) elog(PANIC, "proc header uninitialized");
if (MyProc != NULL) elog(ERROR, "you already exist");
SpinLockAcquire(ProcStructLock);
set_spins_per_delay(procglobal->spins_per_delay);
if (IsAutoVacuumWorkerProcess())
MyProc = procglobal->autovacFreeProcs;
else
MyProc = procglobal->freeProcs;
if (MyProc != NULL) {
if (IsAutoVacuumWorkerProcess())
procglobal->autovacFreeProcs = (PGPROC *) MyProc->links.next;
else
procglobal->freeProcs = (PGPROC *) MyProc->links.next;
SpinLockRelease(ProcStructLock);
}
else {
SpinLockRelease(ProcStructLock);
ereport(FATAL,
(errcode(ERRCODE_TOO_MANY_CONNECTIONS),
errmsg("sorry, too many clients already")));
}
if (IsUnderPostmaster)
MarkPostmasterChildActive();
SHMQueueElemInit(&(MyProc->links));
MyProc->waitStatus = STATUS_OK;
MyProc->lxid = InvalidLocalTransactionId;
MyProc->xid = InvalidTransactionId;
MyProc->xmin = InvalidTransactionId;
MyProc->pid = MyProcPid;
/* backendId, databaseId and roleId will be filled in later */
MyProc->backendId = InvalidBackendId;
MyProc->databaseId = InvalidOid;
MyProc->roleId = InvalidOid;
MyProc->inCommit = false;
MyProc->vacuumFlags = 0;
if (IsAutoVacuumWorkerProcess())
MyProc->vacuumFlags |= PROC_IS_AUTOVACUUM;
MyProc->lwWaiting = false;
MyProc->lwExclusive = false;
MyProc->lwWaitLink = NULL;
MyProc->waitLock = NULL;
MyProc->waitProcLock = NULL;
for (i = 0; i < NUM_LOCK_PARTITIONS; i++)
SHMQueueInit(&(MyProc->myProcLocks[i]));
PGSemaphoreReset(&MyProc->sem);
on_shmem_exit(ProcKill, 0);
InitDeadLockChecking();
}
可见,MyProc主要从ProcGlobal->freeProcs列表中找到第一个,赋给自己,然后简单的填充各项数据。
这样,经过第2项的初始化之后,我们得出内存中的数据结构为下图,图中灰色颜色为在heap中,浅黄色表示在shared memory中,红色代表在data段:
3.am_superuser = InitPostgres(dbname, InvalidOid, username, NULL)
进入最复杂的InitPostgres("mydb", InvalidOid, "postgres", NULL)。我们先列列都调用了哪些重要函数:
好,开工,先来看: SetDatabasePath(fullpath);
这个最简单,就是调用 DatabasePath = strdup(path); 设置 DatabasePath 全局变量,为:"base/16384",这里的16384是Oid MyDatabaseId =16384。怎么知道MyDatabaseId 的呢,实际上实现很简单,就是直接读取文件/usr/local/pgsql/data/global/pg_database 把有"mydb"那一行找出来,解析一下就是了。我的pg_database示例如下:
接下来是 InitProcessPhase2(); 还记得第二步当中的 InitProcess()吗?那里几乎只是简单的初始化了一下,这里要继续初始化什么呢?先看调用这个函数的注释:
/*
* Finish filling in the PGPROC struct, and add it to the ProcArray. (We
* need to know MyDatabaseId before we can do this, since it's entered
* into the PGPROC struct.)
*
* Once I have done this, I am visible to other backends!
*/
看样子也没干什么大不了的事,进到函数里面看看,果然如此:
先是MyProc->databaseId = MyDatabaseId; 赋值16384。
接着ProcArrayAdd(MyProc);。里面几乎也没干什么事,只是设置了全局变量procArray->procs[arrayP->numProcs] = proc;
到这里我们画张图看看,内存里都有了啥:

看样子上面没干什么复杂的东西,接下来分析分析 InitBufferPoolBackend();
这里很简单就是注册了一个回调函数 on_shmem_exit(AtProcExit_Buffers, 0);
接下来就是 RelationCacheInitialize();
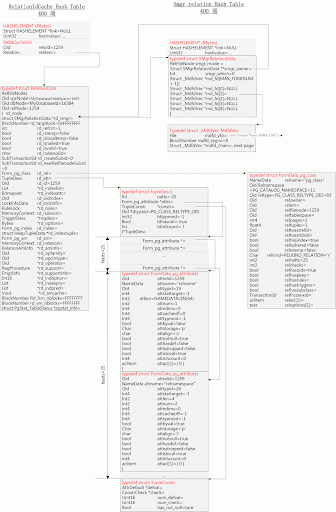
该函数只是在heap上创建了一个用于relation查找的hash表。我们在postmaster的初始化里对hash表数据结构已经很熟悉了,只是这里创建在heap上,而不是shared memory里,该RealtionIdCache内存结构如下图。
一点说明:有些人会问,这个RealtionIdCache是干什么用的呢?试想一下,我们数据库中有很多relation,这些relation如果要从硬盘上搬到内存的话,肯定是在内存中要有个地方放该relation的实际数据的,例如可能访问该relation的第一个page,放这个实际数据的位置就是postmaster中初始化的BLOCK数据结构,那么肯定有一个数据结构来描述这个打开的relation的,这个数据结构是什么呢,就是Relation,那么如果打开了很多个Relation,如何管理呢,这就是RealtionIdCache要干的事。
注意这里的400是默认的hash表容量,即最大打开的relation个数。

接下来就是通过 InitCatalogCache();初始化syscache 。
void InitCatalogCache(void){
int cacheId;
Assert(!CacheInitialized);
MemSet(SysCache, 0, sizeof(SysCache));
for (cacheId = 0; cacheId < SysCacheSize; cacheId++) {
SysCache[cacheId] = InitCatCache(cacheId,
cacheinfo[cacheId].reloid,
cacheinfo[cacheId].indoid,
cacheinfo[cacheId].reloidattr,
cacheinfo[cacheId].nkeys,
cacheinfo[cacheId].key,
cacheinfo[cacheId].nbuckets);
if (!PointerIsValid(SysCache[cacheId]))
elog(ERROR, "could not initialize cache %u (%d)",
cacheinfo[cacheId].reloid, cacheId);
}
CacheInitialized = true;
}
从上面代码知道,用cacheinfo硬编码在源代码中的数据初始化static CatCache *SysCache[lengthof(cacheinfo)]; 这里lengthof(cacheinfo)] = 54;
下图更加清晰一些,注意图中故意把两个将要用到的CatCache 里面的数据列了一下:
这两个CatCache 分别是
static CatCache *SysCache[19] cc_reloid=1262
static CatCache *SysCache[37] cc_reloid=1259
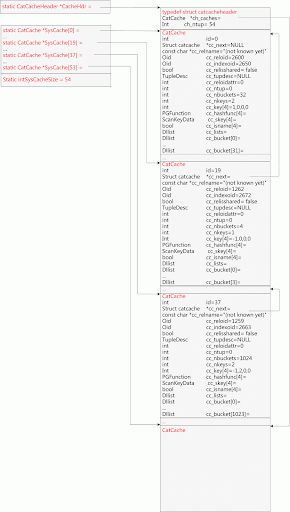
在debug窗口看到的CatCache[37]为:
"SysCache[37]" = 0x09bf5e94
id = 37
cc_next = 0x09bf1d64
cc_relname = 0x08488751 "(not known yet)"
*cc_relname = '('
cc_reloid = 1259
cc_indexoid = 2663
cc_relisshared = false
cc_tupdesc = 0x00000000
cc_reloidattr = -2
cc_ntup = 0
cc_nbuckets = 1024
cc_nkeys = 2
cc_key = 0x09bf5ec0
cc_key[0] = 1
cc_key[1] = 2
cc_key[2] = 0
cc_key[3] = 0
cc_hashfunc = 0x09bf5ed0
cc_hashfunc[0] = 0x00000000
cc_hashfunc[1] = 0x00000000
cc_hashfunc[2] = 0x00000000
cc_hashfunc[3] = 0x00000000
cc_skey = 0x09bf5ee0
cc_skey[0] = {...}
sk_flags = 0
sk_attno = 0
sk_strategy = 0
sk_subtype = 0
sk_func = {...}
fn_addr = 0x00000000
fn_oid = 0
fn_nargs = 0
fn_strict = false
fn_retset = false
fn_stats = 0
fn_extra = 0x00000000
fn_mcxt = 0x00000000
fn_expr = 0x00000000
sk_argument = 0
cc_skey[1] = {...}
sk_flags = 0
sk_attno = 0
sk_strategy = 0
sk_subtype = 0
sk_func = {...}
fn_addr = 0x00000000
fn_oid = 0
fn_nargs = 0
fn_strict = false
fn_retset = false
fn_stats = 0
fn_extra = 0x00000000
fn_mcxt = 0x00000000
fn_expr = 0x00000000
sk_argument = 0
cc_skey[2] = {...}
sk_flags = 0
sk_attno = 0
sk_strategy = 0
sk_subtype = 0
sk_func = {...}
fn_addr = 0x00000000
fn_oid = 0
fn_nargs = 0
fn_strict = false
fn_retset = false
fn_stats = 0
fn_extra = 0x00000000
fn_mcxt = 0x00000000
fn_expr = 0x00000000
sk_argument = 0
cc_skey[3] = {...}
sk_flags = 0
sk_attno = 0
sk_strategy = 0
sk_subtype = 0
sk_func = {...}
fn_addr = 0x00000000
fn_oid = 0
fn_nargs = 0
fn_strict = false
fn_retset = false
fn_stats = 0
fn_extra = 0x00000000
fn_mcxt = 0x00000000
fn_expr = 0x00000000
sk_argument = 0
cc_isname = 0x09bf5f90
cc_isname[0] = false
cc_isname[1] = false
cc_isname[2] = false
cc_isname[3] = false
cc_lists = {...}
dll_head = 0x00000000
dll_tail = 0x00000000
cc_bucket = 0x09bf5f9c
cc_bucket[0] = {...}
dll_head = 0x00000000
dll_tail = 0x00000000
和我们图中示意完全一样。
下面是全部的54个系统CatCache信息,我用设置CACHEDEBUG然后 log如下:
DEBUG: InitCatCache: rel=2600 ind=2650 id=0 nkeys=1 size=32
DEBUG: InitCatCache: rel=2601 ind=2651 id=1 nkeys=1 size=4
DEBUG: InitCatCache: rel=2601 ind=2652 id=2 nkeys=1 size=4
DEBUG: InitCatCache: rel=2602 ind=2654 id=3 nkeys=2 size=64
DEBUG: InitCatCache: rel=2602 ind=2653 id=4 nkeys=4 size=64
DEBUG: InitCatCache: rel=2603 ind=2655 id=5 nkeys=4 size=64
DEBUG: InitCatCache: rel=1249 ind=2658 id=6 nkeys=2 size=2048
DEBUG: InitCatCache: rel=1249 ind=2659 id=7 nkeys=2 size=2048
DEBUG: InitCatCache: rel=1261 ind=2695 id=8 nkeys=2 size=128
DEBUG: InitCatCache: rel=1261 ind=2694 id=9 nkeys=2 size=128
DEBUG: InitCatCache: rel=1260 ind=2676 id=10 nkeys=1 size=128
DEBUG: InitCatCache: rel=1260 ind=2677 id=11 nkeys=1 size=128
DEBUG: InitCatCache: rel=2605 ind=2661 id=12 nkeys=2 size=256
DEBUG: InitCatCache: rel=2616 ind=2686 id=13 nkeys=3 size=64
DEBUG: InitCatCache: rel=2616 ind=2687 id=14 nkeys=1 size=64
DEBUG: InitCatCache: rel=2607 ind=2668 id=15 nkeys=4 size=128
DEBUG: InitCatCache: rel=2607 ind=2669 id=16 nkeys=2 size=128
DEBUG: InitCatCache: rel=2606 ind=2667 id=17 nkeys=1 size=1024
DEBUG: InitCatCache: rel=2607 ind=2670 id=18 nkeys=1 size=128
DEBUG: InitCatCache: rel=1262 ind=2672 id=19 nkeys=1 size=4
DEBUG: InitCatCache: rel=3501 ind=3502 id=20 nkeys=1 size=256
DEBUG: InitCatCache: rel=3501 ind=3503 id=21 nkeys=2 size=256
DEBUG: InitCatCache: rel=2328 ind=548 id=22 nkeys=1 size=8
DEBUG: InitCatCache: rel=2328 ind=112 id=23 nkeys=1 size=8
DEBUG: InitCatCache: rel=1417 ind=549 id=24 nkeys=1 size=32
DEBUG: InitCatCache: rel=1417 ind=113 id=25 nkeys=1 size=32
DEBUG: InitCatCache: rel=2610 ind=2679 id=26 nkeys=1 size=1024
DEBUG: InitCatCache: rel=2612 ind=2681 id=27 nkeys=1 size=4
DEBUG: InitCatCache: rel=2612 ind=2682 id=28 nkeys=1 size=4
DEBUG: InitCatCache: rel=2615 ind=2684 id=29 nkeys=1 size=256
DEBUG: InitCatCache: rel=2615 ind=2685 id=30 nkeys=1 size=256
DEBUG: InitCatCache: rel=2617 ind=2689 id=31 nkeys=4 size=1024
DEBUG: InitCatCache: rel=2617 ind=2688 id=32 nkeys=1 size=1024
DEBUG: InitCatCache: rel=2753 ind=2754 id=33 nkeys=3 size=64
DEBUG: InitCatCache: rel=2753 ind=2755 id=34 nkeys=1 size=64
DEBUG: InitCatCache: rel=1255 ind=2691 id=35 nkeys=3 size=2048
DEBUG: InitCatCache: rel=1255 ind=2690 id=36 nkeys=1 size=2048
DEBUG: InitCatCache: rel=1259 ind=2663 id=37 nkeys=2 size=1024
DEBUG: InitCatCache: rel=1259 ind=2662 id=38 nkeys=1 size=1024
DEBUG: InitCatCache: rel=2618 ind=2693 id=39 nkeys=2 size=1024
DEBUG: InitCatCache: rel=2619 ind=2696 id=40 nkeys=2 size=1024
DEBUG: InitCatCache: rel=3603 ind=3609 id=41 nkeys=3 size=4
DEBUG: InitCatCache: rel=3602 ind=3608 id=42 nkeys=2 size=16
DEBUG: InitCatCache: rel=3602 ind=3712 id=43 nkeys=1 size=16
DEBUG: InitCatCache: rel=3600 ind=3604 id=44 nkeys=2 size=16
DEBUG: InitCatCache: rel=3600 ind=3605 id=45 nkeys=1 size=16
DEBUG: InitCatCache: rel=3601 ind=3606 id=46 nkeys=2 size=4
DEBUG: InitCatCache: rel=3601 ind=3607 id=47 nkeys=1 size=4
DEBUG: InitCatCache: rel=3764 ind=3766 id=48 nkeys=2 size=16
DEBUG: InitCatCache: rel=3764 ind=3767 id=49 nkeys=1 size=16
DEBUG: InitCatCache: rel=1247 ind=2704 id=50 nkeys=2 size=1024
DEBUG: InitCatCache: rel=1247 ind=2703 id=51 nkeys=1 size=1024
DEBUG: InitCatCache: rel=1418 ind=174 id=52 nkeys=1 size=128
DEBUG: InitCatCache: rel=1418 ind=175 id=53 nkeys=2 size=128
接下来我们分析分析 InitPlanCache();
/*
* InitPlanCache: initialize module during InitPostgres.
*
* All we need to do is hook into inval.c's callback lists.
*/
void InitPlanCache(void){
CacheRegisterRelcacheCallback(PlanCacheRelCallback, (Datum) 0);
CacheRegisterSyscacheCallback(PROCOID, PlanCacheFuncCallback, (Datum) 0);
CacheRegisterSyscacheCallback(NAMESPACEOID, PlanCacheSysCallback, (Datum) 0);
CacheRegisterSyscacheCallback(OPEROID, PlanCacheSysCallback, (Datum) 0);
CacheRegisterSyscacheCallback(AMOPOPID, PlanCacheSysCallback, (Datum) 0);
}
正如源码注释中所说的那样,该函数只是注册了5个callback 函数。
接下来是 EnablePortalManager();
/*
* EnablePortalManager
* Enables the portal management module at backend startup.
*/
void EnablePortalManager(void){
HASHCTL ctl;
Assert(PortalMemory == NULL);
PortalMemory = AllocSetContextCreate(TopMemoryContext,
"PortalMemory",
ALLOCSET_DEFAULT_MINSIZE,
ALLOCSET_DEFAULT_INITSIZE,
ALLOCSET_DEFAULT_MAXSIZE);
ctl.keysize = MAX_PORTALNAME_LEN;
ctl.entrysize = sizeof(PortalHashEnt);
/*
* use PORTALS_PER_USER as a guess of how many hash table entries to
* create, initially
*/
PortalHashTable = hash_create("Portal hash", PORTALS_PER_USER,&ctl, HASH_ELEM);
}
我们发现该函数仅仅是做了又创建了一个hash表,so simple的事情。该hash表早就是我们的老东家了,此处不再上图。注意PORTALS_PER_USER =16。
接下来是一直让我们做噩梦的 RelationCacheInitializePhase2();现在我们要看看他老人家有多恐怖。我们先列列有哪些函数调用:
九阴真经之load_relcache_init_file()
先看看注释:
* + When the backend is started up in normal mode, we load an image
* of the appropriate relation descriptors, in internal format,
* from an initialization file in the data/base/... directory.
*
* + If the initialization file isn't there, then we create the
* relation descriptors using sequential scans and write 'em to
* the initialization file for use by subsequent backends.
首先该文件为char initfilename ="base/16384/pg_internal.init"。上面的注释说明,如果不存在该文件,则顺序扫描并创建relation descriptors,之后写入该文件。如果该文件存在,则简单的load进内存,填充 relation descriptors。
A.先假定第一次,我们没有base/16384/pg_internal.init 该文件。则该 load_relcache_init_file()仅仅是返回false。不做任何工作,进而进入
formrdesc("pg_class", PG_CLASS_RELTYPE_OID,
true, Natts_pg_class, Desc_pg_class);
formrdesc("pg_attribute", PG_ATTRIBUTE_RELTYPE_OID,
false, Natts_pg_attribute, Desc_pg_attribute);
formrdesc("pg_proc", PG_PROC_RELTYPE_OID,
true, Natts_pg_proc, Desc_pg_proc);
formrdesc("pg_type", PG_TYPE_RELTYPE_OID,
true, Natts_pg_type, Desc_pg_type);
阶段。并接下来进入:
load_critical_index(ClassOidIndexId,
RelationRelationId);
load_critical_index(AttributeRelidNumIndexId,
AttributeRelationId);
load_critical_index(IndexRelidIndexId,
IndexRelationId);
load_critical_index(OpclassOidIndexId,
OperatorClassRelationId);
load_critical_index(AccessMethodStrategyIndexId,
AccessMethodOperatorRelationId);
load_critical_index(AccessMethodProcedureIndexId,
AccessMethodProcedureRelationId);
load_critical_index(OperatorOidIndexId,
OperatorRelationId);
load_critical_index(RewriteRelRulenameIndexId,
RewriteRelationId);
load_critical_index(TriggerRelidNameIndexId,
TriggerRelationId);
阶段。然后是
hash_seq_init(&status, RelationIdCache);
while ((idhentry = (RelIdCacheEnt *) hash_seq_search(&status)) != NULL)
阶段。
最后是如果没有"base/16384/pg_internal.init"文件,则写入到 base/16384/pg_internal.init 文件中去。
我们先来看看第一步:
formrdesc("pg_class", PG_CLASS_RELTYPE_OID,
true, Natts_pg_class, Desc_pg_class);
我们先看看这个函数的原型:
static void formrdesc
(const char *relationName, Oid relationReltype,bool hasoids, int natts, FormData_pg_attribute *att){}
那么传入的参数为:
formrdesc("pg_class", 83, true, 25, Desc_pg_class);
那么Desc_pg_class是什么呢,我们来看看定义:
static FormData_pg_attribute Desc_pg_class[Natts_pg_class] = {Schema_pg_class};
而Schema_pg_class又定义为:
/* ----------------
* pg_class
* ----------------
*/
#define Schema_pg_class /
{ 1259, {"relname"}, 19, -1, NAMEDATALEN, 1, 0, -1, -1, false, 'p', 'c', true, false, false, true, 0, { 0 } }, /
{ 1259, {"relnamespace"}, 26, -1, 4, 2, 0, -1, -1, true, 'p', 'i', true, false, false, true, 0, { 0 } }, /
{ 1259, {"reltype"}, 26, -1, 4, 3, 0, -1, -1, true, 'p', 'i', true, false, false, true, 0, { 0 } }, /
{ 1259, {"relowner"}, 26, -1, 4, 4, 0, -1, -1, true, 'p', 'i', true, false, false, true, 0, { 0 } }, /
{ 1259, {"relam"}, 26, -1, 4, 5, 0, -1, -1, true, 'p', 'i', true, false, false, true, 0, { 0 } }, /
{ 1259, {"relfilenode"}, 26, -1, 4, 6, 0, -1, -1, true, 'p', 'i', true, false, false, true, 0, { 0 } }, /
{ 1259, {"reltablespace"}, 26, -1, 4, 7, 0, -1, -1, true, 'p', 'i', true, false, false, true, 0, { 0 } }, /
{ 1259, {"relpages"}, 23, -1, 4, 8, 0, -1, -1, true, 'p', 'i', true, false, false, true, 0, { 0 } }, /
{ 1259, {"reltuples"}, 700, -1, 4, 9, 0, -1, -1, FLOAT4PASSBYVAL, 'p', 'i', true, false, false, true, 0, { 0 } }, /
{ 1259, {"reltoastrelid"}, 26, -1, 4, 10, 0, -1, -1, true, 'p', 'i', true, false, false, true, 0, { 0 } }, /
{ 1259, {"reltoastidxid"}, 26, -1, 4, 11, 0, -1, -1, true, 'p', 'i', true, false, false, true, 0, { 0 } }, /
{ 1259, {"relhasindex"}, 16, -1, 1, 12, 0, -1, -1, true, 'p', 'c', true, false, false, true, 0, { 0 } }, /
{ 1259, {"relisshared"}, 16, -1, 1, 13, 0, -1, -1, true, 'p', 'c', true, false, false, true, 0, { 0 } }, /
{ 1259, {"relistemp"}, 16, -1, 1, 14, 0, -1, -1, true, 'p', 'c', true, false, false, true, 0, { 0 } }, /
{ 1259, {"relkind"}, 18, -1, 1, 15, 0, -1, -1, true, 'p', 'c', true, false, false, true, 0, { 0 } }, /
{ 1259, {"relnatts"}, 21, -1, 2, 16, 0, -1, -1, true, 'p', 's', true, false, false, true, 0, { 0 } }, /
{ 1259, {"relchecks"}, 21, -1, 2, 17, 0, -1, -1, true, 'p', 's', true, false, false, true, 0, { 0 } }, /
{ 1259, {"relhasoids"}, 16, -1, 1, 18, 0, -1, -1, true, 'p', 'c', true, false, false, true, 0, { 0 } }, /
{ 1259, {"relhaspkey"}, 16, -1, 1, 19, 0, -1, -1, true, 'p', 'c', true, false, false, true, 0, { 0 } }, /
{ 1259, {"relhasrules"}, 16, -1, 1, 20, 0, -1, -1, true, 'p', 'c', true, false, false, true, 0, { 0 } }, /
{ 1259, {"relhastriggers"},16, -1, 1, 21, 0, -1, -1, true, 'p', 'c', true, false, false, true, 0, { 0 } }, /
{ 1259, {"relhassubclass"},16, -1, 1, 22, 0, -1, -1, true, 'p', 'c', true, false, false, true, 0, { 0 } }, /
{ 1259, {"relfrozenxid"}, 28, -1, 4, 23, 0, -1, -1, true, 'p', 'i', true, false, false, true, 0, { 0 } }, /
{ 1259, {"relacl"}, 1034, -1, -1, 24, 1, -1, -1, false, 'x', 'i', false, false, false, true, 0, { 0 } }, /
{ 1259, {"reloptions"}, 1009, -1, -1, 25, 1, -1, -1, false, 'x', 'i', false, false, false, true, 0, { 0 } }
可见Desc_pg_class主要是定义了pg_class表结构里的25个字段相关的信息。
那么回头我们看看formrdesc()函数里主要干了什么事情,经过一分析,我们知道
Relation relation;
relation = (Relation) palloc0(sizeof(RelationData));
......./*填充数据*/
RelationCacheInsert(relation); /*在上面刚刚创建的RelationIdCache哈希表中登记一下*/
这样子我们可以画个图,看看这个Relation到底是什么。图中只画出RelationIdCache里的hash表项,hash值我直接省略。
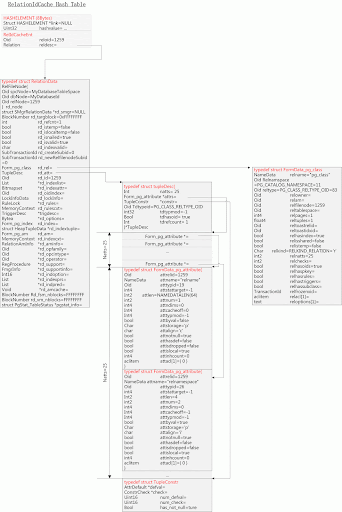
那么上面的图是否正确呢?我们debug一下,看看这个relation到底什么样。
relation 0x09812f90
rd_node {...}
spcNode 1663
dbNode 16384
relNode 1259
rd_smgr 0x00000000
rd_targblock 4294967295
rd_refcnt 1
rd_istemp false
rd_islocaltemp false
rd_isnailed true
rd_isvalid false
rd_indexvalid 0
rd_createSubid 0
rd_newRelfilenodeSubid 0
rd_rel 0x0981b040
relname {...}
data 0x0981b040
relnamespace 11
reltype 83
relowner 0
relam 0
relfilenode 1259
reltablespace 0
relpages 1
reltuples 1.0
reltoastrelid 0
reltoastidxid 0
relhasindex true
relisshared false
relistemp false
relkind 'r'
relnatts 25
relchecks 0
relhasoids true
relhaspkey false
relhasrules false
relhastriggers false
relhassubclass false
relfrozenxid 0
relacl 0x0981b0bc
relacl[0] 126
reloptions 0x0981b0c0
rd_att 0x09838780
natts 25
attrs 0x0983879c
attrs[0] 0x09838800
attrelid 1259
attname {...}
data 0x09838804
data[0] 'r'
data[1] 'e'
data[2] 'l'
data[3] 'n'
data[4] 'a'
data[5] 'm'
data[6] 'e'
data[7] 0
data[8] 0
data[9] 0
...
data[63]
atttypid 19
attstattarget -1
attlen 64
attnum 1
attndims 0
attcacheoff 0
atttypmod -1
attbyval false
attstorage 'p'
attalign 'c'
attnotnull true
atthasdef false
attisdropped false
attislocal true
attinhcount 0
attacl 0x09838868
attrs[1] 0x09838868
attrs[2] 0x098388d0
attrs[3] 0x09838938
attrs[4] 0x098389a0
....
attrs[23] 0x09839158
attrs[24] 0x098391c0
constr 0x09806e88
tdtypeid 83
tdtypmod -1
tdhasoid true
tdrefcount 1
rd_id 1259
rd_indexlist 0x00000000
rd_indexattr 0x00000000
rd_oidindex 0
rd_lockInfo {...}
lockRelId {...}
relId 1259
dbId 16384
rd_rules 0x00000000
rd_rulescxt 0x00000000
trigdesc 0x00000000
rd_options 0x00000000
rd_index 0x00000000
rd_indextuple 0x00000000
rd_am 0x00000000
rd_indexcxt 0x00000000
rd_aminfo 0x00000000
rd_opfamily 0x00000000
rd_opcintype 0x00000000
rd_operator 0x00000000
rd_support 0x00000000
rd_supportinfo 0x00000000
rd_indoption 0x00000000
rd_indexprs 0x00000000
rd_indpred 0x00000000
rd_amcache 0x00000000
rd_fsm_nblocks 4294967295
rd_vm_nblocks 4294967295
pgstat_info 0x00000000
可见完全正确。
剩余的其他三项: formrdesc("pg_attribute", PG_ATTRIBUTE_RELTYPE_OID,
false, Natts_pg_attribute, Desc_pg_attribute);
formrdesc("pg_proc", PG_PROC_RELTYPE_OID,
true, Natts_pg_proc, Desc_pg_proc);
formrdesc("pg_type", PG_TYPE_RELTYPE_OID,
true, Natts_pg_type, Desc_pg_type);
分析就类似了,不再详述。
我们先来看看第二步:
load_critical_index(ClassOidIndexId,
RelationRelationId);
看看这里面都初始化了哪些内容。
上式实际上是调用static void load_critical_index(2662, 1259)。在该函数中实际上只调用了:
Relation ird;
ird = RelationBuildDesc(2662, true);
我们看看RelationBuildDesc()有什么?
(Form_pg_class) GETSTRUCT(pg_class_tuple);的作用就是把该tupe实际指的数据抽取填充新建的relation的rd_rel指向的Form_pg_class数据结构。
RelationBuildTupleDesc(relation);主要是填充一些默认数值。这样我们得出如下几张图,图中绘出了用到的数据结构,以及新生成的oid为2662 index的relation。
下图是在这个阶段中对pg_class的relation数据结构的修改:
下图是这阶段搜索tuple用到的数据结构:
下图是新生成的oid为2662的新的relation数据结构:

剩余的load index 类似,这里不再展开描述。
接下来我们进入 第三个阶段:
hash_seq_init(&status, RelationIdCache); 很简单,只是初始化了几个变量
while ((idhentry = (RelIdCacheEnt *) hash_seq_search(&status)) != NULL){}
所以我们来看看while循环。
其实这里面非常简单,就是顺序扫描 RelationIdCache hash表,找到每一项 RelIdCacheEnt ,继而找到该relation,如果该relation->rd_rel->relhasrules 和relhastriggers为true,则导入相应的rules和triggers,我们这里就暂时不分析如何导入这些rules和triggers了。
接下来我们进入 第四个阶段:把相应的 RelationIdCache 内容写到 base/16384/pg_internal.init 文件中去。
由于涉及的内容不复杂,这一步我们不分析了。
B.如果我们已经有了base/16384/pg_internal.init 该文件,则 load_relcache_init_file() 的代码用于导入到该映像文件到内存中去了。
由于内容对我们理解后续的步骤不是很重要,暂缓分析。
至此,我们的对 RelationCacheInitializePhase2()的分析告一段落,这里做个小结,这个阶段主要是在 RelationIdCache 中生成几个系统表和index在内存中的relation表示。由此可见relation是在内存中的核心表示。
接下来是 CheckMyDatabase(dbname, am_superuser);
这个阶段做的工作主要是扫描SysCache[54]中的DATABASEOID项,如果TupleDesc cc_tupdesc=NULL,则创建该relation并把该relation的TupleDesc rd_att属性赋给cc_tupdesc,并打开pg_database relation,顺序读取其中oid为 dbname的中的tuple,并把该tuple的encoding等信息,赋给DatabaseEncoding等全局变量。
所以该阶段做了两个事情,一个是创建oid=DATABASEOID的relation内存数据结构,然后顺序读取该relation中的各个tuple,找到oid= dbname的tuple,读取各个参数,赋给全局变量以及更新SysCache中的相应项。
接下来是 InitializeSearchPath();
注册了一个回调函数,并设置
baseSearchPathValid = false;
接下来是 InitializeClientEncoding();
实际上很简单,就是设置static pg_enc2name *clientEncoding =PG_UTF8
至此,全部结束。
- Postmaster的Shared Memory中的shmem index table 内存结构
- Postmaster的Shared Memory中的shared buffer pool内存结构
- Postmaster的Memory Context 初始化内存结构
- PostmasterMain()中的process table的初始化后内存结构
接下来就得写写Postgres进程里面的初始化内存结构了。如何调试PostgresMain()从 pg_usleep(PostAuthDelay * 1000000L);到 for()循环之间的代码请参考: Postmaster 命令 -W 参数使用中的启动参数说明。
我们知道,一个新的connection来到后,postmaster通过fork()一个postgre进程,PostgresMain()开始做一些初始化,然后进入for(;;)循环,处理后续的sql命令。那么从进入PostgresMain()函数开始到for(;;)循环之间关于该进程有哪些重要的初始化呢?因为我们想知道是否在内存中是否通过初始化给将要buffer的table,heaptuple预留出相应的内存空间。
通过分析,在PostgresMain()中我们发现有三个重要的初始化函数:
- BaseInit();
- InitProcess();
- am_superuser = InitPostgres(dbname, InvalidOid, username, NULL);
void BaseInit(void){
/*
* Attach to shared memory and semaphores, and initialize our
* input/output/debugging file descriptors.
*/
InitCommunication();
DebugFileOpen();
/* Do local initialization of file, storage and buffer managers */
InitFileAccess();
smgrinit();
InitBufferPoolAccess();
}
其中 InitCommunication()没做什么事。 DebugFileOpen()暂时我们先不管它。接下来就是 InitFileAccess():
void InitFileAccess(void){
Assert(SizeVfdCache == 0); /* call me only once */
/* initialize cache header entry */
VfdCache = (Vfd *) malloc(sizeof(Vfd));
if (VfdCache == NULL)
ereport(FATAL,
(errcode(ERRCODE_OUT_OF_MEMORY),
errmsg("out of memory")));
MemSet((char *) &(VfdCache[0]), 0, sizeof(Vfd));
VfdCache->fd = VFD_CLOSED;
SizeVfdCache = 1;
/* register proc-exit hook to ensure temp files are dropped at exit */
on_proc_exit(AtProcExit_Files, 0);
}
我们发现其实也没做什么工作,主要是初始化了VfdCache和SizeVfdCache。
接下来是 smgrinit(),即初始化硬盘管理器,static const f_smgr smgrsw[],通过跟踪我们发现同样没做什么工作。
那么最后一项 InitBufferPoolAccess()做了哪些工作呢?通过该调用:
void InitBufferPoolAccess(void){
/*
* Allocate and zero local arrays of per-buffer info.
*/
PrivateRefCount = (int32 *) calloc(NBuffers, sizeof(int32));
if (!PrivateRefCount)
ereport(FATAL,
(errcode(ERRCODE_OUT_OF_MEMORY),
errmsg("out of memory")));
}
我们发现,只是初始化了NBuffers个PrivateRefCount 。
故,我们小结一下:BaseInit();简单初始化了几个变量:VfdCache ,SizeVfdCache ,PrivateRefCount 。
如下图:
2.接下来我们看看InitProcess()
void InitProcess(void){
volatile PROC_HDR *procglobal = ProcGlobal;
int i;
if (procglobal == NULL) elog(PANIC, "proc header uninitialized");
if (MyProc != NULL) elog(ERROR, "you already exist");
SpinLockAcquire(ProcStructLock);
set_spins_per_delay(procglobal->spins_per_delay);
if (IsAutoVacuumWorkerProcess())
MyProc = procglobal->autovacFreeProcs;
else
MyProc = procglobal->freeProcs;
if (MyProc != NULL) {
if (IsAutoVacuumWorkerProcess())
procglobal->autovacFreeProcs = (PGPROC *) MyProc->links.next;
else
procglobal->freeProcs = (PGPROC *) MyProc->links.next;
SpinLockRelease(ProcStructLock);
}
else {
SpinLockRelease(ProcStructLock);
ereport(FATAL,
(errcode(ERRCODE_TOO_MANY_CONNECTIONS),
errmsg("sorry, too many clients already")));
}
if (IsUnderPostmaster)
MarkPostmasterChildActive();
SHMQueueElemInit(&(MyProc->links));
MyProc->waitStatus = STATUS_OK;
MyProc->lxid = InvalidLocalTransactionId;
MyProc->xid = InvalidTransactionId;
MyProc->xmin = InvalidTransactionId;
MyProc->pid = MyProcPid;
/* backendId, databaseId and roleId will be filled in later */
MyProc->backendId = InvalidBackendId;
MyProc->databaseId = InvalidOid;
MyProc->roleId = InvalidOid;
MyProc->inCommit = false;
MyProc->vacuumFlags = 0;
if (IsAutoVacuumWorkerProcess())
MyProc->vacuumFlags |= PROC_IS_AUTOVACUUM;
MyProc->lwWaiting = false;
MyProc->lwExclusive = false;
MyProc->lwWaitLink = NULL;
MyProc->waitLock = NULL;
MyProc->waitProcLock = NULL;
for (i = 0; i < NUM_LOCK_PARTITIONS; i++)
SHMQueueInit(&(MyProc->myProcLocks[i]));
PGSemaphoreReset(&MyProc->sem);
on_shmem_exit(ProcKill, 0);
InitDeadLockChecking();
}
可见,MyProc主要从ProcGlobal->freeProcs列表中找到第一个,赋给自己,然后简单的填充各项数据。
这样,经过第2项的初始化之后,我们得出内存中的数据结构为下图,图中灰色颜色为在heap中,浅黄色表示在shared memory中,红色代表在data段:
3.am_superuser = InitPostgres(dbname, InvalidOid, username, NULL)
进入最复杂的InitPostgres("mydb", InvalidOid, "postgres", NULL)。我们先列列都调用了哪些重要函数:
- SetDatabasePath(fullpath);
- InitProcessPhase2();
- InitBufferPoolBackend();
- RelationCacheInitialize();
- InitCatalogCache();
- InitPlanCache();
- EnablePortalManager();
- RelationCacheInitializePhase2();
- CheckMyDatabase(dbname, am_superuser);
- InitializeSearchPath();
- InitializeClientEncoding();
好,开工,先来看: SetDatabasePath(fullpath);
这个最简单,就是调用 DatabasePath = strdup(path); 设置 DatabasePath 全局变量,为:"base/16384",这里的16384是Oid MyDatabaseId =16384。怎么知道MyDatabaseId 的呢,实际上实现很简单,就是直接读取文件/usr/local/pgsql/data/global/pg_database 把有"mydb"那一行找出来,解析一下就是了。我的pg_database示例如下:
"template1" 1 1663 648
"template0" 11563 1663 648
"postgres" 11564 1663 648
"mydb" 16384 1663 648
"test3" 17240 1663 648
"template0" 11563 1663 648
"postgres" 11564 1663 648
"mydb" 16384 1663 648
"test3" 17240 1663 648
接下来是 InitProcessPhase2(); 还记得第二步当中的 InitProcess()吗?那里几乎只是简单的初始化了一下,这里要继续初始化什么呢?先看调用这个函数的注释:
/*
* Finish filling in the PGPROC struct, and add it to the ProcArray. (We
* need to know MyDatabaseId before we can do this, since it's entered
* into the PGPROC struct.)
*
* Once I have done this, I am visible to other backends!
*/
看样子也没干什么大不了的事,进到函数里面看看,果然如此:
先是MyProc->databaseId = MyDatabaseId; 赋值16384。
接着ProcArrayAdd(MyProc);。里面几乎也没干什么事,只是设置了全局变量procArray->procs[arrayP->numProcs] = proc;
到这里我们画张图看看,内存里都有了啥:
看样子上面没干什么复杂的东西,接下来分析分析 InitBufferPoolBackend();
这里很简单就是注册了一个回调函数 on_shmem_exit(AtProcExit_Buffers, 0);
接下来就是 RelationCacheInitialize();
该函数只是在heap上创建了一个用于relation查找的hash表。我们在postmaster的初始化里对hash表数据结构已经很熟悉了,只是这里创建在heap上,而不是shared memory里,该RealtionIdCache内存结构如下图。
一点说明:有些人会问,这个RealtionIdCache是干什么用的呢?试想一下,我们数据库中有很多relation,这些relation如果要从硬盘上搬到内存的话,肯定是在内存中要有个地方放该relation的实际数据的,例如可能访问该relation的第一个page,放这个实际数据的位置就是postmaster中初始化的BLOCK数据结构,那么肯定有一个数据结构来描述这个打开的relation的,这个数据结构是什么呢,就是Relation,那么如果打开了很多个Relation,如何管理呢,这就是RealtionIdCache要干的事。
注意这里的400是默认的hash表容量,即最大打开的relation个数。
接下来就是通过 InitCatalogCache();初始化syscache 。
void InitCatalogCache(void){
int cacheId;
Assert(!CacheInitialized);
MemSet(SysCache, 0, sizeof(SysCache));
for (cacheId = 0; cacheId < SysCacheSize; cacheId++) {
SysCache[cacheId] = InitCatCache(cacheId,
cacheinfo[cacheId].reloid,
cacheinfo[cacheId].indoid,
cacheinfo[cacheId].reloidattr,
cacheinfo[cacheId].nkeys,
cacheinfo[cacheId].key,
cacheinfo[cacheId].nbuckets);
if (!PointerIsValid(SysCache[cacheId]))
elog(ERROR, "could not initialize cache %u (%d)",
cacheinfo[cacheId].reloid, cacheId);
}
CacheInitialized = true;
}
从上面代码知道,用cacheinfo硬编码在源代码中的数据初始化static CatCache *SysCache[lengthof(cacheinfo)]; 这里lengthof(cacheinfo)] = 54;
下图更加清晰一些,注意图中故意把两个将要用到的CatCache 里面的数据列了一下:
这两个CatCache 分别是
static CatCache *SysCache[19] cc_reloid=1262
我们用mydb=# select oid,relname from pg_class where oid = 1262;一查
oid | relname
------+-------------
1262 | pg_database
(1 row)
便知道 表明该项是关于pg_database 这个Relation的。
oid | relname
------+-------------
1262 | pg_database
(1 row)
static CatCache *SysCache[37] cc_reloid=1259
我们用mydb=# select oid,relname from pg_class where oid=1259 ;一查
oid | relname
------+----------
1259 | pg_class
(1 row)
便知道 表明该项是关于pg_class 这个Relation的。
oid | relname
------+----------
1259 | pg_class
(1 row)
在debug窗口看到的CatCache[37]为:
"SysCache[37]" = 0x09bf5e94
id = 37
cc_next = 0x09bf1d64
cc_relname = 0x08488751 "(not known yet)"
*cc_relname = '('
cc_reloid = 1259
cc_indexoid = 2663
cc_relisshared = false
cc_tupdesc = 0x00000000
cc_reloidattr = -2
cc_ntup = 0
cc_nbuckets = 1024
cc_nkeys = 2
cc_key = 0x09bf5ec0
cc_key[0] = 1
cc_key[1] = 2
cc_key[2] = 0
cc_key[3] = 0
cc_hashfunc = 0x09bf5ed0
cc_hashfunc[0] = 0x00000000
cc_hashfunc[1] = 0x00000000
cc_hashfunc[2] = 0x00000000
cc_hashfunc[3] = 0x00000000
cc_skey = 0x09bf5ee0
cc_skey[0] = {...}
sk_flags = 0
sk_attno = 0
sk_strategy = 0
sk_subtype = 0
sk_func = {...}
fn_addr = 0x00000000
fn_oid = 0
fn_nargs = 0
fn_strict = false
fn_retset = false
fn_stats = 0
fn_extra = 0x00000000
fn_mcxt = 0x00000000
fn_expr = 0x00000000
sk_argument = 0
cc_skey[1] = {...}
sk_flags = 0
sk_attno = 0
sk_strategy = 0
sk_subtype = 0
sk_func = {...}
fn_addr = 0x00000000
fn_oid = 0
fn_nargs = 0
fn_strict = false
fn_retset = false
fn_stats = 0
fn_extra = 0x00000000
fn_mcxt = 0x00000000
fn_expr = 0x00000000
sk_argument = 0
cc_skey[2] = {...}
sk_flags = 0
sk_attno = 0
sk_strategy = 0
sk_subtype = 0
sk_func = {...}
fn_addr = 0x00000000
fn_oid = 0
fn_nargs = 0
fn_strict = false
fn_retset = false
fn_stats = 0
fn_extra = 0x00000000
fn_mcxt = 0x00000000
fn_expr = 0x00000000
sk_argument = 0
cc_skey[3] = {...}
sk_flags = 0
sk_attno = 0
sk_strategy = 0
sk_subtype = 0
sk_func = {...}
fn_addr = 0x00000000
fn_oid = 0
fn_nargs = 0
fn_strict = false
fn_retset = false
fn_stats = 0
fn_extra = 0x00000000
fn_mcxt = 0x00000000
fn_expr = 0x00000000
sk_argument = 0
cc_isname = 0x09bf5f90
cc_isname[0] = false
cc_isname[1] = false
cc_isname[2] = false
cc_isname[3] = false
cc_lists = {...}
dll_head = 0x00000000
dll_tail = 0x00000000
cc_bucket = 0x09bf5f9c
cc_bucket[0] = {...}
dll_head = 0x00000000
dll_tail = 0x00000000
和我们图中示意完全一样。
下面是全部的54个系统CatCache信息,我用设置CACHEDEBUG然后 log如下:
DEBUG: InitCatCache: rel=2600 ind=2650 id=0 nkeys=1 size=32
DEBUG: InitCatCache: rel=2601 ind=2651 id=1 nkeys=1 size=4
DEBUG: InitCatCache: rel=2601 ind=2652 id=2 nkeys=1 size=4
DEBUG: InitCatCache: rel=2602 ind=2654 id=3 nkeys=2 size=64
DEBUG: InitCatCache: rel=2602 ind=2653 id=4 nkeys=4 size=64
DEBUG: InitCatCache: rel=2603 ind=2655 id=5 nkeys=4 size=64
DEBUG: InitCatCache: rel=1249 ind=2658 id=6 nkeys=2 size=2048
DEBUG: InitCatCache: rel=1249 ind=2659 id=7 nkeys=2 size=2048
DEBUG: InitCatCache: rel=1261 ind=2695 id=8 nkeys=2 size=128
DEBUG: InitCatCache: rel=1261 ind=2694 id=9 nkeys=2 size=128
DEBUG: InitCatCache: rel=1260 ind=2676 id=10 nkeys=1 size=128
DEBUG: InitCatCache: rel=1260 ind=2677 id=11 nkeys=1 size=128
DEBUG: InitCatCache: rel=2605 ind=2661 id=12 nkeys=2 size=256
DEBUG: InitCatCache: rel=2616 ind=2686 id=13 nkeys=3 size=64
DEBUG: InitCatCache: rel=2616 ind=2687 id=14 nkeys=1 size=64
DEBUG: InitCatCache: rel=2607 ind=2668 id=15 nkeys=4 size=128
DEBUG: InitCatCache: rel=2607 ind=2669 id=16 nkeys=2 size=128
DEBUG: InitCatCache: rel=2606 ind=2667 id=17 nkeys=1 size=1024
DEBUG: InitCatCache: rel=2607 ind=2670 id=18 nkeys=1 size=128
DEBUG: InitCatCache: rel=1262 ind=2672 id=19 nkeys=1 size=4
DEBUG: InitCatCache: rel=3501 ind=3502 id=20 nkeys=1 size=256
DEBUG: InitCatCache: rel=3501 ind=3503 id=21 nkeys=2 size=256
DEBUG: InitCatCache: rel=2328 ind=548 id=22 nkeys=1 size=8
DEBUG: InitCatCache: rel=2328 ind=112 id=23 nkeys=1 size=8
DEBUG: InitCatCache: rel=1417 ind=549 id=24 nkeys=1 size=32
DEBUG: InitCatCache: rel=1417 ind=113 id=25 nkeys=1 size=32
DEBUG: InitCatCache: rel=2610 ind=2679 id=26 nkeys=1 size=1024
DEBUG: InitCatCache: rel=2612 ind=2681 id=27 nkeys=1 size=4
DEBUG: InitCatCache: rel=2612 ind=2682 id=28 nkeys=1 size=4
DEBUG: InitCatCache: rel=2615 ind=2684 id=29 nkeys=1 size=256
DEBUG: InitCatCache: rel=2615 ind=2685 id=30 nkeys=1 size=256
DEBUG: InitCatCache: rel=2617 ind=2689 id=31 nkeys=4 size=1024
DEBUG: InitCatCache: rel=2617 ind=2688 id=32 nkeys=1 size=1024
DEBUG: InitCatCache: rel=2753 ind=2754 id=33 nkeys=3 size=64
DEBUG: InitCatCache: rel=2753 ind=2755 id=34 nkeys=1 size=64
DEBUG: InitCatCache: rel=1255 ind=2691 id=35 nkeys=3 size=2048
DEBUG: InitCatCache: rel=1255 ind=2690 id=36 nkeys=1 size=2048
DEBUG: InitCatCache: rel=1259 ind=2663 id=37 nkeys=2 size=1024
DEBUG: InitCatCache: rel=1259 ind=2662 id=38 nkeys=1 size=1024
DEBUG: InitCatCache: rel=2618 ind=2693 id=39 nkeys=2 size=1024
DEBUG: InitCatCache: rel=2619 ind=2696 id=40 nkeys=2 size=1024
DEBUG: InitCatCache: rel=3603 ind=3609 id=41 nkeys=3 size=4
DEBUG: InitCatCache: rel=3602 ind=3608 id=42 nkeys=2 size=16
DEBUG: InitCatCache: rel=3602 ind=3712 id=43 nkeys=1 size=16
DEBUG: InitCatCache: rel=3600 ind=3604 id=44 nkeys=2 size=16
DEBUG: InitCatCache: rel=3600 ind=3605 id=45 nkeys=1 size=16
DEBUG: InitCatCache: rel=3601 ind=3606 id=46 nkeys=2 size=4
DEBUG: InitCatCache: rel=3601 ind=3607 id=47 nkeys=1 size=4
DEBUG: InitCatCache: rel=3764 ind=3766 id=48 nkeys=2 size=16
DEBUG: InitCatCache: rel=3764 ind=3767 id=49 nkeys=1 size=16
DEBUG: InitCatCache: rel=1247 ind=2704 id=50 nkeys=2 size=1024
DEBUG: InitCatCache: rel=1247 ind=2703 id=51 nkeys=1 size=1024
DEBUG: InitCatCache: rel=1418 ind=174 id=52 nkeys=1 size=128
DEBUG: InitCatCache: rel=1418 ind=175 id=53 nkeys=2 size=128
接下来我们分析分析 InitPlanCache();
/*
* InitPlanCache: initialize module during InitPostgres.
*
* All we need to do is hook into inval.c's callback lists.
*/
void InitPlanCache(void){
CacheRegisterRelcacheCallback(PlanCacheRelCallback, (Datum) 0);
CacheRegisterSyscacheCallback(PROCOID, PlanCacheFuncCallback, (Datum) 0);
CacheRegisterSyscacheCallback(NAMESPACEOID, PlanCacheSysCallback, (Datum) 0);
CacheRegisterSyscacheCallback(OPEROID, PlanCacheSysCallback, (Datum) 0);
CacheRegisterSyscacheCallback(AMOPOPID, PlanCacheSysCallback, (Datum) 0);
}
正如源码注释中所说的那样,该函数只是注册了5个callback 函数。
接下来是 EnablePortalManager();
/*
* EnablePortalManager
* Enables the portal management module at backend startup.
*/
void EnablePortalManager(void){
HASHCTL ctl;
Assert(PortalMemory == NULL);
PortalMemory = AllocSetContextCreate(TopMemoryContext,
"PortalMemory",
ALLOCSET_DEFAULT_MINSIZE,
ALLOCSET_DEFAULT_INITSIZE,
ALLOCSET_DEFAULT_MAXSIZE);
ctl.keysize = MAX_PORTALNAME_LEN;
ctl.entrysize = sizeof(PortalHashEnt);
/*
* use PORTALS_PER_USER as a guess of how many hash table entries to
* create, initially
*/
PortalHashTable = hash_create("Portal hash", PORTALS_PER_USER,&ctl, HASH_ELEM);
}
我们发现该函数仅仅是做了又创建了一个hash表,so simple的事情。该hash表早就是我们的老东家了,此处不再上图。注意PORTALS_PER_USER =16。
接下来是一直让我们做噩梦的 RelationCacheInitializePhase2();现在我们要看看他老人家有多恐怖。我们先列列有哪些函数调用:
- load_relcache_init_file()
- formrdesc("pg_class", PG_CLASS_RELTYPE_OID,
true, Natts_pg_class, Desc_pg_class);
formrdesc("pg_attribute", PG_ATTRIBUTE_RELTYPE_OID,
false, Natts_pg_attribute, Desc_pg_attribute);
formrdesc("pg_proc", PG_PROC_RELTYPE_OID,
true, Natts_pg_proc, Desc_pg_proc);
formrdesc("pg_type", PG_TYPE_RELTYPE_OID,
true, Natts_pg_type, Desc_pg_type); - load_critical_index(ClassOidIndexId,
RelationRelationId);
load_critical_index(AttributeRelidNumIndexId,
AttributeRelationId);
load_critical_index(IndexRelidIndexId,
IndexRelationId);
load_critical_index(OpclassOidIndexId,
OperatorClassRelationId);
load_critical_index(AccessMethodStrategyIndexId,
AccessMethodOperatorRelationId);
load_critical_index(AccessMethodProcedureIndexId,
AccessMethodProcedureRelationId);
load_critical_index(OperatorOidIndexId,
OperatorRelationId);
load_critical_index(RewriteRelRulenameIndexId,
RewriteRelationId);
load_critical_index(TriggerRelidNameIndexId,
TriggerRelationId); - hash_seq_init(&status, RelationIdCache);
- while ((idhentry = (RelIdCacheEnt *) hash_seq_search(&status)) != NULL){}
九阴真经之load_relcache_init_file()
先看看注释:
* + When the backend is started up in normal mode, we load an image
* of the appropriate relation descriptors, in internal format,
* from an initialization file in the data/base/... directory.
*
* + If the initialization file isn't there, then we create the
* relation descriptors using sequential scans and write 'em to
* the initialization file for use by subsequent backends.
首先该文件为char initfilename ="base/16384/pg_internal.init"。上面的注释说明,如果不存在该文件,则顺序扫描并创建relation descriptors,之后写入该文件。如果该文件存在,则简单的load进内存,填充 relation descriptors。
A.先假定第一次,我们没有base/16384/pg_internal.init 该文件。则该 load_relcache_init_file()仅仅是返回false。不做任何工作,进而进入
formrdesc("pg_class", PG_CLASS_RELTYPE_OID,
true, Natts_pg_class, Desc_pg_class);
formrdesc("pg_attribute", PG_ATTRIBUTE_RELTYPE_OID,
false, Natts_pg_attribute, Desc_pg_attribute);
formrdesc("pg_proc", PG_PROC_RELTYPE_OID,
true, Natts_pg_proc, Desc_pg_proc);
formrdesc("pg_type", PG_TYPE_RELTYPE_OID,
true, Natts_pg_type, Desc_pg_type);
阶段。并接下来进入:
load_critical_index(ClassOidIndexId,
RelationRelationId);
load_critical_index(AttributeRelidNumIndexId,
AttributeRelationId);
load_critical_index(IndexRelidIndexId,
IndexRelationId);
load_critical_index(OpclassOidIndexId,
OperatorClassRelationId);
load_critical_index(AccessMethodStrategyIndexId,
AccessMethodOperatorRelationId);
load_critical_index(AccessMethodProcedureIndexId,
AccessMethodProcedureRelationId);
load_critical_index(OperatorOidIndexId,
OperatorRelationId);
load_critical_index(RewriteRelRulenameIndexId,
RewriteRelationId);
load_critical_index(TriggerRelidNameIndexId,
TriggerRelationId);
阶段。然后是
hash_seq_init(&status, RelationIdCache);
while ((idhentry = (RelIdCacheEnt *) hash_seq_search(&status)) != NULL)
阶段。
最后是如果没有"base/16384/pg_internal.init"文件,则写入到 base/16384/pg_internal.init 文件中去。
我们先来看看第一步:
formrdesc("pg_class", PG_CLASS_RELTYPE_OID,
true, Natts_pg_class, Desc_pg_class);
我们先看看这个函数的原型:
static void formrdesc
(const char *relationName, Oid relationReltype,bool hasoids, int natts, FormData_pg_attribute *att){}
那么传入的参数为:
formrdesc("pg_class", 83, true, 25, Desc_pg_class);
那么Desc_pg_class是什么呢,我们来看看定义:
static FormData_pg_attribute Desc_pg_class[Natts_pg_class] = {Schema_pg_class};
而Schema_pg_class又定义为:
/* ----------------
* pg_class
* ----------------
*/
#define Schema_pg_class /
{ 1259, {"relname"}, 19, -1, NAMEDATALEN, 1, 0, -1, -1, false, 'p', 'c', true, false, false, true, 0, { 0 } }, /
{ 1259, {"relnamespace"}, 26, -1, 4, 2, 0, -1, -1, true, 'p', 'i', true, false, false, true, 0, { 0 } }, /
{ 1259, {"reltype"}, 26, -1, 4, 3, 0, -1, -1, true, 'p', 'i', true, false, false, true, 0, { 0 } }, /
{ 1259, {"relowner"}, 26, -1, 4, 4, 0, -1, -1, true, 'p', 'i', true, false, false, true, 0, { 0 } }, /
{ 1259, {"relam"}, 26, -1, 4, 5, 0, -1, -1, true, 'p', 'i', true, false, false, true, 0, { 0 } }, /
{ 1259, {"relfilenode"}, 26, -1, 4, 6, 0, -1, -1, true, 'p', 'i', true, false, false, true, 0, { 0 } }, /
{ 1259, {"reltablespace"}, 26, -1, 4, 7, 0, -1, -1, true, 'p', 'i', true, false, false, true, 0, { 0 } }, /
{ 1259, {"relpages"}, 23, -1, 4, 8, 0, -1, -1, true, 'p', 'i', true, false, false, true, 0, { 0 } }, /
{ 1259, {"reltuples"}, 700, -1, 4, 9, 0, -1, -1, FLOAT4PASSBYVAL, 'p', 'i', true, false, false, true, 0, { 0 } }, /
{ 1259, {"reltoastrelid"}, 26, -1, 4, 10, 0, -1, -1, true, 'p', 'i', true, false, false, true, 0, { 0 } }, /
{ 1259, {"reltoastidxid"}, 26, -1, 4, 11, 0, -1, -1, true, 'p', 'i', true, false, false, true, 0, { 0 } }, /
{ 1259, {"relhasindex"}, 16, -1, 1, 12, 0, -1, -1, true, 'p', 'c', true, false, false, true, 0, { 0 } }, /
{ 1259, {"relisshared"}, 16, -1, 1, 13, 0, -1, -1, true, 'p', 'c', true, false, false, true, 0, { 0 } }, /
{ 1259, {"relistemp"}, 16, -1, 1, 14, 0, -1, -1, true, 'p', 'c', true, false, false, true, 0, { 0 } }, /
{ 1259, {"relkind"}, 18, -1, 1, 15, 0, -1, -1, true, 'p', 'c', true, false, false, true, 0, { 0 } }, /
{ 1259, {"relnatts"}, 21, -1, 2, 16, 0, -1, -1, true, 'p', 's', true, false, false, true, 0, { 0 } }, /
{ 1259, {"relchecks"}, 21, -1, 2, 17, 0, -1, -1, true, 'p', 's', true, false, false, true, 0, { 0 } }, /
{ 1259, {"relhasoids"}, 16, -1, 1, 18, 0, -1, -1, true, 'p', 'c', true, false, false, true, 0, { 0 } }, /
{ 1259, {"relhaspkey"}, 16, -1, 1, 19, 0, -1, -1, true, 'p', 'c', true, false, false, true, 0, { 0 } }, /
{ 1259, {"relhasrules"}, 16, -1, 1, 20, 0, -1, -1, true, 'p', 'c', true, false, false, true, 0, { 0 } }, /
{ 1259, {"relhastriggers"},16, -1, 1, 21, 0, -1, -1, true, 'p', 'c', true, false, false, true, 0, { 0 } }, /
{ 1259, {"relhassubclass"},16, -1, 1, 22, 0, -1, -1, true, 'p', 'c', true, false, false, true, 0, { 0 } }, /
{ 1259, {"relfrozenxid"}, 28, -1, 4, 23, 0, -1, -1, true, 'p', 'i', true, false, false, true, 0, { 0 } }, /
{ 1259, {"relacl"}, 1034, -1, -1, 24, 1, -1, -1, false, 'x', 'i', false, false, false, true, 0, { 0 } }, /
{ 1259, {"reloptions"}, 1009, -1, -1, 25, 1, -1, -1, false, 'x', 'i', false, false, false, true, 0, { 0 } }
可见Desc_pg_class主要是定义了pg_class表结构里的25个字段相关的信息。
那么回头我们看看formrdesc()函数里主要干了什么事情,经过一分析,我们知道
Relation relation;
relation = (Relation) palloc0(sizeof(RelationData));
......./*填充数据*/
RelationCacheInsert(relation); /*在上面刚刚创建的RelationIdCache哈希表中登记一下*/
这样子我们可以画个图,看看这个Relation到底是什么。图中只画出RelationIdCache里的hash表项,hash值我直接省略。
那么上面的图是否正确呢?我们debug一下,看看这个relation到底什么样。
relation 0x09812f90
rd_node {...}
spcNode 1663
dbNode 16384
relNode 1259
rd_smgr 0x00000000
rd_targblock 4294967295
rd_refcnt 1
rd_istemp false
rd_islocaltemp false
rd_isnailed true
rd_isvalid false
rd_indexvalid 0
rd_createSubid 0
rd_newRelfilenodeSubid 0
rd_rel 0x0981b040
relname {...}
data 0x0981b040
relnamespace 11
reltype 83
relowner 0
relam 0
relfilenode 1259
reltablespace 0
relpages 1
reltuples 1.0
reltoastrelid 0
reltoastidxid 0
relhasindex true
relisshared false
relistemp false
relkind 'r'
relnatts 25
relchecks 0
relhasoids true
relhaspkey false
relhasrules false
relhastriggers false
relhassubclass false
relfrozenxid 0
relacl 0x0981b0bc
relacl[0] 126
reloptions 0x0981b0c0
rd_att 0x09838780
natts 25
attrs 0x0983879c
attrs[0] 0x09838800
attrelid 1259
attname {...}
data 0x09838804
data[0] 'r'
data[1] 'e'
data[2] 'l'
data[3] 'n'
data[4] 'a'
data[5] 'm'
data[6] 'e'
data[7] 0
data[8] 0
data[9] 0
...
data[63]
atttypid 19
attstattarget -1
attlen 64
attnum 1
attndims 0
attcacheoff 0
atttypmod -1
attbyval false
attstorage 'p'
attalign 'c'
attnotnull true
atthasdef false
attisdropped false
attislocal true
attinhcount 0
attacl 0x09838868
attrs[1] 0x09838868
attrs[2] 0x098388d0
attrs[3] 0x09838938
attrs[4] 0x098389a0
....
attrs[23] 0x09839158
attrs[24] 0x098391c0
constr 0x09806e88
tdtypeid 83
tdtypmod -1
tdhasoid true
tdrefcount 1
rd_id 1259
rd_indexlist 0x00000000
rd_indexattr 0x00000000
rd_oidindex 0
rd_lockInfo {...}
lockRelId {...}
relId 1259
dbId 16384
rd_rules 0x00000000
rd_rulescxt 0x00000000
trigdesc 0x00000000
rd_options 0x00000000
rd_index 0x00000000
rd_indextuple 0x00000000
rd_am 0x00000000
rd_indexcxt 0x00000000
rd_aminfo 0x00000000
rd_opfamily 0x00000000
rd_opcintype 0x00000000
rd_operator 0x00000000
rd_support 0x00000000
rd_supportinfo 0x00000000
rd_indoption 0x00000000
rd_indexprs 0x00000000
rd_indpred 0x00000000
rd_amcache 0x00000000
rd_fsm_nblocks 4294967295
rd_vm_nblocks 4294967295
pgstat_info 0x00000000
可见完全正确。
剩余的其他三项: formrdesc("pg_attribute", PG_ATTRIBUTE_RELTYPE_OID,
false, Natts_pg_attribute, Desc_pg_attribute);
formrdesc("pg_proc", PG_PROC_RELTYPE_OID,
true, Natts_pg_proc, Desc_pg_proc);
formrdesc("pg_type", PG_TYPE_RELTYPE_OID,
true, Natts_pg_type, Desc_pg_type);
分析就类似了,不再详述。
我们先来看看第二步:
load_critical_index(ClassOidIndexId,
RelationRelationId);
看看这里面都初始化了哪些内容。
上式实际上是调用static void load_critical_index(2662, 1259)。在该函数中实际上只调用了:
Relation ird;
ird = RelationBuildDesc(2662, true);
我们看看RelationBuildDesc()有什么?
pg_class_tuple = ScanPgRelation(targetRelId, true); 其中
targetRelId=2662
relid = HeapTupleGetOid(pg_class_tuple);
relp = (Form_pg_class) GETSTRUCT(pg_class_tuple);
relation = AllocateRelationDesc(relp);
...
RelationBuildTupleDesc(relation);
....
我们发现纵观全文从开始到现在,唯独这个
ScanPgRelation(targetRelId, true)最复杂,具体细节我不在展开,这里我只是说明该函数的作用就是首先把该pg_class 的6个page中的第一个读入到内存,顺序抽取各个tuple,比较oid是否等于2662,若相等,则返回,若不相等,则读入第2个page,用于描述该过程的数据结构是MdfdVec->mdfd_chain。
relid = HeapTupleGetOid(pg_class_tuple);
relp = (Form_pg_class) GETSTRUCT(pg_class_tuple);
relation = AllocateRelationDesc(relp);
...
RelationBuildTupleDesc(relation);
....
(Form_pg_class) GETSTRUCT(pg_class_tuple);的作用就是把该tupe实际指的数据抽取填充新建的relation的rd_rel指向的Form_pg_class数据结构。
RelationBuildTupleDesc(relation);主要是填充一些默认数值。这样我们得出如下几张图,图中绘出了用到的数据结构,以及新生成的oid为2662 index的relation。
下图是在这个阶段中对pg_class的relation数据结构的修改:
下图是这阶段搜索tuple用到的数据结构:
下图是新生成的oid为2662的新的relation数据结构:
剩余的load index 类似,这里不再展开描述。
接下来我们进入 第三个阶段:
hash_seq_init(&status, RelationIdCache); 很简单,只是初始化了几个变量
while ((idhentry = (RelIdCacheEnt *) hash_seq_search(&status)) != NULL){}
所以我们来看看while循环。
其实这里面非常简单,就是顺序扫描 RelationIdCache hash表,找到每一项 RelIdCacheEnt ,继而找到该relation,如果该relation->rd_rel->relhasrules 和relhastriggers为true,则导入相应的rules和triggers,我们这里就暂时不分析如何导入这些rules和triggers了。
接下来我们进入 第四个阶段:把相应的 RelationIdCache 内容写到 base/16384/pg_internal.init 文件中去。
由于涉及的内容不复杂,这一步我们不分析了。
B.如果我们已经有了base/16384/pg_internal.init 该文件,则 load_relcache_init_file() 的代码用于导入到该映像文件到内存中去了。
由于内容对我们理解后续的步骤不是很重要,暂缓分析。
至此,我们的对 RelationCacheInitializePhase2()的分析告一段落,这里做个小结,这个阶段主要是在 RelationIdCache 中生成几个系统表和index在内存中的relation表示。由此可见relation是在内存中的核心表示。
接下来是 CheckMyDatabase(dbname, am_superuser);
这个阶段做的工作主要是扫描SysCache[54]中的DATABASEOID项,如果TupleDesc cc_tupdesc=NULL,则创建该relation并把该relation的TupleDesc rd_att属性赋给cc_tupdesc,并打开pg_database relation,顺序读取其中oid为 dbname的中的tuple,并把该tuple的encoding等信息,赋给DatabaseEncoding等全局变量。
所以该阶段做了两个事情,一个是创建oid=DATABASEOID的relation内存数据结构,然后顺序读取该relation中的各个tuple,找到oid= dbname的tuple,读取各个参数,赋给全局变量以及更新SysCache中的相应项。
接下来是 InitializeSearchPath();
注册了一个回调函数,并设置
baseSearchPathValid = false;
接下来是 InitializeClientEncoding();
实际上很简单,就是设置static pg_enc2name *clientEncoding =PG_UTF8
至此,全部结束。


 7万+
7万+

 被折叠的 条评论
为什么被折叠?
被折叠的 条评论
为什么被折叠?
 到【灌水乐园】发言


