In this chapter, let us go through the steps involved in integrating the Tiles framework with Struts2. Apache Tiles is a templating framework built to simplify the development of web application user interfaces.
First of all we need to download the tiles jar files from the Apache Tiles website. You need to add the following jar files to the project's class path.
-
tiles-api-x.y.z.jar
-
tiles-compat-x.y.z.jar
-
tiles-core-x.y.z.jar
-
tiles-jsp-x.y.z.jar
-
tiles-servlet-x.y.z.jar
In addition to the above, we have to copy the following jar files from the struts2 download in your WEB-INF/lib.
-
commons-beanutils-x.y.zjar
-
commons-digester-x.y.jar
-
struts2-tiles-plugin-x.y.z.jar
Now let us setup the web.xml for the Struts-Tiles integration as given below. There are two important point to note here. First, we need to tell tiles, where to find tiles configuration file tiles.xml. In our case, it will be under /WEB-INF folder. Next we need to initiliaze the Tiles listener that comes with Struts2 download.
<?xml version="1.0" encoding="UTF-8"?>
<web-app xmlns:xsi="http://www.w3.org/2001/XMLSchema-instance"
   xmlns="http://java.sun.com/xml/ns/javaee"
   xmlns:web="http://java.sun.com/xml/ns/javaee/web-app_2_5.xsd"
   xsi:schemaLocation="http://java.sun.com/xml/ns/javaee
   http://java.sun.com/xml/ns/javaee/web-app_2_5.xsd"
   id="WebApp_ID" version="2.5">
   <display-name>Struts2Example15</display-name>

   <context-param>
   <param-name>
      org.apache.tiles.impl.BasicTilesContainer.DEFINITIONS_CONFIG
   </param-name>
   <param-value>
      /WEB-INF/tiles.xml
   </param-value>
   </context-param>

   <listener>
   <listener-class>
      org.apache.struts2.tiles.StrutsTilesListener
   </listener-class>
   </listener>

   <filter>
   <filter-name>struts2</filter-name>
   <filter-class>
   org.apache.struts2.dispatcher.ng.filter.StrutsPrepareAndExecuteFilter
   </filter-class>
   </filter>

   <filter-mapping>
      <filter-name>struts2</filter-name>
      <url-pattern>/*</url-pattern>
   </filter-mapping>

   <welcome-file-list>
      <welcome-file>index.jsp</welcome-file>
   </welcome-file-list>
</web-app>
|
Next let us create tiles.xml under /WEB-INF folder with the following contents:
<?xml version="1.0" encoding="UTF-8" ?>

<!DOCTYPE tiles-definitions PUBLIC
   "-//Apache Software Foundation//DTD Tiles Configuration 2.0//EN"
   "http://tiles.apache.org/dtds/tiles-config_2_0.dtd">

<tiles-definitions>

   <definition name="baseLayout" template="/baseLayout.jsp">
      <put-attribute name="title"  value="Template"/>
      <put-attribute name="banner" value="/banner.jsp"/>
      <put-attribute name="menu"   value="/menu.jsp"/>
      <put-attribute name="body"   value="/body.jsp"/>
      <put-attribute name="footer"   value="/footer.jsp"/>
   </definition>

   <definition name="tiger" extends="baseLayout">
      <put-attribute name="title"  value="Tiger"/>
      <put-attribute name="body"   value="/tiger.jsp"/>
   </definition>

   <definition name="lion" extends="baseLayout">
      <put-attribute name="title"  value="Lion"/>
      <put-attribute name="body"   value="/lion.jsp"/>
   </definition>

</tiles-definitions>
|
Mext. we define a basic skeleton layout in the baseLayout.jsp. It has five reusable / overridable areas. Namely title, banner, menu, body and footer. We provide the default values for the baseLayout and then we create two customizations that extend from the default layout. The tiger layout is similar to the basic layout, except it uses the tiger.jsp as its body and the text "Tiger" as the title. Similarly, the lion layout is similar to the basic layout, except it uses the lion.jsp as its body and the text "Lion" as the title.
Let us have a look at the individual jsp files. Following is the content of baseLayout.jsp file:
<%@ taglib uri="http://tiles.apache.org/tags-tiles" prefix="tiles"%> <!DOCTYPE HTML PUBLIC "-//W3C//DTD HTML 4.01 Transitional//EN" "http://www.w3.org/TR/html4/loose.dtd"> <html> <head> <meta http-equiv="Content-Type" content="text/html; charset=UTF-8"> <title><tiles:insertAttribute name="title" ignore="true" /> </title> </head> <body> <tiles:insertAttribute name="banner" /><br/> <hr/> <tiles:insertAttribute name="menu" /><br/> <hr/> <tiles:insertAttribute name="body" /><br/> <hr/> <tiles:insertAttribute name="footer" /><br/> </body> </html> |
Here we just put together a basic HTML page that has the tiles attributes. We insert the tiles attributes in the places where we need them to be. Next, let us create banner.jsp file with the following content:
<img src="http://www.tutorialspoint.com/images/tp-logo.gif"/> |
The menu.jsp file will have following lines which are the links - to the TigerMenu.action and the LionMenu.action struts actions.
<%@taglib uri="/struts-tags" prefix="s"%> <a href="<s:url action="tigerMenu"/>" Tiger</a><br> <a href="<s:url action="lionMenu"/>" Lion</a><br> |
The lion.jsp file will have following content:
<img src="http://upload.wikimedia.org/wikipedia/commons/d/d2/Lion.jpg"/> The lion |
The tiger.jsp file will have following content:
<img src="http://www.freewebs.com/tigerofdarts/tiger.jpg"/> The tiger |
Next, let us create the action class file MenuAction.java which contains the following:
package com.tutorialspoint.struts2;

import com.opensymphony.xwork2.ActionSupport;

public class MenuAction extends ActionSupport {
   public String tiger() { return "tiger"; }
   public String lion() { return "lion"; }

}
|
This is a pretty straight forward class. We declared two methods tiger() and lion() that return tiger and lion as outcomes respectively. Let us put it all together in the struts.xml file:
<!DOCTYPE struts PUBLIC
"-//Apache Software Foundation//DTD Struts Configuration 2.0//EN"
"http://struts.apache.org/dtds/struts-2.0.dtd">

<struts>
   <package name="default" extends="struts-default">
      <result-types>
         <result-type name="tiles"
         class="org.apache.struts2.views.tiles.TilesResult" />
      </result-types>

      <action name="*Menu" method="{1}"
         class="com.tutorialspoint.struts2.MenuAction">
         <result name="tiger" type="tiles">tiger</result>
         <result name="lion" type="tiles">lion</result>
      </action>

   </package>
</struts>
|
Let us check what we did in above file. First of all, we declared a new result type called "tiles" as we are now using tiles instead of plain jsp for the view technology. Struts2 has its support for the Tiles View result type, so we create the result type "tiles" to be of the "org.apache.struts2.view.tiles.TilesResult" class.
Next, we want to say if the request is for /tigerMenu.action take the user to the tiger tiles page and if the request is for /lionMenu.action take the user to the lion tiles page.
We achieve this using a bit of regular expression. In our action definition, we say anything that matches the pattern "*Menu" will be handled by this action. The matching method will be invoked in the MenuAction class. That is, tigerMenu.action will invoke tiger() and lionMenu.action will invoke lion(). We then need to map the outcome of the result to the appropriate tiles pages.
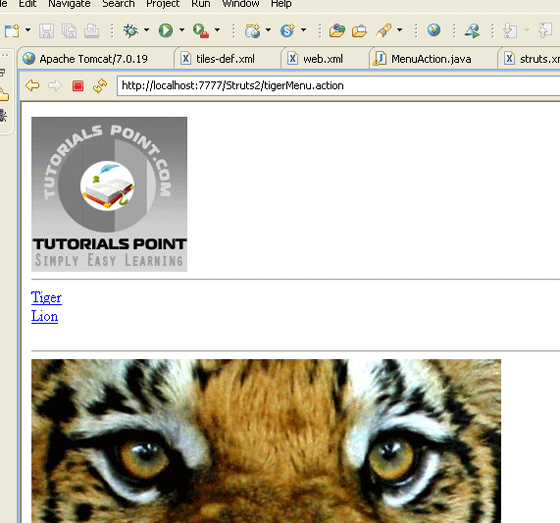
Now right click on the project name and click Export > WAR File to create a War file. Then deploy this WAR in the Tomcat's webapps directory. Finally, start Tomcat server and try to access URL http://localhost:8080/HelloWorldStruts2/tigerMenu.jsp. This will give you following screen:

Similarly, if you goto the lionMenu.action page, you will see the lion page which uses the same tiles layout.


 本文详细介绍了如何将Tiles框架与Struts2整合,包括下载并配置相关jar文件,设置web.xml,创建tiles.xml文件,定义基本布局及自定义页面等内容。


 被折叠的 条评论
为什么被折叠?


