


目的:
1.ArcGIS.Server.9.3和ArcGIS API for JavaScript实现自定义图形,保存自定义的Graphic图形到服务端的xml文件中,同时也能在地图载入时读入xml中的图形数据显示到地图中。 这里的自定义面的Label是通过GeometryServer的labelPoints实现的。
准备工作:
1. 在ArcGis Server9.3中发布名为Geometry的GeometryServer。
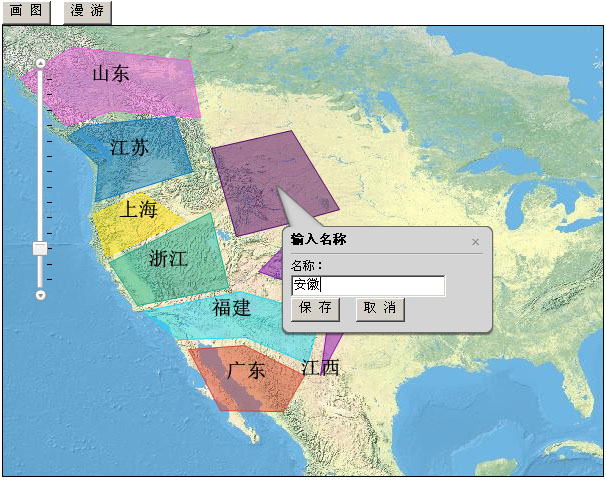
完成后的效果图:
开始
0.关于GeometryServer的labelPoints介绍,labelPoints允许在多边形中指定Label显示的位置点,是jsapi1.2才支持的新功能,需要需要ArcGIS Server 9.3 sp1支持。
1.启动vs新建名为SaveGraphics的ASP.NET Web应用程序。
2.接着在工程中添加名为javascript的文件夹并且在这个文件夹里新建mapfunc.js的文件,这里用来编写我们自己的js代码了,在Default.aspx页面里添加对这个js文件的引用,同时在Default.aspx页面里添加一个id为map的div标签作为地图控件的载体、2个input的功能按钮:
 <%
@ Page Language
=
"
C#
"
AutoEventWireup
=
"
true
"
CodeBehind
=
"
saveGraphic.aspx.cs
"
Inherits
=
"
LabelingSample.saveGraphic
"
%>
<%
@ Page Language
=
"
C#
"
AutoEventWireup
=
"
true
"
CodeBehind
=
"
saveGraphic.aspx.cs
"
Inherits
=
"
LabelingSample.saveGraphic
"
%>
<! DOCTYPE html PUBLIC "-//W3C//DTD XHTML 1.0 Transitional//EN" "http://www.w3.org/TR/xhtml1/DTD/xhtml1-transitional.dtd" >
< html xmlns ="http://www.w3.org/1999/xhtml" >
< head id ="Head1" runat ="server" >
< title > Untitled Page </ title >
< style type ="text/css" > @import "http://serverapi.arcgisonline.com/jsapi/arcgis/1.2/js/dojo/dijit/themes/tundra/tundra.css"; </ style >
< script type ="text/javascript" src ="http://serverapi.arcgisonline.com/jsapi/arcgis/?v=1.2" ></ script >
< script type ="text/javascript" src ="javascript/mapfunc.js" >
</ script >
</ head >
< body class ="tundra" >
< form id ="form1" runat ="server" >
< input id ="Button1" type ="button" value ="画 图" onclick ="toolbar.activate(esri.toolbars.Draw.POLYGON);map.hideZoomSlider();" />
< input id ="Button2" type ="button" value ="漫 游" onclick ="toolbar.deactivate();map.showZoomSlider();" />
< div id ="map" style ="width:600px; height:450px; border:1px solid #000;" ></ div >
</ form >
</ body >
</ html >
3、上面的html代码很简单主要是
2个input的画图、漫游功能按钮。
4、切换到mapfunc.js开始编写js代码,现在从执行顺序来说明代码。
5、首先是初始化地图显示的init()方法:
function
init()
{
map = new esri.Map( " map " ,{extent: new esri.geometry.Extent( - 183.780014745329 , 16.2975638854873 , - 61.4068547410964 , 74.0304580085983 , new esri.SpatialReference({wkid: 4269 }))});
var usamap = new esri.layers.ArcGISTiledMapServiceLayer( " http://server.arcgisonline.com/ArcGIS/rest/services/NGS_Topo_US_2D/MapServer " );
map.addLayer(usamap);
toolbar = new esri.toolbars.Draw(map);
dojo.connect(toolbar, " onDrawEnd " , doDraw);
// 添加map载入后事件监听,用来从xml中读入自定义的图形在地图上显示
dojo.connect(map, " onLoad " ,showGraphic);
// 设置infoWindow的大小
map.infoWindow.resize( 200 , 100 );
// 设置infoWindow的标题头
map.infoWindow.setTitle( " 输入名称 " );
// 实例化GeometryService
geometryService = new esri.tasks.GeometryService( " http://mypc/ArcGIS/rest/services/Geometry/GeometryServer " );
}
6、上面的
init()方法中执行了dojo.connect(map,"onLoad",showGraphic);代码,所以接下来是showGraphic()方法代码:
<?
xml version="1.0" encoding="gb2312"
?>
- < Graphics >
- < Graphic >
< Content > {"geometry":{"rings":[[[-107.3883566182127,25.740182822042797],[-112.9254659932127,25.828073447042797],[-115.7379659932127,31.189401572042797],[-110.8160909932127,31.540964072042797],[-105.5426534932127,28.904245322042797],[-107.3883566182127,25.740182822042797]]],"spatialReference":{"wkid":4269}},"attributes":{"id":"0","title":"广东"},"symbol":{"color":[216,67,48,128],"outline":{"color":[216,67,48,255],"width":0.75,"style":"esriSLSSolid"},"style":"esriSFSSolid"}} </ Content >
</ Graphic >
- < Graphic >
< Content > {"geometry":{"x":-110.640309743213,"y":28.6224372863286,"spatialReference":{"wkid":4269}},"attributes":{"title":"广东"},"symbol":{"color":[0,0,0,255],"style":"esriTS","angle":0,"xoffset":0,"yoffset":0,"text":"广东","align":"middle","decoration":"none","rotated":false,"kerning":true,"font":{"size":"20px","style":"normal","variant":"normal","weight":"bolder","family":undefined}}} </ Content >
</ Graphic >
。。。。。。
上面的xml片段中保存了2条geometry记录,一个是多边形、一个是点,都是以json的格式保存,程序要做的就是读取这些
geometry记录显示到地图上。
下面的 loadGraphic()方法用ajax的方式请求服务端的getG.aspx页面,getG.aspx页面的cs代码(具体C#代码贴在文章备注中)会读取 xmlData/xmlGraphic.xml数据返回给客户端。
//
读取ml文件里自定义图形完成后添加到map进行显示
function getEnd(graphics)
{
for ( var i = 0 ;i < graphics.Graphic.length;i ++ )
{
var g = graphics.Graphic[i];
var graphic = new esri.Graphic(g);
map.graphics.add(graphic);
}
}
9、上面是载入xml保存的图形的过程了,接下来讲保存的过程。
10、添加首先是点击地图上的画图按钮然后执行onclick时间,在html代码中可以看到οnclick="toolbar.activate(esri.toolbars.Draw.POLYGON);map.hideZoomSlider();"就是把地图状态设置成画POLYGON状态。
11、然后就是在地图上进行画 POLYGON画图完成后执行doDraw(geometry)方法,把图形添加到map.graphics中进行显示同时显示infoWindow让用户输入名称进行确认保存,代码如下:
//
画图
function doDraw(geometry)
{
// 随机颜色
var numR = Math.ceil(Math.random() * 255 );
var numG = Math.ceil(Math.random() * 255 );
var numB = Math.ceil(Math.random() * 255 );
// 定义样式
var highlightSymbol = new esri.symbol.SimpleFillSymbol(esri.symbol.SimpleFillSymbol.STYLE_SOLID, new esri.symbol.SimpleLineSymbol(esri.symbol.SimpleLineSymbol.STYLE_SOLID, new dojo.Color([numR,numG,numB]), 1 ), new dojo.Color([numR,numG,numB, 0.5 ]));
// 设置图形显示样式
var graphic = new esri.Graphic(geometry, highlightSymbol);
// 清除上一次的画图内容
map.graphics.add(graphic);
// 获取图形的中心点
var centerPoint = map.toScreen(graphic.geometry.getExtent().getCenter());
// 在图形的中心点显示infoWindow
map.infoWindow.show(centerPoint,map.getInfoWindowAnchor(centerPoint));
var index = map.graphics.graphics.length - 1 ;
// 设置infoWindow的显示内容
var content = " <div>名称:</div><div><input type='text' id='nameText' name='nameText' /></div><div><input type='button' name='Submit' value='保 存' οnclick=finash(' " + index + " ') /> <input type='button' name='Submit' value='取 消' οnclick=cancel(' " + index + " ') /></div> " ;
map.infoWindow.setContent(content);
}
12、上面的代码中infoWindow显示的内容如上面的效果图,一个输入框、一个保存按钮、一个取消按钮。输入名称然后点击保存按钮时保存当前所画的图形,保存代码:
//
infoWindow中保存按钮的事件
function finash(index)
{
// 获取输入的名字
var titleStr = dojo.byId( ' nameText ' ).value;
// 获取当前所画的图形
var cgraphic = map.graphics.graphics[index];
// 设置图形的属性,id、title
cgraphic.attributes = {id:index,title:titleStr};
tempGraphic = cgraphic;
// 对面图形进行geometryService的simplify操作
geometryService.simplify([cgraphic],getLabelPoints);
// 获取当前所画图形的json字符串用来保存
var graphicStr = dojo.toJson(cgraphic.toJson());
// 设置ajax请求的参数
var params = {graphic:graphicStr}
// 用dojo的xhrGet的ajax方法把图形的json字符串提交到服务端保存
dojo.xhrGet({url: " saveG.aspx " ,handleAs: " text " ,preventCache: true ,content:params,load: dojo.hitch( this , " saveEnd " )});
// 隐藏infoWindow
map.infoWindow.hide();
}
13、上面的finash(index)方法中把当前所画的图形的json字符通过ajax请求服务端的saveG.aspx页面,
saveG.aspx页面的cs代码(具体C#代码贴在文章备注中)会把图形的json字符串保存到xmlData/xmlGraphic.xml中。finash方法还调用了geometryService的simplify操作目的是进行接下来的labelPoints操作为图形添加Label显示。
14、labelPoints操作的代码:
function
getLabelPoints(graphics)
{
geometryService.labelPoints(graphics,showLabel);
}
// 显示Label,同时保存Label点到服务端的xml
function showLabel(labelPoints)
{
// 定义字体
var font = new esri.symbol.Font( " 20px " , esri.symbol.Font.STYLE_NORMAL, esri.symbol.Font.VARIANT_NORMAL, esri.symbol.Font.WEIGHT_BOLDER);
for ( var i = 0 ;i < labelPoints.length;i ++ )
{
// 获取输入框输入的内容
var labelstr = dojo.byId( ' nameText ' ).value;
// 定义样式
var textSymbol = new esri.symbol.TextSymbol(labelstr,font, new dojo.Color([ 0 , 0 , 0 ]));
// 设置样式
labelPoints[i].setSymbol(textSymbol);
// 设置属性
labelPoints[i].attributes = {title:labelstr};
// 添加到地图上显示
map.graphics.add(labelPoints[i]);
// 获取Label点的json字符串内容
var graphicStr = dojo.toJson(labelPoints[i].toJson());
// 提交到服务端进行保存
var params = {graphic:graphicStr}
dojo.xhrGet({url: " saveG.aspx " ,handleAs: " text " ,preventCache: true ,content:params});
}
}
15、保存结束的提示方法,上面的代码中有用到。
17、 取消按钮代码:
//
infoWindow中取消按钮的事件
function cancel(index)
{
for ( var i = 0 ;i < map.graphics.graphics.length;i ++ )
{
var cgraphic = map.graphics.graphics[index];
map.graphics.remove(cgraphic);
}
map.infoWindow.hide();
}
18、取消按钮的代码就是不保存当前所画的图形,同时删除在map上的显示。
19、初始化调用。
备注:
getG.aspx页面的html代码为空,cs代码如下:
using
System;
using System.Collections;
using System.Configuration;
using System.Data;
using System.Linq;
using System.Web;
using System.Web.Security;
using System.Web.UI;
using System.Web.UI.HtmlControls;
using System.Web.UI.WebControls;
using System.Web.UI.WebControls.WebParts;
using System.Xml.Linq;
using System.Xml;
using System.IO;
using System.Xml.XPath;
using System.Text;
namespace LabelingSample
{
public partial class getG : System.Web.UI.Page
{
protected void Page_Load( object sender, EventArgs e)
{
string filepath = " xmlData/xmlGraphic.xml " ;
FileInfo TheFile = new FileInfo(Server.MapPath(filepath));
if (TheFile.Exists)
{
// XmlDocument xmldoc = new XmlDocument();
// xmldoc.Load(Server.MapPath(filepath));
string json = toJson(Server.MapPath(filepath));
Response.Write(json);
}
else
{
Response.Write( " nodata " );
}
}
private string toJson( string path)
{
StringBuilder json = new StringBuilder();
json.Append( " {\ " Graphic\ " :[ " );
XPathDocument xpdoc = new XPathDocument(path);
XPathNavigator navigator = xpdoc.CreateNavigator();
XPathNodeIterator myXPathNodeIterator = navigator.Select( " Graphics/Graphic/Content " );
while (myXPathNodeIterator.MoveNext())
{
string tempStr = myXPathNodeIterator.Current.Value;
// string tempStr = "1";
if (myXPathNodeIterator.CurrentPosition == 1 )
{
json.AppendFormat( " {0} " ,tempStr);
}
else
{
json.AppendFormat( " {0} " ,( " , " + tempStr));
}
}
json.Append( " ]} " );
return json.ToString();
}
}
}
saveG.aspx页面的html代码为空,cs代码如下:
using
System;
using System.Collections;
using System.Configuration;
using System.Data;
using System.Linq;
using System.Web;
using System.Web.Security;
using System.Web.UI;
using System.Web.UI.HtmlControls;
using System.Web.UI.WebControls;
using System.Web.UI.WebControls.WebParts;
using System.Xml.Linq;
using System.Xml;
using System.IO;
namespace LabelingSample
{
public partial class saveG : System.Web.UI.Page
{
protected void Page_Load( object sender, EventArgs e)
{
string graphic = Request.Params[ " graphic " ].ToString();
buildXML(graphic);
Response.Write( " 保存成功! " );
}
private void buildXML( string graphic)
{
string filepath = " xmlData/xmlGraphic.xml " ;
FileInfo TheFile = new FileInfo(Server.MapPath(filepath));
if (TheFile.Exists)
{
XmlDocument xmldoc = new XmlDocument();
xmldoc.Load(Server.MapPath(filepath));
XmlNode objNode = xmldoc.SelectSingleNode( " Graphics " );
XmlElement xmlelem2 = xmldoc.CreateElement( "" , " Graphic " , "" );
objNode.AppendChild(xmlelem2);
XmlElement xmlelem4 = xmldoc.CreateElement( "" , " Content " , "" );
xmlelem4.InnerText = graphic;
xmlelem2.AppendChild(xmlelem4);
xmldoc.Save(Server.MapPath( " xmlData/xmlGraphic.xml " ));
}
else
{
XmlDocument xmldoc = new XmlDocument();
XmlDeclaration xmldecl;
xmldecl = xmldoc.CreateXmlDeclaration( " 1.0 " , " gb2312 " , null );
xmldoc.AppendChild(xmldecl);
XmlElement xmlelem = xmldoc.CreateElement( "" , " Graphics " , "" );
XmlElement xmlelem2 = xmldoc.CreateElement( "" , " Graphic " , "" );
xmlelem.AppendChild(xmlelem2);
XmlElement xmlelem4 = xmldoc.CreateElement( "" , " Content " , "" );
xmlelem4.InnerText = graphic;
xmlelem2.AppendChild(xmlelem4);
xmldoc.AppendChild(xmlelem);
xmldoc.Save(Server.MapPath( " xmlData/xmlGraphic.xml " ));
}
}
}
}
1.ArcGIS.Server.9.3和ArcGIS API for JavaScript实现自定义图形,保存自定义的Graphic图形到服务端的xml文件中,同时也能在地图载入时读入xml中的图形数据显示到地图中。 这里的自定义面的Label是通过GeometryServer的labelPoints实现的。
准备工作:
1. 在ArcGis Server9.3中发布名为Geometry的GeometryServer。
完成后的效果图:
开始
0.关于GeometryServer的labelPoints介绍,labelPoints允许在多边形中指定Label显示的位置点,是jsapi1.2才支持的新功能,需要需要ArcGIS Server 9.3 sp1支持。
1.启动vs新建名为SaveGraphics的ASP.NET Web应用程序。
2.接着在工程中添加名为javascript的文件夹并且在这个文件夹里新建mapfunc.js的文件,这里用来编写我们自己的js代码了,在Default.aspx页面里添加对这个js文件的引用,同时在Default.aspx页面里添加一个id为map的div标签作为地图控件的载体、2个input的功能按钮:
<! DOCTYPE html PUBLIC "-//W3C//DTD XHTML 1.0 Transitional//EN" "http://www.w3.org/TR/xhtml1/DTD/xhtml1-transitional.dtd" >
< html xmlns ="http://www.w3.org/1999/xhtml" >
< head id ="Head1" runat ="server" >
< title > Untitled Page </ title >
< style type ="text/css" > @import "http://serverapi.arcgisonline.com/jsapi/arcgis/1.2/js/dojo/dijit/themes/tundra/tundra.css"; </ style >
< script type ="text/javascript" src ="http://serverapi.arcgisonline.com/jsapi/arcgis/?v=1.2" ></ script >
< script type ="text/javascript" src ="javascript/mapfunc.js" >
</ script >
</ head >
< body class ="tundra" >
< form id ="form1" runat ="server" >
< input id ="Button1" type ="button" value ="画 图" onclick ="toolbar.activate(esri.toolbars.Draw.POLYGON);map.hideZoomSlider();" />
< input id ="Button2" type ="button" value ="漫 游" onclick ="toolbar.deactivate();map.showZoomSlider();" />
< div id ="map" style ="width:600px; height:450px; border:1px solid #000;" ></ div >
</ form >
</ body >
</ html >
4、切换到mapfunc.js开始编写js代码,现在从执行顺序来说明代码。
5、首先是初始化地图显示的init()方法:
{
map = new esri.Map( " map " ,{extent: new esri.geometry.Extent( - 183.780014745329 , 16.2975638854873 , - 61.4068547410964 , 74.0304580085983 , new esri.SpatialReference({wkid: 4269 }))});
var usamap = new esri.layers.ArcGISTiledMapServiceLayer( " http://server.arcgisonline.com/ArcGIS/rest/services/NGS_Topo_US_2D/MapServer " );
map.addLayer(usamap);
toolbar = new esri.toolbars.Draw(map);
dojo.connect(toolbar, " onDrawEnd " , doDraw);
// 添加map载入后事件监听,用来从xml中读入自定义的图形在地图上显示
dojo.connect(map, " onLoad " ,showGraphic);
// 设置infoWindow的大小
map.infoWindow.resize( 200 , 100 );
// 设置infoWindow的标题头
map.infoWindow.setTitle( " 输入名称 " );
// 实例化GeometryService
geometryService = new esri.tasks.GeometryService( " http://mypc/ArcGIS/rest/services/Geometry/GeometryServer " );
}
//
map载入后事件监听,用来从xml中读入自定义的图形在地图上显示
function showGraphic()
{
// 延迟1秒执行
setTimeout(loadGraphic, 1000 );
}
7、上面的
showGraphic()方法调用了loadGraphic()方法,这样方法中用了dojo的ajax功能向服务端请求获取服务端的xmlData/xmlGraphic.xml数据,关于dojo.xhrGet方法可以参考dojo的帮助, 这里首先来看一下
xmlGraphic.xml中保存的数据,如下:
function showGraphic()
{
// 延迟1秒执行
setTimeout(loadGraphic, 1000 );
}
- < Graphics >
- < Graphic >
< Content > {"geometry":{"rings":[[[-107.3883566182127,25.740182822042797],[-112.9254659932127,25.828073447042797],[-115.7379659932127,31.189401572042797],[-110.8160909932127,31.540964072042797],[-105.5426534932127,28.904245322042797],[-107.3883566182127,25.740182822042797]]],"spatialReference":{"wkid":4269}},"attributes":{"id":"0","title":"广东"},"symbol":{"color":[216,67,48,128],"outline":{"color":[216,67,48,255],"width":0.75,"style":"esriSLSSolid"},"style":"esriSFSSolid"}} </ Content >
</ Graphic >
- < Graphic >
< Content > {"geometry":{"x":-110.640309743213,"y":28.6224372863286,"spatialReference":{"wkid":4269}},"attributes":{"title":"广东"},"symbol":{"color":[0,0,0,255],"style":"esriTS","angle":0,"xoffset":0,"yoffset":0,"text":"广东","align":"middle","decoration":"none","rotated":false,"kerning":true,"font":{"size":"20px","style":"normal","variant":"normal","weight":"bolder","family":undefined}}} </ Content >
</ Graphic >
。。。。。。
下面的 loadGraphic()方法用ajax的方式请求服务端的getG.aspx页面,getG.aspx页面的cs代码(具体C#代码贴在文章备注中)会读取 xmlData/xmlGraphic.xml数据返回给客户端。
//
读取服务端的xml文件里保存的自定义图形数据
function loadGraphic()
{
dojo.xhrGet({url: " getG.aspx " ,handleAs: " json " ,preventCache: true ,load: dojo.hitch( this , " getEnd " )});
}
8、上面的
loadGraphic()方法获取服务端xmlData/xmlGraphic.xml文件的数据,完成后执行getEnd(graphics)方法把获取来的图形数据显示在地图上:
function loadGraphic()
{
dojo.xhrGet({url: " getG.aspx " ,handleAs: " json " ,preventCache: true ,load: dojo.hitch( this , " getEnd " )});
}
function getEnd(graphics)
{
for ( var i = 0 ;i < graphics.Graphic.length;i ++ )
{
var g = graphics.Graphic[i];
var graphic = new esri.Graphic(g);
map.graphics.add(graphic);
}
}
10、添加首先是点击地图上的画图按钮然后执行onclick时间,在html代码中可以看到οnclick="toolbar.activate(esri.toolbars.Draw.POLYGON);map.hideZoomSlider();"就是把地图状态设置成画POLYGON状态。
11、然后就是在地图上进行画 POLYGON画图完成后执行doDraw(geometry)方法,把图形添加到map.graphics中进行显示同时显示infoWindow让用户输入名称进行确认保存,代码如下:
function doDraw(geometry)
{
// 随机颜色
var numR = Math.ceil(Math.random() * 255 );
var numG = Math.ceil(Math.random() * 255 );
var numB = Math.ceil(Math.random() * 255 );
// 定义样式
var highlightSymbol = new esri.symbol.SimpleFillSymbol(esri.symbol.SimpleFillSymbol.STYLE_SOLID, new esri.symbol.SimpleLineSymbol(esri.symbol.SimpleLineSymbol.STYLE_SOLID, new dojo.Color([numR,numG,numB]), 1 ), new dojo.Color([numR,numG,numB, 0.5 ]));
// 设置图形显示样式
var graphic = new esri.Graphic(geometry, highlightSymbol);
// 清除上一次的画图内容
map.graphics.add(graphic);
// 获取图形的中心点
var centerPoint = map.toScreen(graphic.geometry.getExtent().getCenter());
// 在图形的中心点显示infoWindow
map.infoWindow.show(centerPoint,map.getInfoWindowAnchor(centerPoint));
var index = map.graphics.graphics.length - 1 ;
// 设置infoWindow的显示内容
var content = " <div>名称:</div><div><input type='text' id='nameText' name='nameText' /></div><div><input type='button' name='Submit' value='保 存' οnclick=finash(' " + index + " ') /> <input type='button' name='Submit' value='取 消' οnclick=cancel(' " + index + " ') /></div> " ;
map.infoWindow.setContent(content);
}
function finash(index)
{
// 获取输入的名字
var titleStr = dojo.byId( ' nameText ' ).value;
// 获取当前所画的图形
var cgraphic = map.graphics.graphics[index];
// 设置图形的属性,id、title
cgraphic.attributes = {id:index,title:titleStr};
tempGraphic = cgraphic;
// 对面图形进行geometryService的simplify操作
geometryService.simplify([cgraphic],getLabelPoints);
// 获取当前所画图形的json字符串用来保存
var graphicStr = dojo.toJson(cgraphic.toJson());
// 设置ajax请求的参数
var params = {graphic:graphicStr}
// 用dojo的xhrGet的ajax方法把图形的json字符串提交到服务端保存
dojo.xhrGet({url: " saveG.aspx " ,handleAs: " text " ,preventCache: true ,content:params,load: dojo.hitch( this , " saveEnd " )});
// 隐藏infoWindow
map.infoWindow.hide();
}
14、labelPoints操作的代码:
{
geometryService.labelPoints(graphics,showLabel);
}
// 显示Label,同时保存Label点到服务端的xml
function showLabel(labelPoints)
{
// 定义字体
var font = new esri.symbol.Font( " 20px " , esri.symbol.Font.STYLE_NORMAL, esri.symbol.Font.VARIANT_NORMAL, esri.symbol.Font.WEIGHT_BOLDER);
for ( var i = 0 ;i < labelPoints.length;i ++ )
{
// 获取输入框输入的内容
var labelstr = dojo.byId( ' nameText ' ).value;
// 定义样式
var textSymbol = new esri.symbol.TextSymbol(labelstr,font, new dojo.Color([ 0 , 0 , 0 ]));
// 设置样式
labelPoints[i].setSymbol(textSymbol);
// 设置属性
labelPoints[i].attributes = {title:labelstr};
// 添加到地图上显示
map.graphics.add(labelPoints[i]);
// 获取Label点的json字符串内容
var graphicStr = dojo.toJson(labelPoints[i].toJson());
// 提交到服务端进行保存
var params = {graphic:graphicStr}
dojo.xhrGet({url: " saveG.aspx " ,handleAs: " text " ,preventCache: true ,content:params});
}
}
//
保存结束进行提示
function saveEnd(text)
{
alert(text);
}
16、通过上面的代码我们把画的图形和Label的点的json内容保存到的xml中。
function saveEnd(text)
{
alert(text);
}
17、 取消按钮代码:
function cancel(index)
{
for ( var i = 0 ;i < map.graphics.graphics.length;i ++ )
{
var cgraphic = map.graphics.graphics[index];
map.graphics.remove(cgraphic);
}
map.infoWindow.hide();
}
19、初始化调用。
dojo.addOnLoad(init);
20、这样就完成了自定义图层的保存和读取显示。
备注:
getG.aspx页面的html代码为空,cs代码如下:
using System.Collections;
using System.Configuration;
using System.Data;
using System.Linq;
using System.Web;
using System.Web.Security;
using System.Web.UI;
using System.Web.UI.HtmlControls;
using System.Web.UI.WebControls;
using System.Web.UI.WebControls.WebParts;
using System.Xml.Linq;
using System.Xml;
using System.IO;
using System.Xml.XPath;
using System.Text;
namespace LabelingSample
{
public partial class getG : System.Web.UI.Page
{
protected void Page_Load( object sender, EventArgs e)
{
string filepath = " xmlData/xmlGraphic.xml " ;
FileInfo TheFile = new FileInfo(Server.MapPath(filepath));
if (TheFile.Exists)
{
// XmlDocument xmldoc = new XmlDocument();
// xmldoc.Load(Server.MapPath(filepath));
string json = toJson(Server.MapPath(filepath));
Response.Write(json);
}
else
{
Response.Write( " nodata " );
}
}
private string toJson( string path)
{
StringBuilder json = new StringBuilder();
json.Append( " {\ " Graphic\ " :[ " );
XPathDocument xpdoc = new XPathDocument(path);
XPathNavigator navigator = xpdoc.CreateNavigator();
XPathNodeIterator myXPathNodeIterator = navigator.Select( " Graphics/Graphic/Content " );
while (myXPathNodeIterator.MoveNext())
{
string tempStr = myXPathNodeIterator.Current.Value;
// string tempStr = "1";
if (myXPathNodeIterator.CurrentPosition == 1 )
{
json.AppendFormat( " {0} " ,tempStr);
}
else
{
json.AppendFormat( " {0} " ,( " , " + tempStr));
}
}
json.Append( " ]} " );
return json.ToString();
}
}
}
using System.Collections;
using System.Configuration;
using System.Data;
using System.Linq;
using System.Web;
using System.Web.Security;
using System.Web.UI;
using System.Web.UI.HtmlControls;
using System.Web.UI.WebControls;
using System.Web.UI.WebControls.WebParts;
using System.Xml.Linq;
using System.Xml;
using System.IO;
namespace LabelingSample
{
public partial class saveG : System.Web.UI.Page
{
protected void Page_Load( object sender, EventArgs e)
{
string graphic = Request.Params[ " graphic " ].ToString();
buildXML(graphic);
Response.Write( " 保存成功! " );
}
private void buildXML( string graphic)
{
string filepath = " xmlData/xmlGraphic.xml " ;
FileInfo TheFile = new FileInfo(Server.MapPath(filepath));
if (TheFile.Exists)
{
XmlDocument xmldoc = new XmlDocument();
xmldoc.Load(Server.MapPath(filepath));
XmlNode objNode = xmldoc.SelectSingleNode( " Graphics " );
XmlElement xmlelem2 = xmldoc.CreateElement( "" , " Graphic " , "" );
objNode.AppendChild(xmlelem2);
XmlElement xmlelem4 = xmldoc.CreateElement( "" , " Content " , "" );
xmlelem4.InnerText = graphic;
xmlelem2.AppendChild(xmlelem4);
xmldoc.Save(Server.MapPath( " xmlData/xmlGraphic.xml " ));
}
else
{
XmlDocument xmldoc = new XmlDocument();
XmlDeclaration xmldecl;
xmldecl = xmldoc.CreateXmlDeclaration( " 1.0 " , " gb2312 " , null );
xmldoc.AppendChild(xmldecl);
XmlElement xmlelem = xmldoc.CreateElement( "" , " Graphics " , "" );
XmlElement xmlelem2 = xmldoc.CreateElement( "" , " Graphic " , "" );
xmlelem.AppendChild(xmlelem2);
XmlElement xmlelem4 = xmldoc.CreateElement( "" , " Content " , "" );
xmlelem4.InnerText = graphic;
xmlelem2.AppendChild(xmlelem4);
xmldoc.AppendChild(xmlelem);
xmldoc.Save(Server.MapPath( " xmlData/xmlGraphic.xml " ));
}
}
}
}


 1179
1179


 被折叠的 条评论
为什么被折叠?
被折叠的 条评论
为什么被折叠?
 到【灌水乐园】发言


